Chain rattling sound ??
#1
 11-01-2007


Join Date: Aug 2006
Location: Cincy, OH
Posts: 182
Likes: 0
Received 0 Likes
on
0 Posts
Chain rattling sound ??
My truck is about 6 years old now (2001), and i've recently noticed that when i drive up hills or slight inclines and my RPM's are around 3k it sounds like a chain rattling in the engine area, and then stops after it gets up to speed.
Any idea what this is or how to fix it.
Thanks
Any idea what this is or how to fix it.
Thanks
#2
11-01-2007

Join Date: Oct 2007
Location: Marietta, GA
Posts: 7
Likes: 0
Received 0 Likes
on
0 Posts

#4
11-01-2007
Join Date: Oct 2006
Location: Virginia Beach, VA
Posts: 193
Likes: 0
Received 0 Likes
on
0 Posts
#5
11-01-2007

Join Date: Oct 2007
Location: south bend, indiana
Posts: 36
Likes: 0
Received 0 Likes
on
0 Posts
#6
11-01-2007
Join Date: Oct 2006
Location: Virginia Beach, VA
Posts: 193
Likes: 0
Received 0 Likes
on
0 Posts
#7
11-01-2007


Originally Posted by mossyoak03
i want to say its your timing belt but i could be wrong mine did the same thing
The 3.0L has a timing chain, instead of a timing belt. From the description, it sounds like pinging (pre-ignition) to me. A dirty MAF sensor will cause this, but to verify that it is pinging, try a tank of premium gas. If you have been using a K&N air filter, there is a very good chance that you have a dirty (contaminated) MAF sensor from the dirt & oil they pass.
#8
11-01-2007
Join Date: Oct 2006
Location: Virginia Beach, VA
Posts: 193
Likes: 0
Received 0 Likes
on
0 Posts
#9
11-01-2007
Join Date: Aug 2006
Location: Cincy, OH
Posts: 182
Likes: 0
Received 0 Likes
on
0 Posts
#10
11-01-2007
Join Date: Oct 2006
Location: Waterloo, Iowa
Posts: 40
Likes: 0
Received 0 Likes
on
0 Posts
#12
11-01-2007
Unregistered User
Posts: n/a
Buy a spraycan of electrical or contact cleaner. Disconnect the batter in your truck. Remove the maf from the airbox.
When you look inside the maf, you will see a resistor element. Use the spray cleaner to clean it off really good. Wait for the cleaner to dry, re-assemble everything.
Use ELECTRICAL CLEANER. I know of people that tried to use WD40 and brake cleaner. I made cash selling them my used maf's.
I would recommend QD Electrical contact cleaner. Its about 20$ a can. You can get away with the Auto-zone or ' local ' store entities, but QD works QUITE well.
#13
11-02-2007
Join Date: Oct 2007
Location: Marietta, GA
Posts: 7
Likes: 0
Received 0 Likes
on
0 Posts
#14
11-02-2007
Join Date: Aug 2006
Location: Cincy, OH
Posts: 182
Likes: 0
Received 0 Likes
on
0 Posts
#15
11-02-2007
Cleaning the MAF
The following procedure is adapted from a TRS Tech Article "Cleaning the MAF":
1. Remove the negative cable from the battery;
2. Unplug the wiring harness clip from the MAF;
3. Remove the two security star-head screws and carefully remove the sensor. You will need a security star (size T15 or T20) torx bit (or see below);
4. Take note of the two sensor filaments, they look almost like the filaments in a light bulb. Carefully spray the filaments with an O2 safe cleaner, and if available, a few careful blasts of compressed air.
5. While it is drying carefully wipe the aluminum mount surface of the MAF body if there is any dust there, but be careful not to get dust in the mount hole.
6. When the sensor is dry, re-install the sensor back in the MAF body and connect the MAF wiring harness clip. Reconnect the negative battery cable.
This what the MAF sensor looks like when you take it out (note the two filaments which you must be VERY careful with when cleaning):

As for those stupid "security star" torx screws, I took a Dremel tool and cut a slit through the head of the bolts so I could remove them with a regular screwdriver. Then I replaced the torx screws with similar-sized phillips heads screws and small lock washers. Now whenever I want access to the MAF I don't have to mess around with security star bits or anything else. I just pull out a screwdriver from my toolbox.
1. Remove the negative cable from the battery;
2. Unplug the wiring harness clip from the MAF;
3. Remove the two security star-head screws and carefully remove the sensor. You will need a security star (size T15 or T20) torx bit (or see below);
4. Take note of the two sensor filaments, they look almost like the filaments in a light bulb. Carefully spray the filaments with an O2 safe cleaner, and if available, a few careful blasts of compressed air.
5. While it is drying carefully wipe the aluminum mount surface of the MAF body if there is any dust there, but be careful not to get dust in the mount hole.
6. When the sensor is dry, re-install the sensor back in the MAF body and connect the MAF wiring harness clip. Reconnect the negative battery cable.
This what the MAF sensor looks like when you take it out (note the two filaments which you must be VERY careful with when cleaning):
As for those stupid "security star" torx screws, I took a Dremel tool and cut a slit through the head of the bolts so I could remove them with a regular screwdriver. Then I replaced the torx screws with similar-sized phillips heads screws and small lock washers. Now whenever I want access to the MAF I don't have to mess around with security star bits or anything else. I just pull out a screwdriver from my toolbox.
#16
11-02-2007
Join Date: Oct 2007
Location: Marietta, GA
Posts: 7
Likes: 0
Received 0 Likes
on
0 Posts
#17
11-02-2007
Join Date: Oct 2006
Location: Waterloo, Iowa
Posts: 40
Likes: 0
Received 0 Likes
on
0 Posts
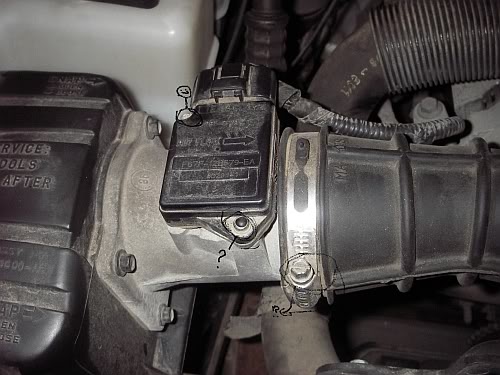
alright, im going to try to explain this the best that i can.
- I see the two screw heads that your saying i need to take out. The top one is fine... but the bottom screw head has this black ??"stuff"?? on it (its like plastic), that is covering up the head?. I have no idea what that is or why it's there. But what if i unhooked the tube right after the MAF sensor and sprayed it in that way?
- I see the two screw heads that your saying i need to take out. The top one is fine... but the bottom screw head has this black ??"stuff"?? on it (its like plastic), that is covering up the head?. I have no idea what that is or why it's there. But what if i unhooked the tube right after the MAF sensor and sprayed it in that way?

Thread
Thread Starter
Forum
Replies
Last Post
jtkonieczny
4.0L OHV & SOHC V6 Tech
10
01-02-2015 09:36 AM
abq02ranger
4.0L OHV & SOHC V6 Tech
10
10-21-2014 04:37 PM


