How To: Hurst Shifter Revisions
#1
 06-27-2005


How To: Hurst Shifter Revisions
Mod: Hurst Shifter Revisions
Difficulty: 1/10
Time: ~1Hour
Author:George Novak (SilverTank)
Please direct all questions and comments to the author.
In working with Hurst, I suggested that a longer arm would improve the shifter's placement. Hurst was kind enough to send a 538-8022 billet arm, which works much better. They also sent a vibration isolator plate, which along with my sound deadening has removed much of the vibration and gear noise. Here are the pictures of my install.
Tools/Equipment needed:
Here's comparison between the standard Hurst 538-4106 arm and the longer 538-8022 arm. I found the longer arm is a much better fit for the Ranger.

This is a diagram for the 538-4106 arm. You can see it's 3/4 of an inch closer to the radio console than the stock arm. This puts the shift **** further away from the driver. Throws are reduced 1.25, and 1.5 inches from stock.

The 538-8022 arm is taller and longer, which places the shift **** 3 inches closer to the driver. It's 1/2 of an inch closer than the stock ****. The reduction in ratios stays the same.
 Here's the vibration dampener from Hurst. It's basically 4 neoprene gaskets and a metal plate. They isolate the shift arm from the selector shaft.

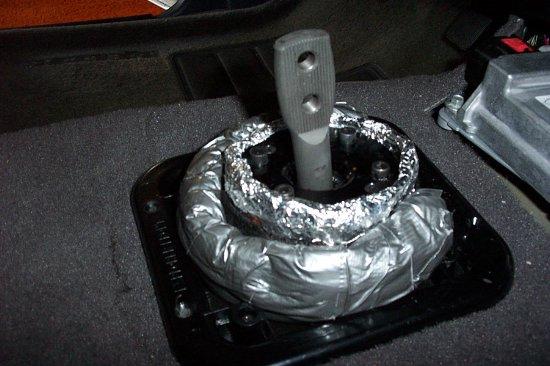
Here's the ring of Dynamat and "snake" around the shift cup. The ring is secured with a Velcro band, so that it can absorb the sounds without having to use adhesives.

The "snake" will absorb sounds that emanate through the ring, or up through the inner boot.
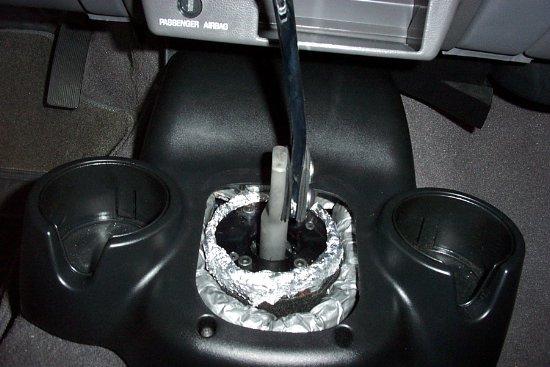
Install the console, but don't bolt it to the floor yet, it's now time to install the shift arm and shift boot. Also make sure the sound deadening isn't obstructing the shifter.

Now install the console, shift arm and neoprene isolator. The neoprene will squeeze out when you tighten the bolts. A hard corded rubber gasket would probably work better. I may replace this later.

The arm is a tad close to the XLT Airbag console, but there's still 1/4 inch before it hits. The Ranger Edge doesn't have this useless storage hole, so there's no problem.
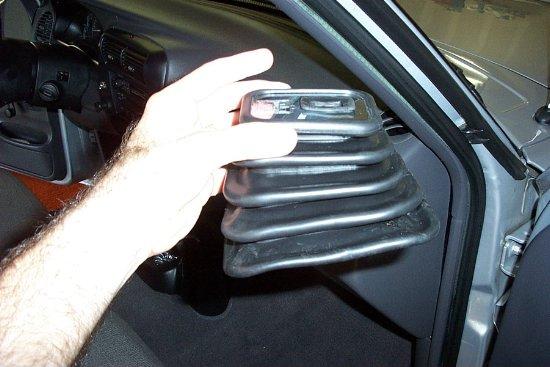
I decided to cut the sixth fold off the Hurst boot. You only use the top 4, and the extra material was making it hard to install.
Now install the sound deadening "donut" over the shift arm down past the two bolts. It should ride the shift arm without obstructing the shift motion. Also install the boot and shift ****.

Now attach the two screws of the console into the floor plate. Make sure your sound deadening doesn't get in the way. It may be a tight fit for the boot.
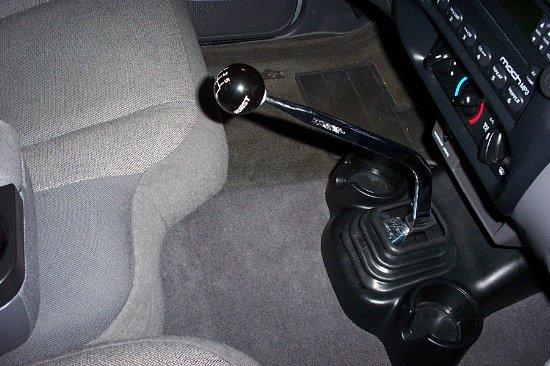
The console should fit flush on the floor, and the shift boot should not have any bulges from the sound deadening. Now enjoy your shifter!

Mod Complete:


Edited by Jason Gonderman (rngprerunner) for grammar and format.
Difficulty: 1/10
Time: ~1Hour
Author:George Novak (SilverTank)
Please direct all questions and comments to the author.
In working with Hurst, I suggested that a longer arm would improve the shifter's placement. Hurst was kind enough to send a 538-8022 billet arm, which works much better. They also sent a vibration isolator plate, which along with my sound deadening has removed much of the vibration and gear noise. Here are the pictures of my install.
Tools/Equipment needed:
- Standard Screwdrivers
- Standard Socket Set
Here's comparison between the standard Hurst 538-4106 arm and the longer 538-8022 arm. I found the longer arm is a much better fit for the Ranger.
This is a diagram for the 538-4106 arm. You can see it's 3/4 of an inch closer to the radio console than the stock arm. This puts the shift **** further away from the driver. Throws are reduced 1.25, and 1.5 inches from stock.
The 538-8022 arm is taller and longer, which places the shift **** 3 inches closer to the driver. It's 1/2 of an inch closer than the stock ****. The reduction in ratios stays the same.
Here's the ring of Dynamat and "snake" around the shift cup. The ring is secured with a Velcro band, so that it can absorb the sounds without having to use adhesives.
The "snake" will absorb sounds that emanate through the ring, or up through the inner boot.
Install the console, but don't bolt it to the floor yet, it's now time to install the shift arm and shift boot. Also make sure the sound deadening isn't obstructing the shifter.
Now install the console, shift arm and neoprene isolator. The neoprene will squeeze out when you tighten the bolts. A hard corded rubber gasket would probably work better. I may replace this later.
The arm is a tad close to the XLT Airbag console, but there's still 1/4 inch before it hits. The Ranger Edge doesn't have this useless storage hole, so there's no problem.
I decided to cut the sixth fold off the Hurst boot. You only use the top 4, and the extra material was making it hard to install.
Now install the sound deadening "donut" over the shift arm down past the two bolts. It should ride the shift arm without obstructing the shift motion. Also install the boot and shift ****.
Now attach the two screws of the console into the floor plate. Make sure your sound deadening doesn't get in the way. It may be a tight fit for the boot.
The console should fit flush on the floor, and the shift boot should not have any bulges from the sound deadening. Now enjoy your shifter!
Mod Complete:
Edited by Jason Gonderman (rngprerunner) for grammar and format.
Last edited by 98liftedranger; 11-27-2011 at 11:43 PM.

Thread
Thread Starter
Forum
Replies
Last Post
drummerboy13
DOHC - 2.3L Duratec / Mazda L Engines
13
09-27-2006 01:38 PM


