How-To: Install Morana Roller Rockers on a 3.0
#1
 11-06-2009


How-To: Install Morana Roller Rockers on a 3.0
How-To author: N20-3.0
Original thread: https://www.ranger-forums.com/forum2...ckers-3-a.html
Let the modding Begin!!
_________________________
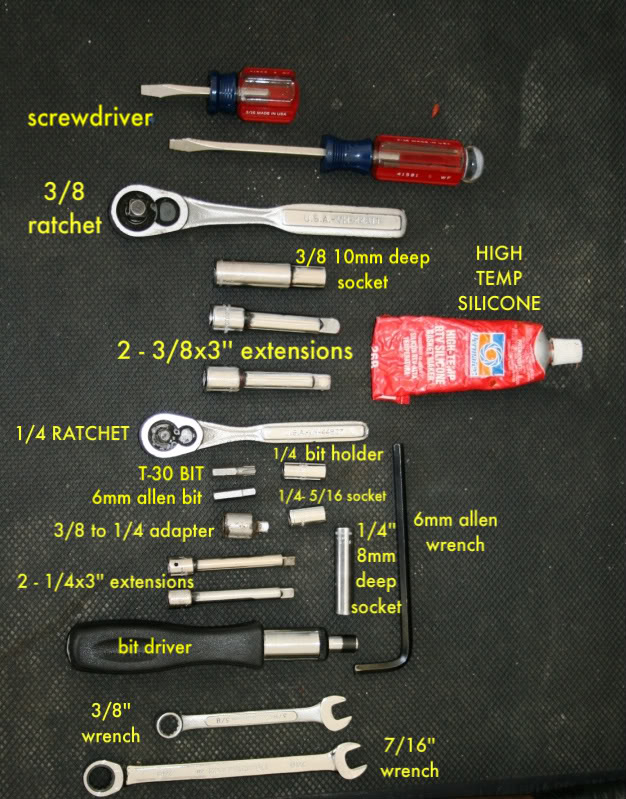
Tools you'll need:
Rubber Mallet
Torque wrench
Screwdriver
6mm Allen wrench
7/16 Wrench
3/8 Wrench
3/8 Ratchet
2-3/8x3'' Extensions
3/8x10mm deep socket
1/4 Ratchet
2-1/4X3'' Extensions
1/4x8mm deep socket
1/4x5/16 socket
3/8 to 1/4 socket adapter
6mm allen bit
T-30 bit
1/4 bit holder
Pliers
Very little high temp silicone
It is a good idea to have your motor as clean as possible before you start.You don't want dirt inside your motor.
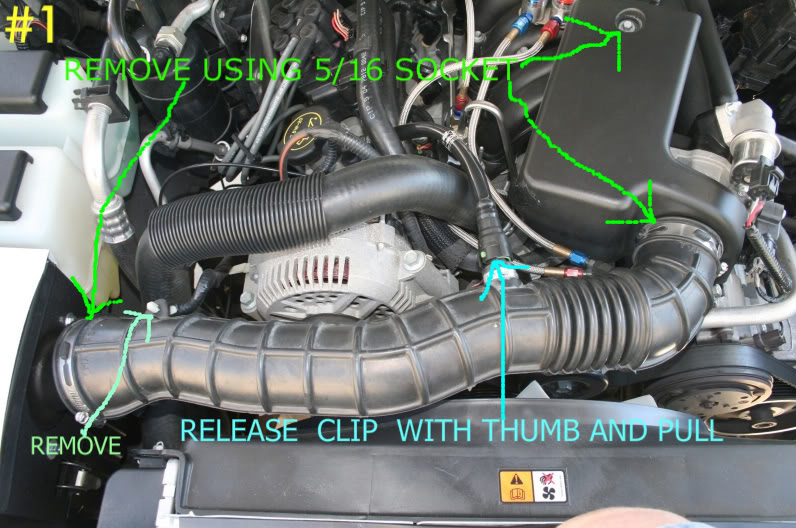
First you want to remove the air intake tube.With your thumb you should be able to push down and release the clip that holds the crankcase vent tube to the air intake.Then pull back to remove.
Next take your 5/16 socket and loosen the the clamps at each end of the intake tube.While your there loosen the screw that holds the throttle body cover on.
Remove wire harness from air tube near air box.
Now remove air intake tube and throttle body cover.
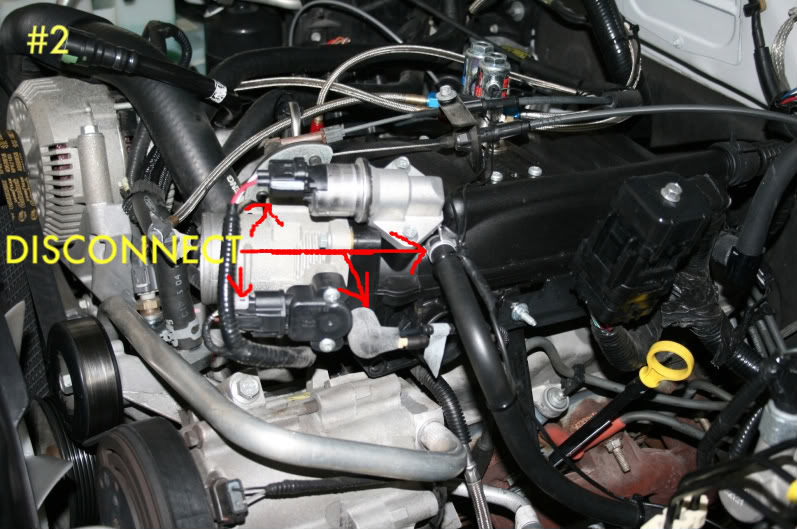
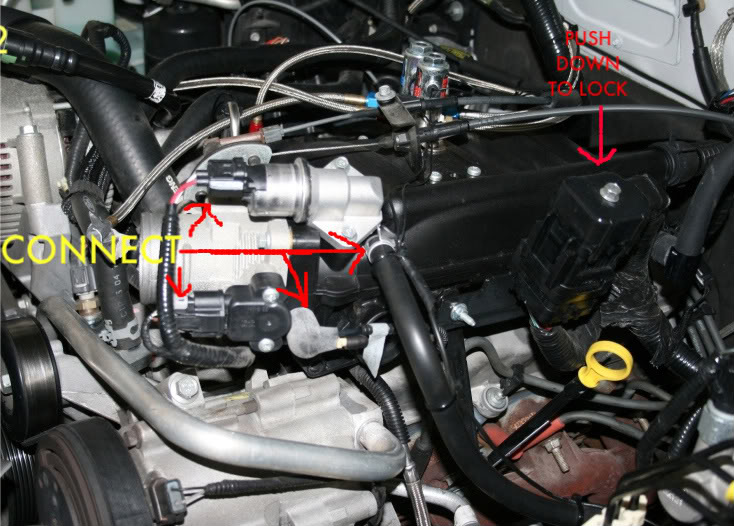
Disconnect the plugs and hoses on throttle body and front of the upper intake as shown in pic #2.Tuck them out of your way.
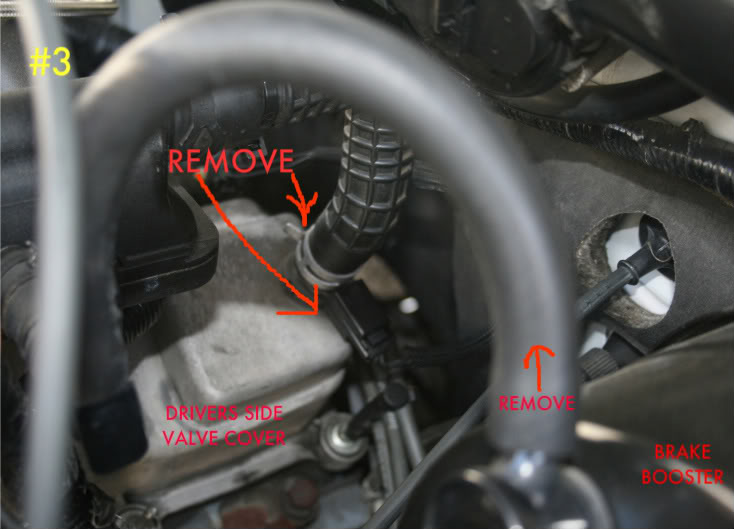
Remove Brake vac.hose from Brake Booster.
Carefully remove electrical connection from crankcase vent.
Take your pliers and release clamp that holds vent tube on valve cover and pull off.
Brake Vac. and Crankcase vent tube come off with the upper intake.
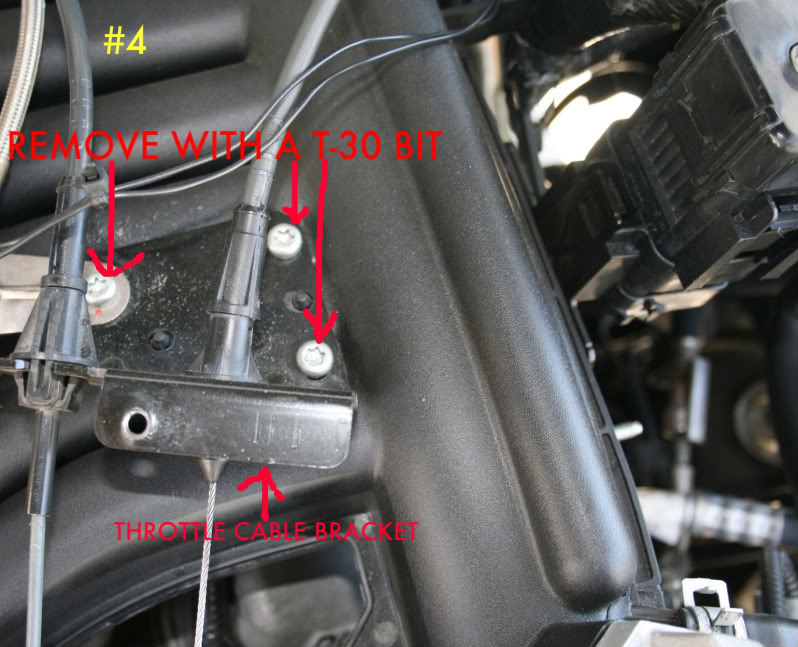
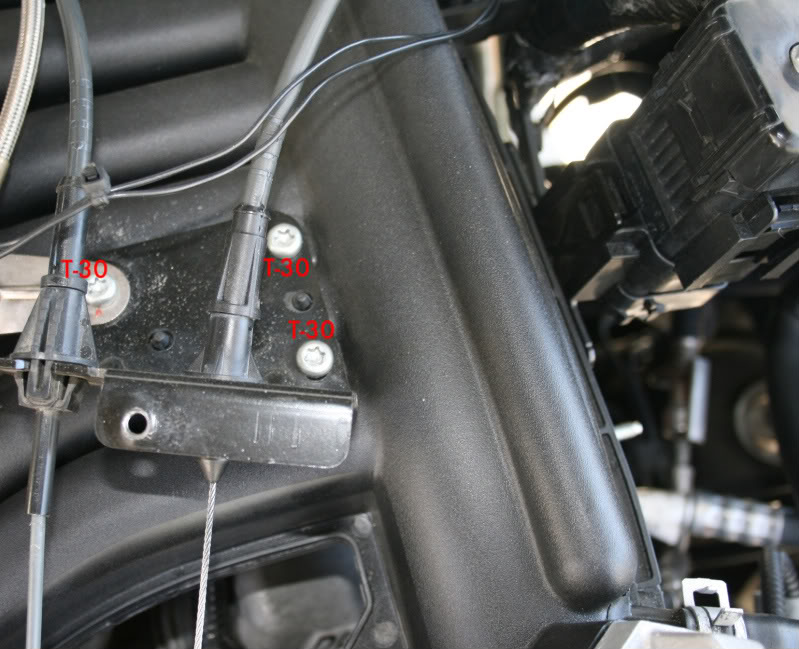
Take your T-30 bit and remove the three screws that hold the throttle cable bracket to the upper intake.
Once you have it off you can release the cruise control cable by pushing forwards on it at the throttle body.
Now you should have enough slack in the throttle cable to un-loop it off the throttle body.
I tucked the whole assembly back by the fire wall to keep it out of the way.
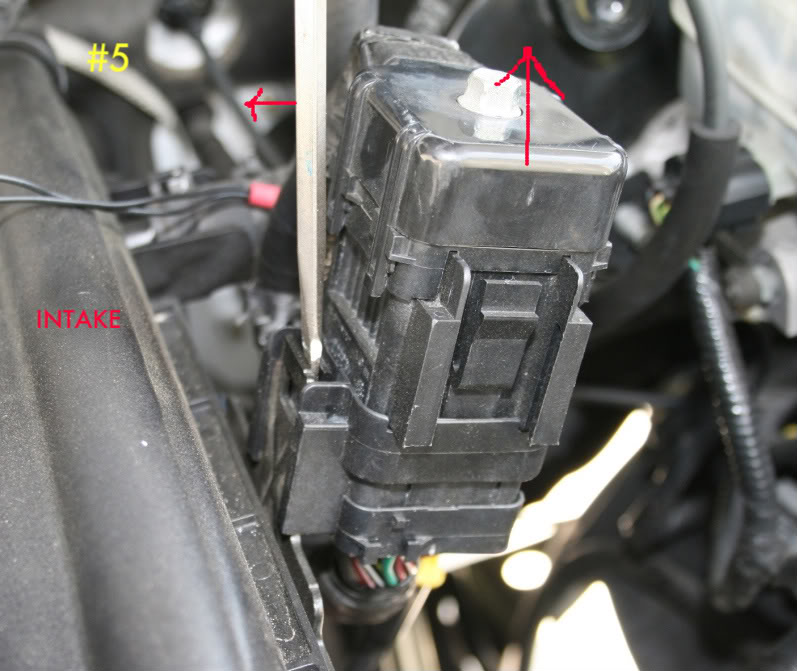
Insert screwdriver as shown in pic.#5 to release clip that holds wire harness to upper intake.
Gently lean screwdriver towards intake and pull up on connector.I used a zip tie to hold it back out of the way.
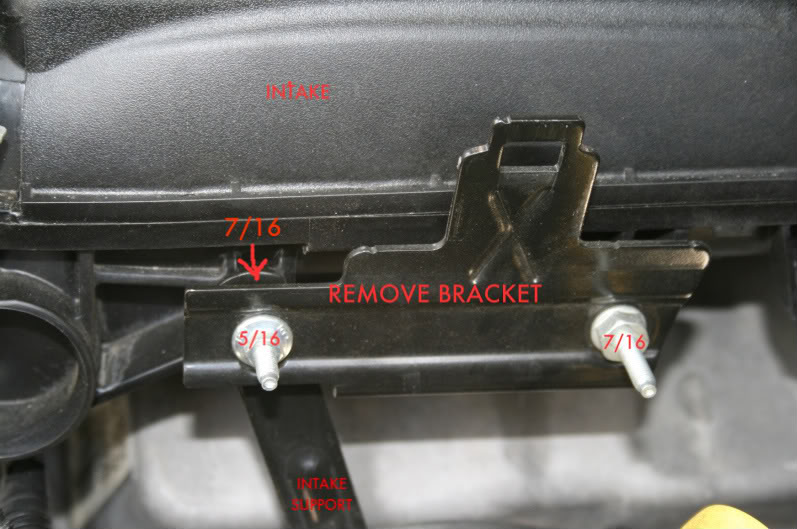
Now you can remove the bracket that held the wire harness.
Once you have it off you'll see another bolt that holds the intake support on.Remove it and slightly bend the support back a little to give some clearance when removing upper intake.
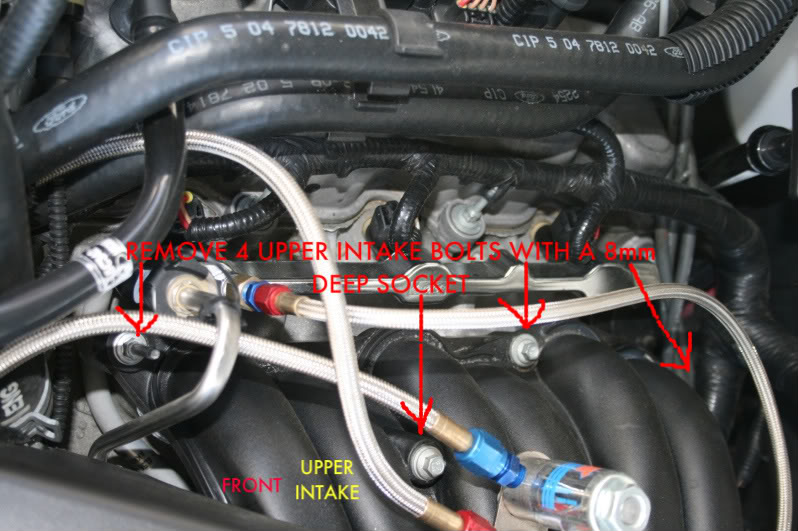
Now take your 1/4 ratchet,extensions and 8mm socket and start loosening the upper intake bolts.
Just break them all loose first.Then go back and start taking them out.
Make the 2nd one back from the front the last one you remove.It is also the longest.
Try to support the intake a little with your right hand while you remove the last bolt.
Now gently lift the intake off.Make sure the hoses that are still connected to the intake don't hang up on anything.
Now lay a towel or large rag over the lower intake.You sure don't want to drop anything down there.
Take the spark plug wires off the plugs on the drivers side and tuck out of way.
Pull the injector harness off the valve cover studs.
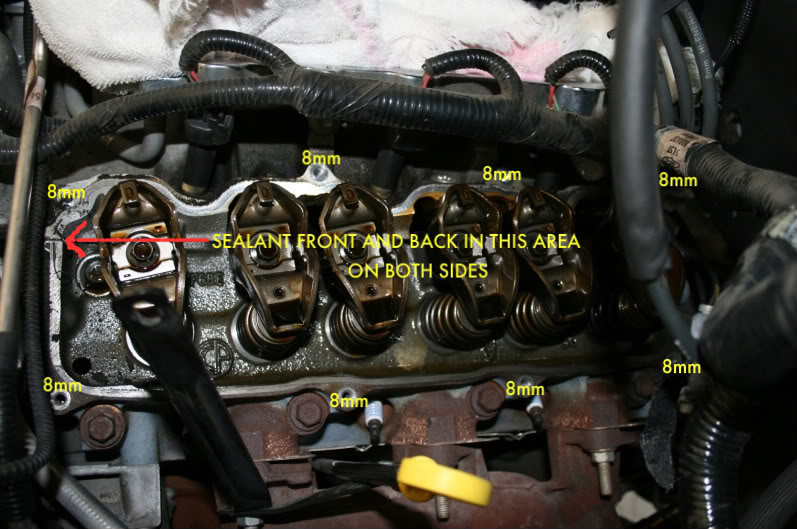
Use the 1/4 drive 8mm socket to loosen the 8 valve cover bolts.Do not pull them out.They help hold the gasket to the valve cover.
Now take a rubber mallet or hammer handle and tap gently on the side of the valve cover to free it.
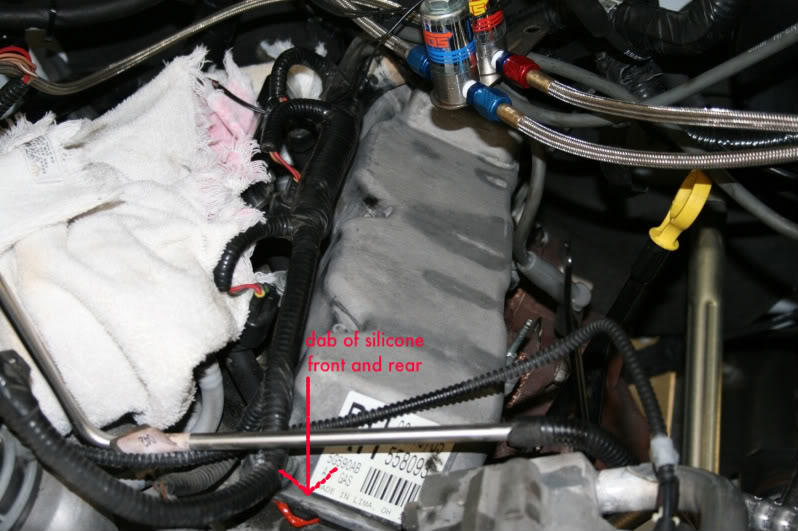
There is a dab of silicone on the front and rear of the cylinder head where the intake and head meet.
Use your fingers to gently work the gasket free from the head.
The valve cover,gasket,and bolts all come off together.
Next UNPLUG THE COIL PACK so you don't get a spark when your bumping the engine over.
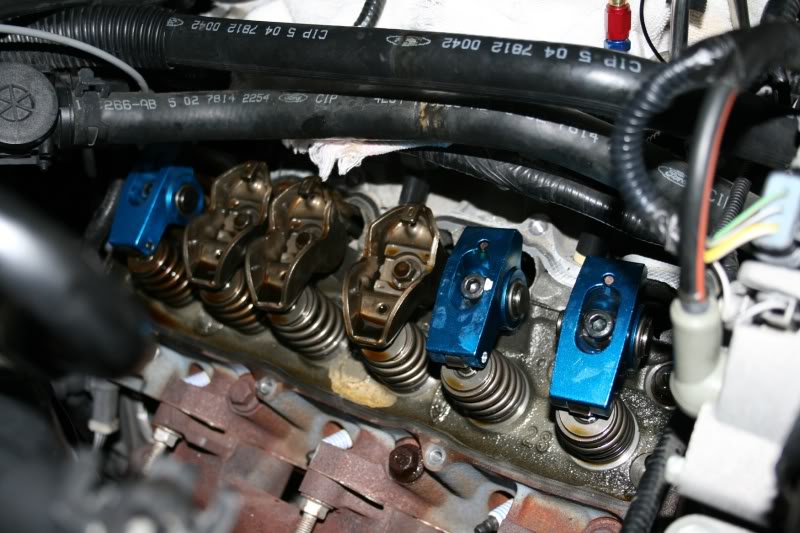
The stock rocker bolts are 10mm.Do not take them all off at once.Do one rocker at a time.
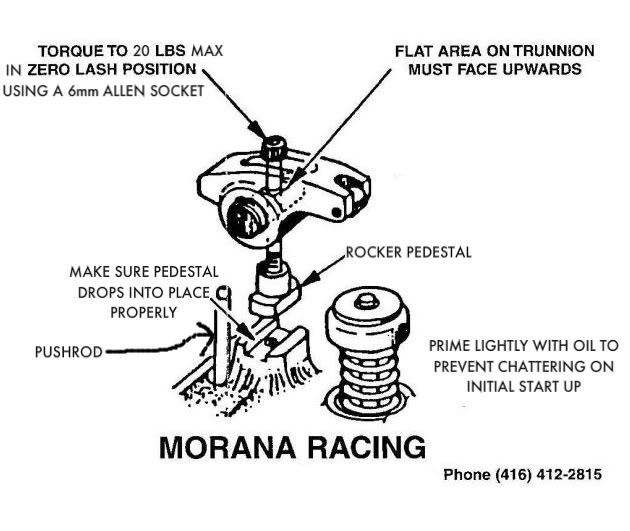
Take care when removing the factory rocker.Hold the push rod down into the lifter when removing rocker.
Start with the rockers that are at or close to zero lash.[valve closed]
It is a good idea to hold the rocker's roller tip centered on the valve tip until you have it snug.
Make sure the push rod is in the rocker arm properly.
I used a 6mm Allen wrench to start the rocker bolt.Then a 6mm Allen socket and torqued down to 20lbs. max.
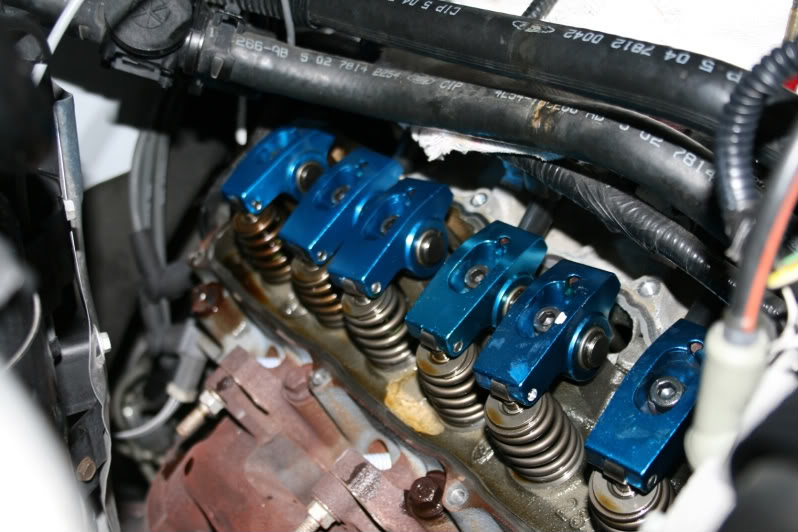
Once you have a couple done you'll want to bump the engine over very slightly to get the other rockers in closed position.
Then repeat process and torque down.
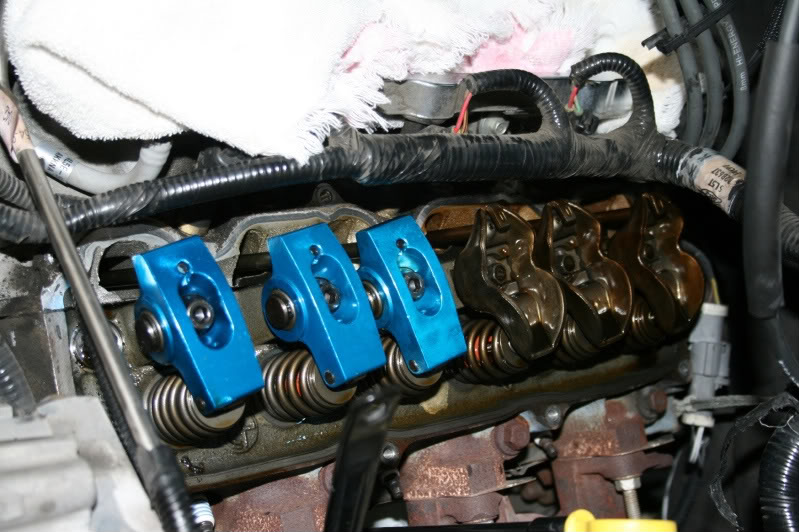
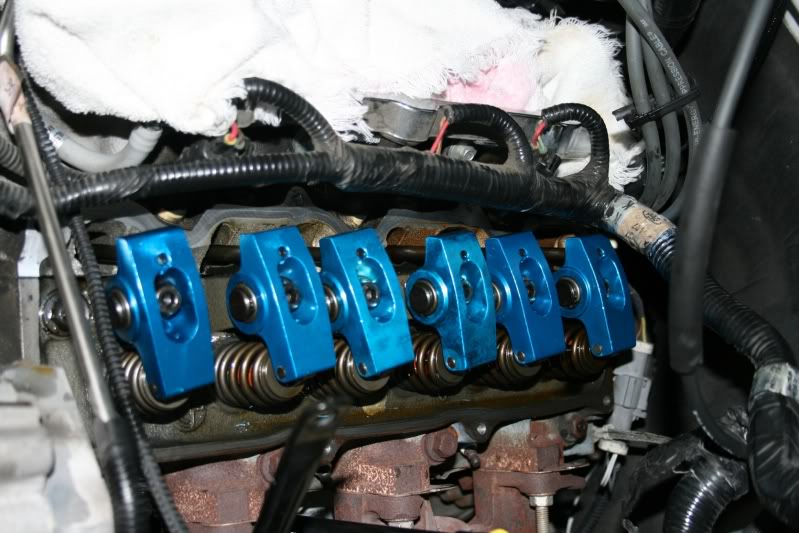
After you have installed all of the drivers side rockers.
You need to take a shop rag with a little oil on it and wipe any dirt or debris that is on the surface of the head where the valve cover gasket sits.
Make sure you get all the old silicone off.
Make sure the valve cover and gasket are dirt free also. Make sure the bolts are seated in the gasket properly.Also make sure the gasket is in the valve cover channel properly.
Now put a small amount of high temp silicone at the front and rear of cylinder head where it meets the lower intake.
DO NOT PUT SILICONE ON THE GASKET.It just makes a mess.
Now gently lower the valve cover into place.Be careful not to get any wires or hoses in between the valve cover and head.
Start a couple of the bolts and then go around evenly and tighten down the valve cover with the 1/4 x 8mm ratchet setup.
Go around a couple times to make sure you got them all good and tight.
PASSENGER SIDE
The coil pack should already be unplugged.
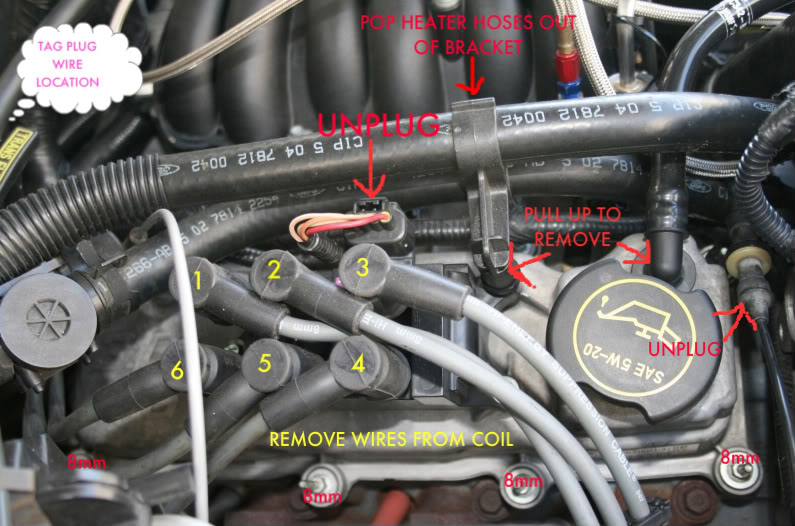
So push the heater hoses out of the plastic bracket that holds them and pull up to remove.
Pull strait up on crankcase vent to remove it from the valve cover.
Unplug vac. hose that runs in front of valve cover and move out of the way.
Tag the plug wire location on the coil pack for easy reassembly.
Now remove drivers side plug wires from coil pack and tuck back out of the way.Take pass side plug wires off completely.
Now pull injector harness off valve cover studs and repeat process from drivers side.
Don't forget to clean everything up good before reassembly.
REASSEMBLY:Use pics for reference
Start with passenger side.
Install injector harness back on valve cover stud.
Replace plug wires to there proper location on coil pack.Put passenger side plug wires on there proper plug.
Reconnect vac. hose in front of valve cover.
Pop crank case vent tube back into valve cover.
Replace heater hose bracket back on stud and push hoses back into bracket.
Plug coil pack back in. Use pic above for reference.
UPPER INTAKE
Make sure everything is clean before reassembly.
Check to make sure the intake gaskets are all in place.
Take the long bolt[2nd from the front]and put it in it's proper hole.
Now carefully lower the intake into position making sure that it is lining up properly.
Start the bolt that is in the intake.While holding the intake up with one hand start the 3rd one back.Now just tighten them down[FINGER TIGHT] just enough so that the intake will set there without tipping.
Now you can get the front and rear bolts started.
Once you have them all snug start to tighten them down in a pattern working out from the center.
Remember it's only a composite intake.You only need to torque to about 19lbs.
I did it without the torque wrench.I just ran my pattern a few times to make sure everything was tight.The only thing I used the torque wrench for was the rockers.
Next reattach intake support and wire harness bracket as shown in pic below.
Remember that the support bolts to the intake.Then the bracket goes on.
Next reconnect attachments at throttle body and front of intake.
Take wire harness and install back on bracket.Use pic below as reference.
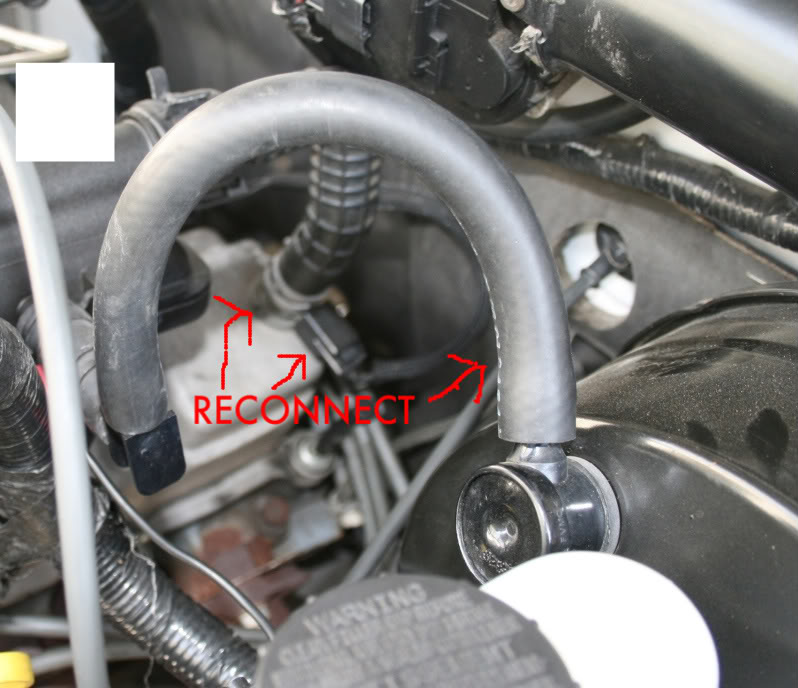
Next reattach vac. hose to brake booster.
Reattach crankcase vent hose and clamp to valve cover.
Reattach sensor wire at crankcase vent.Use pic below for reference.
You can also reinstall the plug wires on the drivers side plugs.
Reattach the throttle and cruise control cable to the throttle body.Then reattach the throttle cable bracket to the top of the intake using the T-30 bit. Pic below
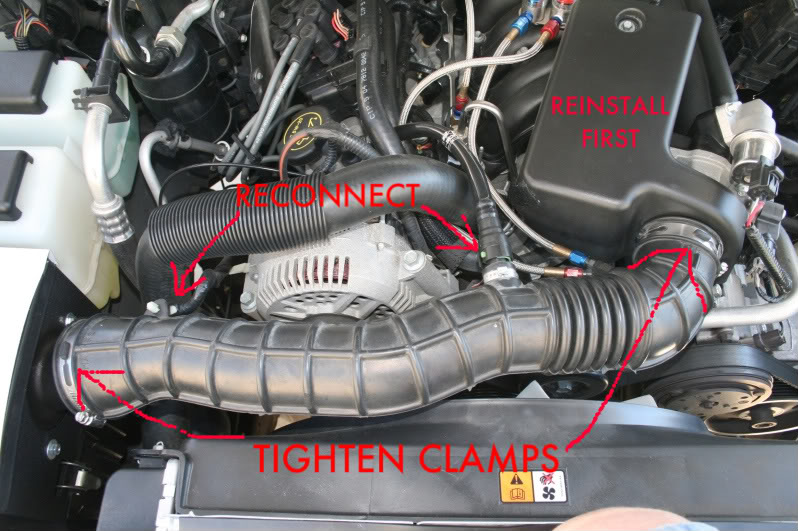
Now you can reinstall the throttle body cover.
Next you can reattach the air intake tube to the air box and throttle body.
Reattach the crankcase vent by simply pushing it back on until you here it click.
Tighten clamps at both end of air tube.
Then reattach MAF wire harness to air intake near air box.
Pic below.
LOOK EVERYTHING OVER GOOD.Just to make sure everything is hooked up properly.If all is good.
CRANK IT UP!!!
I hope this was helpful.
Tony.
Original thread: https://www.ranger-forums.com/forum2...ckers-3-a.html
Let the modding Begin!!
_________________________
Tools you'll need:
Rubber Mallet
Torque wrench
Screwdriver
6mm Allen wrench
7/16 Wrench
3/8 Wrench
3/8 Ratchet
2-3/8x3'' Extensions
3/8x10mm deep socket
1/4 Ratchet
2-1/4X3'' Extensions
1/4x8mm deep socket
1/4x5/16 socket
3/8 to 1/4 socket adapter
6mm allen bit
T-30 bit
1/4 bit holder
Pliers
Very little high temp silicone
It is a good idea to have your motor as clean as possible before you start.You don't want dirt inside your motor.
First you want to remove the air intake tube.With your thumb you should be able to push down and release the clip that holds the crankcase vent tube to the air intake.Then pull back to remove.
Next take your 5/16 socket and loosen the the clamps at each end of the intake tube.While your there loosen the screw that holds the throttle body cover on.
Remove wire harness from air tube near air box.
Now remove air intake tube and throttle body cover.
Disconnect the plugs and hoses on throttle body and front of the upper intake as shown in pic #2.Tuck them out of your way.
Remove Brake vac.hose from Brake Booster.
Carefully remove electrical connection from crankcase vent.
Take your pliers and release clamp that holds vent tube on valve cover and pull off.
Brake Vac. and Crankcase vent tube come off with the upper intake.
Take your T-30 bit and remove the three screws that hold the throttle cable bracket to the upper intake.
Once you have it off you can release the cruise control cable by pushing forwards on it at the throttle body.
Now you should have enough slack in the throttle cable to un-loop it off the throttle body.
I tucked the whole assembly back by the fire wall to keep it out of the way.
Insert screwdriver as shown in pic.#5 to release clip that holds wire harness to upper intake.
Gently lean screwdriver towards intake and pull up on connector.I used a zip tie to hold it back out of the way.
Now you can remove the bracket that held the wire harness.
Once you have it off you'll see another bolt that holds the intake support on.Remove it and slightly bend the support back a little to give some clearance when removing upper intake.
Now take your 1/4 ratchet,extensions and 8mm socket and start loosening the upper intake bolts.
Just break them all loose first.Then go back and start taking them out.
Make the 2nd one back from the front the last one you remove.It is also the longest.
Try to support the intake a little with your right hand while you remove the last bolt.
Now gently lift the intake off.Make sure the hoses that are still connected to the intake don't hang up on anything.
Now lay a towel or large rag over the lower intake.You sure don't want to drop anything down there.
Take the spark plug wires off the plugs on the drivers side and tuck out of way.
Pull the injector harness off the valve cover studs.
Use the 1/4 drive 8mm socket to loosen the 8 valve cover bolts.Do not pull them out.They help hold the gasket to the valve cover.
Now take a rubber mallet or hammer handle and tap gently on the side of the valve cover to free it.
There is a dab of silicone on the front and rear of the cylinder head where the intake and head meet.
Use your fingers to gently work the gasket free from the head.
The valve cover,gasket,and bolts all come off together.
Next UNPLUG THE COIL PACK so you don't get a spark when your bumping the engine over.
The stock rocker bolts are 10mm.Do not take them all off at once.Do one rocker at a time.
Take care when removing the factory rocker.Hold the push rod down into the lifter when removing rocker.
Start with the rockers that are at or close to zero lash.[valve closed]
It is a good idea to hold the rocker's roller tip centered on the valve tip until you have it snug.
Make sure the push rod is in the rocker arm properly.
I used a 6mm Allen wrench to start the rocker bolt.Then a 6mm Allen socket and torqued down to 20lbs. max.
Once you have a couple done you'll want to bump the engine over very slightly to get the other rockers in closed position.
Then repeat process and torque down.
After you have installed all of the drivers side rockers.
You need to take a shop rag with a little oil on it and wipe any dirt or debris that is on the surface of the head where the valve cover gasket sits.
Make sure you get all the old silicone off.
Make sure the valve cover and gasket are dirt free also. Make sure the bolts are seated in the gasket properly.Also make sure the gasket is in the valve cover channel properly.
Now put a small amount of high temp silicone at the front and rear of cylinder head where it meets the lower intake.
DO NOT PUT SILICONE ON THE GASKET.It just makes a mess.
Now gently lower the valve cover into place.Be careful not to get any wires or hoses in between the valve cover and head.
Start a couple of the bolts and then go around evenly and tighten down the valve cover with the 1/4 x 8mm ratchet setup.
Go around a couple times to make sure you got them all good and tight.
PASSENGER SIDE
The coil pack should already be unplugged.
So push the heater hoses out of the plastic bracket that holds them and pull up to remove.
Pull strait up on crankcase vent to remove it from the valve cover.
Unplug vac. hose that runs in front of valve cover and move out of the way.
Tag the plug wire location on the coil pack for easy reassembly.
Now remove drivers side plug wires from coil pack and tuck back out of the way.Take pass side plug wires off completely.
Now pull injector harness off valve cover studs and repeat process from drivers side.
Don't forget to clean everything up good before reassembly.
REASSEMBLY:Use pics for reference
Start with passenger side.
Install injector harness back on valve cover stud.
Replace plug wires to there proper location on coil pack.Put passenger side plug wires on there proper plug.
Reconnect vac. hose in front of valve cover.
Pop crank case vent tube back into valve cover.
Replace heater hose bracket back on stud and push hoses back into bracket.
Plug coil pack back in. Use pic above for reference.
UPPER INTAKE
Make sure everything is clean before reassembly.
Check to make sure the intake gaskets are all in place.
Take the long bolt[2nd from the front]and put it in it's proper hole.
Now carefully lower the intake into position making sure that it is lining up properly.
Start the bolt that is in the intake.While holding the intake up with one hand start the 3rd one back.Now just tighten them down[FINGER TIGHT] just enough so that the intake will set there without tipping.
Now you can get the front and rear bolts started.
Once you have them all snug start to tighten them down in a pattern working out from the center.
Remember it's only a composite intake.You only need to torque to about 19lbs.
I did it without the torque wrench.I just ran my pattern a few times to make sure everything was tight.The only thing I used the torque wrench for was the rockers.
Next reattach intake support and wire harness bracket as shown in pic below.
Remember that the support bolts to the intake.Then the bracket goes on.
Next reconnect attachments at throttle body and front of intake.
Take wire harness and install back on bracket.Use pic below as reference.
Next reattach vac. hose to brake booster.
Reattach crankcase vent hose and clamp to valve cover.
Reattach sensor wire at crankcase vent.Use pic below for reference.
You can also reinstall the plug wires on the drivers side plugs.
Reattach the throttle and cruise control cable to the throttle body.Then reattach the throttle cable bracket to the top of the intake using the T-30 bit. Pic below
Now you can reinstall the throttle body cover.
Next you can reattach the air intake tube to the air box and throttle body.
Reattach the crankcase vent by simply pushing it back on until you here it click.
Tighten clamps at both end of air tube.
Then reattach MAF wire harness to air intake near air box.
Pic below.
LOOK EVERYTHING OVER GOOD.Just to make sure everything is hooked up properly.If all is good.
CRANK IT UP!!!
I hope this was helpful.
Tony.
Last edited by 98liftedranger; 11-27-2011 at 11:29 PM.
#2
01-11-2012


Join Date: Jan 2012
Location: schenectady
Posts: 44
Likes: 0
Received 0 Likes
on
0 Posts
#4
02-27-2012
Join Date: Jan 2012
Location: schenectady
Posts: 44
Likes: 0
Received 0 Likes
on
0 Posts
#5
02-27-2012
I have put some kits together.
And they work great. Gonna post dyno results this week.
https://www.ranger-forums.com/2-9l-3-0l-v6-tech-32/3-0l-1-7-roller-rocker-kits-131462/
And they work great. Gonna post dyno results this week.
https://www.ranger-forums.com/2-9l-3-0l-v6-tech-32/3-0l-1-7-roller-rocker-kits-131462/

Thread
Thread Starter
Forum
Replies
Last Post


