*TEASER* Explorer Power Seats & More...
#1
 04-28-2010

*TEASER* Explorer Power Seats & More...
Just a teaser, no pics yet...
Got my Explorer seats today. Woo Hoo!
The process would have taken about 10 minutes if not for the seat rails being lowered all the way down on top of the mounting bolts!! Not to mention that I didn't have a Torx bit to fit the seatbelt bolts (always a good idea to take a couple of cheap screwdrivers you don't mind bending or shearing off)
Seeing as the Exp. doesn't have a motor, battery, tranny or most of the front end, there wasn't much I could do.
I found that the center console has a HVAC blower motor for the rear passengers. I have no need for it, nor the rear control panel or vents (as well as the lower-rear door was missing), so I'll probably make a panel to fill in the rear section of the console.
Also thinking about removing some of the inner supports/ducting (replacing with some metal or wood supports) and re-working the CD holder area to get a larger storage area. I still need to measure the brackets to see what I can modify to gain more storage space in the console.
After removing the HVAC tube connecting the console to the floor vent, I should gain enough room to add 3 or 4 12v outlets on each side (pass. side already has one 12v outlet with the cool retractable cover).
There is an oval area (looks like it was for a parking brake lever) near the middle of the console that's open to the inner parts of the CD storage area that looks like a perfect place to fill in and add some switches.
The armrest has a hole right in the center, so I need to determine what will work best for re-covering.
The entire console was basically covered in spilled beverages, fry grease, dirt & other miscellaneous filth & grime.
The two cubby holes (right below the HVAC controls) are filthy & have a felt type coating that isn't cooperating when it comes to cleaning.
The mounting brackets are in good shape, other than some surface rust. I plan on sanding & painting the mounting brackets to add a few more years of use.
I may have to paint the entire console if I find any damage or scratches under the gunk & I'm thinking about changing from gray/black to all black.
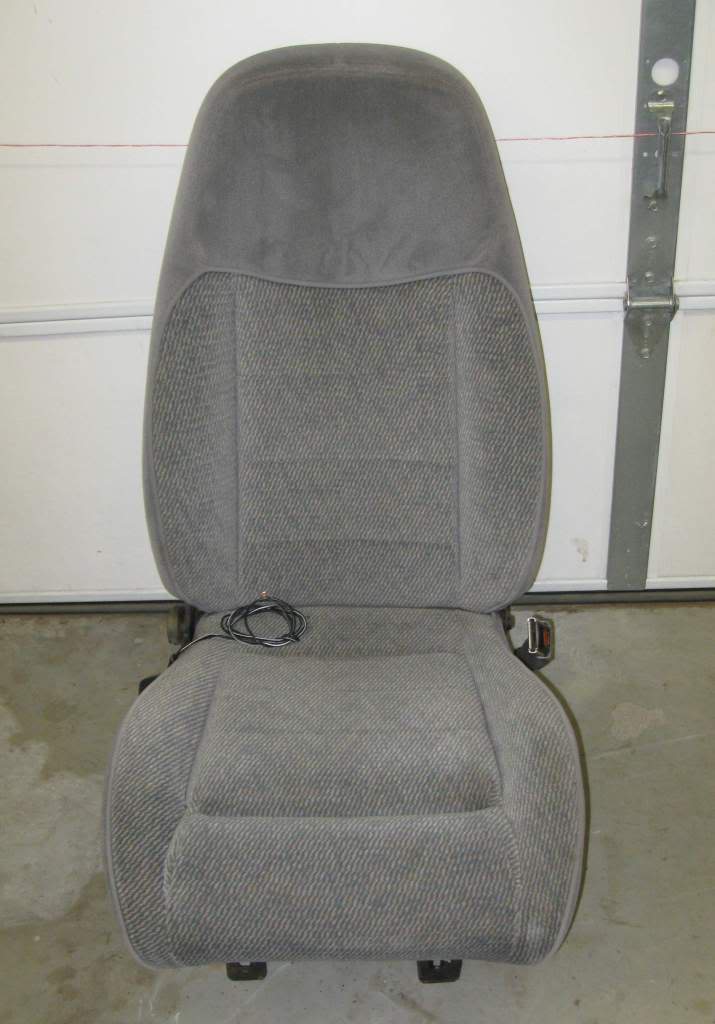
Seats are gray cloth with a hint of blue/light gray in the design. Power and lumbar function. Not heated, but that's something I might consider at a later time.
They were quite dirty & had a few stains that I'm cleaning out. Only one small hole in the driver's seat (looks to be a cigarette burn hole), need to look into how to repair this. Backs have large pockets that are filthy at the moment.
I had the privilege of removing the door trim & visors and cutting the carpet so I could cut quite a nice length of wire for each seat for later connection.
Since I was already dirty, I got the instrument panel gauge cluster & trim bezel (including the air vent & headlight switch), the HVAC controls (same as the Ranger has), the multi-function switch & steering column surround, the OHC (missing the door & all the sensors under the hood...remember no front end), the rearview mirror (connects to the OHC & has a sensor I believe for controlling auto wipers), a grab handle and more stuff that I haven't had time to unbox yet.
Pics to come as I get stuff cleaned up.
Got my Explorer seats today. Woo Hoo!
The process would have taken about 10 minutes if not for the seat rails being lowered all the way down on top of the mounting bolts!! Not to mention that I didn't have a Torx bit to fit the seatbelt bolts (always a good idea to take a couple of cheap screwdrivers you don't mind bending or shearing off)
Seeing as the Exp. doesn't have a motor, battery, tranny or most of the front end, there wasn't much I could do.
I found that the center console has a HVAC blower motor for the rear passengers. I have no need for it, nor the rear control panel or vents (as well as the lower-rear door was missing), so I'll probably make a panel to fill in the rear section of the console.
Also thinking about removing some of the inner supports/ducting (replacing with some metal or wood supports) and re-working the CD holder area to get a larger storage area. I still need to measure the brackets to see what I can modify to gain more storage space in the console.
After removing the HVAC tube connecting the console to the floor vent, I should gain enough room to add 3 or 4 12v outlets on each side (pass. side already has one 12v outlet with the cool retractable cover).
There is an oval area (looks like it was for a parking brake lever) near the middle of the console that's open to the inner parts of the CD storage area that looks like a perfect place to fill in and add some switches.
The armrest has a hole right in the center, so I need to determine what will work best for re-covering.
The entire console was basically covered in spilled beverages, fry grease, dirt & other miscellaneous filth & grime.
The two cubby holes (right below the HVAC controls) are filthy & have a felt type coating that isn't cooperating when it comes to cleaning.
The mounting brackets are in good shape, other than some surface rust. I plan on sanding & painting the mounting brackets to add a few more years of use.
I may have to paint the entire console if I find any damage or scratches under the gunk & I'm thinking about changing from gray/black to all black.
Seats are gray cloth with a hint of blue/light gray in the design. Power and lumbar function. Not heated, but that's something I might consider at a later time.
They were quite dirty & had a few stains that I'm cleaning out. Only one small hole in the driver's seat (looks to be a cigarette burn hole), need to look into how to repair this. Backs have large pockets that are filthy at the moment.
I had the privilege of removing the door trim & visors and cutting the carpet so I could cut quite a nice length of wire for each seat for later connection.
Since I was already dirty, I got the instrument panel gauge cluster & trim bezel (including the air vent & headlight switch), the HVAC controls (same as the Ranger has), the multi-function switch & steering column surround, the OHC (missing the door & all the sensors under the hood...remember no front end), the rearview mirror (connects to the OHC & has a sensor I believe for controlling auto wipers), a grab handle and more stuff that I haven't had time to unbox yet.
Pics to come as I get stuff cleaned up.
#2
04-29-2010

#3
04-29-2010


Join Date: Jun 2009
Location: Beaumont, CA
Posts: 632
Likes: 0
Received 0 Likes
on
0 Posts
that oval area is a tissue dispenser I think...sounds like you got it out of a 4 door explorer....Sports and sport tracs have a similar console but different cup holder section. post up some pics once installed. BTW, Ive had to ask for a loner battery to move seats...just walk back to the office and explain what youre wanting to do and theyll probably let u borrow a battery so u can move the seat around.


#5
04-29-2010

that oval area is a tissue dispenser I think...sounds like you got it out of a 4 door explorer....Sports and sport tracs have a similar console but different cup holder section. post up some pics once installed. BTW, Ive had to ask for a loner battery to move seats...just walk back to the office and explain what youre wanting to do and theyll probably let u borrow a battery so u can move the seat around.
I pulled all the ducting out of mine as well, used that area for a power inverter and acc fuse panel there.
#6
04-29-2010
that oval area is a tissue dispenser I think...sounds like you got it out of a 4 door explorer....Sports and sport tracs have a similar console but different cup holder section. post up some pics once installed. BTW, Ive had to ask for a loner battery to move seats...just walk back to the office and explain what youre wanting to do and theyll probably let u borrow a battery so u can move the seat around.
I hope that oval isn't a tissue holder, it wouldn't hold enough tissue for one good booger

#8
04-29-2010
The Explorer was at a friends...out in a field, almost in the middle of nowhere & I didn't think to bring any extra wire to hook the seats up to my battery to get them raised.
The seats have cleaned up pretty well, just one small burn hole on the driver's seat (right in the middle of the crotch area), but the backside pockets are still pretty gummed up. Looks like somebody tossed chunks in there. eeeeew!
The console cleaned up nicely with some degreaser & a little scrubbing as did the other plastic parts. Somebody just didn't take time to do a little regular cleaning on that SUV.
I still need to sand the brackets & paint them to prevent more rust.
I might have broken off a couple of tabs on the bottom of the console near the center. I don't think it will hinder the install, especially if I remove some of the duct & add some additional bracing.
The OHC is missing the rear hatch/door and I don't have any of the sensors to get it working, so I'm thinking about removing the green/blue display panel and installing a flat piece of ABS plastic with a PC temp sensor or my voltmeter from the radio bezel. I'll have to come up with some brilliant idea for making a new hatch/door.
Pics when I get everything cleaned up & organized...
#9
04-29-2010


#11
04-29-2010
I forgot to get pics of the side trim for the seats that hold the controls...
They were drying when I took pics today.
As soon as I get my T50 torx bits in, I'll be starting to remove the seat belts from the truck & starting the swap.
It got a little dangerous after the first 2 screwdrivers sheared off, so I thought it would be safer to have an actual bit for removing & installing the belts.
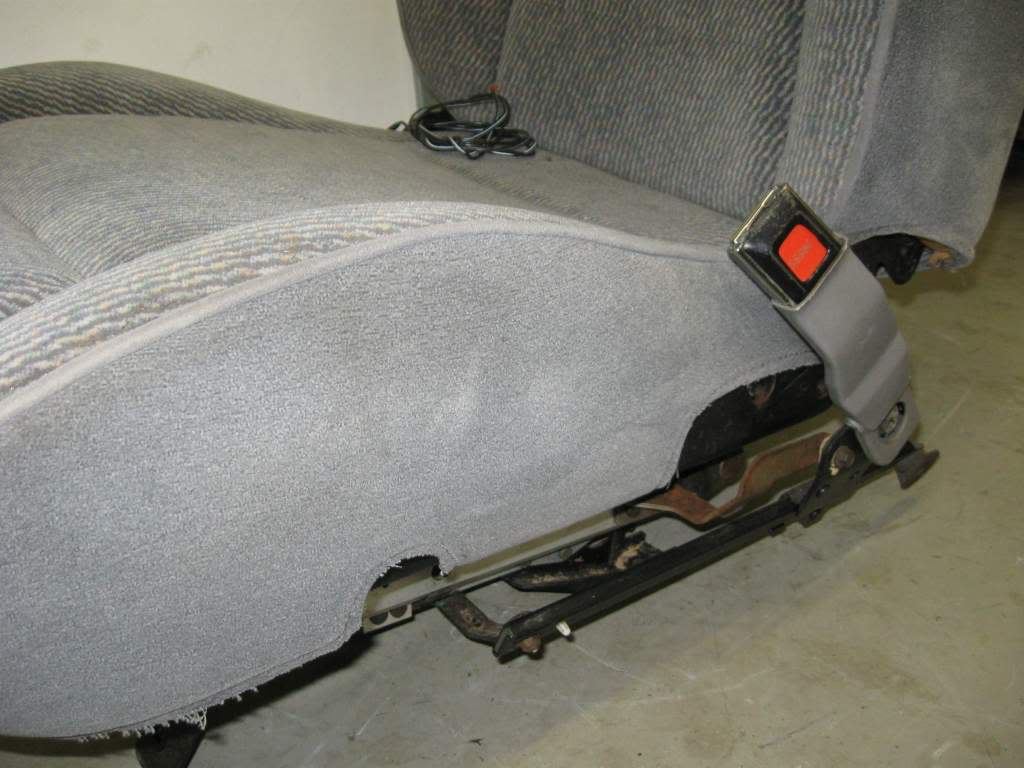
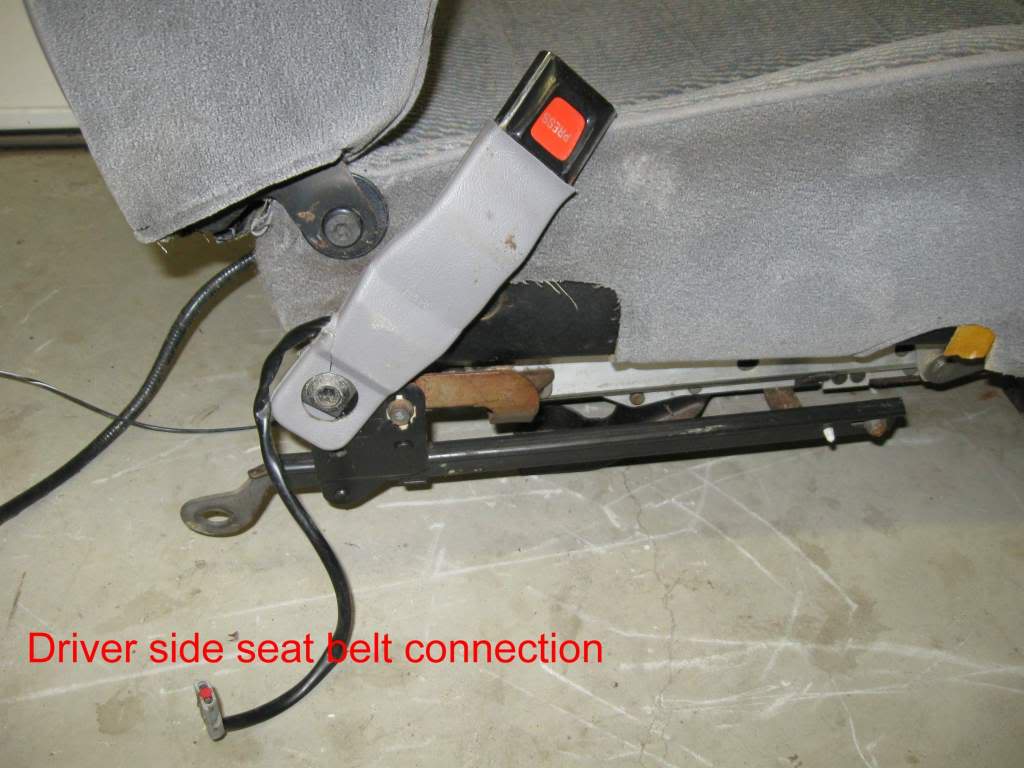
The Explorer seat belt bracket (driver's side only) has a 2 wire plug, but I can't remember if the Ranger seat belt bracket has any electrical connection. I'm sure there's a seat belt reminder sensor around somewhere.
They were drying when I took pics today.
As soon as I get my T50 torx bits in, I'll be starting to remove the seat belts from the truck & starting the swap.
It got a little dangerous after the first 2 screwdrivers sheared off, so I thought it would be safer to have an actual bit for removing & installing the belts.
The Explorer seat belt bracket (driver's side only) has a 2 wire plug, but I can't remember if the Ranger seat belt bracket has any electrical connection. I'm sure there's a seat belt reminder sensor around somewhere.
#12
04-30-2010
Join Date: Jun 2009
Location: Beaumont, CA
Posts: 632
Likes: 0
Received 0 Likes
on
0 Posts
#13
04-30-2010
I was thinking that cutting slots for those tabs would be a PAIN... I'll either chop them off & screw them down or hammer them to the same level as the surrounding area and use the slots for bolts & washers.
#14
04-30-2010

When installed mine, I used a slightly different approach. I had bolts welded to the floor. I used existing slots in the front and cut off the elongated bumps on the bottom of the rear mount. Then I used fender washers and nuts to install the console. That way there were no holes in the floor. Gotta be careful up here, rust will attack everything and I did not want to have any holes in the floor.
#15
04-30-2010
When installed mine, I used a slightly different approach. I had bolts welded to the floor. I used existing slots in the front and cut off the elongated bumps on the bottom of the rear mount. Then I used fender washers and nuts to install the console. That way there were no holes in the floor. Gotta be careful up here, rust will attack everything and I did not want to have any holes in the floor.
I'm thinking about drilling 1/4" holes through the floor & feeding carriage bolts up from under the floor, sealing around the heads with silicone & spraying undercoating over the bolt heads.
#16
05-01-2010
I believe I read in another thread where rwenzing (bob) posted that the seat wiring is: WH/BK = 25a fused, hot all times & BK = ground.
Would it be best to have each seat on it's own 25a fuse, or would a single fuse feeding both seats be sufficient?
The seats look very nice after a secondary touch-up cleaning. While I was at it, I painted the mounting brackets and release lever bracket.
I shot some white grease in the tracks & all moving parts to keep thing moving smoothly.
BTW, I'm starting to sand the "felt-like stuff" out of the front cubby holes because it just wouldn't come clean enough for me. That is some tough stuff to remove!! No pics yet, but I'll upload some when I'm finished sanding & painting.
#17
05-01-2010
Join Date: Jun 2009
Location: Beaumont, CA
Posts: 632
Likes: 0
Received 0 Likes
on
0 Posts
#18
05-04-2010
Got the seats installed today. (pics to come)
It looks a little funny without the Explorer console mounted.
I just have the seats temporarily wired in at this point. I have an extra 10ga or 8ga wire already ran through the firewall (used to power aftermarket remote door locks), so I've got a 25a fuse at the battery feeding both seats.
I plan on changing the 25a ATO blade fuse at the battery to a 30a or 40a fuse, then splitting off to separate 25a fuses under each seat. I doubt if I'll ever have both seats running at full power at the same time, so I'm hoping a 30a or 40a at the battery will be sufficient.
The passenger seat gave me a bit of trouble... the back holes were off by about 1/4" and I had to grind out a little metal from the bracket & the bolts now fit perfectly.
The driver's seat bolted up with no issues. I even removed the door trim & lifted the carpet to make sure there wouldn't be anything hitting under the carpet. There were a few connectors & a pass through plug, but they were down far enough as not to interfere.
The seat belt bars from the Explorer seats, however were a different story. The Ranger bracket has a bend where the T50 Torx bolt attaches to the body floor, where the Explorer bracket is basically flat. I had already removed the T50 torx bolts from the female seat belt brackets, so I had to re-install them back to the Ranger tracks & remove the 2 bolts from the Ranger tracks & swap them with the Explorer tracks. Long story short, the Ranger tracks & seat belts work perfectly.
I crimped & soldered a terminal with some of the extra wire from the harness & used one of the rear bolts (on each side) for my grounds.
When I'm ready to install the console, the passenger seat will be removed to make life easier so I also added a couple of bullet connectors to the grounds to make for easier removal. I'll add bullet connectors to the power cables once I'm closer to being finished.
The OEM connector under the seat (power & ground) is impossible to reach unless you have the seat turned upside down, so if I ever need to remove the seats again, all I need to do is pop apart the bullet connectors & remove the wire loom.
The console is coming along pretty well... I have the lid covered with gray automotive carpet (thinking about changing it to black carpet now) and it matches pretty well.
I did notice that the front end (below the ashtray & airbag switch) looks like it will block off the vents that blow in the footwells. I might need to trim a bit of the plastic back so my feet will stay warm.
Is this extended front area due to this console being from a 4dr with the blower motor in the console? If not, how did some of you deal with the blocked vents?
What did you do with the airbag switch when you installed your console?? I'm thinking about mounting it in the side of the console...if I can get the actual switch apart from the housing.
More pics to come when I get a chance.
#20
05-05-2010
Finally got the console installed (more or less) today. No pics yet, sorry.
I had to trim some of each side of the front end of the console to get it to fit around the air vent.
The bracket (mounts where the ashtray & airbag switch was) had to be trimmed a bit, but eventually it worked.
I was tired & lazy so I just used some large sheet metal screws (#12 or 1/4" I think) and pre-drilled some holes in the center hump area. Once I saw how difficult it would be to fish carriage bolts from underneath I quickly decided against it.
It's plenty sturdy with 4 screws & washers, along with the front bracket.
I utilized one of the front screws for a grounding point that will be used for my accessories & 12v outlets, etc.
I still need to finish sanding the felt stuff off the 2 front cubby holes (right now I have a box of tissues filling the hole).
The rear cover/vent/audio/cup holder piece is still a work in progress. I'm making use of the vents & control area for either 12v outlets or switches for warning lights.
The seats are wired in & fused. One 25a fuse mounted under each seat (everything covered in wire loom for added protection) which come together with a single 10ga cable to the battery (fused at the battery with a 30a fuse...I need to find a 40a blade fuse later).
#21
05-10-2010
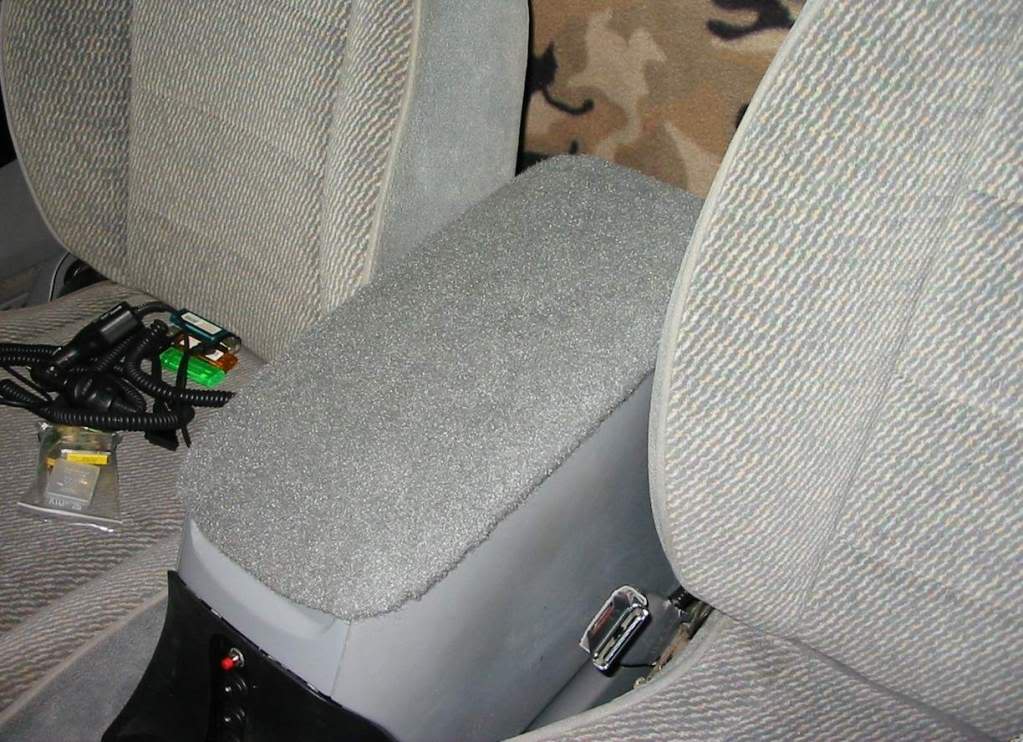
Here's a few quick pics of the console installed & my additions...
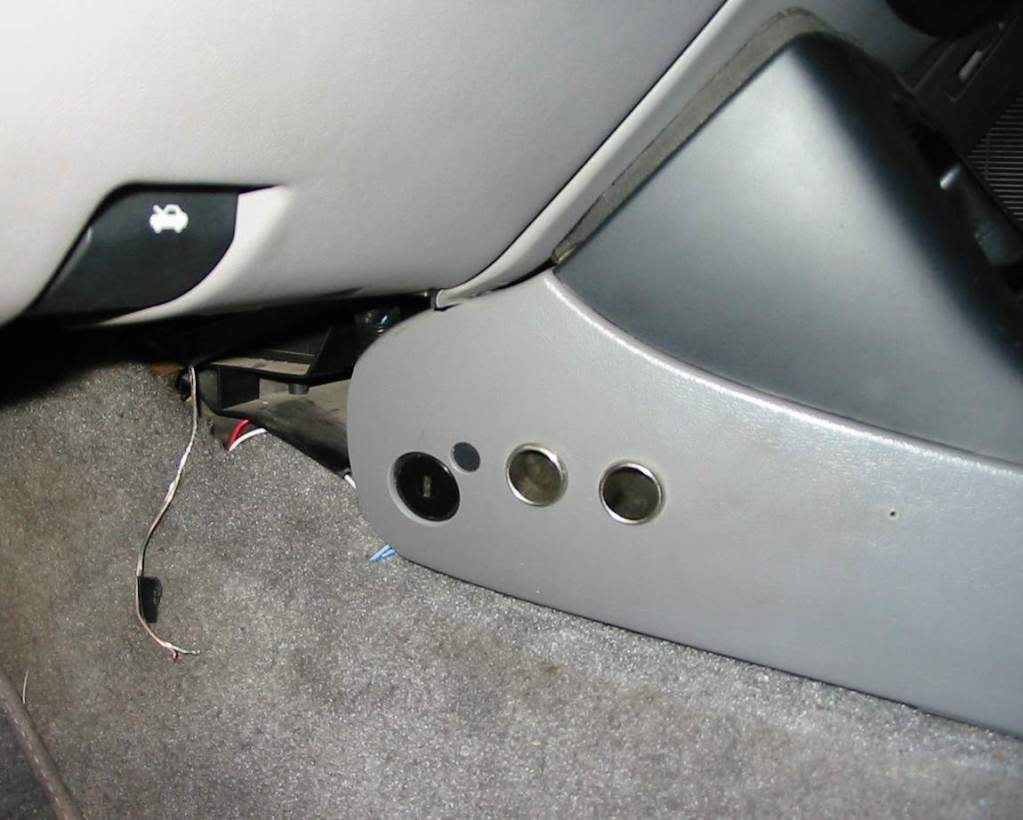
Had to modify the side of the console to allow my footwell vents to work.
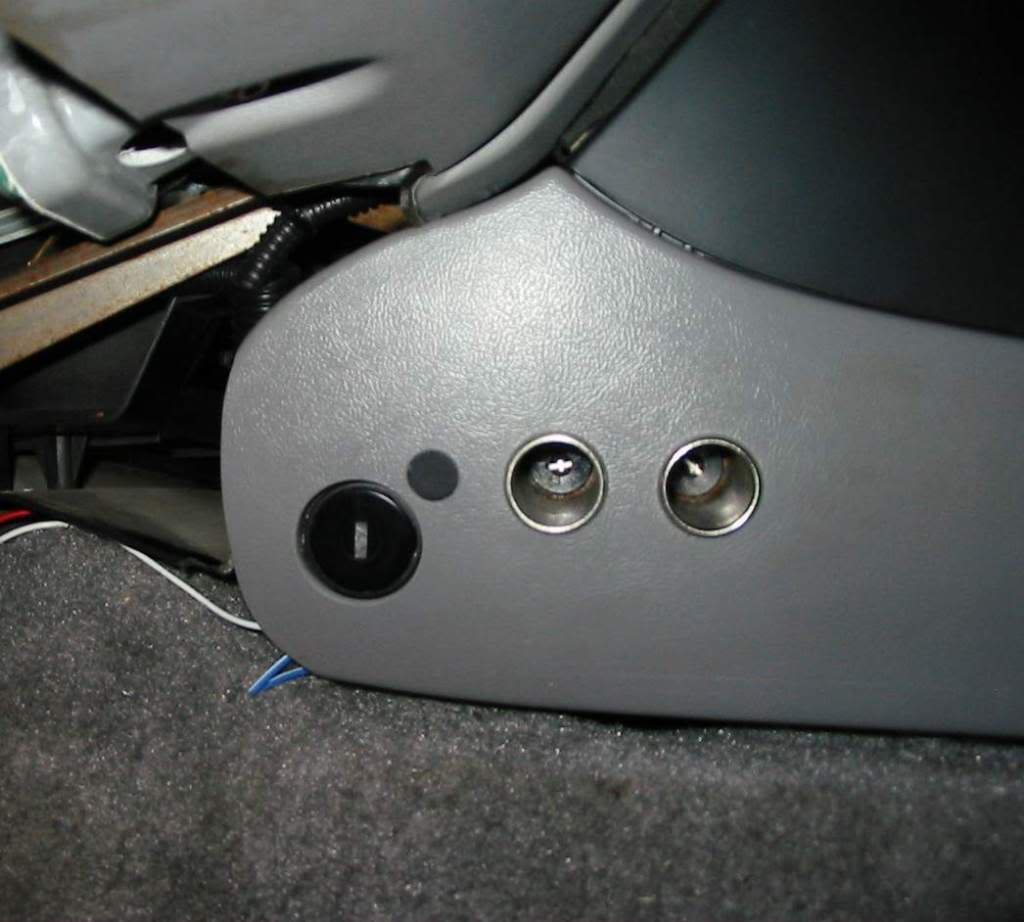
While I was at it, I installed my airbag switch to the side of the console (includes OEM "OFF" indicator). The airbag switch is right behind or in front of (depending on how you look at it) the floor vent. It's well out of the way & easy to access if needed. I've only turned it on/off 3 times since I've owned the truck now. Once when I bought it and 2 times recently to make sure it still works.
Also added a couple of switched 12v outlets; controlled by one of the switches in the tissue holder area.
Don't mind the wires hanging down, I haven't had time to wrap everything with wire loom yet.
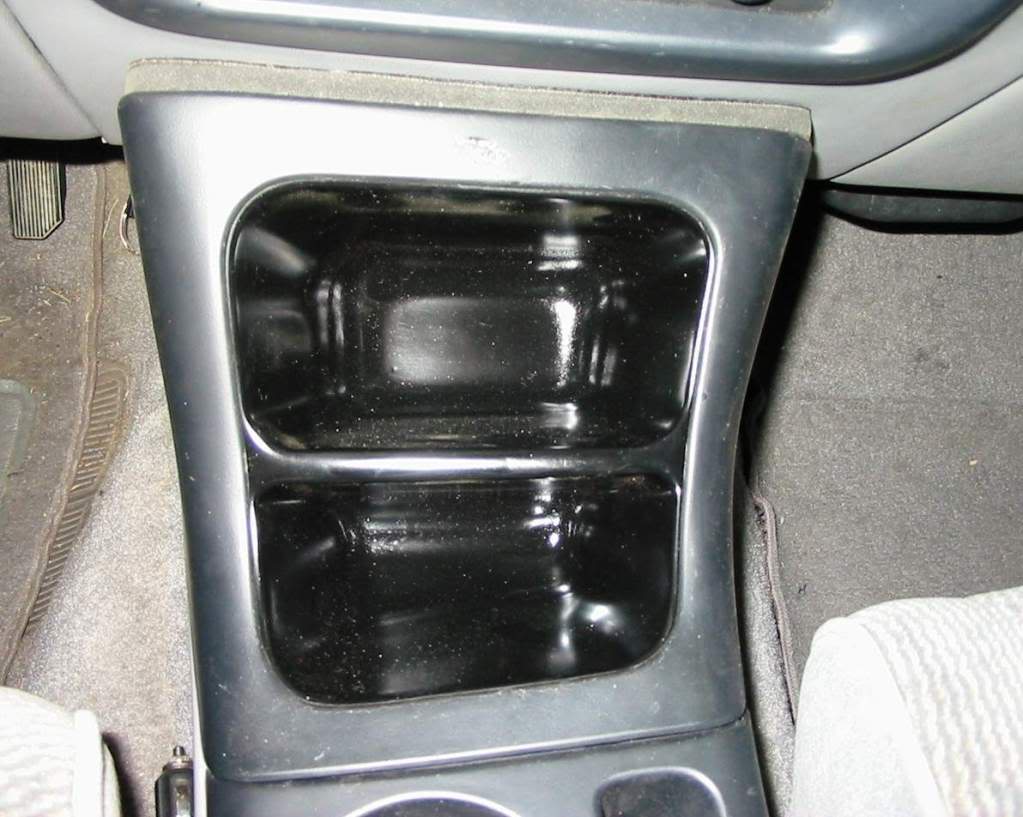
The re-done cubby holes:
Had to sand off all the felt junk & paint them with 3 coats of Krylon Fusion Satin Black. I can't tell much difference between the satin & gloss myself.
Don't mind the dust in there, I changed my cigarette lighter socket & all the dust & ashes filled my console.
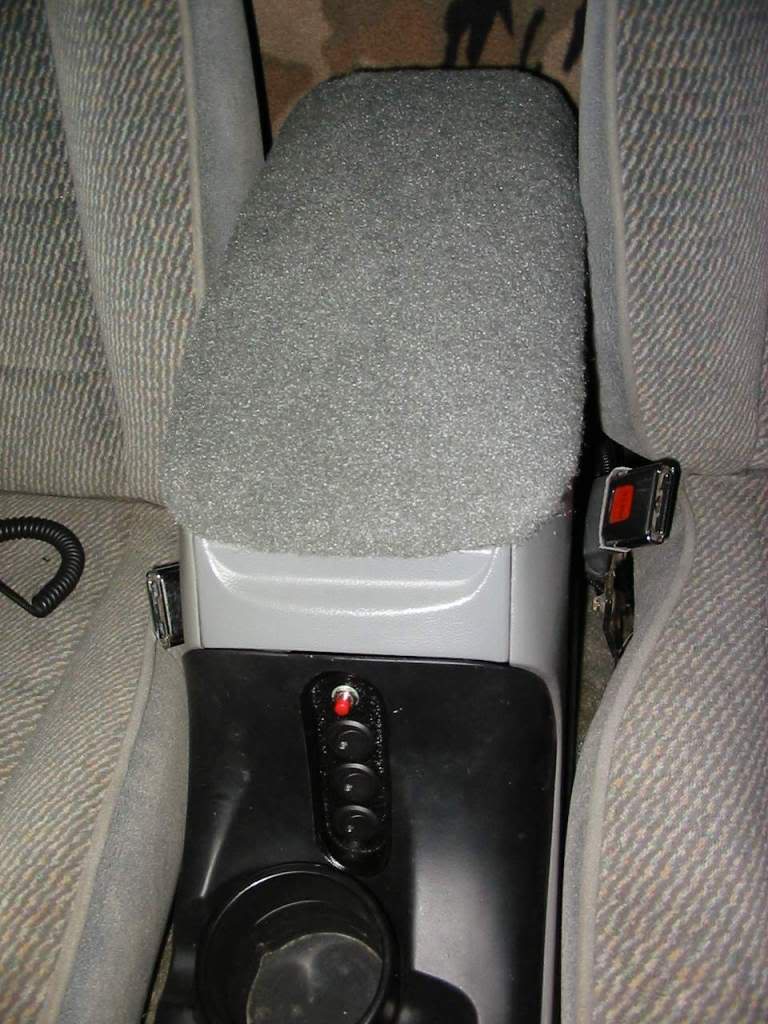
Armrest & switches mounted:
Armrest covered with automotive carpet. Looks & feels pretty good, I may change it to black later.
Switches are mounted to a piece of textured ABS plastic that's glued to the back side of where the tissue hole used to be.
The red button is for my cheap air horn.
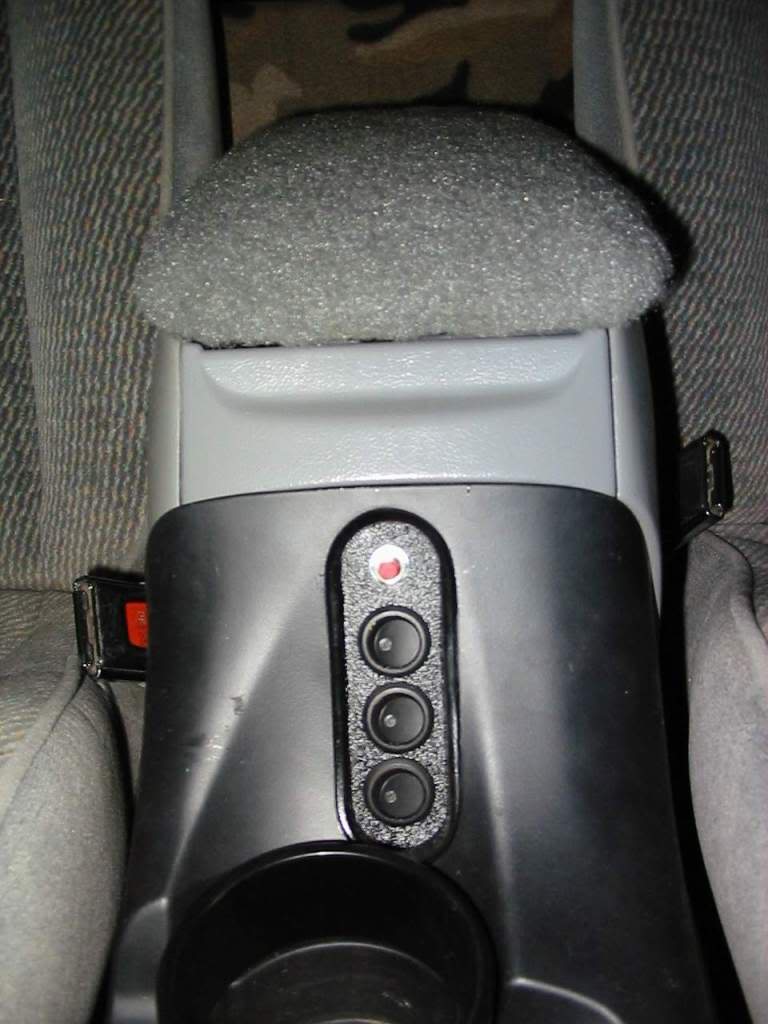
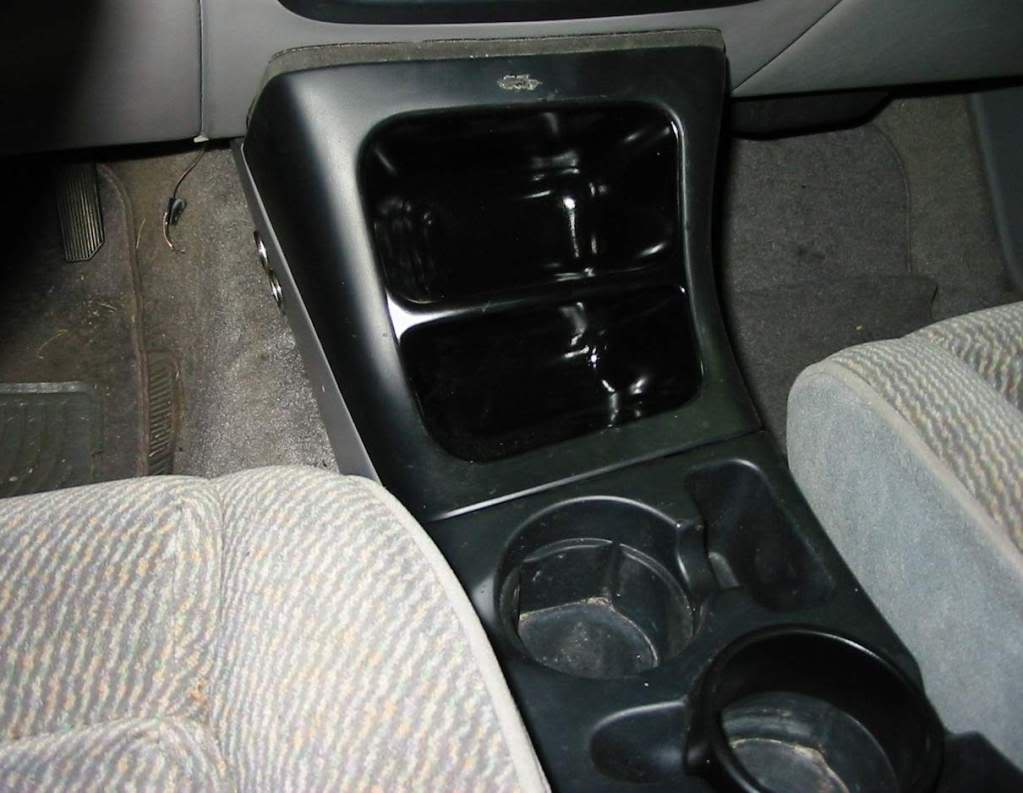
The black ring in the rear cupholder is a piece of 3" PVC pipe I cut & shaped to increase the height & decrease the diameter of the cupholder to fit my large water bottles.
Before anyone asks, I don't smoke... the lighters were for heatshrink tubing I used to finish the ends of connections.
Notice the camo? Stealth baby, stealth.
For some reason, the cupholder/switch piece doesn't want to completely snap into place, hence the small gap. I probably need to raise the rear of the bracket with some washers to see if it aligns better. It'll have to wait until I get some longer sheet metal screws though.
Still not finished with the rear panel. The plywood I used to fill in the vent area doesn't want to cooperate. The paint keeps flaking off, leaving primer spots, so I'll probably chip the plywood off & use some more of my ABS sheet.
I went from 2 12v outlets to 3 in the vent area, so I didn't have any extra outlets to add an extra one to the passenger side of the console behind the OEM 12v socket door. The "vent hole" outlets will be controlled by one of the "tissue hole" switches as well.
If it wasn't for the hassle of sanding all the rubbery junk off the cubby hole outer shell & cupholder area, I'd paint those parts with Black Fusion paint too. I got sidetracked from sanding the radio bezel when I started the seats/console install, so I'll have to get back to work on that pretty soon.
I'll post more & better pics, maybe even a video when I have time. I might even include some shots of my latest secret project.
Had to modify the side of the console to allow my footwell vents to work.
While I was at it, I installed my airbag switch to the side of the console (includes OEM "OFF" indicator). The airbag switch is right behind or in front of (depending on how you look at it) the floor vent. It's well out of the way & easy to access if needed. I've only turned it on/off 3 times since I've owned the truck now. Once when I bought it and 2 times recently to make sure it still works.
Also added a couple of switched 12v outlets; controlled by one of the switches in the tissue holder area.
Don't mind the wires hanging down, I haven't had time to wrap everything with wire loom yet.
The re-done cubby holes:
Had to sand off all the felt junk & paint them with 3 coats of Krylon Fusion Satin Black. I can't tell much difference between the satin & gloss myself.
Don't mind the dust in there, I changed my cigarette lighter socket & all the dust & ashes filled my console.
Armrest & switches mounted:
Armrest covered with automotive carpet. Looks & feels pretty good, I may change it to black later.
Switches are mounted to a piece of textured ABS plastic that's glued to the back side of where the tissue hole used to be.
The red button is for my cheap air horn.
The black ring in the rear cupholder is a piece of 3" PVC pipe I cut & shaped to increase the height & decrease the diameter of the cupholder to fit my large water bottles.
Before anyone asks, I don't smoke... the lighters were for heatshrink tubing I used to finish the ends of connections.
Notice the camo? Stealth baby, stealth.
For some reason, the cupholder/switch piece doesn't want to completely snap into place, hence the small gap. I probably need to raise the rear of the bracket with some washers to see if it aligns better. It'll have to wait until I get some longer sheet metal screws though.
Still not finished with the rear panel. The plywood I used to fill in the vent area doesn't want to cooperate. The paint keeps flaking off, leaving primer spots, so I'll probably chip the plywood off & use some more of my ABS sheet.
I went from 2 12v outlets to 3 in the vent area, so I didn't have any extra outlets to add an extra one to the passenger side of the console behind the OEM 12v socket door. The "vent hole" outlets will be controlled by one of the "tissue hole" switches as well.
If it wasn't for the hassle of sanding all the rubbery junk off the cubby hole outer shell & cupholder area, I'd paint those parts with Black Fusion paint too. I got sidetracked from sanding the radio bezel when I started the seats/console install, so I'll have to get back to work on that pretty soon.
I'll post more & better pics, maybe even a video when I have time. I might even include some shots of my latest secret project.
#22
05-11-2010
#23
05-11-2010
No pics of how it's attached, I was in a rush when installing it. Basically, I used a couple layers of heavy duty double sided foam tape to the switch. The extra thickness conforms to the curvature of the console & gives a little bit of vibration dampening.
Next time I have the console out, I'll get some pics of the install from the inside.
#24
05-17-2010

Nice work, I like the extra switches and power outlets, NICE… wow, just noticed the Air Bag Switch too, sweet.
Great ideas !
I attempted to remove the full length console from an ‘01 X-Sport, what a PITA.
Too many bolts, clips, plastic snap-in things (that break way too easily) and way too much time to remove to sell but if someone wanted it then I can see that it would be worth the trouble.
Great ideas !
I attempted to remove the full length console from an ‘01 X-Sport, what a PITA.
Too many bolts, clips, plastic snap-in things (that break way too easily) and way too much time to remove to sell but if someone wanted it then I can see that it would be worth the trouble.


