When you click on links to various merchants on this site and make a purchase, this can result in this site earning a commission. Affiliate programs and affiliations include, but are not limited to, the eBay Partner Network.
Author : Michael Sunlin (Mnemonic)
Please direct all questions and comments to the author.
Today I was chasing down a rattle in my headliner, and had to go behind the dome light. So I figured that would be a good time to show everyone the Mustang Dome Light mod. This is a very simple mod, but 2004 and newer Rangers will have a little more work than earlier models.
Tools needed:
Philips & small flathead Screwdriver
9/32" 6 point socket/rachet
Replacement Dome Light (From Mustang/Explorer/F-Series etc)
3 screws (should come with new dome light, or you can match one to the two in your current dome light)
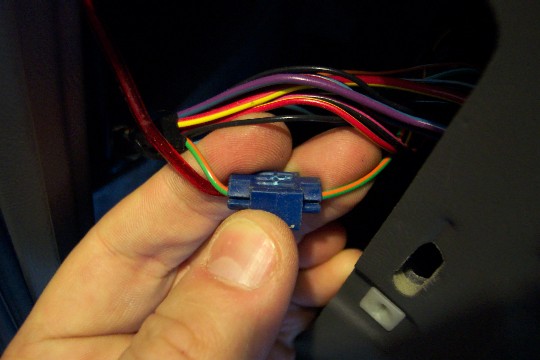
1 Wire Tap
About 8 feet of wire (I used speaker wire)
Electric tape
Electrical Fish tape (not required but helpful)
PREPARATAION: Get your self a dome light. Some members sell them, or you can visit your local junkyard (or ebay) to find these items. I recommend Taurus and Mustangs, but F-series and explorers may also work.
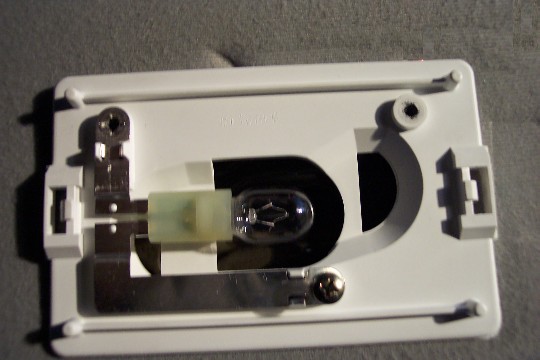
Clean your dome light. Most often these devices are dirty. Just remember they are almost 100% plastic, so make sure to use a very mild cleaner. Some may prefer to paint the dome light housing as well as black housings are very rare. Check light bulbs for loose fillaments and replace if necessary.
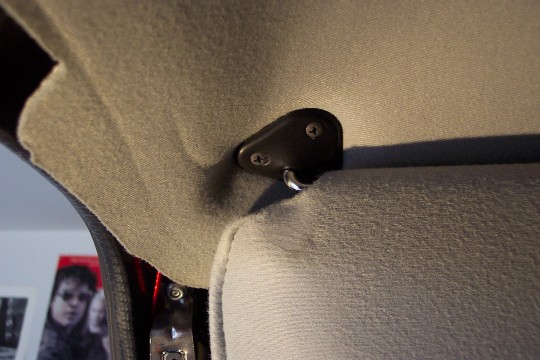
Step 1: Remove existing dome light.
Pop off the plastic cover with a small flathead. Then take out the two philips screws and the old dome light should be off.
IMPORTANT! 2003 and older Rangers should have 2 wires visible behind their dome light. 1 wire is constant power for map lights(not used by stock dome light), and the 2nd is switched power for the dome light. Ground is to the chassis. 2003 and older rangers can skip to the last step of bolting the new dome light in.
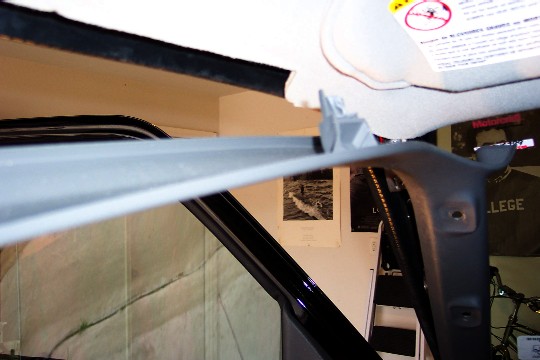
Step 2: Removing trim.
We need to run power from the headlight switch to the dome light. So we must first remove the trim.
Start by taking off the dash access panel (or whatever it's called).
Then remove the grab handles on the A-pillar. This is accomplished by first removing the plastic trim plugs to expose the 9/32" hex bolts. These bolts are the same size as the 2 bolts that hold in the A/C bezel.
Now you can pull off the A-Pillar trim piece. Note there are 2 plugs (one in the pic) that hold this trim in place. Just pull the trim straight down (towards the ground) and it'll pop out. Just take your time, and wiggle it if it's not cooperating.
Remove the 3 philips screws that hold the sun-visor in place. After removing them, you should be able to drop the corner of the headliner, allowing you to run the wiring.
You should now have a clear shot to run the wiring. Start from behind the headlight switch, up the a-pillar, through the headliner and to dome light. I use this product called Fish Tape, available at home depot, that makes running any cable or wire a snap. It works just like a tape measure, but the tape is a little skinnier and a bit stronger. A must have if you plan on doing any long speaker runs in your home theater setup.
Step 3: Running the constant power wire.
Standard disclaimer: Caution, you can shock yourself and/or blow some fuses if you don't do this right, so be safe and disconnect the battery. R-F.com is not responsible for anything.
Locate the Green wire with Orange Stripe behind the headlight switch. This is the wire missing behind the dome light on 2004 (and newer) Rangers. This wire is "behind" the power saver relay, which means this wire will deliver constant power for approximately 10 minutes without a key in the ignition. If you want constant power without any interuptions, you will need to run a line from the battery (with fuse) or tap into the fuse box (passenger kick panel).
Use a wire tap to splice into the Green/orange wire.
Run this wire up the a-pillar and in behind the Headliner. I attached my wire to the fish tape, and used that to run the wire to the dome light hole. You can also use a wire hanger, or just keep wiggling and pushing the wire until it makes it to the dome light hole. With the fish tape, it took about 30 seconds. Just take your time to tuck the wire behind any molding.
TIP: Those with high powered subwoofers may want to take this time to secure the power wire with plenty of tape and/or wire ties. I had to secure mine in many places because it caused a few annoying rattles when the sub hit.
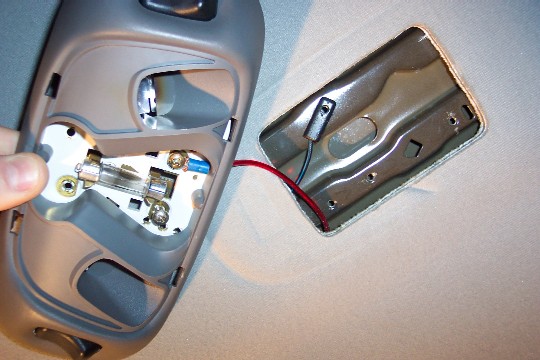
Step 4: Wire in the dome light.
Put your fabrication hat on. There are many ways to do this, but the end result is you want your new power wire to connect to the screw circled in YELLOW. The RED circle is for switched power and this hole should like up with the black/blue wire Ford put behind the dome light. As stated before, the ground is the chassis. Just make sure the last screw hole (circled in DARK BLUE) lines up with a pre-drilled hole into the dome light brace.
YELLOW = Constant RED = Switched BLUE = Ground
TIP: Tape down the little plastic pieces marked by the yellow rectangle (or just remove them), as they may be yet another source of rattling/vibration. I kept them in, just in case they helped keep the light form bleeding through. They were there for a reason, right Ford?
The red square above marks another location you can use to tap the wiring into, but the screws are the easiest method.
Step 4b: Mounting the light.
By using the screws for ground and switched power (screwed to the factory locations) should be sufficient for a secure mount.
Step 5: Test the installation.
CHECK ALL WIRING. Make sure all dome light screws are contacting the factory wire, your power wire, or the chassis. Make sure the wire tap is in contact with the wire.
Reconnect the battery.
Close all doors to reset the battery saver relay. Then turn the rotary dial by the headlight switch to turn on the dome light. The center bulb should illuminate. Turn the switch back to "off".
Test the map light switches on the dome light. Each switch should turn on one bulb and one bulb only. It should be obvious which one that it. These map light switches should work independently of the headlight dome switch, because of the power wire you ran.
REMEMBER, that the wire we tapped into is behind the battery saver module. So after about 10 minutes or so, it will shut off. This will make sure you don't leave a light on over night and have a weak or dead battery the next day.
Step 6: Replace trim.
Follow step 2 in reverse order.
Mod Complete:
Looks MUCH better and now you have functioning map lights!
Edited by Jason Gonderman (rngprerunner) for format.
Last edited by 04blackedge; 03-03-2009 at 06:30 PM.
Reason: Fixed pics
I do that anyway, i'm assuming you haven't seen the regular Ranger dome light? It wouldn't be out of place in some 1960's vehicle - additionally, the 'upgraded' unit not only looks nicer, but has map lights too.
I put LED's in my stock unit, and upgraded to the Mustang light with LED's too, much better, looks nicer etc.
I just bought my 2002 Edge...and was looking for some things to do to it.. and I saw this mod... The dome light is ugly I admit...So I guess the 90s Mustang mod dome would be a better.So did u add the Mustang dome and add LED bulbs to that?? what size LED bulbs?,,,You get dome light on E Bay?
Looks good..Mine is a 4.0 Edge.. Not sure why mine has blue seats in it when the rest of the interior is Grey.....So do u know what LED bulb fits the Mustang dome? I guess any late yr Mustang?
It's popular to swap out seats, i think those blue ones are from an FX4 model. I linked the bulbs i bought in the post. Just check the dome light you get takes 3 festoon type bulbs before buying them, i've seen some references to them being a mix sometimes.
an FX4?.. what is that? its straight buckets with the short console bolted to the floor....Dont know why anyone ..even Ford.. would put blue seats in a grey interior truck...There are no rips nor tears at all..I just hate the color
I see... well in mine the door panels, jump seats, dash.. everything is grey except seats and padded piece on console.. its blue as well..just different fabric...are there specific years mustanG that the dome assembly is used?
Your seats came from another truck, someone changed them, it's popular as they're better seats.
Dome just refers to the American term for interior light (they were originally dome shaped) basically any interior light that looks like the one i pictured, will fit.
You'll find them in pre 2004 mustangs, F150's and 250's.
Do these 2 lights come on when the door opens as well as individual as map lights?,,Yes Im an old guy and thats all we ever called them were Dome lights..I was wondering why these seats are in such good shape to be 16 years old..So do u think they came from a newer Ranger?..Wish they were black and grey
I believe the seats are from a few years newer ranger, special edition, less miles and newer material with higher wear rating.
Center light comes on when you open the door, larger "lens" area - map lights are in smaller more targeted holes and only come on with the switches on side.
If your Edge is like mine, there will be two wires up behind your current light, if so, you don't need to any new wiring, just use the 3 screws that your Ranger came with, not the screws from the vehicle you get the light from.
So the 2 screws pass thru the wires into 2 matching 2 holes in the truck then align the 3rd hole up? Does it matter which wire goes where? Also what about an LED bulb for the high mount brake light?.....Im gonna ck those seats, thats interesting...
 06-24-2005


 YELLOW = Constant