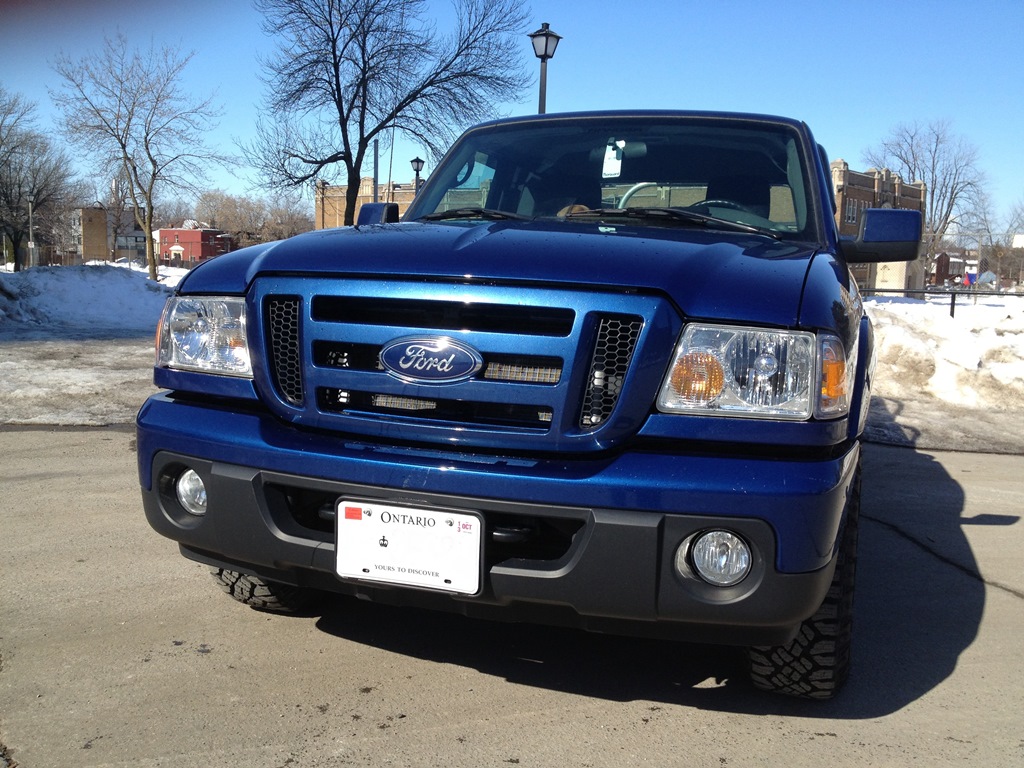
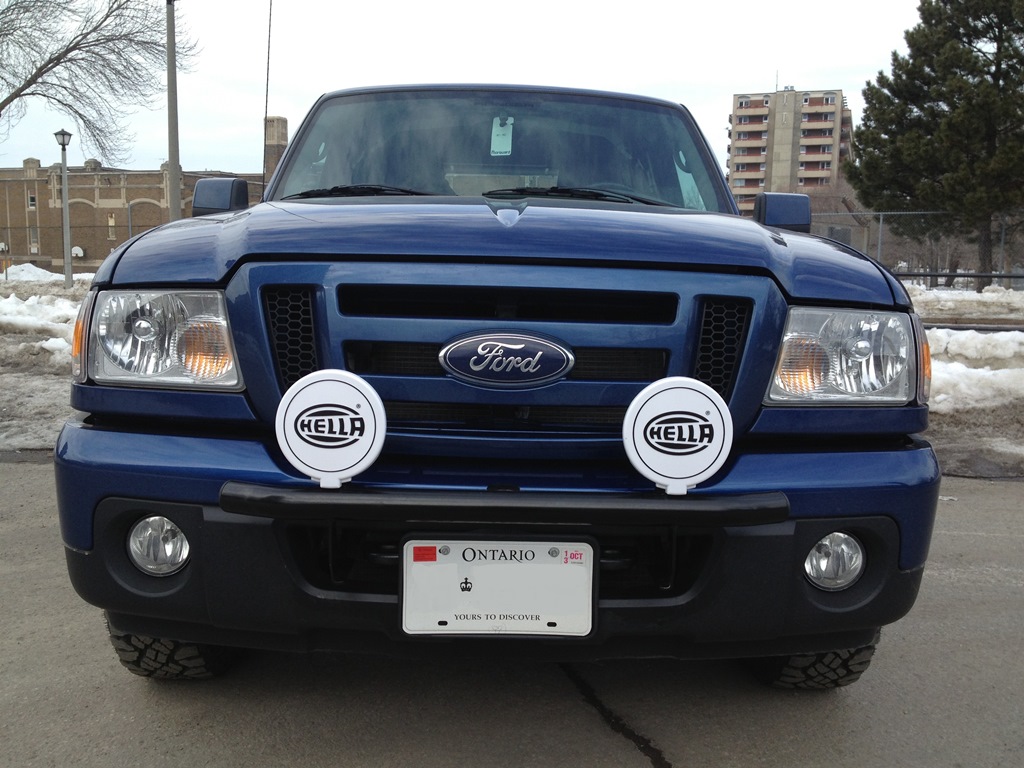
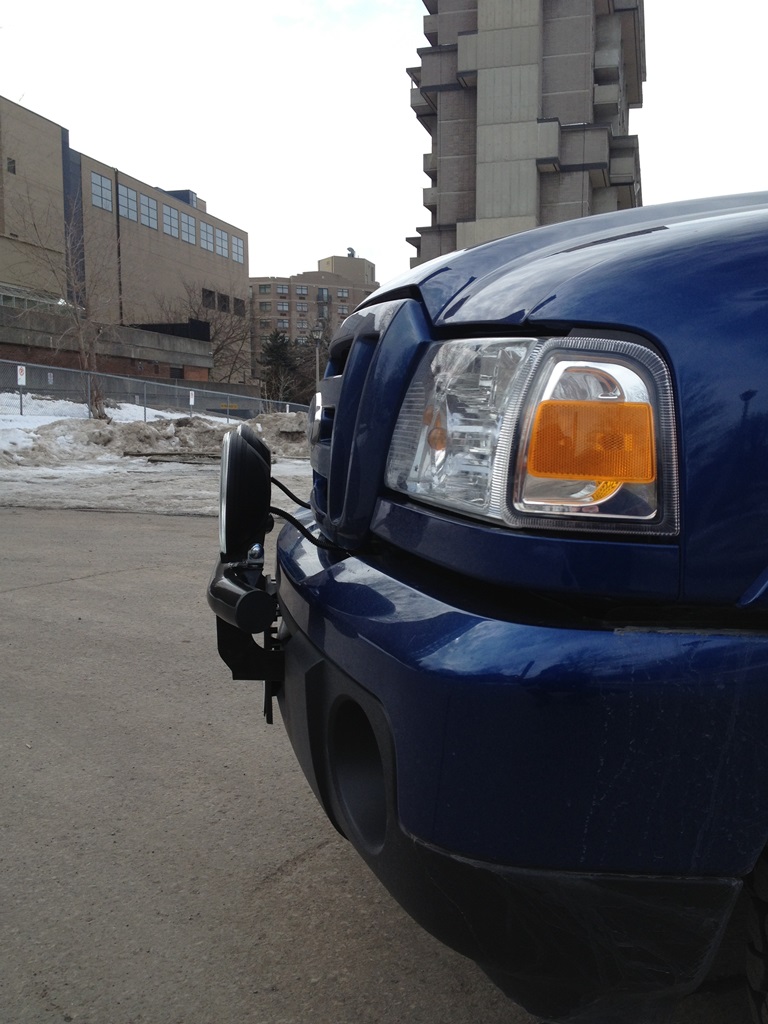
Install of Westin Off-road Light bar and Hella 500ff Lights
#1
 03-10-2013


Join Date: Jun 2011
Location: Sooke, BC
Posts: 74
Likes: 0
Received 0 Likes
on
0 Posts
Install of Westin Off-road Light bar and Hella 500ff Lights
So I wanted to install some lights on my truck some things that I wanted though:
I did not want connections in the elements down near the bumper.
I did not want to cut or alter the dashboard.
I did not want to have to drill of modify the bumper to make something fit.
So with my list I set out to get things together to meet my criteria.
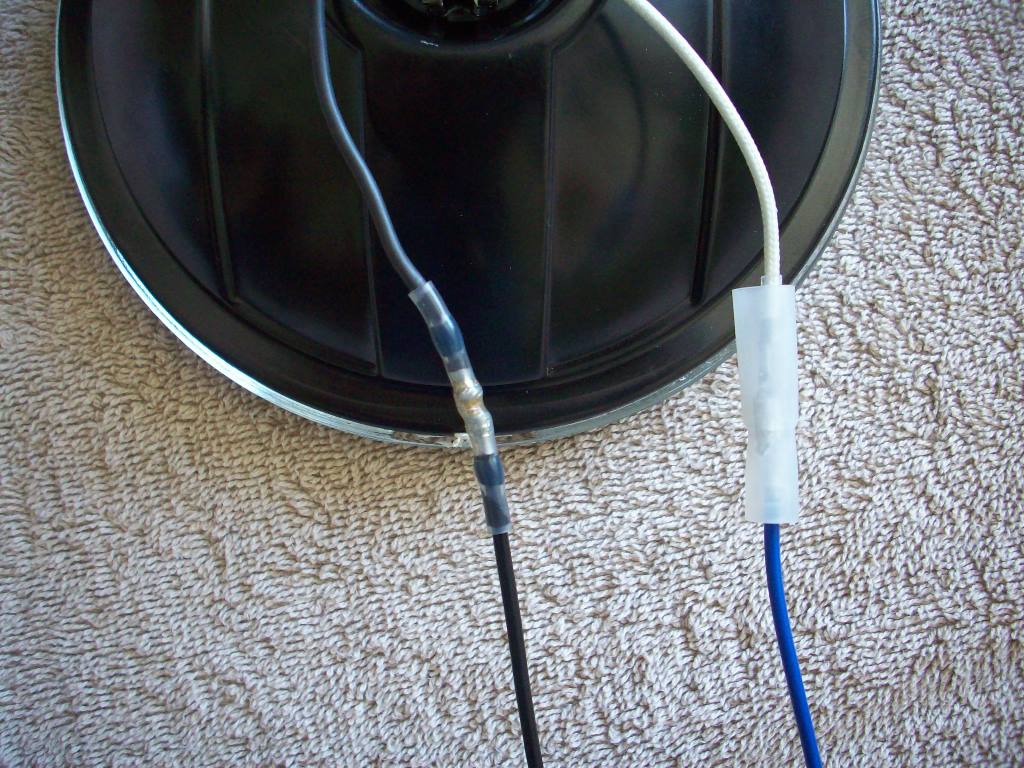
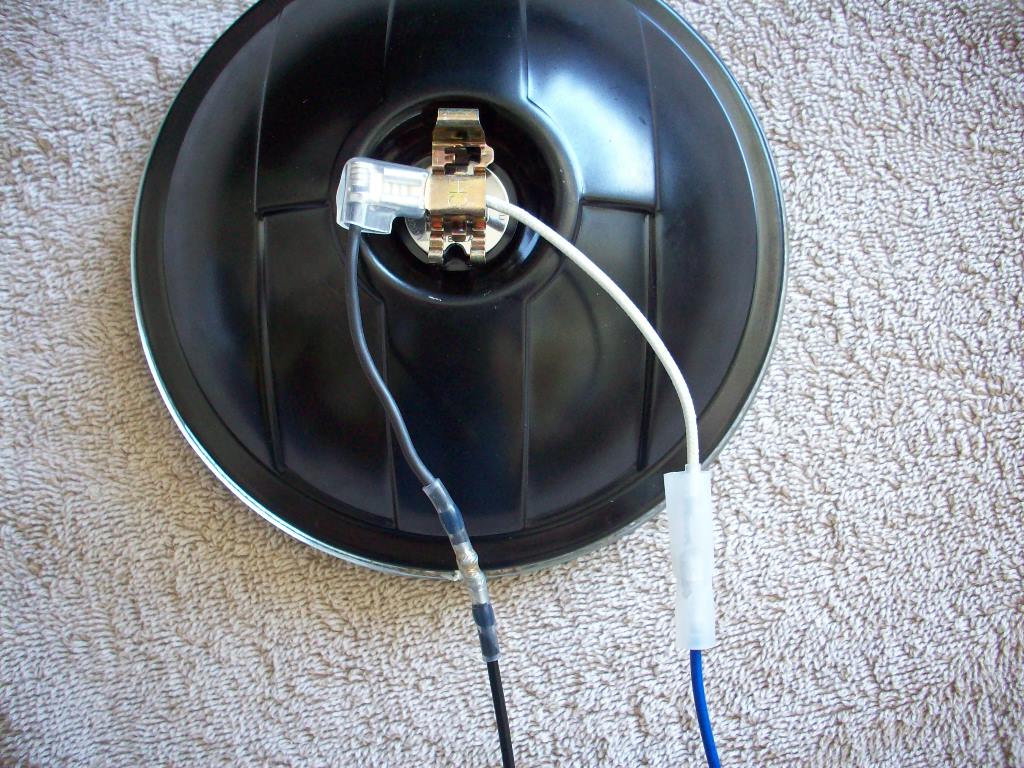
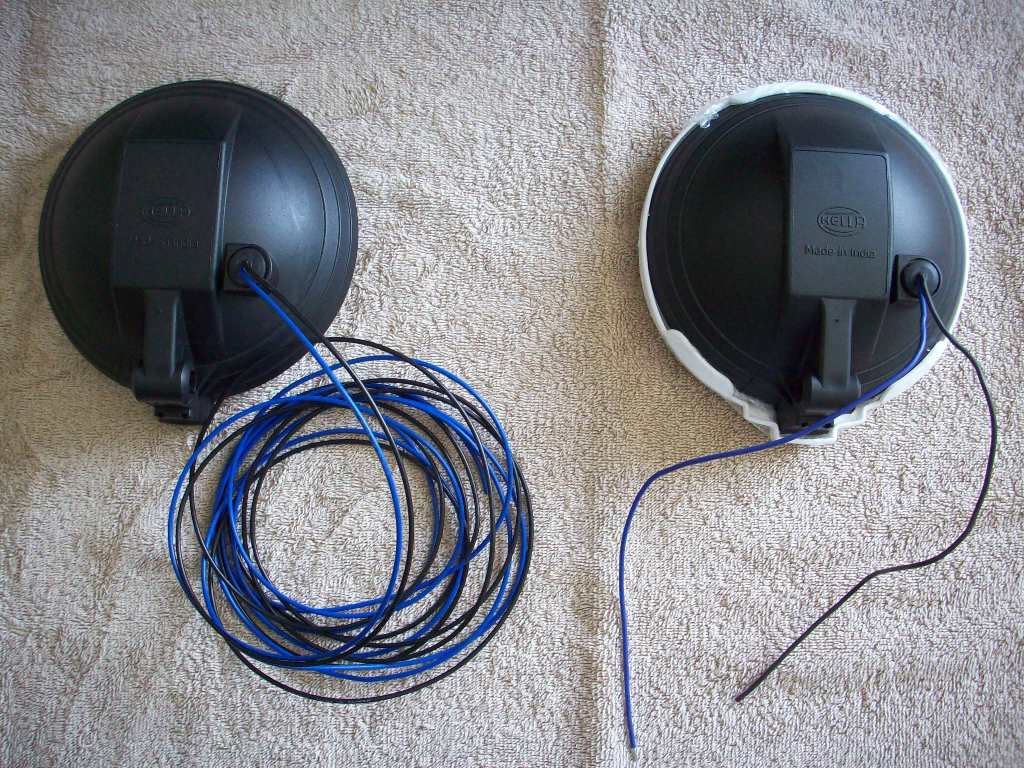
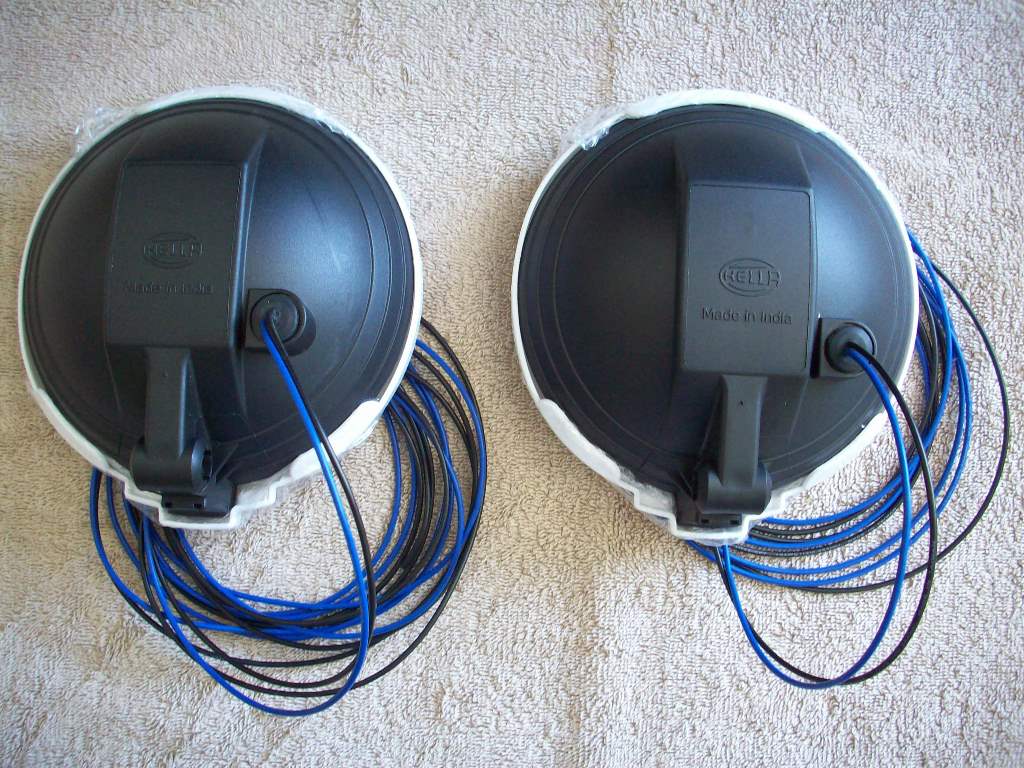
To get all the connections up into the engine bay I replaced the short leads with new colour coded wire to allow connection in the engine bay.
I ditched many of the provided connections in favor of Western Union wire splices and heat shrink soldered connections
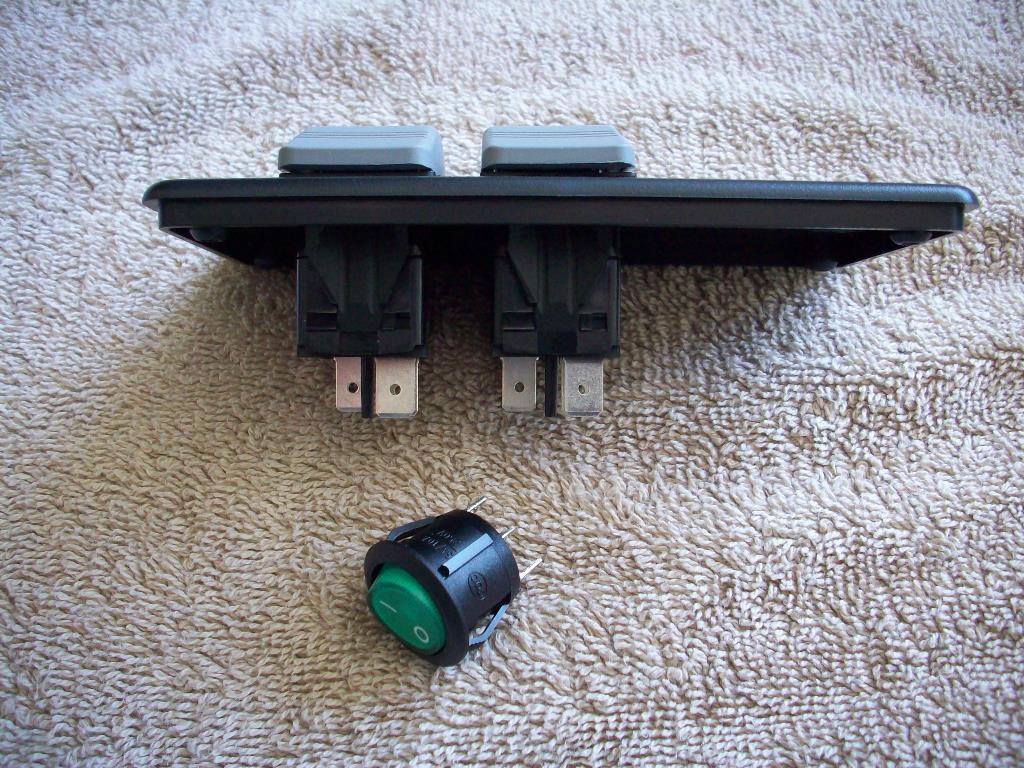
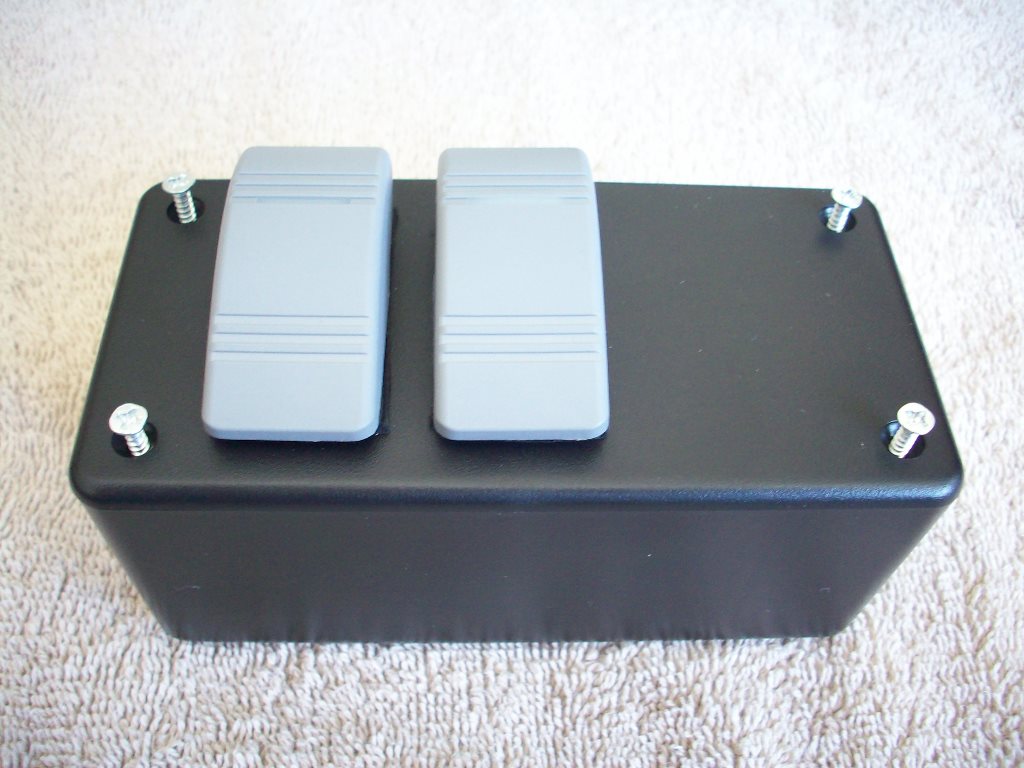
I bought a project box to house the switches and would place it below the center of the dash in front of the shifter.
I found the Westin Off-road Light Bar simple to mount and not an arm and a leg with no modification required
After consulting some members I used the Hood release grommet to get wires into the cab.
Lots of pictures to follow……

I did not want connections in the elements down near the bumper.
I did not want to cut or alter the dashboard.
I did not want to have to drill of modify the bumper to make something fit.
So with my list I set out to get things together to meet my criteria.
To get all the connections up into the engine bay I replaced the short leads with new colour coded wire to allow connection in the engine bay.
I ditched many of the provided connections in favor of Western Union wire splices and heat shrink soldered connections
I bought a project box to house the switches and would place it below the center of the dash in front of the shifter.
I found the Westin Off-road Light Bar simple to mount and not an arm and a leg with no modification required
After consulting some members I used the Hood release grommet to get wires into the cab.
Lots of pictures to follow……
Last edited by pafenton; 03-10-2013 at 08:46 PM.
#3
03-10-2013
Join Date: Jun 2011
Location: Sooke, BC
Posts: 74
Likes: 0
Received 0 Likes
on
0 Posts

#4
03-10-2013
Join Date: Jun 2011
Location: Sooke, BC
Posts: 74
Likes: 0
Received 0 Likes
on
0 Posts
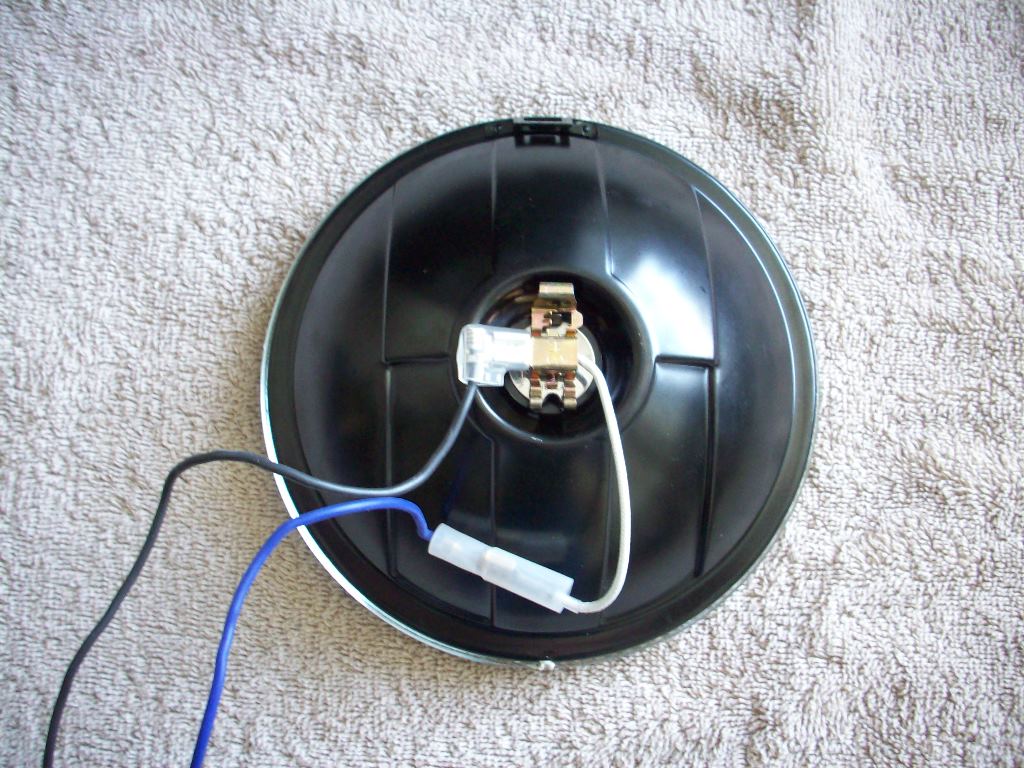
Hella 500ff Lights Cont.Engine Bay Wiring
I ran all the wires and placed the relay tight and high in the drivers side fender outboard the battery.
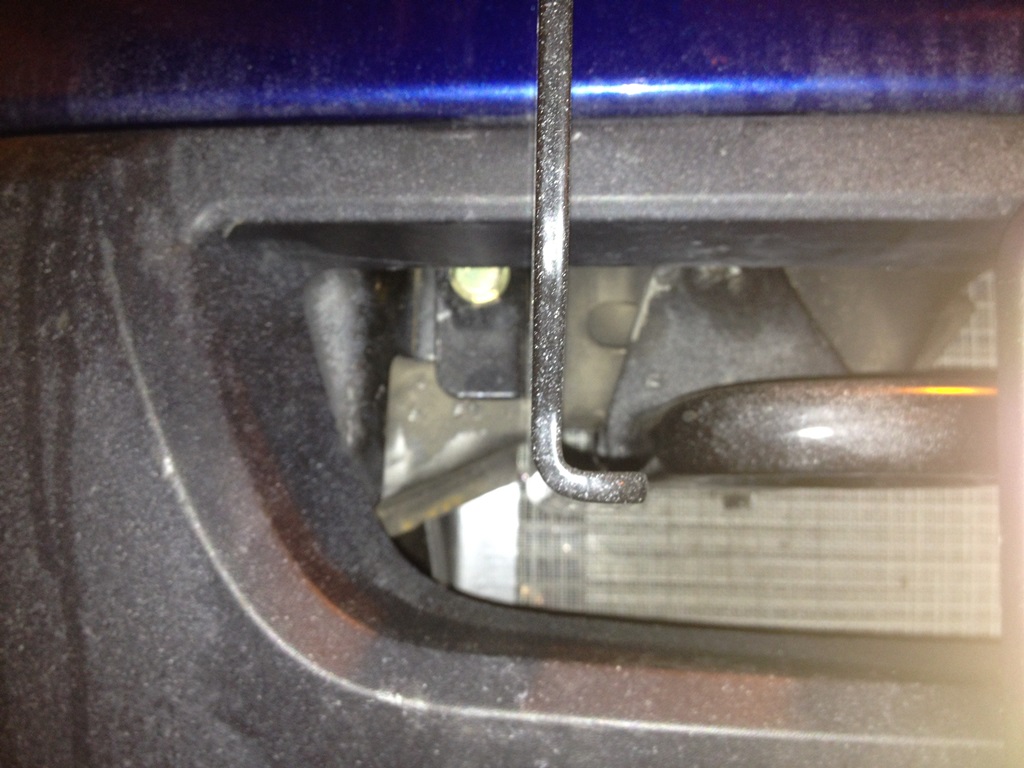
Using provided advice I ran the + 12 Volt (Green) taken from the High beem (Purple with Orange Stripe) from Drivers side headlamp and the load (Yellow) wires throught the firewall at the hood release cable grommet. I did this by pushing a 1/8 allen key from the inside to stretch the grommet and then made a small incision to allow the wires to be fed into the cab.
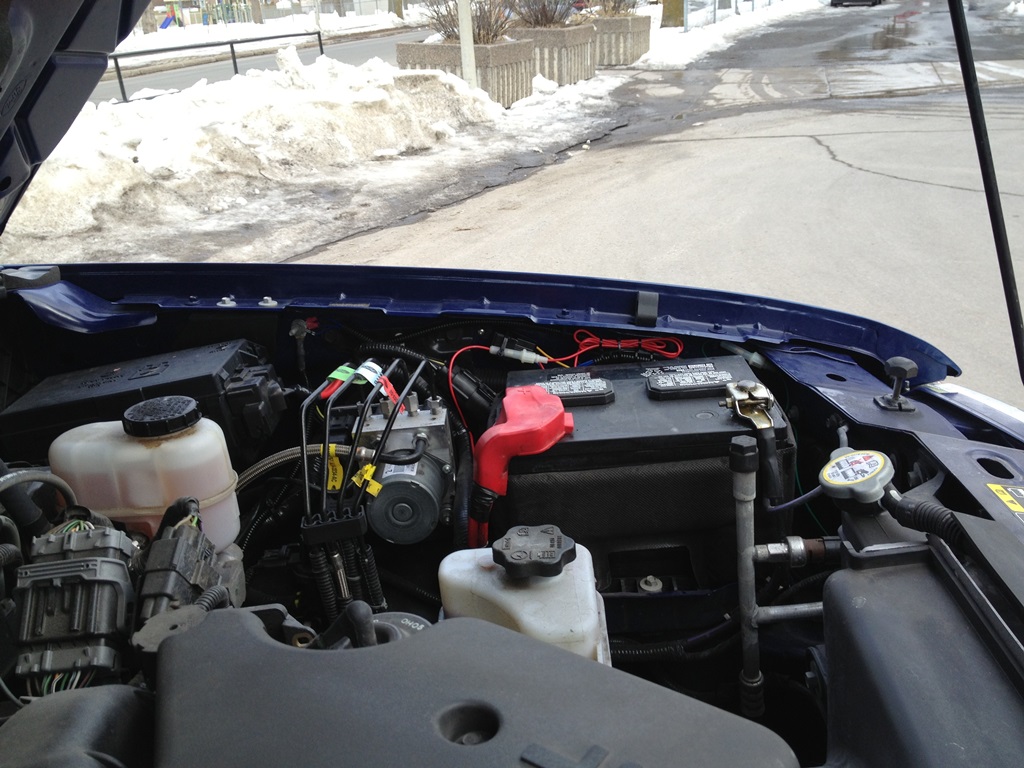
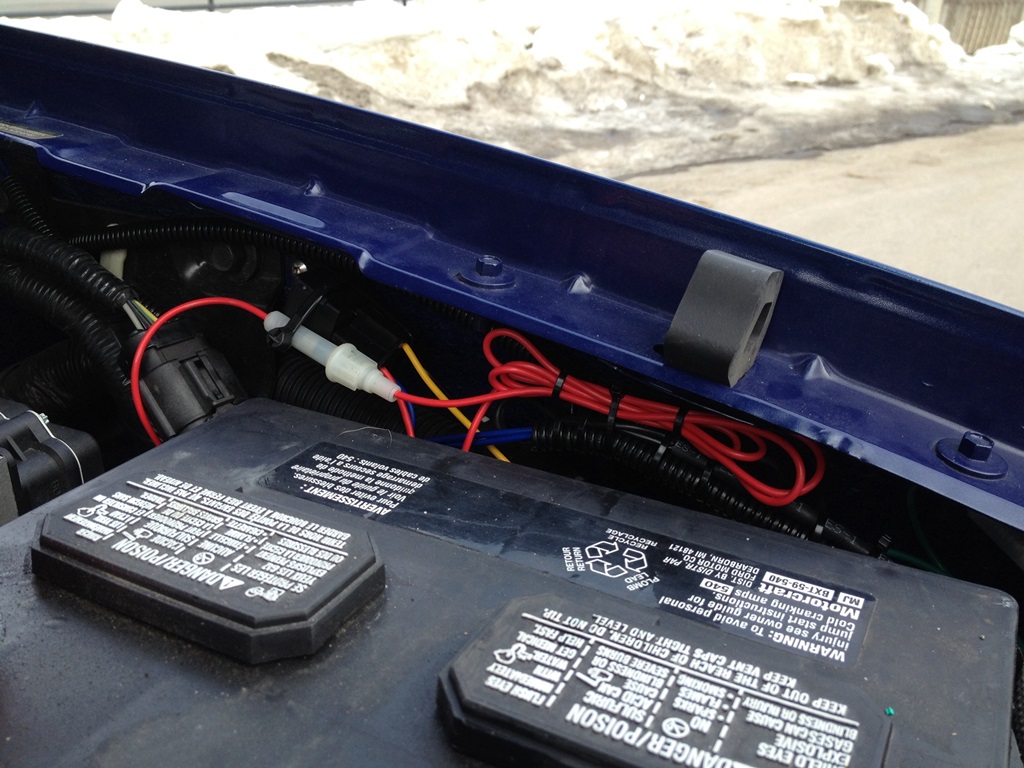
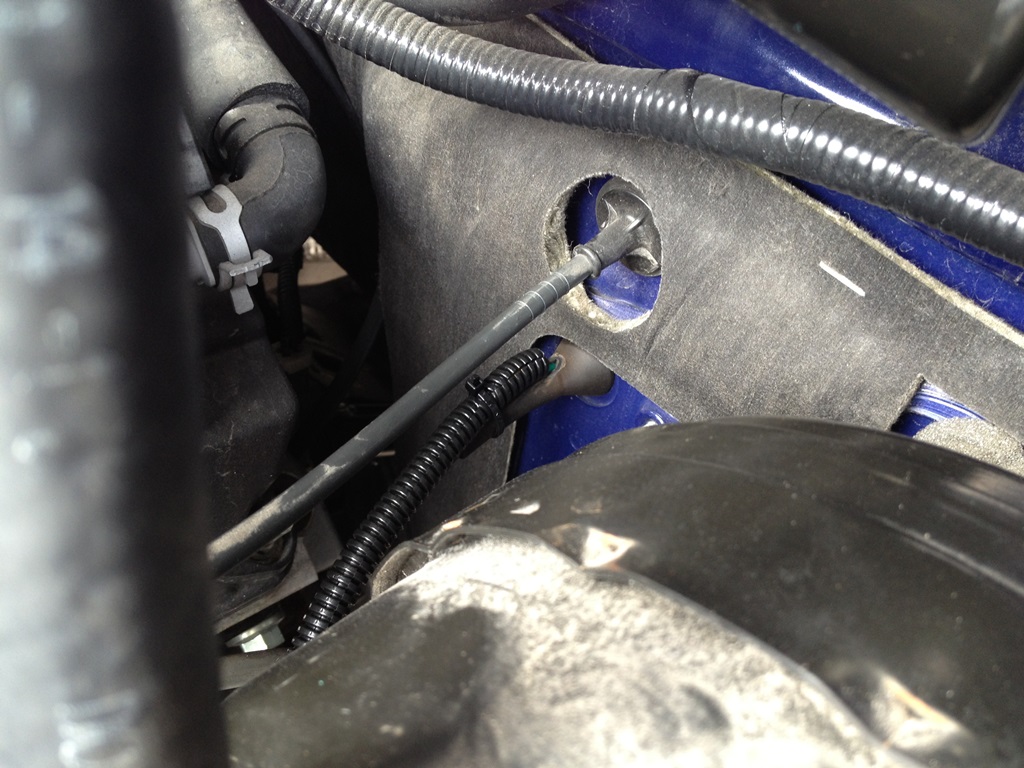
Using provided advice I ran the + 12 Volt (Green) taken from the High beem (Purple with Orange Stripe) from Drivers side headlamp and the load (Yellow) wires throught the firewall at the hood release cable grommet. I did this by pushing a 1/8 allen key from the inside to stretch the grommet and then made a small incision to allow the wires to be fed into the cab.
Last edited by pafenton; 03-11-2013 at 12:28 PM.

#6
03-10-2013
Join Date: Jun 2011
Location: Sooke, BC
Posts: 74
Likes: 0
Received 0 Likes
on
0 Posts
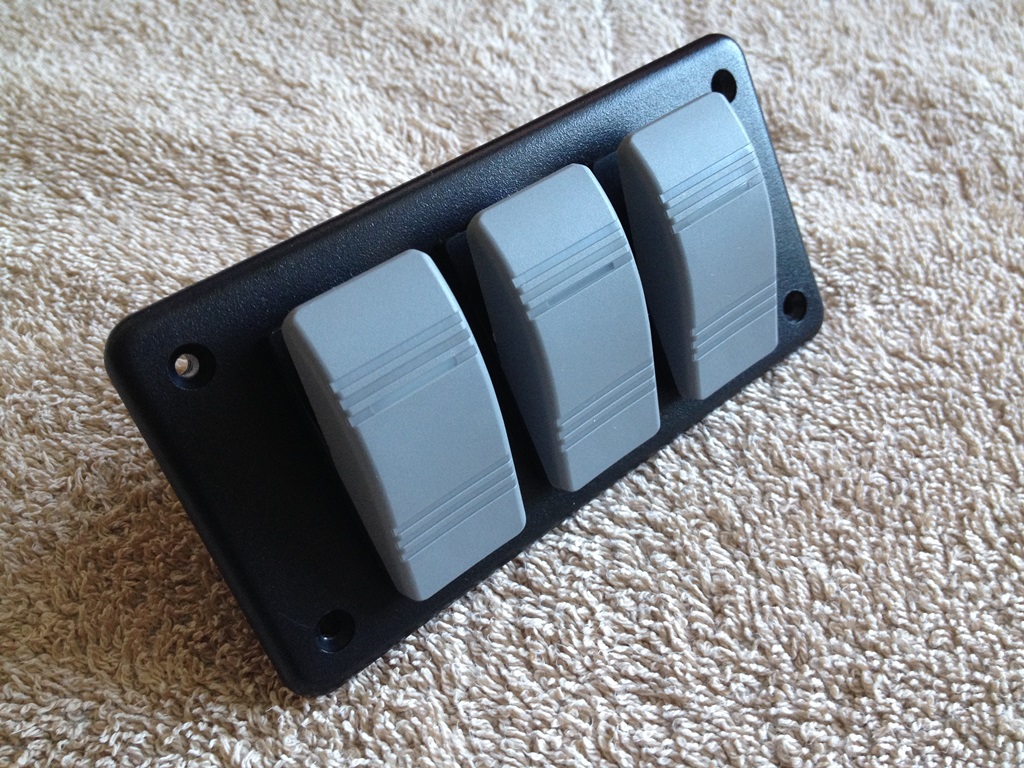
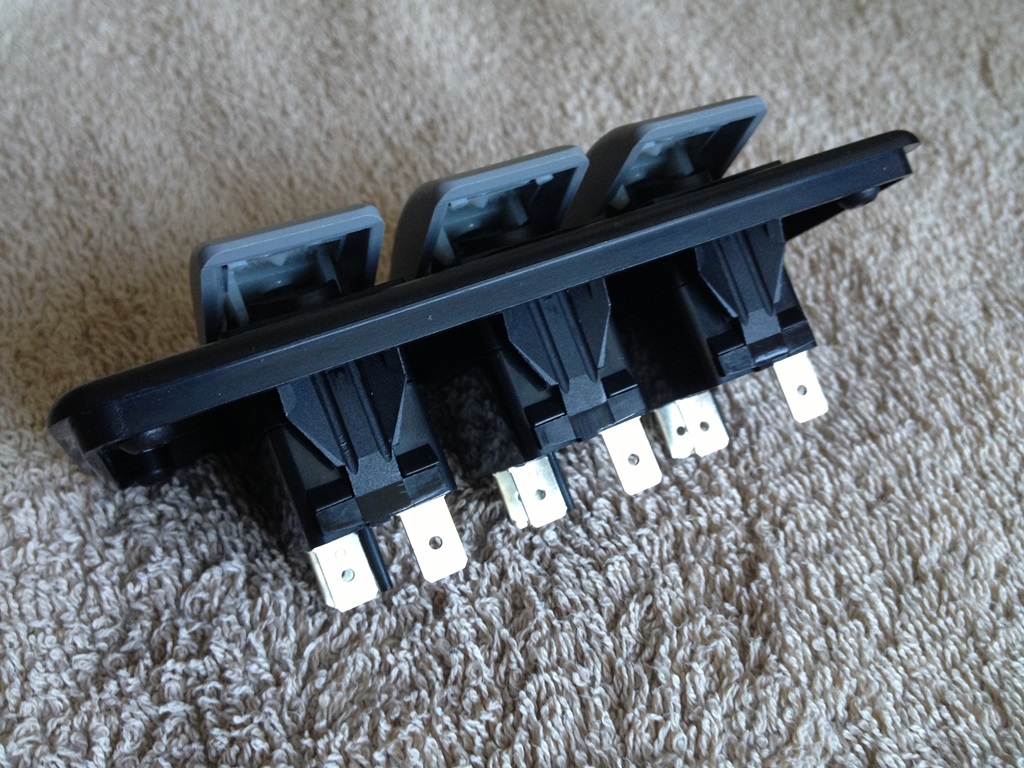
Switch Panel Location
I was not a fan of the switch supplied with the lights and wanted a switch with a higher rating and a rocker action, after getting frustrated with the internet and pricing I found the final switches at a local marine store that did mail order as well but a quick drive out I got three switches with the same ratings as another brand all in probably including my gas for less that the shipping another Ontario outlet wanted to ship from Burlington to Ottawa.
the Switches are Blue Sea Systems PN 8230 are LED indicated and are rated for 20 amps at 12 VDC
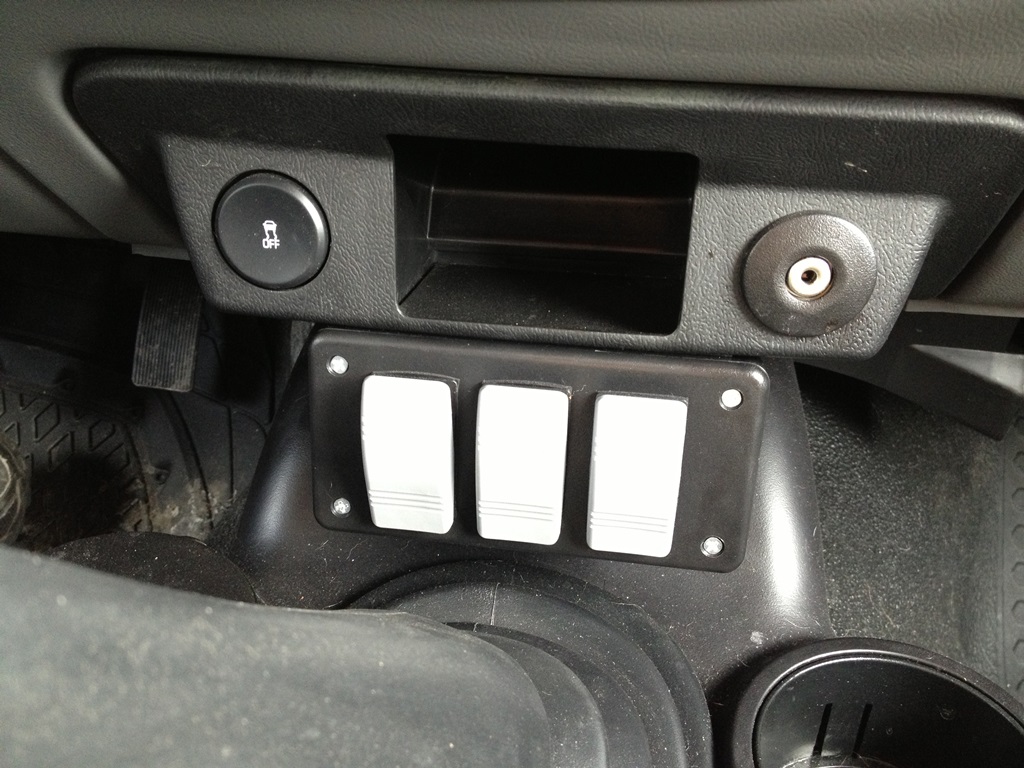
the Switches are Blue Sea Systems PN 8230 are LED indicated and are rated for 20 amps at 12 VDC
Last edited by pafenton; 03-10-2013 at 08:25 PM.


#10
03-10-2013
#12
03-10-2013
Join Date: Jun 2011
Location: Sooke, BC
Posts: 74
Likes: 0
Received 0 Likes
on
0 Posts
2006 Ford Ranger: A mild facelift for the '06 Ranger involved modest revisions to bumpers, grille, fenders, and lights.
I believe that the bumpers are steel prior to 2005, in the LMC truck cataloge you can see the differences the 2006 plus bumpers contain an impact bar under the bumper pad that you can see this is the colour matched part or black textured part your see on newer trucks.
for this reason the contruction underneath is different.
Hope this helps
Page 20 in the LMC Fall 2012 Catalog if you have one
#13
03-10-2013
#14
03-10-2013

#15
03-10-2013
Join Date: Jun 2011
Location: Sooke, BC
Posts: 74
Likes: 0
Received 0 Likes
on
0 Posts
I understand the cosmetic changes in 06
Towhook and bumpers are interchangeable in all 98+ Rangers, I don't recall any other mounting provisions that would be different.
I like it and think it would be a clean way to mount an LED bar, besides the tabs that everyone makes
Towhook and bumpers are interchangeable in all 98+ Rangers, I don't recall any other mounting provisions that would be different.
I like it and think it would be a clean way to mount an LED bar, besides the tabs that everyone makes
#16
03-11-2013
Me. Me ! 
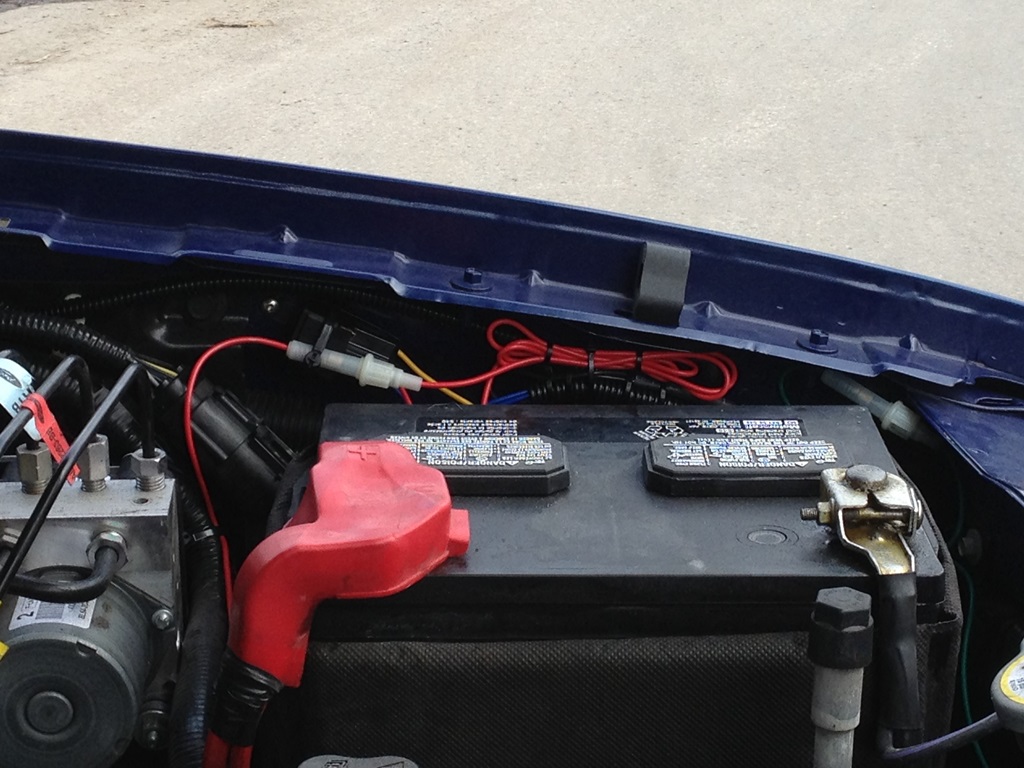
Since I hope you are running a relay (picture shows one) for the lights the switch need only carry approximately 2 or 3 amp rating. There are not a lot of good looking 12V switches in that amperage category so we can do with what ever one we like the looks of but 20 amps is not needed.
The relay in the battery picture is for the lights ?
The switch box idea is unique for the Ranger Forums, interesting the way you set it up.
What are the extra switches for ?
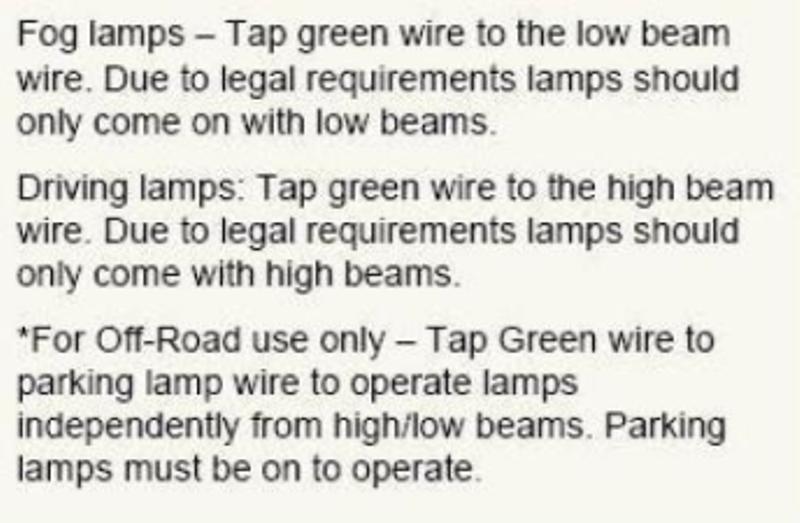
Why use the High Beam Wire, why not the Low Beam as OEM or the Parking Light wire for on all the time with any lights ?
Your method of getting the wires inside is a good one, nice look, minimal damage to the grommet. I wish there was other holes that we could open up to get a group of wire through the firewall.
I was not a fan of the switch supplied with the lights and wanted a switch with a higher rating and a rocker action, I found the final switches at a local marine store, I got three switches with the same ratings as another brand .
The Switches are Blue Sea Systems PN 8230 are LED indicated and are rated for 20 amps at 12 VDC
The Switches are Blue Sea Systems PN 8230 are LED indicated and are rated for 20 amps at 12 VDC
The relay in the battery picture is for the lights ?
The switch box idea is unique for the Ranger Forums, interesting the way you set it up.
What are the extra switches for ?
Using provided advice I ran the + 12 Volt (Green) taken from the High beem (Purple with Orange Stripe) from Drivers side headlamp and the load (Yellow) wires through the firewall at the hood release cable grommet. I did this by pussing a 1/8 allen key from the inside to stretch the grommet and then made a small incision to allow the wires to be fed into the cab.
Your method of getting the wires inside is a good one, nice look, minimal damage to the grommet. I wish there was other holes that we could open up to get a group of wire through the firewall.
#17
03-11-2013
Join Date: Jun 2011
Location: Sooke, BC
Posts: 74
Likes: 0
Received 0 Likes
on
0 Posts
The Switches were just a preference and yes there is a relay it is actually behind the fuse holder on the red lead, the Ty-wrap is lose around the relay so I can remove the fuse but hold it in place. I am a Marine Electrician in the Royal Canadian Navy by trade.
The Two addition switches will be used for a set of worklights facing behind the truck mounted on my rack, and cargo lamp under the rack for the bed.
As for use of the High Beam lead that is as per Provincial Regulations Driving lights may only be used with High Beam lights so when I return to BC this summer there will be no issues with inspections. The supplied Hella instructions cover this.
I wired a previous truck in the same manner, the bonus is you can never leave them on when using the High beam lead to trigger the relay as they turn off automatically when you go back to low beam and you don't offend oncoming traffic.
I had bought some grommets to make my own hole but try and get a drill in there, and I even have a compact dewalt.
The project box comes from the Source(Radio Shack) and was six bucks it gives you a choice of the black plastic you see or an aluminum plate for the front cover. I choose the black obviously and the grey switches also tie in with the dash and interior colours.
Last edited by pafenton; 03-11-2013 at 08:35 AM.
#18
03-11-2013
Join Date: Jun 2011
Location: Sooke, BC
Posts: 74
Likes: 0
Received 0 Likes
on
0 Posts
About the switches at twenty amps they are overkill but when you consider they are marine grade, dust and waterproof with a panel gasket provided it is a good chance I will never have to replace them. The box is perched between to cup holders so it was a little insurance to boot. At less than 10 dollars a pop they were only a dollar or two more than what is available at Canadian Tire or the local auto parts store and almost half the price of Cole Hersee or Daystar switches that are almost identical.
Also if I want to run a load through them I can for worklights or the cargo light bcause the rating is more that sufficient.
Also if I want to run a load through them I can for worklights or the cargo light bcause the rating is more that sufficient.
Last edited by pafenton; 03-11-2013 at 02:08 PM.
#19
03-11-2013
The Switches were just a preference and yes there is a relay it is actually behind the fuse holder on the red lead, the Ty-wrap is lose around the relay so I can remove the fuse but hold it in place. I am a Marine Electrician in the Royal Canadian Navy by trade.
The Two addition switches will be used for a set of worklights facing behind the truck mounted on my rack, and cargo lamp under the rack for the bed.
As for use of the High Beam lead that is as per Provincial Regulations Driving lights may only be used with High Beam lights so when I return to BC this summer there will be no issues with inspections. The supplied Hella instructions cover this.
I wired a previous truck in the same manner, the bonus is you can never leave them on when using the High beam lead to trigger the relay as they turn off automatically when you go back to low beam and you don't offend oncoming traffic.
I had bought some grommets to make my own hole but try and get a drill in there, and I even have a compact dewalt.
The project box comes from the Source(Radio Shack) and was six bucks it gives you a choice of the black plastic you see or an aluminum plate for the front cover. I choose the black obviously and the grey switches also tie in with the dash and interior colours.
The Two addition switches will be used for a set of worklights facing behind the truck mounted on my rack, and cargo lamp under the rack for the bed.
As for use of the High Beam lead that is as per Provincial Regulations Driving lights may only be used with High Beam lights so when I return to BC this summer there will be no issues with inspections. The supplied Hella instructions cover this.
I wired a previous truck in the same manner, the bonus is you can never leave them on when using the High beam lead to trigger the relay as they turn off automatically when you go back to low beam and you don't offend oncoming traffic.
I had bought some grommets to make my own hole but try and get a drill in there, and I even have a compact dewalt.
The project box comes from the Source(Radio Shack) and was six bucks it gives you a choice of the black plastic you see or an aluminum plate for the front cover. I choose the black obviously and the grey switches also tie in with the dash and interior colours.
Ok on that.
Good job and looks good.
Ltr
#20
03-11-2013
Join Date: Jun 2011
Location: Sooke, BC
Posts: 74
Likes: 0
Received 0 Likes
on
0 Posts
I understand the cosmetic changes in 06
Towhook and bumpers are interchangeable in all 98+ Rangers, I don't recall any other mounting provisions that would be different.
I like it and think it would be a clean way to mount an LED bar, besides the tabs that everyone makes
Towhook and bumpers are interchangeable in all 98+ Rangers, I don't recall any other mounting provisions that would be different.
I like it and think it would be a clean way to mount an LED bar, besides the tabs that everyone makes

#23
06-16-2013

Join Date: Jun 2013
Location: Elverta, CA
Posts: 1
Likes: 0
Received 0 Likes
on
0 Posts

Thread
Thread Starter
Forum
Replies
Last Post
98liftedranger
OLD - Interior, Exterior, Electrical, & Misc.
4
10-01-2011 10:36 AM
For Sale: HELLA 500FF (FL)
gt.teamnog
OLD - Interior, Exterior, Electrical, & Misc.
2
11-20-2009 09:11 AM
korey89
General Ford Ranger Discussion
19
08-05-2008 12:52 AM


