How-To: Lincoln Town Car Turn Signal Switch
#1
 02-06-2011


How-To: Lincoln Town Car Turn Signal Switch
Ok so this mod is to complement the mod for the Lincoln Town Car shifter found here
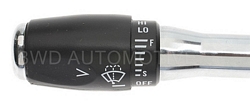
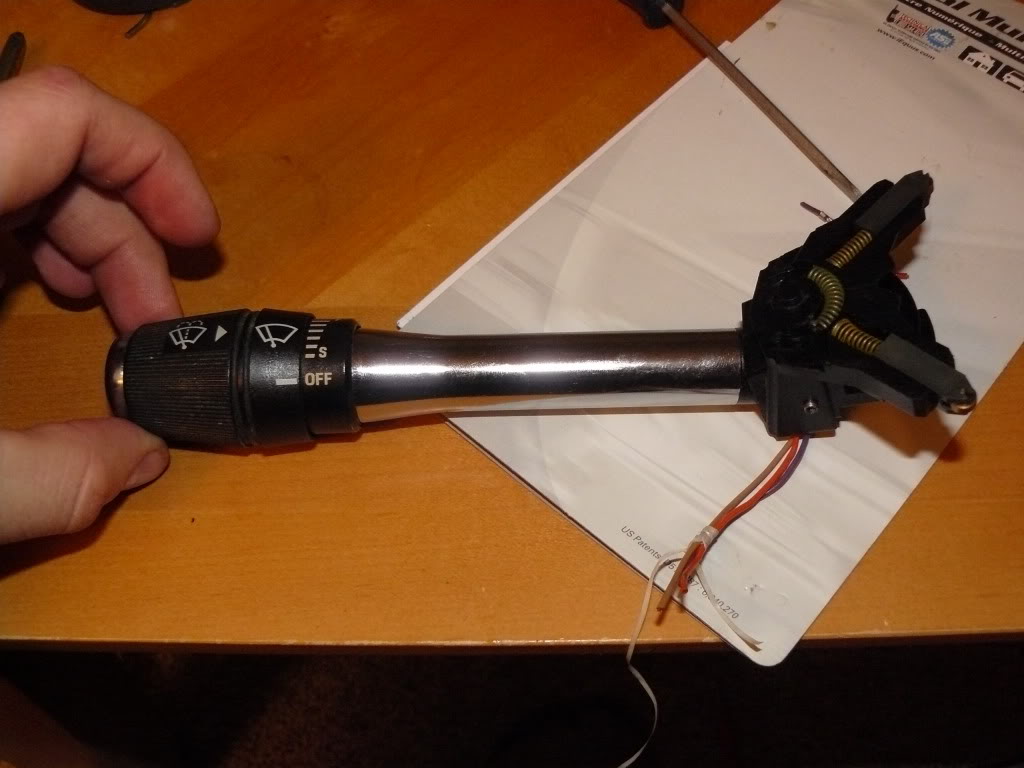
The reason for the mod is because the stalk of the switch looks better than the Rangers flat black.


Differences in Switches
Now from what I've researched there are two different versions of this switch on the Town Car/Crown Vic/Grand Marquis:
1990-1994 Town Car/Crown Vic/Grand Marquis
This switch is the most identical to the Rangers, the **** is the same but the stalk is chrome.
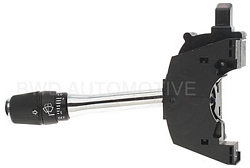
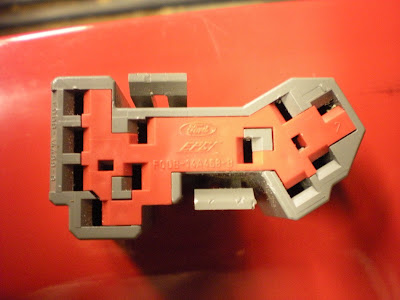
Top connector:
1995-1997 Town Car/Crown Vic/Grand Marquis
This switch has a different **** (it doesn't have the ridges) and the stalk is also chrome. The top connector changed to add another pin slot.
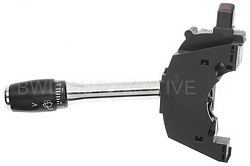
Top connector:
How to's for different year Rangers
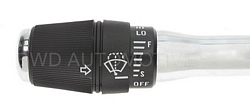
1995-1998 Rangers
90-94 Switch
Plug and Play....your done.......easy.
95-97 Switch
You have to get a new connector and repin it to your existing harness. Translate the wires over to the exact same spots on the new connector except for two wires: Light blue and White/Red.
This is where to relocate these two wires:

1999-2003 Rangers
90-94 Switch
The plug and wiring is the exact same but for one BIG problem. Ford changed the internal resistances shown on the wires for each interval on the wiper part. If you hooked this up with your stock GEM your wipers wouldn't work until HIGH is selected and then they wouldn't be able to shut off.
Only fix for this is either change out the resistors (check post by mikerider below) or swap your GEM to a 1998 or older one. I swapped mine to a 1998 and the wipers work fine but the GEM I swapped in had a different Speed Sensor calibration so the speedometer and odometer are off. So if you swap GEMS your either gonna have to find a truck with the same speed calibration or have yours calibrated.
****Note there may be more problems to face by swapping GEMs.*******
95-97 Switch
On this one your gonna have to repin to a new connector as stated above AND do the GEM swap (or guts swap below).
If anyone knows of a fix to the differences in resistances problem let me know.
The reason for the mod is because the stalk of the switch looks better than the Rangers flat black.
Differences in Switches
Now from what I've researched there are two different versions of this switch on the Town Car/Crown Vic/Grand Marquis:
1990-1994 Town Car/Crown Vic/Grand Marquis
This switch is the most identical to the Rangers, the **** is the same but the stalk is chrome.
Top connector:
1995-1997 Town Car/Crown Vic/Grand Marquis
This switch has a different **** (it doesn't have the ridges) and the stalk is also chrome. The top connector changed to add another pin slot.
Top connector:
How to's for different year Rangers
1995-1998 Rangers
90-94 Switch
Plug and Play....your done.......easy.
95-97 Switch
You have to get a new connector and repin it to your existing harness. Translate the wires over to the exact same spots on the new connector except for two wires: Light blue and White/Red.
This is where to relocate these two wires:
1999-2003 Rangers
90-94 Switch
The plug and wiring is the exact same but for one BIG problem. Ford changed the internal resistances shown on the wires for each interval on the wiper part. If you hooked this up with your stock GEM your wipers wouldn't work until HIGH is selected and then they wouldn't be able to shut off.
Only fix for this is either change out the resistors (check post by mikerider below) or swap your GEM to a 1998 or older one. I swapped mine to a 1998 and the wipers work fine but the GEM I swapped in had a different Speed Sensor calibration so the speedometer and odometer are off. So if you swap GEMS your either gonna have to find a truck with the same speed calibration or have yours calibrated.
****Note there may be more problems to face by swapping GEMs.*******
95-97 Switch
On this one your gonna have to repin to a new connector as stated above AND do the GEM swap (or guts swap below).
If anyone knows of a fix to the differences in resistances problem let me know.
Last edited by sheltonfilms; 02-09-2011 at 11:35 PM.
#2
02-09-2011
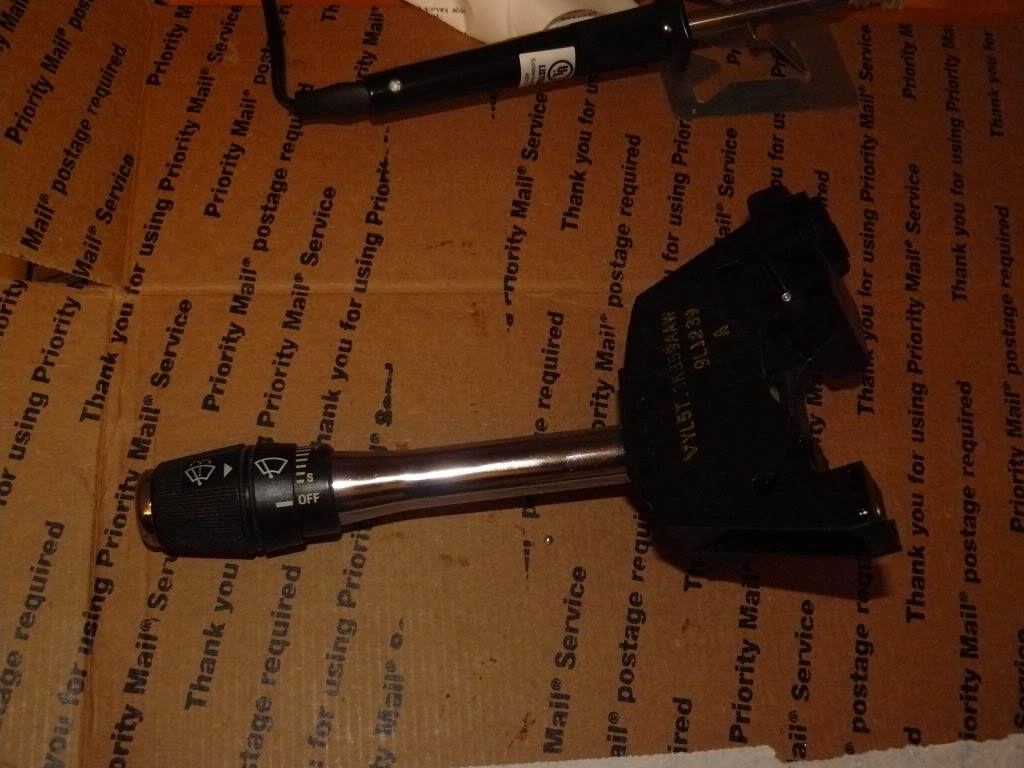
well I tore into mine tonight, I got the internals switched and it bench tests well I plan to install it this weekend and make sure everything is working properly.
on to the pics
pull out the screws and carefully pull apart the assembly.
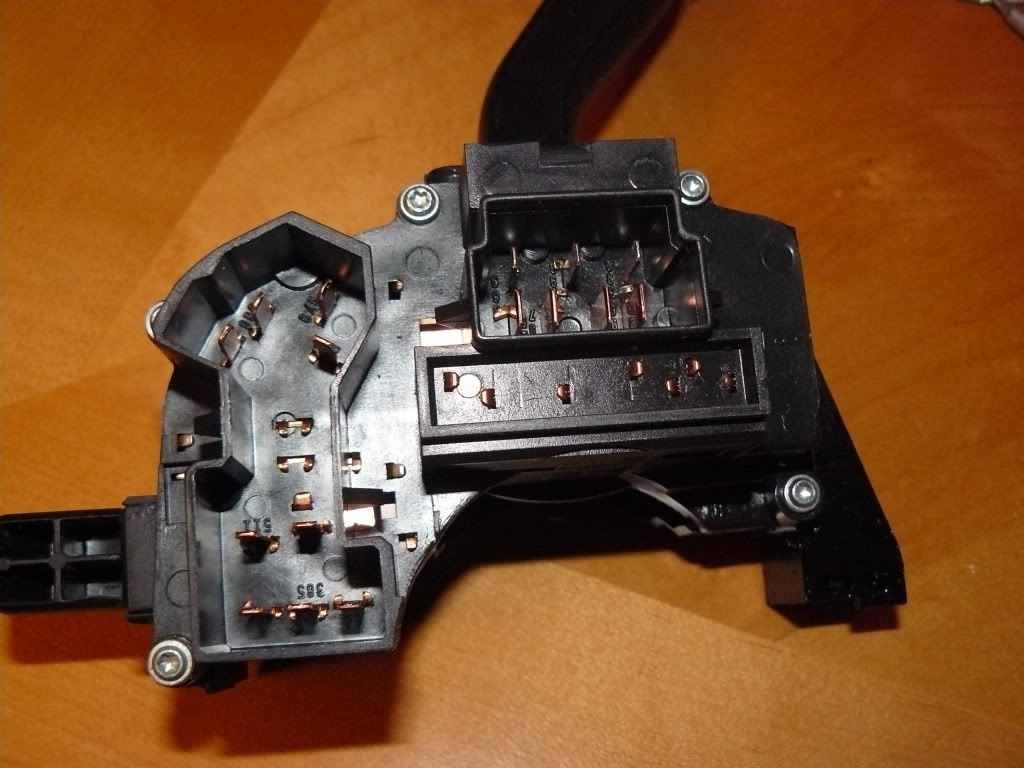
Internals
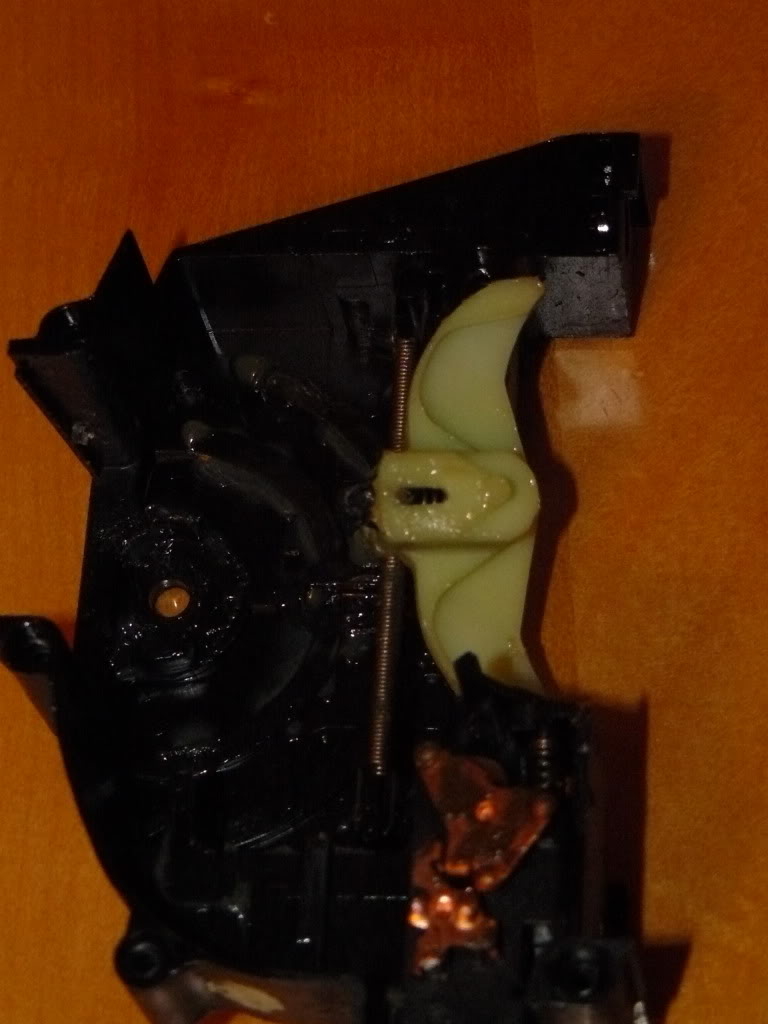
remove the connection and stalk, cut off the wire connector with enough wire to reconnect later)
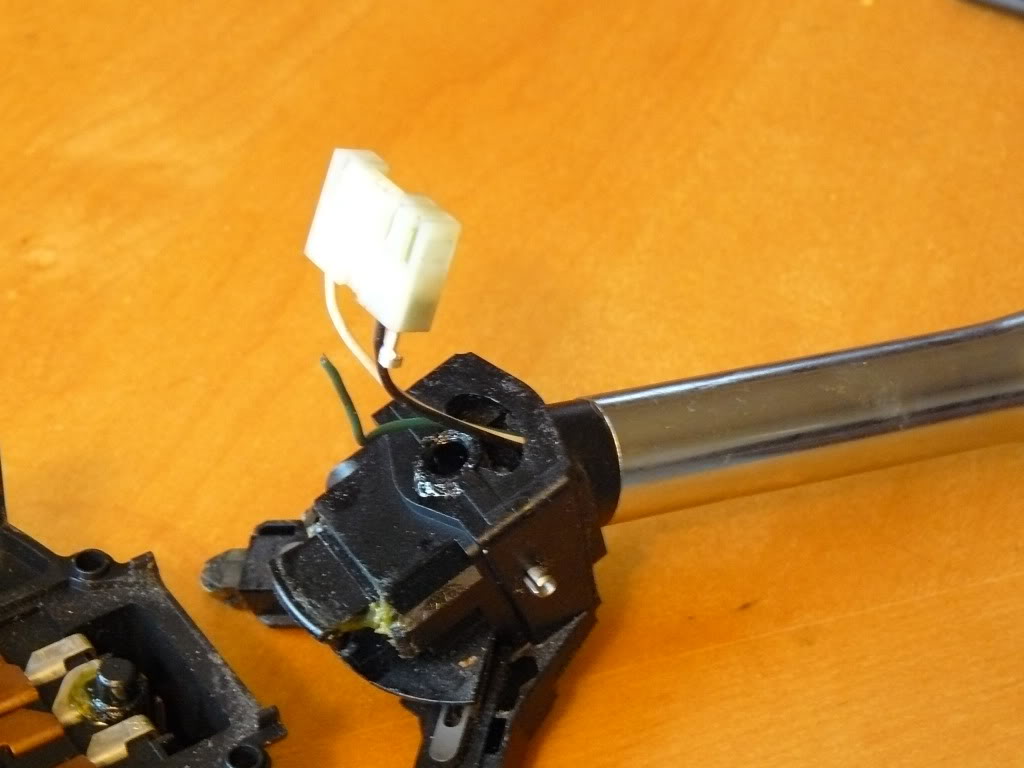
Remove the end cap off the stalk
disassemble the switch

remove wiring (ranger left crown vic right)
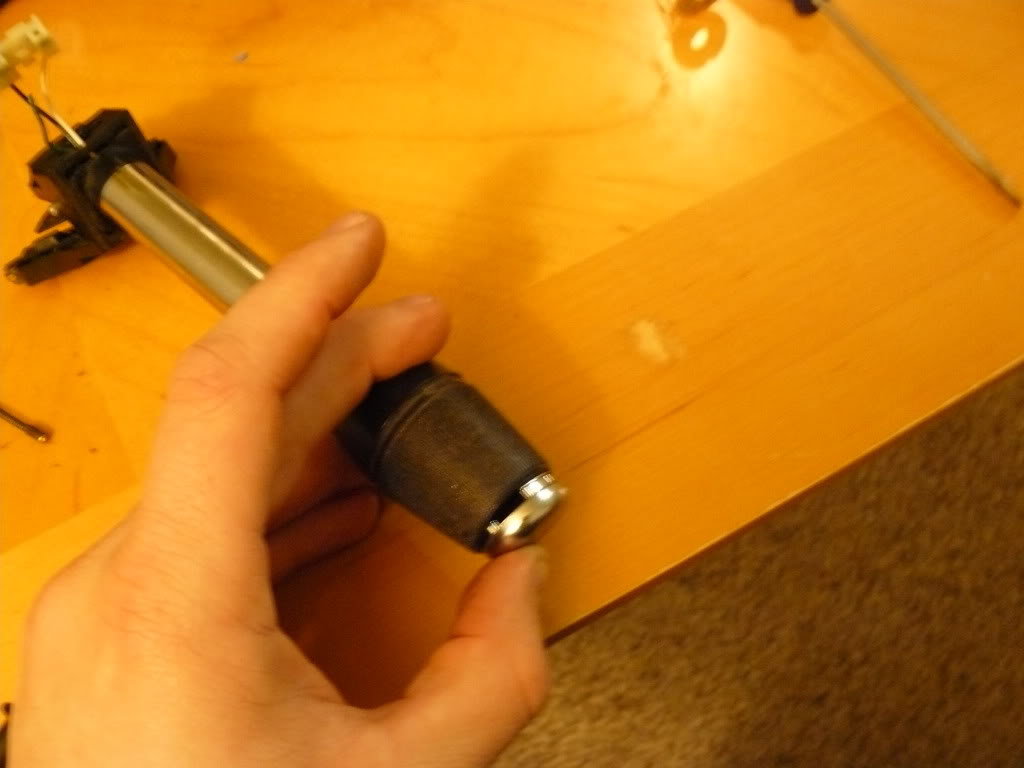
reassemble ranger internals in crown vic stalk, solder connector back together then assemble crown vic stalk in ranger housing.
I will report back once its in the truck
on to the pics
pull out the screws and carefully pull apart the assembly.
Internals
remove the connection and stalk, cut off the wire connector with enough wire to reconnect later)
Remove the end cap off the stalk
disassemble the switch
remove wiring (ranger left crown vic right)
reassemble ranger internals in crown vic stalk, solder connector back together then assemble crown vic stalk in ranger housing.
I will report back once its in the truck
#3
02-09-2011
So pretty much you are just changing out the stalk housing everything else is the Ranger (main housing and guts). FREAKING AWESOME!!!!!!!!!!
I've been riding around with mine now but my speeds off because of the other GEM but this is awesome!
Thanks for the post
Edit: Maybe you should make these and sell them!
I've been riding around with mine now but my speeds off because of the other GEM but this is awesome!
Thanks for the post
Edit: Maybe you should make these and sell them!
Last edited by sheltonfilms; 02-09-2011 at 11:31 PM.
#4
02-09-2011
Was there anyway to repin that white connector without cutting it?
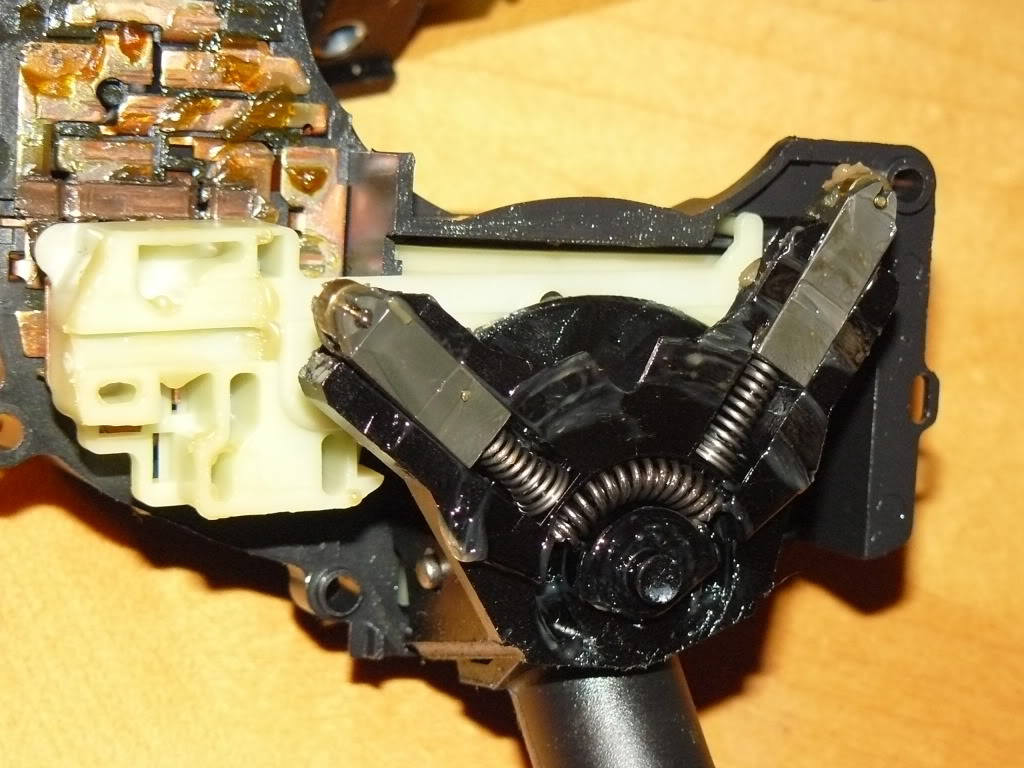
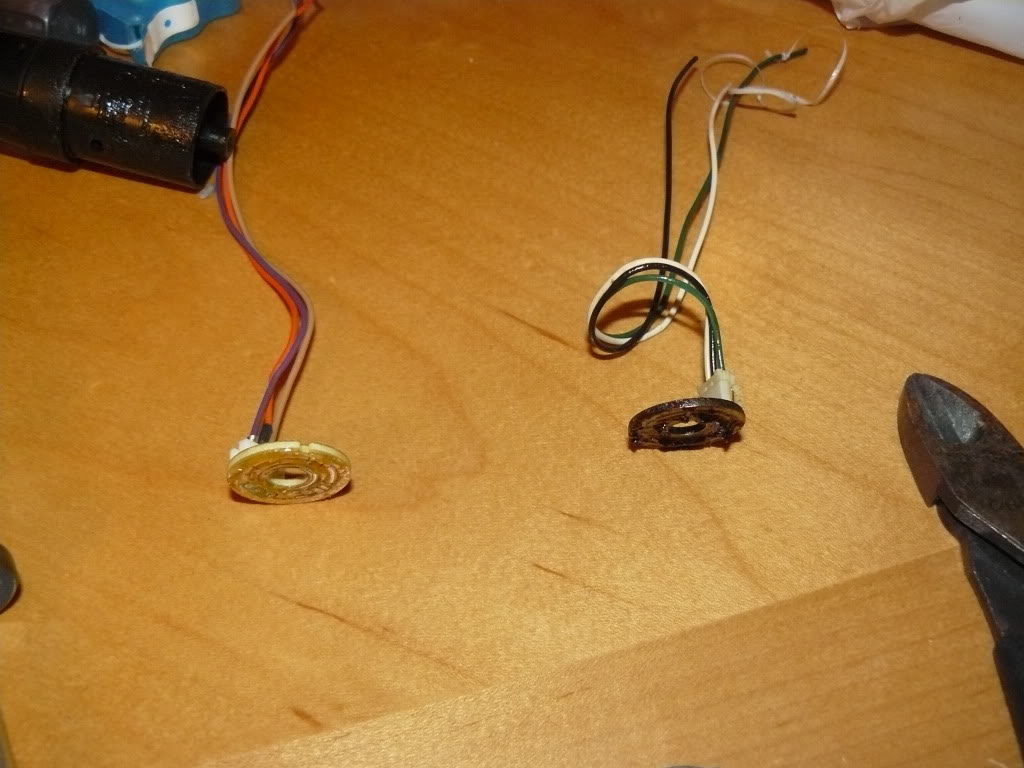
Also from the pictures it looks like you can disconnect the resistor disk where the wires connect to it. If this is so all you would have to do is switch just the disks out. But you would still probably need to take the main housing apart to get the ring some slack to come out it looks like. (speaking of, how did you get the disk out? I took apart the **** on the spare and pulled the white contact shaft out. Do you just push on the wires on the end of the stalk to get it out?)
Also from the pictures it looks like you can disconnect the resistor disk where the wires connect to it. If this is so all you would have to do is switch just the disks out. But you would still probably need to take the main housing apart to get the ring some slack to come out it looks like. (speaking of, how did you get the disk out? I took apart the **** on the spare and pulled the white contact shaft out. Do you just push on the wires on the end of the stalk to get it out?)
Last edited by sheltonfilms; 02-10-2011 at 12:55 AM.
#5
02-10-2011
Was there anyway to repin that white connector without cutting it?
Also from the pictures it looks like you can disconnect the resistor disk where the wires connect to it. If this is so all you would have to do is switch just the disks out. But you would still probably need to take the main housing apart to get the ring some slack to come out it looks like. (speaking of, how did you get the disk out? I took apart the **** on the spare and pulled the white contact shaft out. Do you just push on the wires on the end of the stalk to get it out?)
Also from the pictures it looks like you can disconnect the resistor disk where the wires connect to it. If this is so all you would have to do is switch just the disks out. But you would still probably need to take the main housing apart to get the ring some slack to come out it looks like. (speaking of, how did you get the disk out? I took apart the **** on the spare and pulled the white contact shaft out. Do you just push on the wires on the end of the stalk to get it out?)
To get the disc out I used a bike spoke, I ran it up from the back side and pushed the disc out. I bet a coat hanger would work well to, it took some work to get the one out of the crown vic shaft.
#6
02-10-2011

Only fix for this is either change out the resistors (check post by mikerider below) or swap your GEM to a 1998 or older one. I swapped mine to a 1998 and the wipers work fine but the GEM I swapped in had a different Speed Sensor calibration so the speedometer and odometer are off.
I have no idea what a dealer would charge but the actual procedure is very simple.
#7
02-10-2011
The speedo/odo calibration in the 1998~2000 RABS GEM/CTM can be fixed through the Data Link Connector using a dealer tool such as an NGS, WDS, IDS or equivalent. All you need to do is change the "revs per mile" number in the GEM to the correct value for the tire on the truck. The revs/mile spec can usually be found on the tire manufacturer's website (measured and exact) or you can use a calculated approximation from a tire size calculator (plenty close enough).
I have no idea what a dealer would charge but the actual procedure is very simple.
I have no idea what a dealer would charge but the actual procedure is very simple.
#8
02-10-2011
No way that I saw to do it with out cutting and re soldering, the clips on both ends are to big to fit through the small holes in the stalk.
To get the disc out I used a bike spoke, I ran it up from the back side and pushed the disc out. I bet a coat hanger would work well to, it took some work to get the one out of the crown vic shaft.
To get the disc out I used a bike spoke, I ran it up from the back side and pushed the disc out. I bet a coat hanger would work well to, it took some work to get the one out of the crown vic shaft.
#9
02-10-2011
There may be aftermarket tools but I have only used the NGS+ Ford tool. These are obsolete for the newest Fords but still work fine on Rangers like yours or mine. You can usually find the NGS+ on eBay for about $400~800. After watching eBay for about a year, I lucked out and finally got a good deal on a nice, nearly new one with the case and all of the necessary data cards and cables.
#10
02-10-2011
#12
02-10-2011
There may be aftermarket tools but I have only used the NGS+ Ford tool. These are obsolete for the newest Fords but still work fine on Rangers like yours or mine. You can usually find the NGS+ on eBay for about $400~800. After watching eBay for about a year, I lucked out and finally got a good deal on a nice, nearly new one with the case and all of the necessary data cards and cables.
Good job. I'm gonna do some gutting this weekend so I can put my factory GEM back in so I get the right speedometer readout.
#13
02-10-2011
I will get some more pics when I get my shifter installed.
#14
02-10-2011
#15
02-10-2011
no not at all, everything just fell into place for me. you have to do it the right way though other wise I could see it being tricky, get the stalk and all the contacts assembled in the lower housing then drop the cover with the connectors on top of it.
#16
02-12-2011
Picked up a resistor disk out of a 1999 Taurus switch today (I want to keep my factory ranger one as a backup).
I took the Lincoln switch apart and I was able to unpin the bigger end connector and snake the pins through the arm so that I had enough slack to switch the disk. Switched the disk and I was going to swap the arm over to a 1998 explorer switch I had laying around but I noticed that the contacts on the newer switches are soldered in. Same connector just solder together. Well I don't have my soldering iron handy to desolder the connector so that I can simply just plug it in so I ended up just using the Lincoln housing. So it is pretty much the lincoln switch with a 1999+ resistor disk.
I took the Lincoln switch apart and I was able to unpin the bigger end connector and snake the pins through the arm so that I had enough slack to switch the disk. Switched the disk and I was going to swap the arm over to a 1998 explorer switch I had laying around but I noticed that the contacts on the newer switches are soldered in. Same connector just solder together. Well I don't have my soldering iron handy to desolder the connector so that I can simply just plug it in so I ended up just using the Lincoln housing. So it is pretty much the lincoln switch with a 1999+ resistor disk.

Thread
Thread Starter
Forum
Replies
Last Post
mikerider
OLD - Interior, Exterior, Electrical, & Misc.
5
03-30-2011 03:32 PM
sheltonfilms
Interior, Exterior, & Electrical
2
02-05-2011 01:42 AM
For Sale: 04+ wiper and turn signal switch (MN)
malydeen
OLD - Interior, Exterior, Electrical, & Misc.
1
01-19-2010 07:56 PM


