Easy LED cluster that looks great
#1
 06-03-2010


Easy LED cluster that looks great
Found this on the explorer forum, that looks damn good for just drop in LED's. I might have to try it since one of mine are burnt out.
This is my second and hopefully much more helpful writeup on converting the 95-01 gauge cluster to LEDs. I have tried 3 different types of 12v wedge based 194 replacements and I have finally found the one that puts out enough light and lights up the cluster evenly.
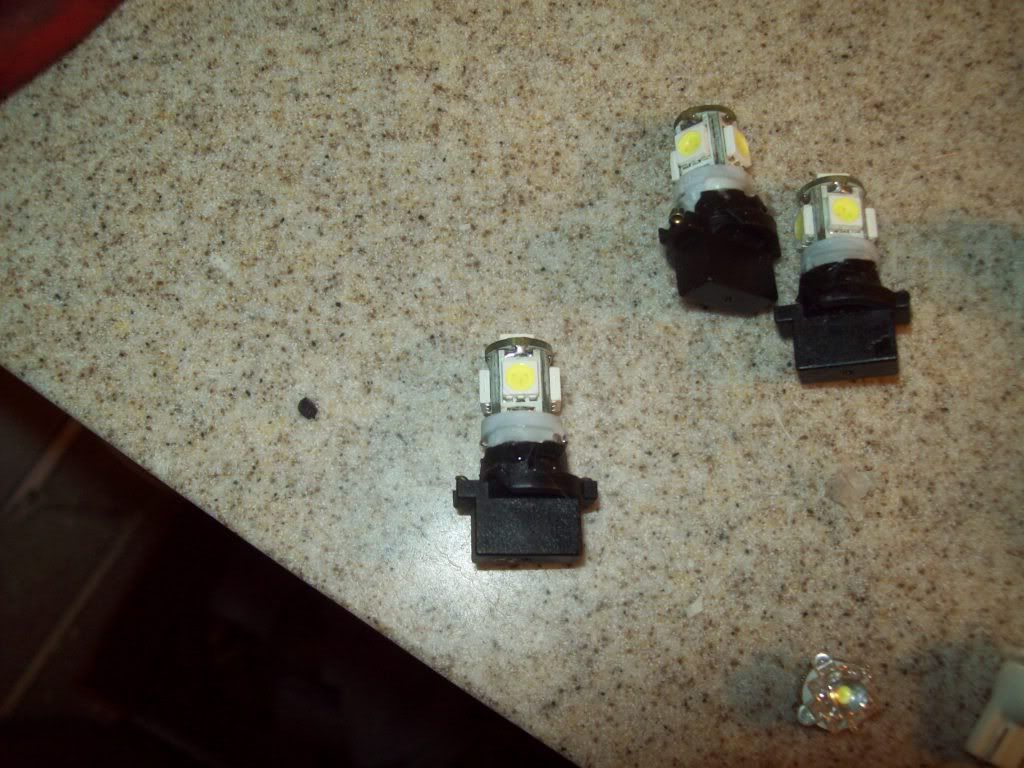
Here were my candidates.
From Left to Right: Inverted Wedge LED, Refractor LED, SMD LEDs
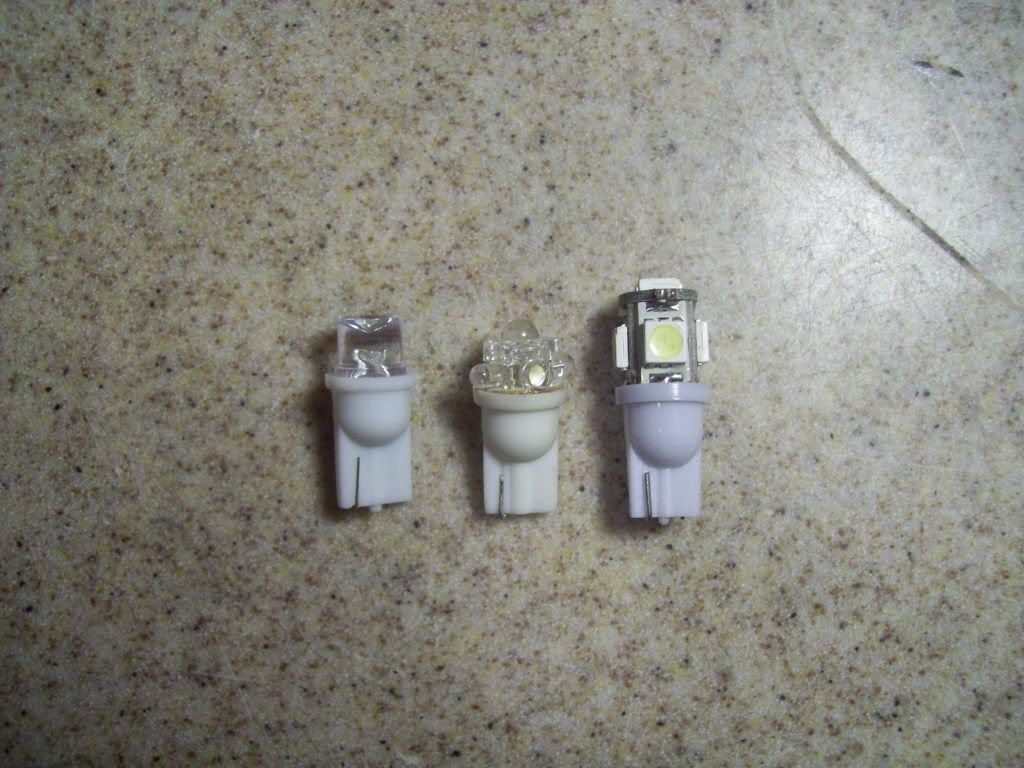
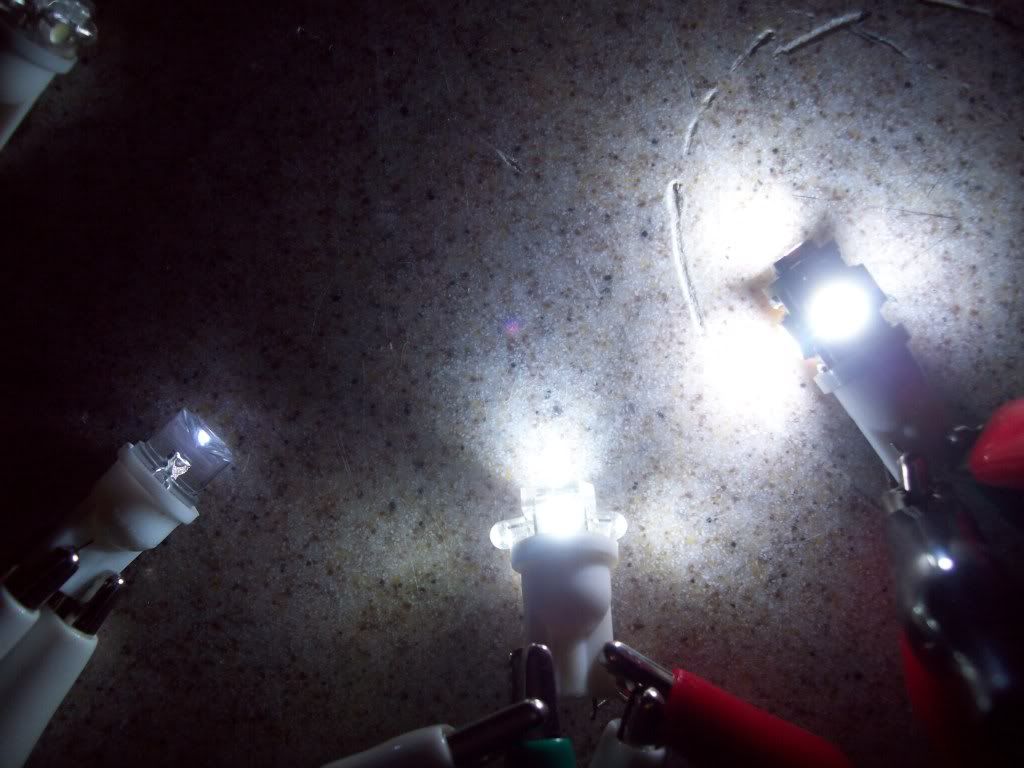
The Results
Inverted Wedge LED: Even Light output, but not bright enough
Refractor LED: Horribly Uneven light output, Short Lifespan (they started blowing on me)
SMD (Surface Mount Diode): Even Light output and very bright (brighter the the 194LL Bulbs)
Getting to the cluster:
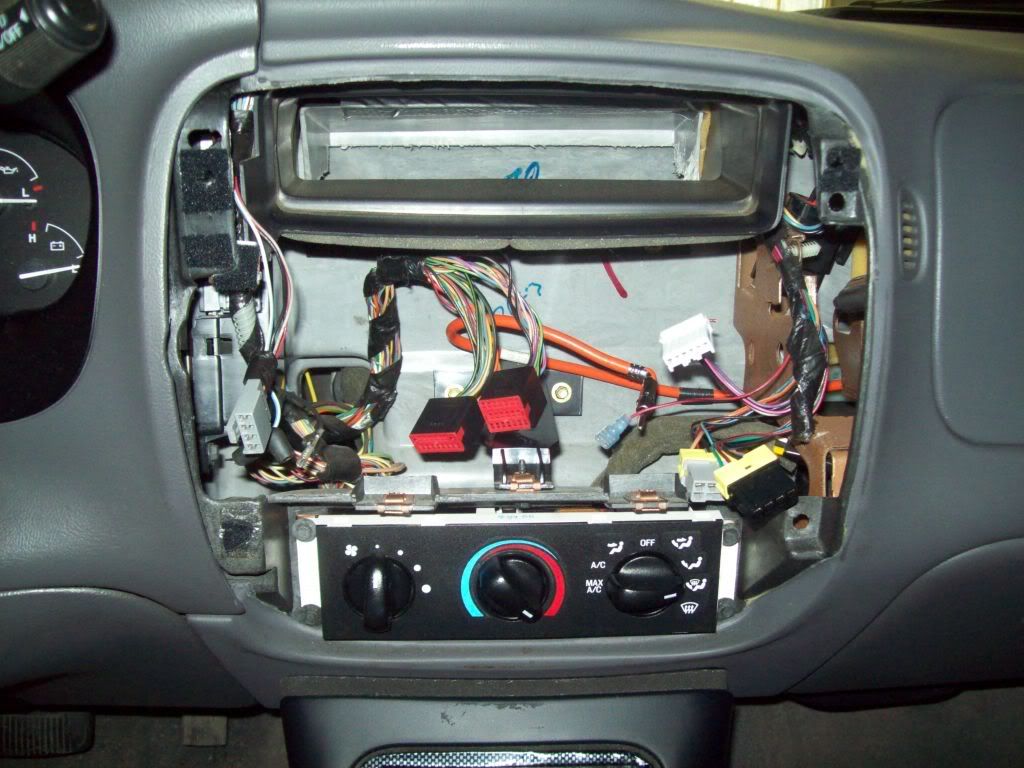
Step 1
Remove the Radio
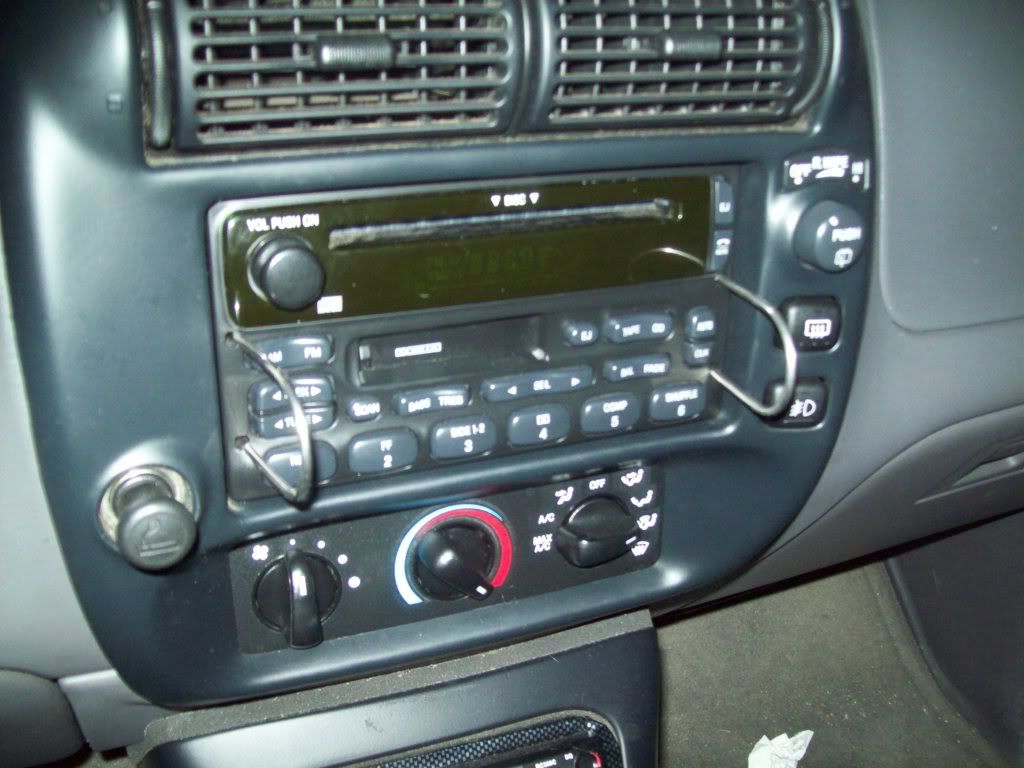
Step 2
Remove the 2 screws (circled in red)
Disconnect the 5 wiring harness behind the bezel (circled in blue)
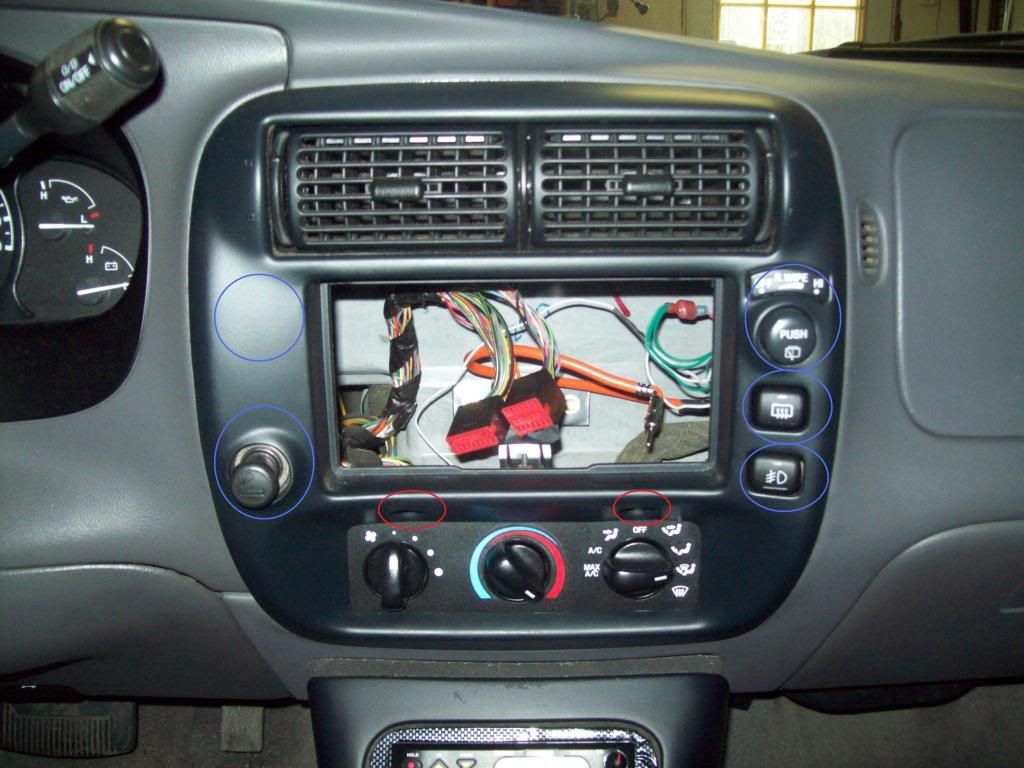
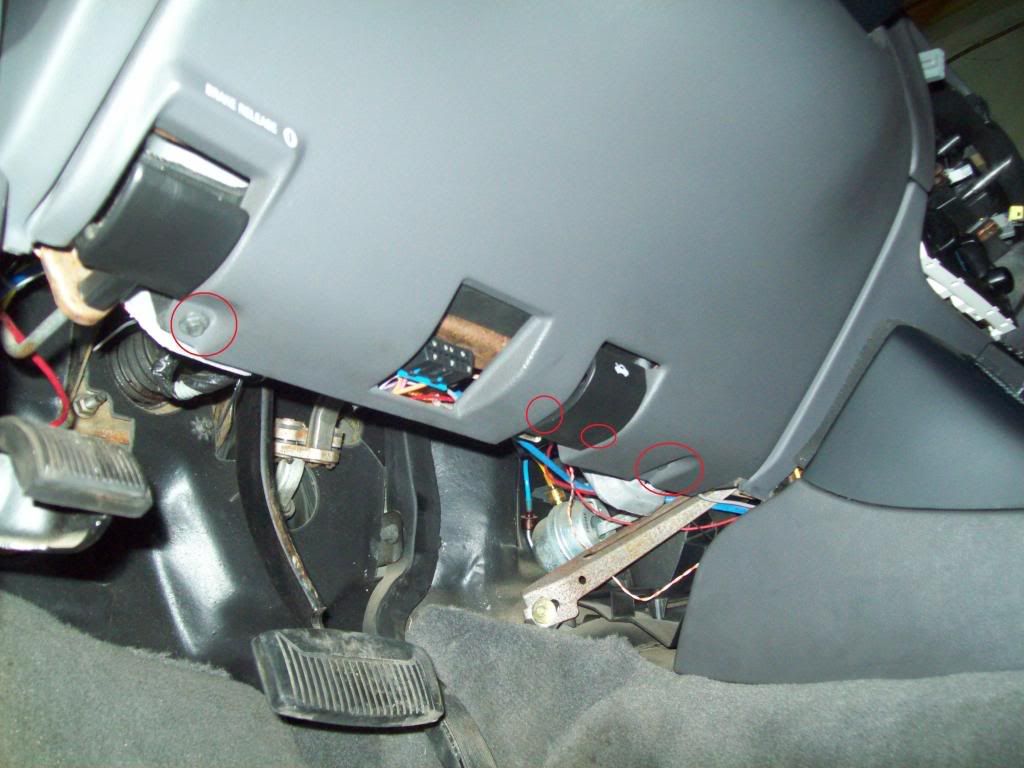
Step 3
Remove the 4 screws holding the plastic panel in place. (2 are hidden under the hood release) Then pull back on the top of the panel ( it is held in by clips)
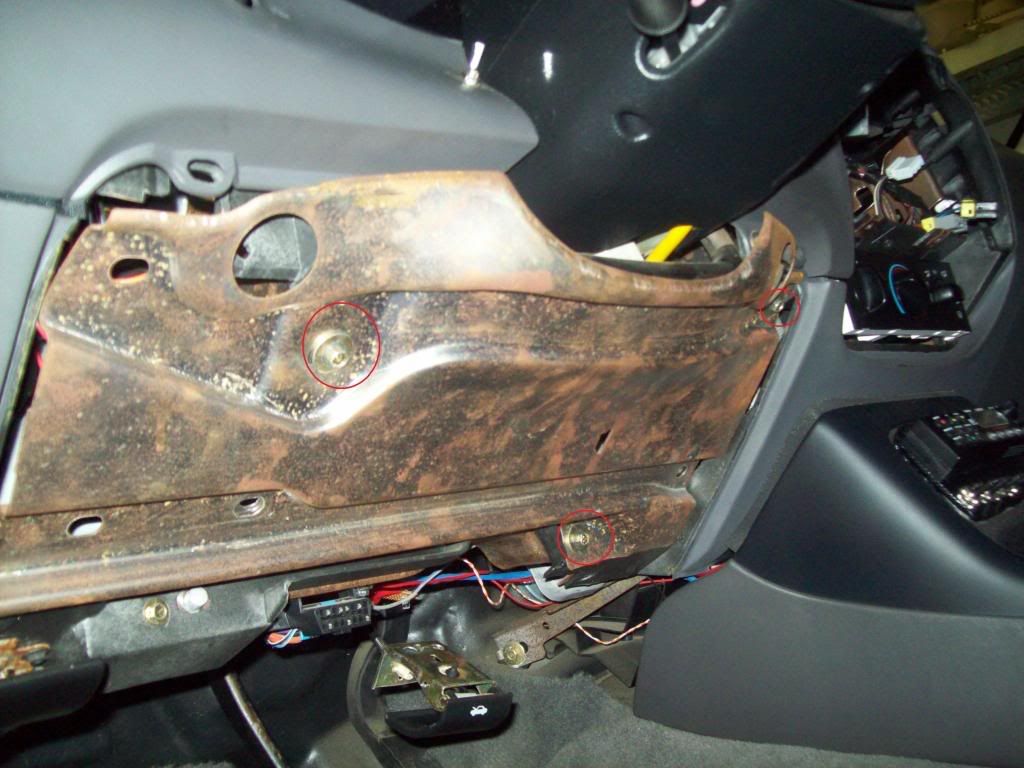
Step 4
Remove the 3 bolts holding the metal shield in place
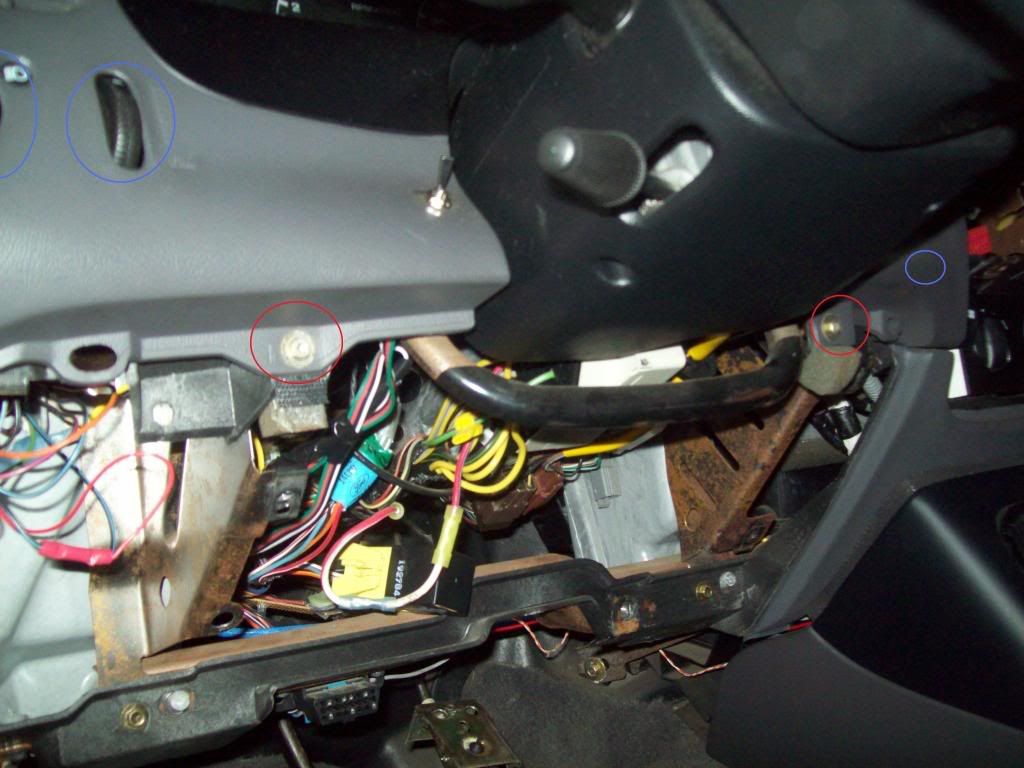
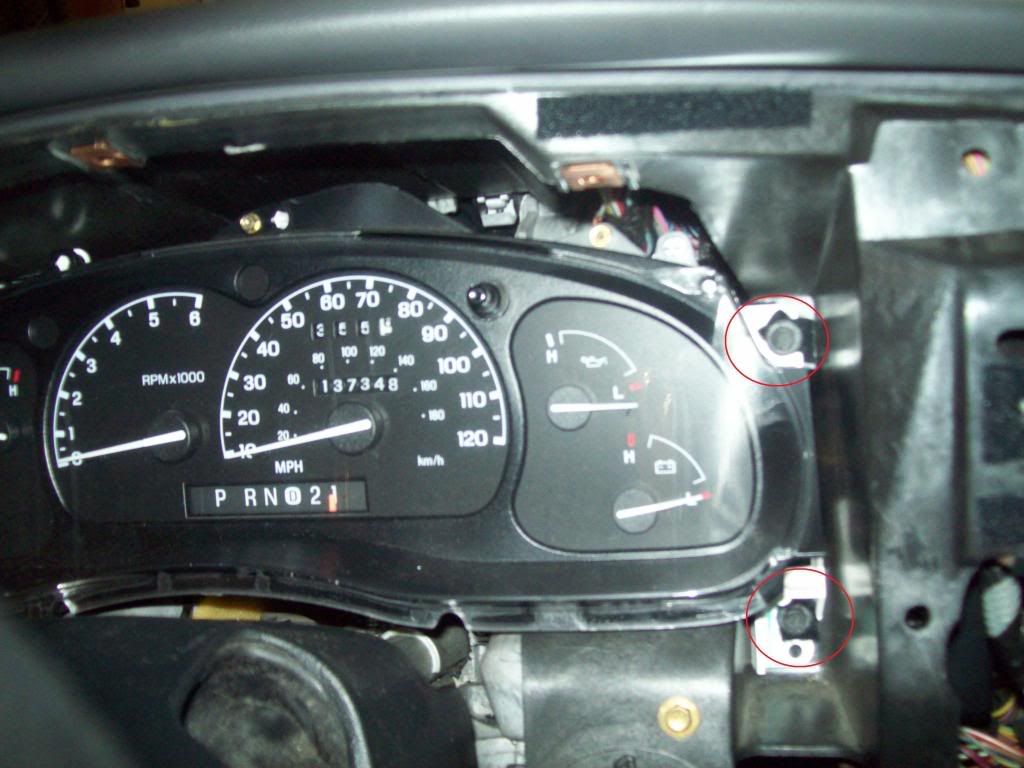
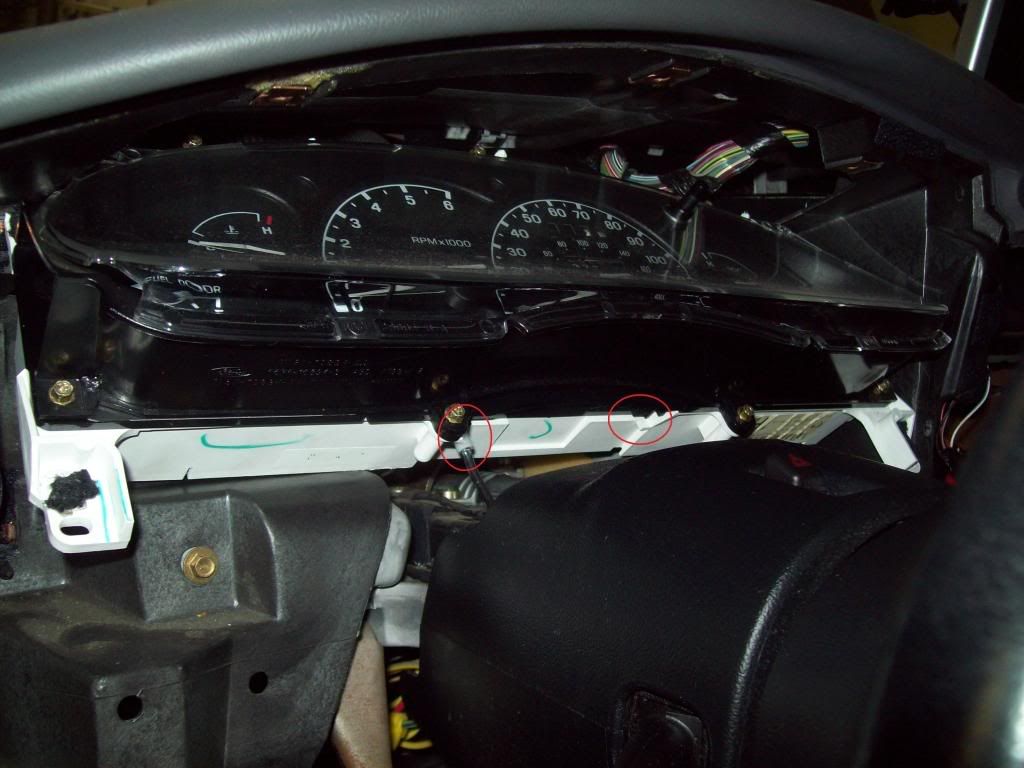
Step 5
Remove the 2 screws at the bottom of the gauge bezel (note the wiring harness locations circled in blue)
Step 6
Remove the 3 screws at the top of the gauge bezel
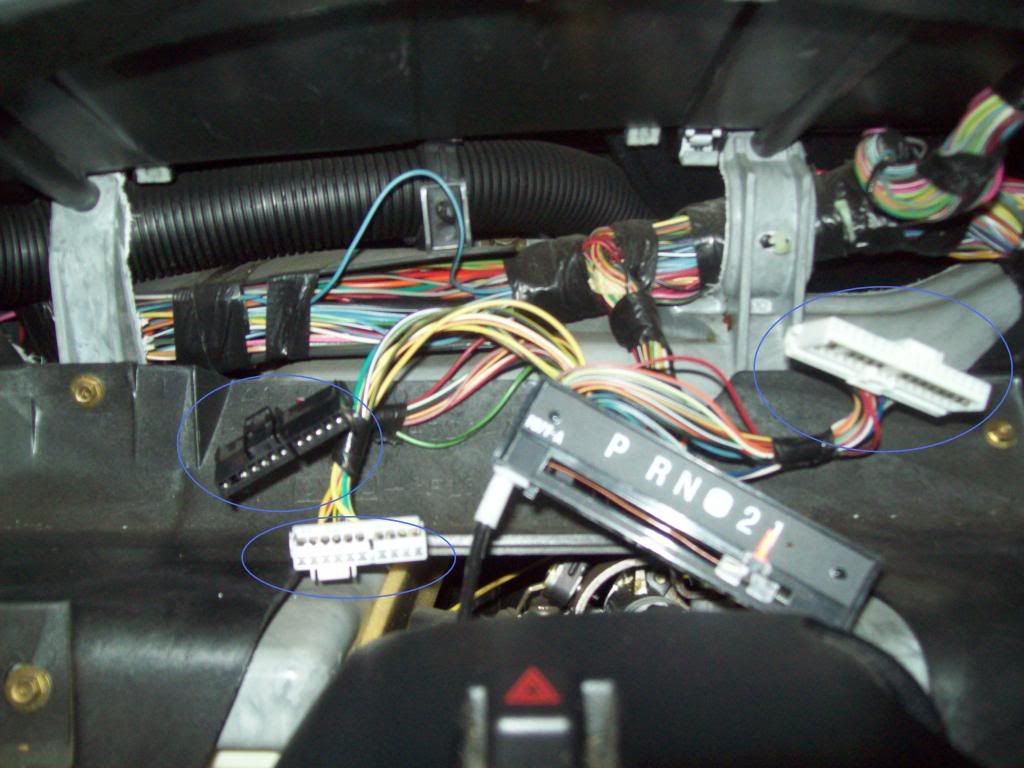
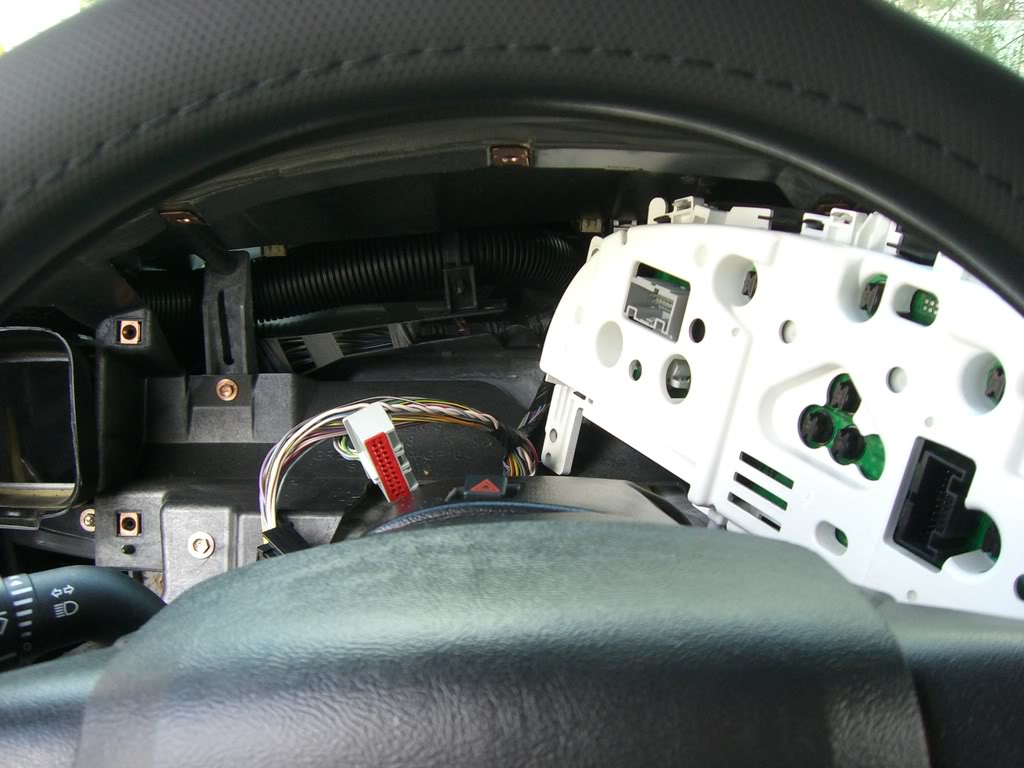
Step 7
Pull out the bezel enough to disconnect the 3 wiring harnesses. (Headlight Switch, Dimmer, and Rear Parking Assist) Then Remove the bezel. (Shifter must be in 1st gear)

Step 8
Remove the 4 screws holding in the Gauge Cluster

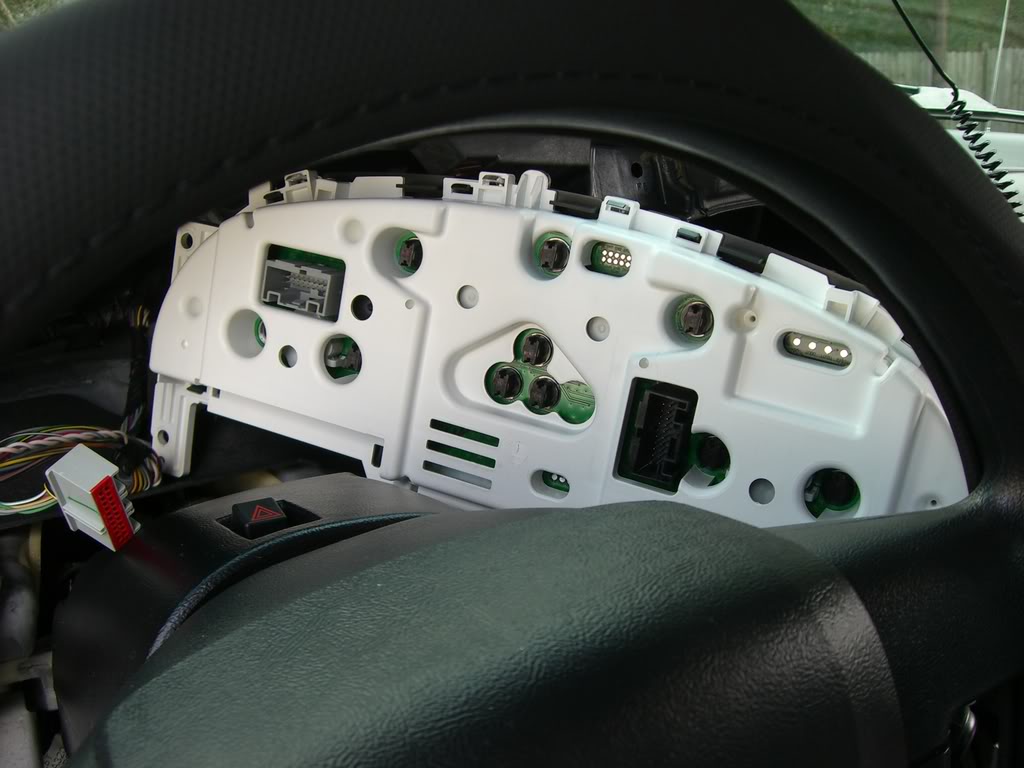
Step 9
Tilt the Cluster back and remove the Shift Indicator from the cluster, there are 2 plastic tabs that must be held on each side to remove the indicator.
Disconnect the 3 wiring harness from behind the cluster, then remove the Cluster
Now Hopefully You are holding your Instrument Cluster and can go on to the fun part.
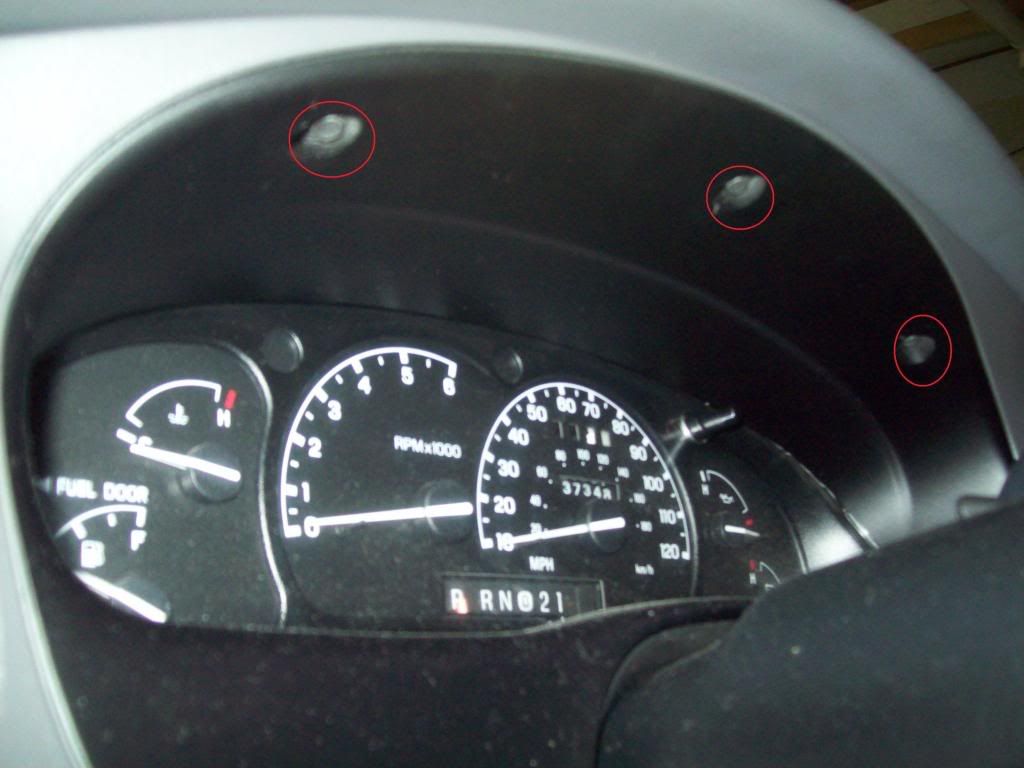
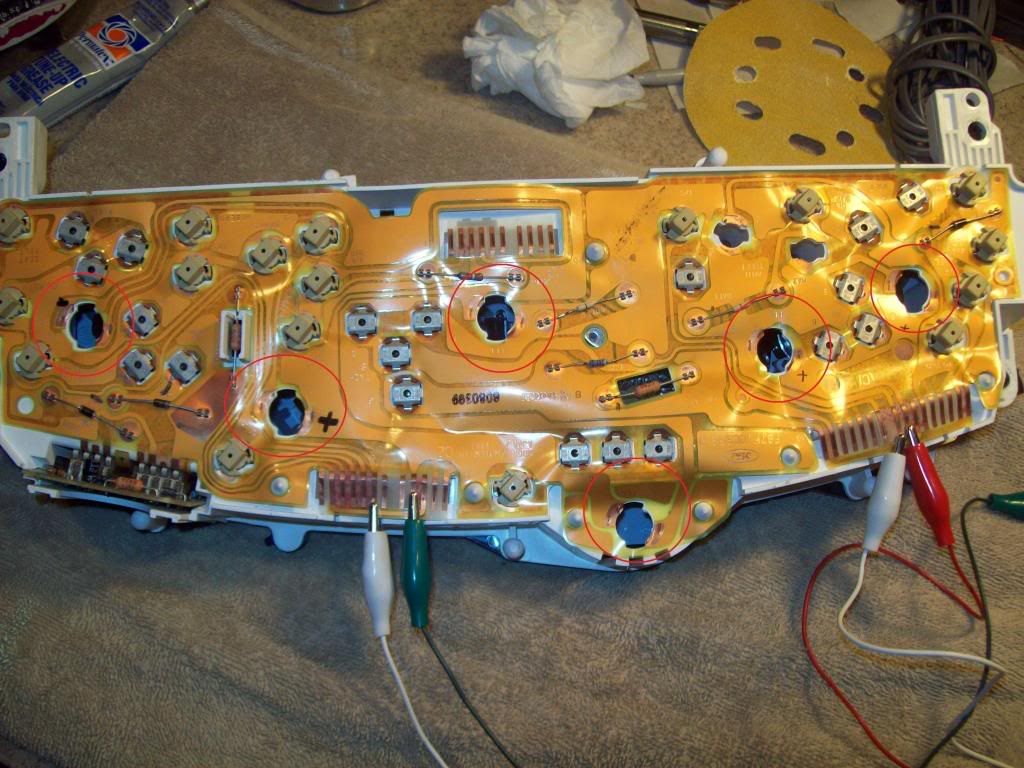
Remove the 6 back light bulbs from the cluster. (Circled in Red)
( I also highly recommend you also remove the THEFT light LED so you don't risk blowing it like I did when I was trying to figure out how to bench test the cluster)
The PC board on the back of the cluster is flexible so you can carefully pull the contacts where the wiring harnesses attach out of the sockets so you can attach alligator clips to bench test.
(The white wires are the - and the RED and GREEN are +)
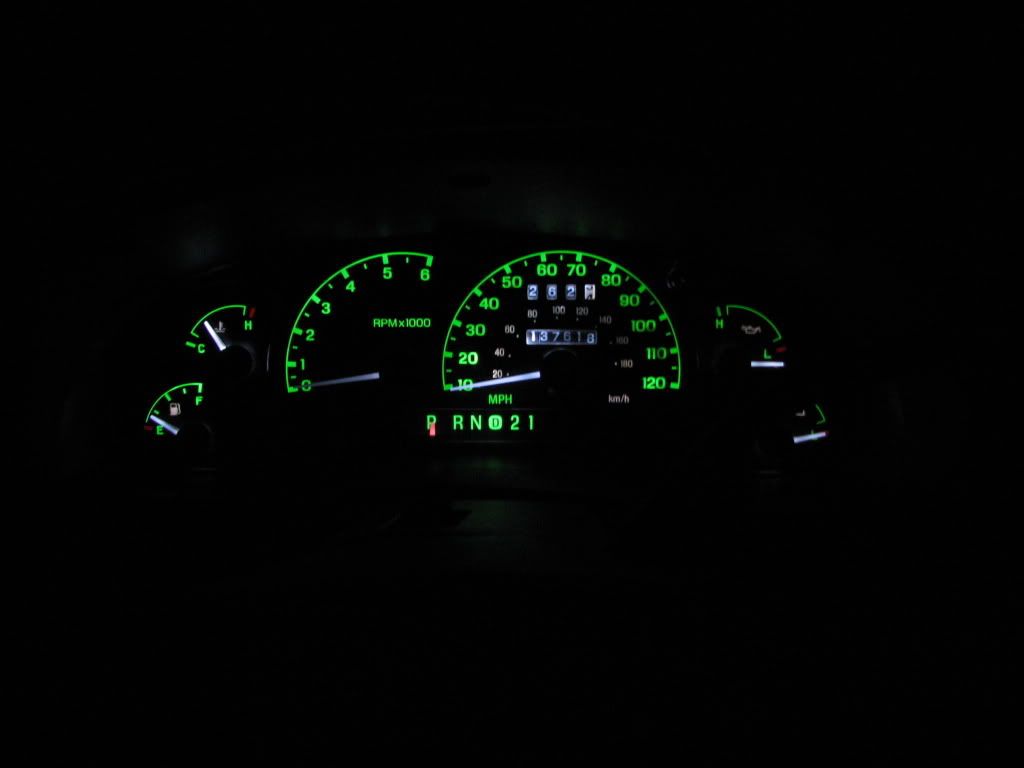
Here are the LEDs in the sockets. ( I used a bit of hot glue to make sure they didn't come out)
I apologize for not having a night shot of the final product, but the camera I have with me is an absolute noise box and takes terrible low light pics. When I get back my Canon ill get some pics.
Good Luck!
Here were my candidates.
From Left to Right: Inverted Wedge LED, Refractor LED, SMD LEDs
The Results
Inverted Wedge LED: Even Light output, but not bright enough
Refractor LED: Horribly Uneven light output, Short Lifespan (they started blowing on me)
SMD (Surface Mount Diode): Even Light output and very bright (brighter the the 194LL Bulbs)
Getting to the cluster:
Step 1
Remove the Radio
Step 2
Remove the 2 screws (circled in red)
Disconnect the 5 wiring harness behind the bezel (circled in blue)
Step 3
Remove the 4 screws holding the plastic panel in place. (2 are hidden under the hood release) Then pull back on the top of the panel ( it is held in by clips)
Step 4
Remove the 3 bolts holding the metal shield in place
Step 5
Remove the 2 screws at the bottom of the gauge bezel (note the wiring harness locations circled in blue)
Step 6
Remove the 3 screws at the top of the gauge bezel
Step 7
Pull out the bezel enough to disconnect the 3 wiring harnesses. (Headlight Switch, Dimmer, and Rear Parking Assist) Then Remove the bezel. (Shifter must be in 1st gear)
Step 8
Remove the 4 screws holding in the Gauge Cluster
Step 9
Tilt the Cluster back and remove the Shift Indicator from the cluster, there are 2 plastic tabs that must be held on each side to remove the indicator.
Disconnect the 3 wiring harness from behind the cluster, then remove the Cluster
Now Hopefully You are holding your Instrument Cluster and can go on to the fun part.
Remove the 6 back light bulbs from the cluster. (Circled in Red)
( I also highly recommend you also remove the THEFT light LED so you don't risk blowing it like I did when I was trying to figure out how to bench test the cluster)
The PC board on the back of the cluster is flexible so you can carefully pull the contacts where the wiring harnesses attach out of the sockets so you can attach alligator clips to bench test.
(The white wires are the - and the RED and GREEN are +)
Here are the LEDs in the sockets. ( I used a bit of hot glue to make sure they didn't come out)
I apologize for not having a night shot of the final product, but the camera I have with me is an absolute noise box and takes terrible low light pics. When I get back my Canon ill get some pics.
Good Luck!
#2
06-03-2010
#4
06-04-2010

They don’t look bad.
I would think if you use the SMD LED Bulbs then you should cut the light towers some to allow the side LEDs to light stuff up.
I will try that on another unit and see how it works out, anyone out there want to donate a No-Tach Cluster to the cause.
I will use the SMD LED Bulbs and see how they work out with mod’d light towers.
#5
06-04-2010

#6
06-04-2010
#7
06-04-2010
More work for the Jp7 version but the results are even lighting and more lighting.
I vote Jp&�s version.
Korey�s with a little work might improve.
Don�t get me wrong, as I stated above it looks good and for someone that did not want to do the extra work it is great.
Nice work !
#8
06-04-2010
If theres any confusion from the first post that whole post isn't mine, its from explorerforum which is why I quoted it all. I didn't do it to mine yet but I plan on it.
Not everyone wants/needs an overly bright gauge cluster. I know I don't. I have better things to do with my time/money that spend a few hundred on LED's for brighter gauges and better things I can do with all that time that it took you to do yours. Every single one of your posts is either something involving how your LED's are the brightest and the best in the world, trying to sell your LEDs or some headlight projectors, or how your Evo is faster than anything and everything on the road. We understand by now. This is just a much quicker and much cheaper option for someone wanting to do an LED cluster, people like to have options. I knew people wanted to do LED clusters with plug ins but didn't want the dark spots like most give, so as soon as I saw this I posted it to help them out. If you compare the time/money invested vs. gain ratio of this it is much better than yours, which will probably mean it is much more popular.
Not everyone wants/needs an overly bright gauge cluster. I know I don't. I have better things to do with my time/money that spend a few hundred on LED's for brighter gauges and better things I can do with all that time that it took you to do yours. Every single one of your posts is either something involving how your LED's are the brightest and the best in the world, trying to sell your LEDs or some headlight projectors, or how your Evo is faster than anything and everything on the road. We understand by now. This is just a much quicker and much cheaper option for someone wanting to do an LED cluster, people like to have options. I knew people wanted to do LED clusters with plug ins but didn't want the dark spots like most give, so as soon as I saw this I posted it to help them out. If you compare the time/money invested vs. gain ratio of this it is much better than yours, which will probably mean it is much more popular.
#10
06-04-2010
 just giving my .02
#13
06-04-2010
#14
06-04-2010
#15
06-04-2010
#16
06-04-2010
GrafixGuy, Wow, a clean back to that dash, different from the earlier ones.
korey89, I hope you didn’t get pissed about any comments I made.
Your Cluster looks great just the way it is but thinking on it, I thought maybe if the light towers were cut down the side SMD LED on those bulbs you used would spread out the light more.
More thinking out loud again.
ltr,
korey89, I hope you didn’t get pissed about any comments I made.
Your Cluster looks great just the way it is but thinking on it, I thought maybe if the light towers were cut down the side SMD LED on those bulbs you used would spread out the light more.
More thinking out loud again.
ltr,
#19
06-04-2010

#21
06-04-2010

#22
06-04-2010
GrafixGuy, Wow, a clean back to that dash, different from the earlier ones.
korey89, I hope you didn�t get pissed about any comments I made.
Your Cluster looks great just the way it is but thinking on it, I thought maybe if the light towers were cut down the side SMD LED on those bulbs you used would spread out the light more.
More thinking out loud again.
ltr,
korey89, I hope you didn�t get pissed about any comments I made.
Your Cluster looks great just the way it is but thinking on it, I thought maybe if the light towers were cut down the side SMD LED on those bulbs you used would spread out the light more.
More thinking out loud again.
ltr,

#23
06-04-2010
#24
06-04-2010

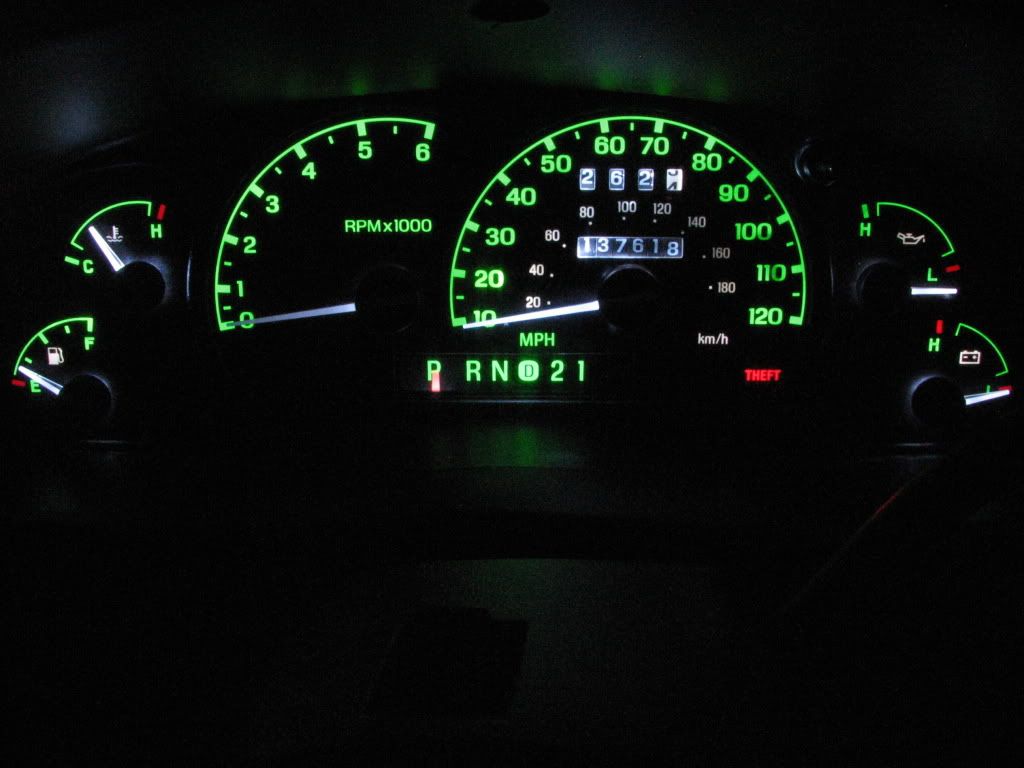
Also, for good measure...

#25
06-04-2010


