LED's to the rescue
#1
 07-31-2010

LED's to the rescue
I finally got the truck in the garage today & I've been working all day & night.
I removed the bezel doing some work on the radio & while I had the bezel out, I modded my digital volt meter with a relay so now whenever the key is in acc or running the voltmeter comes on automatically.
Finally got to install my mods for the fog light LED, 4x4 LED and HVAC LED bulbs, MAN!! what a difference.
I still had a little energy so I thought I'd tackle the dash/cluster mod too....
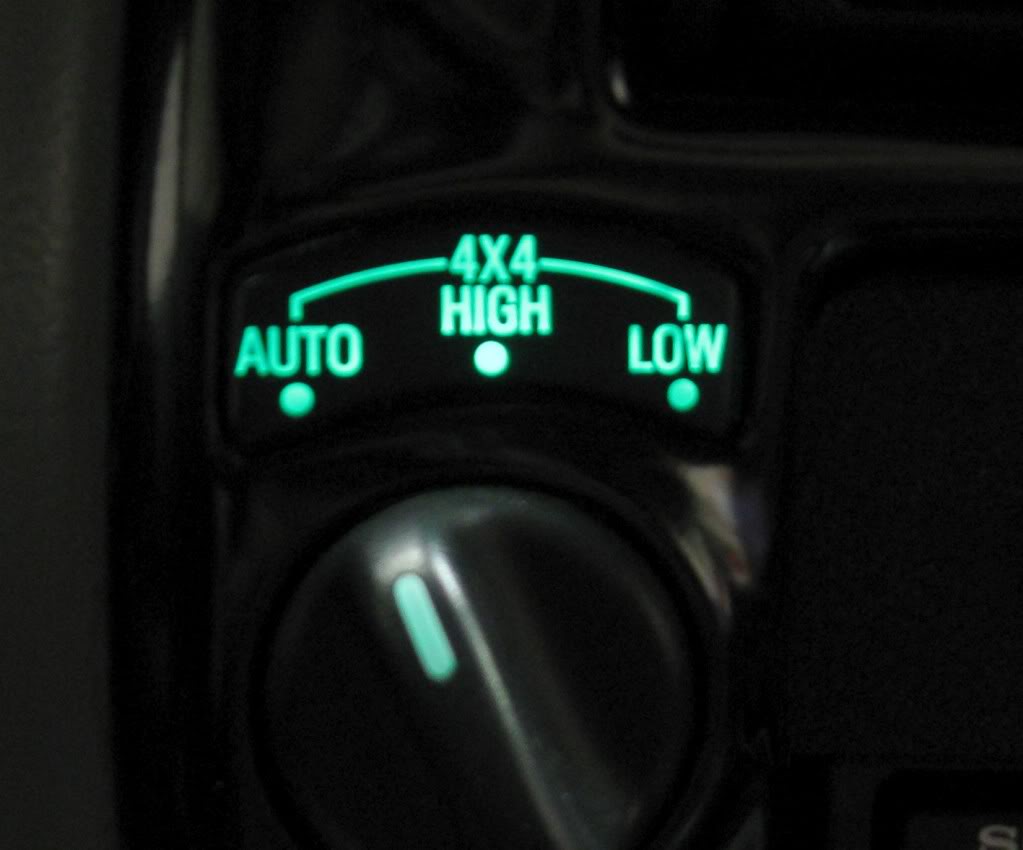
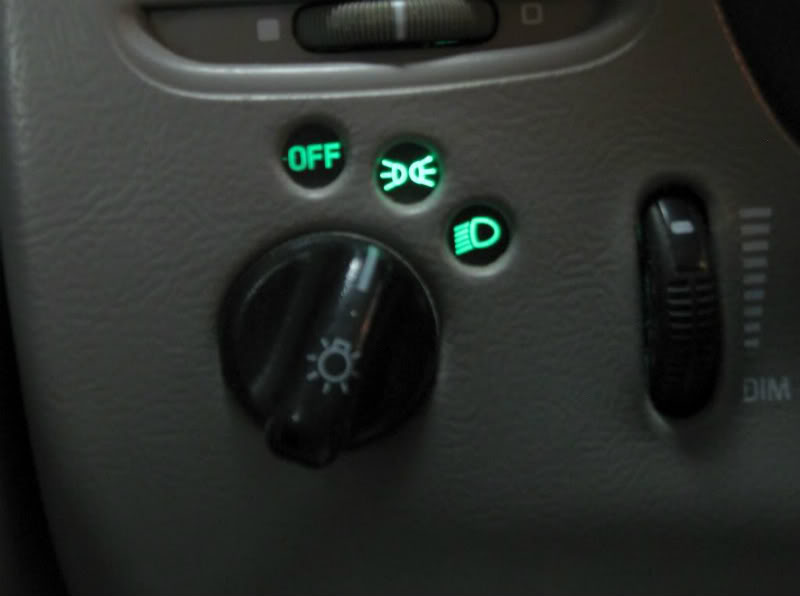
Well, I'm about 25% started here. I finally got the dash trim off (and swapped in my modded LED for the headlight switch) and got the cover off the cluster...no easy task in an automatic.
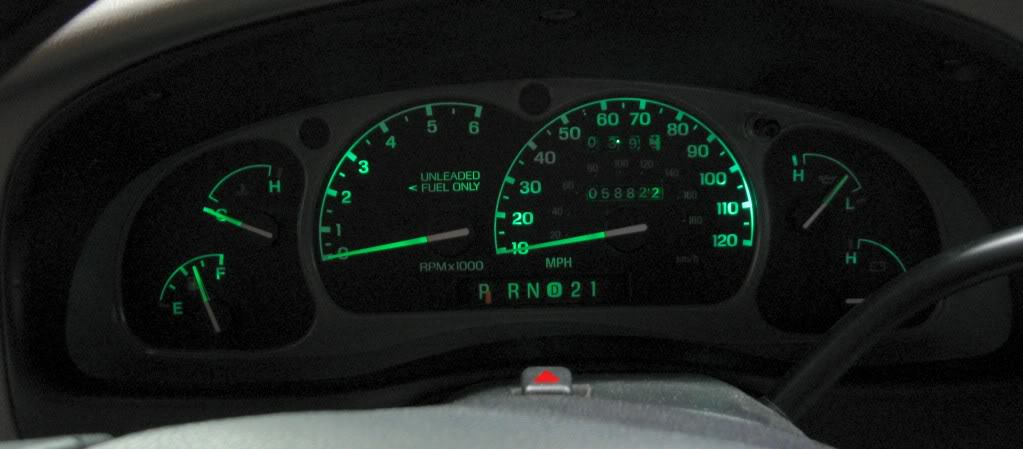
With the cover off, I had just enough room to twist the cluster around to swap out the bulbs with LED's. A nice addition, now I have green backlighting (a few bright/dim spots, but I'm more than happy with GREEN that I can see now).
I took some T10 base 4x LED white bulbs and de-soldered the white LED's & put in my much higher output green 3mm LED's. Took a while, but it was worth it.
Just when I started changing the indicator bulbs with my modded LED's I remembered that I didn't have any colored LED's modded yet!!
I've got 2x green turn signals done & installed. When using the old bulbs, the turn signals lit green, but when using white LED's they lit blue. I used green 5mm LED's & they are MUCH better. Even made a blue LED for the high beam indicator.
Still working on the yellow & red LED mods, so it may be a while before I can go anywhere, but at least I can see the dash lights now.
I've been dreading the dash mod, I even bought extra cluster parts & painted the overlays, but I don't think I'll even bother with all that extra work now. My goal was to get a green dash with OEM color indicators modded with LEDs for more output & I'm well on my way now.
I'm not looking forward to putting the dash back in, though. It was a bear getting it out, but I do have an extra dash panel from an Explorer that I can use if something breaks on the old one.
I know, PICS OR IT DIDN'T HAPPEN...
Hey I've been in the truck for 14 hours today, I'm tired... pics whenever I get finished & well rested.
I removed the bezel doing some work on the radio & while I had the bezel out, I modded my digital volt meter with a relay so now whenever the key is in acc or running the voltmeter comes on automatically.
Finally got to install my mods for the fog light LED, 4x4 LED and HVAC LED bulbs, MAN!! what a difference.
I still had a little energy so I thought I'd tackle the dash/cluster mod too....
Well, I'm about 25% started here. I finally got the dash trim off (and swapped in my modded LED for the headlight switch) and got the cover off the cluster...no easy task in an automatic.
With the cover off, I had just enough room to twist the cluster around to swap out the bulbs with LED's. A nice addition, now I have green backlighting (a few bright/dim spots, but I'm more than happy with GREEN that I can see now).
I took some T10 base 4x LED white bulbs and de-soldered the white LED's & put in my much higher output green 3mm LED's. Took a while, but it was worth it.
Just when I started changing the indicator bulbs with my modded LED's I remembered that I didn't have any colored LED's modded yet!!
I've got 2x green turn signals done & installed. When using the old bulbs, the turn signals lit green, but when using white LED's they lit blue. I used green 5mm LED's & they are MUCH better. Even made a blue LED for the high beam indicator.
Still working on the yellow & red LED mods, so it may be a while before I can go anywhere, but at least I can see the dash lights now.
I've been dreading the dash mod, I even bought extra cluster parts & painted the overlays, but I don't think I'll even bother with all that extra work now. My goal was to get a green dash with OEM color indicators modded with LEDs for more output & I'm well on my way now.
I'm not looking forward to putting the dash back in, though. It was a bear getting it out, but I do have an extra dash panel from an Explorer that I can use if something breaks on the old one.
I know, PICS OR IT DIDN'T HAPPEN...
Hey I've been in the truck for 14 hours today, I'm tired... pics whenever I get finished & well rested.


#3
08-01-2010
Still no pics, but hopefully I'll get some good ones.
Small update
Finally got the dash back together today.
While changing the indicator bulbs to my LED's I noticed that the airbag indicator & the 4wd Low indicator wanted to stay lit, however very dimly after everything else went out. I tried some different LED's I had made up, but no luck.
Oh well, that's just 2 plain bulbs left. I swapped the hi beam indicator with a blue LED & it really stands out now.
While I had the front of the cluster off, I swapped out my new/old painted trim piece & it made such an improvement in the looks of the dash! I never thought a little touch of gray would make such a difference.
Still have the radio bezel off, waiting on parts for the head unit.
If I'm real lucky, I'll get my new 3x Fog Switch modded bezel sanded, painted & ready to switch out. I'm thinking about modding each fog switch with a different color LED indicator.
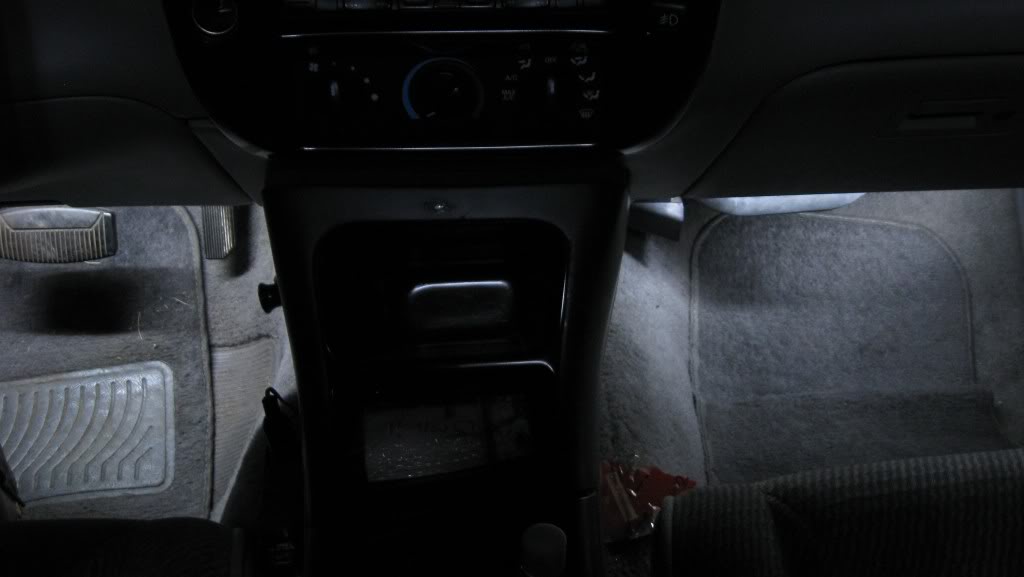
I did manage to re-wire under my console cubby hole/cup holder areas. It's been a long time coming, but I finally have all my 12v feeds connected to a single barrier strip, as well as all the grounds to their own strip. Makes life so much easier with everything labeled & easy to remove with just a screw. I still have plenty of open spaces for future additions, such as my console rear cover with 12v & USB outlets.
Now that I've eliminated the need for 2 of the 4 switches above my head unit, I'm considering making a new panel for my digital voltmeter & a digital thermometer I've been trying to figure out where to put. I don't know if I'm going to install my OHC or not, but I'd like a temp reading for inside the cab temps.
After months of thinking about it, I finally dove into modding my dome light. Nothing to spectacular about the dome light itself, but I finally figured out which contacts (inside) control the switches to each outer light socket.
I soldered a wire on each contact, ran a ring terminal to the ground screw, connected the wires to the wiring I ran across the headliner-down the door-etc. to my console wiring location where I connected them to my under dash LED strips. Now, when the dome lights are on (door open) the foot wells are well lit. When you switch the dome light to the left, the left dome light AND the left foot well LED's come on, vise/versa for the right side.
I may not be the first person with foot well lights, but I may be the first with this particular version.
Hopefully, I'll get everything back together by the middle of next week... then let the pics begin.
Small update
Finally got the dash back together today.
While changing the indicator bulbs to my LED's I noticed that the airbag indicator & the 4wd Low indicator wanted to stay lit, however very dimly after everything else went out. I tried some different LED's I had made up, but no luck.
Oh well, that's just 2 plain bulbs left. I swapped the hi beam indicator with a blue LED & it really stands out now.
While I had the front of the cluster off, I swapped out my new/old painted trim piece & it made such an improvement in the looks of the dash! I never thought a little touch of gray would make such a difference.
Still have the radio bezel off, waiting on parts for the head unit.
If I'm real lucky, I'll get my new 3x Fog Switch modded bezel sanded, painted & ready to switch out. I'm thinking about modding each fog switch with a different color LED indicator.
I did manage to re-wire under my console cubby hole/cup holder areas. It's been a long time coming, but I finally have all my 12v feeds connected to a single barrier strip, as well as all the grounds to their own strip. Makes life so much easier with everything labeled & easy to remove with just a screw. I still have plenty of open spaces for future additions, such as my console rear cover with 12v & USB outlets.
Now that I've eliminated the need for 2 of the 4 switches above my head unit, I'm considering making a new panel for my digital voltmeter & a digital thermometer I've been trying to figure out where to put. I don't know if I'm going to install my OHC or not, but I'd like a temp reading for inside the cab temps.
After months of thinking about it, I finally dove into modding my dome light. Nothing to spectacular about the dome light itself, but I finally figured out which contacts (inside) control the switches to each outer light socket.
I soldered a wire on each contact, ran a ring terminal to the ground screw, connected the wires to the wiring I ran across the headliner-down the door-etc. to my console wiring location where I connected them to my under dash LED strips. Now, when the dome lights are on (door open) the foot wells are well lit. When you switch the dome light to the left, the left dome light AND the left foot well LED's come on, vise/versa for the right side.
I may not be the first person with foot well lights, but I may be the first with this particular version.
Hopefully, I'll get everything back together by the middle of next week... then let the pics begin.
#4
08-01-2010

#5
08-01-2010
Put a resistor that matches your original bulbs resistance (or slightly higher) in parallel with whatever LED you originally wanted to use.
#7
08-03-2010

Join Date: Jan 2008
Location: Ontario, Canada
Posts: 1,694
Likes: 0
Received 0 Likes
on
0 Posts
#10
08-04-2010
Tried using a 15ohm 1/2watt resistor (same value as the bulb was) in parallel & it started smoking after about a minute. The resistor was so hot I couldn't touch it. Definitely not going to work here.
Decided to just put regular bulbs back in the locations where the lights wanted to stay dimly lit.
I've got about half regular bulbs & half LED's now. Most of the indicators that wanted to stay lit were only on for a short time anyway (4x4, airbag, etc) so I can live with them being a slightly different brightness for a few seconds.
I did, however manage to get most everything put back together... pics on the way.
#11
08-05-2010
And now, for your viewing pleasure...
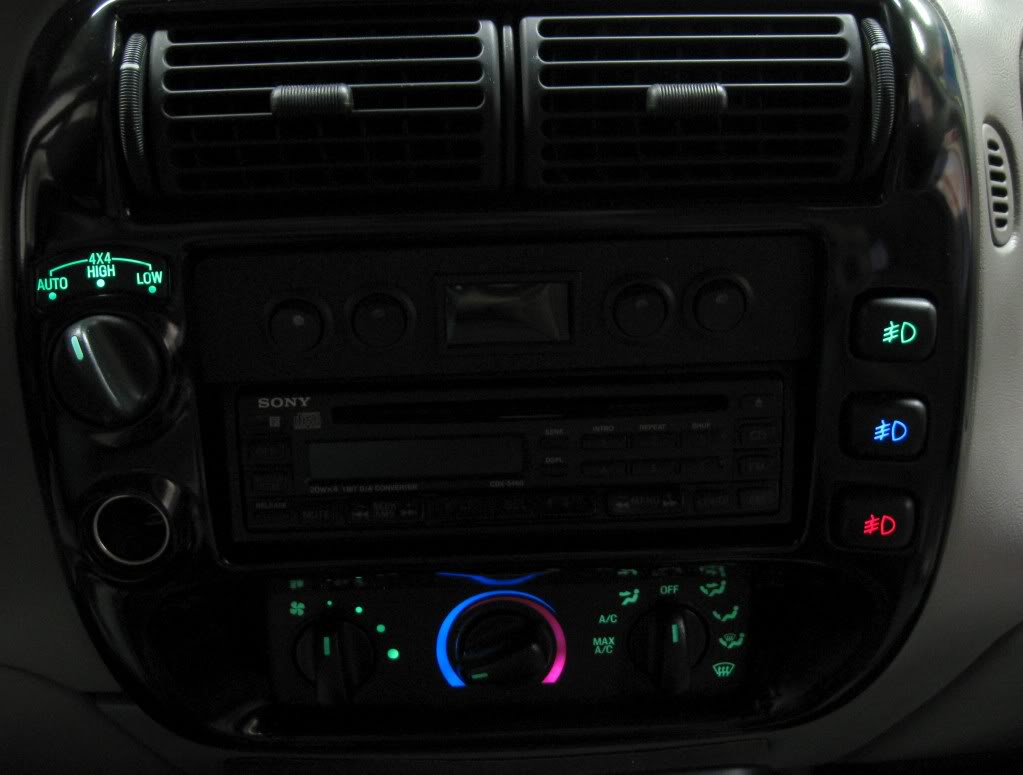


I need to get some better macro shots of the detail around the fog switches & the filled-in wiper insert above the top fog light switch. I'm no professional photographer by any means & these shots don't begin to show the near perfect finish on the radio bezel.
My first time using bondo on plastic, but after a bit of sanding, painting, sanding, painting & clear coating... it turned out better than I expected.
The radio bezel is painted with several coats of Krylon Fusion Black Satin, and about 3 coats of Krylon Satin Clear. It still came out a bit shiny, but it's very close to my door panels that I painted with Krylon Fusion gloss.
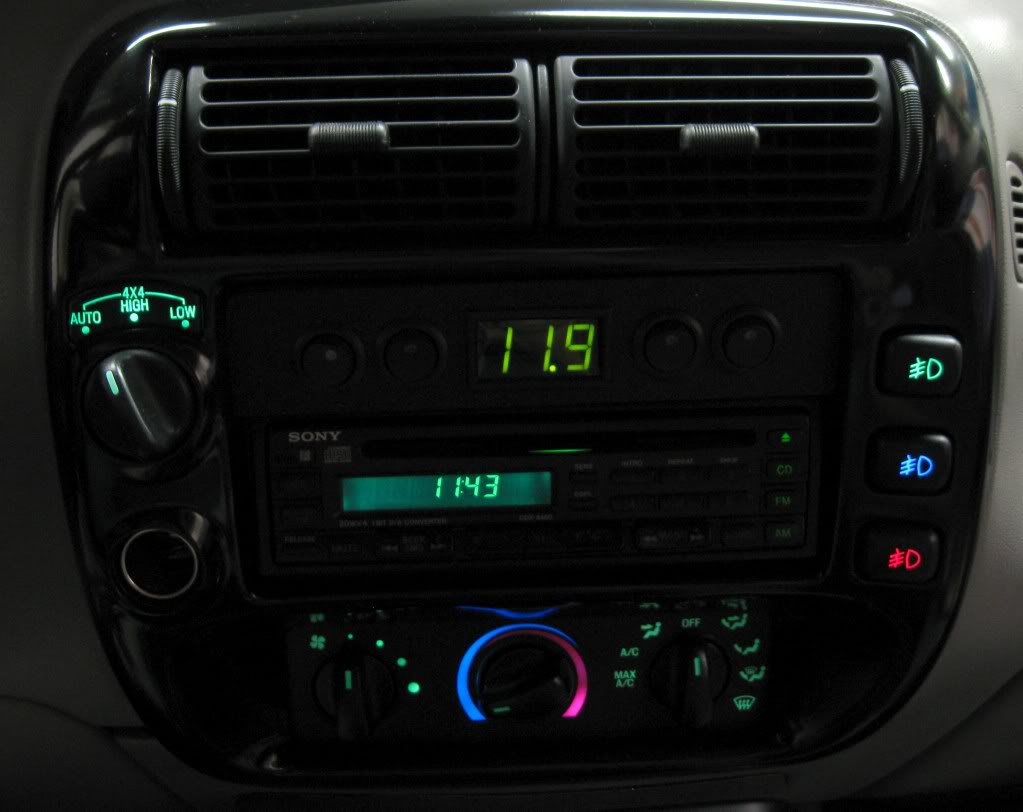
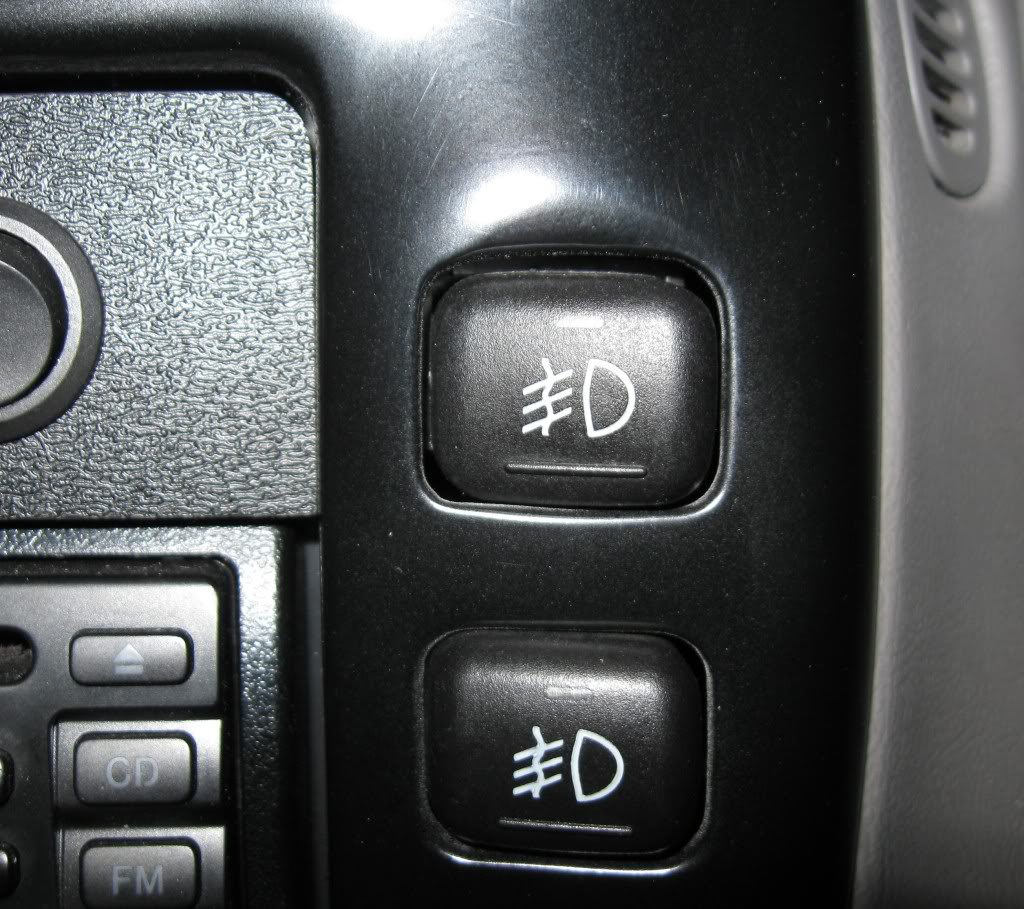
The cluster came out better than I could have hoped for, aside from a couple "hot spots". I found out that my dash, HVAC, headlight, 4x4 & fog switch were all blue. I'm guessing the cruise pods are blue too, but they're both burned out... I smell another mod on the horizon.
I used my own custom 4x 3mm LED bulbs in place of the OEM T10 bulbs for the back lighting. I bought a bunch of white 4x 3mm LED bulbs & de-soldered the white LED's & replaced them with green LED's. I was afraid the green wouldn't look very good coming through the blue overlays, but I guess the LED's are so powerful the green pops right out.
The gray trim around the cluster really set it off!
As for the 3 colored fog switches... I wanted something different & the colors help me remember which switch controls which lights.
Green = OEM yellow fog lights ( I was going to use a yellow LED, but it wasn't nearly as bright as the green )
Blue = Alt. fog lights
Red = Reverse Lights
The HVAC panel got a little mod as well. I took the blue filter out & replaced it with a green one & added a couple of 7x 3mm LED bulbs. It's much brighter than before & I can even change the ***** to blue & they light up blue... I might swap them out sometime just for a little more color.
The voltmeter/switch panel above the head unit is going to be leaving soon. All of the switches are now unused (they were fog switches & voltmeter power) and I've got something else I want to add to a new panel along with the voltmeter.
The voltmeter now operates via a relay, every time the key is in ACC or ON/RUN, the voltmeter automatically comes on.
If anyone wants the old panel (when I've made a new template from this one) let me know. You WILL need your own voltmeter & switches unless you want to buy it as is.
I also plan on offering LED modding for OEM fog light switches, 4x4 & headlight switches. I have the LED's & resistors, but I need more OEM bulb holders - or you can send me yours... I now have a method that allows for a plug-and-play system even with fog light switches.
Feel free to PM me or check my posts, I'll probably make a "for sale" post for this service.
I need to get some better macro shots of the detail around the fog switches & the filled-in wiper insert above the top fog light switch. I'm no professional photographer by any means & these shots don't begin to show the near perfect finish on the radio bezel.
My first time using bondo on plastic, but after a bit of sanding, painting, sanding, painting & clear coating... it turned out better than I expected.
The radio bezel is painted with several coats of Krylon Fusion Black Satin, and about 3 coats of Krylon Satin Clear. It still came out a bit shiny, but it's very close to my door panels that I painted with Krylon Fusion gloss.
The cluster came out better than I could have hoped for, aside from a couple "hot spots". I found out that my dash, HVAC, headlight, 4x4 & fog switch were all blue. I'm guessing the cruise pods are blue too, but they're both burned out... I smell another mod on the horizon.
I used my own custom 4x 3mm LED bulbs in place of the OEM T10 bulbs for the back lighting. I bought a bunch of white 4x 3mm LED bulbs & de-soldered the white LED's & replaced them with green LED's. I was afraid the green wouldn't look very good coming through the blue overlays, but I guess the LED's are so powerful the green pops right out.
The gray trim around the cluster really set it off!
As for the 3 colored fog switches... I wanted something different & the colors help me remember which switch controls which lights.
Green = OEM yellow fog lights ( I was going to use a yellow LED, but it wasn't nearly as bright as the green )
Blue = Alt. fog lights
Red = Reverse Lights
The HVAC panel got a little mod as well. I took the blue filter out & replaced it with a green one & added a couple of 7x 3mm LED bulbs. It's much brighter than before & I can even change the ***** to blue & they light up blue... I might swap them out sometime just for a little more color.
The voltmeter/switch panel above the head unit is going to be leaving soon. All of the switches are now unused (they were fog switches & voltmeter power) and I've got something else I want to add to a new panel along with the voltmeter.
The voltmeter now operates via a relay, every time the key is in ACC or ON/RUN, the voltmeter automatically comes on.
If anyone wants the old panel (when I've made a new template from this one) let me know. You WILL need your own voltmeter & switches unless you want to buy it as is.
I also plan on offering LED modding for OEM fog light switches, 4x4 & headlight switches. I have the LED's & resistors, but I need more OEM bulb holders - or you can send me yours... I now have a method that allows for a plug-and-play system even with fog light switches.
Feel free to PM me or check my posts, I'll probably make a "for sale" post for this service.
#12
08-05-2010
Join Date: Jan 2008
Location: Ontario, Canada
Posts: 1,694
Likes: 0
Received 0 Likes
on
0 Posts

#14
08-05-2010
#15
08-05-2010
#16
08-06-2010
I remember seeing a how-to here somewhere, but I can't seem to find it now.
Something odd I noticed today too...
My voltage before all the LED's usually read 14.5 - 14.9v at idle or any speed on the voltmeter, but now it seems to stay around 14.1v at idle or any speed. It still beats the heck out of 12.5v.
I did re-wire the voltmeter, using better wire & connections than I had before and it's now turned on by a relay feeding a 7805 5v regulator (same regulator I used before).
The 5v is for powering the unit only, the voltage still comes from the same source: my distribution/fuse block fed by my 1/0ga cable from the battery.
#18
08-06-2010
It gets it's 12volts from my amp fuse/distribution block, but any constant 12v source like the cig lighter should work. I just wanted as clean of a path to the battery as possible.
- It has 2 power connections & 2 grounds. 1 power is constant 12v, 1 power is the turn-on, both grounds can be connected together.
For it's power, I have a relay that's energized when the key is on/run or acc'y, I think I tapped into the radio power for the switched output to trigger the relay.
It used to be on a switch, but I'd always forget to turn it off.
From the relay, I ran 12v power to a 7805 5v voltage regulator (with a ground) the 5v output goes to the voltmeter's power/turn on wire so that whenever it sees 5v, it comes on. Most of the voltmeters I found all required 5v turn-on power.
There are probably some now that only need 1 power & 1 ground, so that the 12v input voltage also powers the voltmeter.
It took a bit of searching (evilBay) to find a voltmeter that was small enough & the right color to fit in that little cubby hole opening above the radio. I think it's called a mini digital voltmeter.
Hope that helps
#22
08-08-2010
#23
08-11-2010
Few more pics:
Finally got my foot well LED's connected & working.
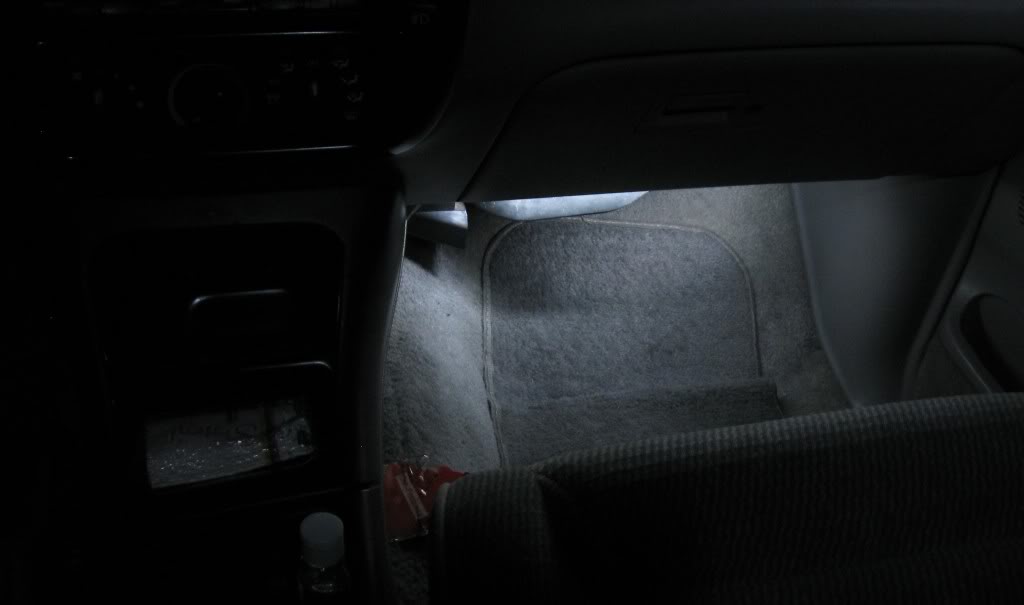
They work with the switch in the OEM dome light.
Switch to the left = dome light left & foot well left come on.
Switch to the right = you guessed it.
Open the door or unlock the door with remote = everything comes on.
I've been wanting to do this forever & finally found the time to get it done.
Finally got my foot well LED's connected & working.
They work with the switch in the OEM dome light.
Switch to the left = dome light left & foot well left come on.
Switch to the right = you guessed it.
Open the door or unlock the door with remote = everything comes on.
I've been wanting to do this forever & finally found the time to get it done.
#24
08-11-2010
While I'm updating pics, here's a few (posted in my other thread too) of the radio bezel modded...


The bezel has at least 4 coats of Krylon Fusion Satin & 4 or more coats of Krylon Satin Clear sprayed on top of that. It still looks a little shiny to me.
Hardly can see where the rear wiper **** & insert were now.
Not bad for my first plastic bondo job, huh?
The bezel has at least 4 coats of Krylon Fusion Satin & 4 or more coats of Krylon Satin Clear sprayed on top of that. It still looks a little shiny to me.
Hardly can see where the rear wiper **** & insert were now.
Not bad for my first plastic bondo job, huh?


