Cubby Paintage?
#1
 07-02-2006


Join Date: Apr 2006
Location: LA / San Luis Obispo
Posts: 804
Likes: 0
Received 0 Likes
on
0 Posts
Cubby Paintage?
so.... has anyone painted the cubby before?
but even more complicated, how about aluminum =)
for the cubby hole a buddy of mine made this aluminum plate to cover up the hole and im gonna be mounting my new power window switches there. BUT, i want it to look cool. so, how would you paint that aluminum & plastic?
thanks
but even more complicated, how about aluminum =)
for the cubby hole a buddy of mine made this aluminum plate to cover up the hole and im gonna be mounting my new power window switches there. BUT, i want it to look cool. so, how would you paint that aluminum & plastic?
thanks
#3
07-05-2006
Join Date: Nov 2005
Location: MASS
Posts: 157
Likes: 0
Received 0 Likes
on
0 Posts
#4
07-05-2006

Join Date: Jul 2005
Location: Steubenville Ohio
Posts: 1,363
Likes: 0
Received 0 Likes
on
0 Posts
#6
07-05-2006
Join Date: Apr 2006
Location: LA / San Luis Obispo
Posts: 804
Likes: 0
Received 0 Likes
on
0 Posts
#7
07-05-2006
Join Date: Nov 2005
Location: MASS
Posts: 157
Likes: 0
Received 0 Likes
on
0 Posts
#8
07-05-2006
Here is my exact process for painting interior
Painting Interior How - To
Clean part with simple green or your favorite degreaser. Scrub with a dish sponge. Rinse, dry.
(This is to get off all the armour all you've been putting on)
Scrub the part again using soapy water (dishsoap works well). Rinse. Dry
Wipe the entire part down with rubbing alcohol.
Sand part with 140 grit automotive sandpaper. I use the sandpaper sponges from 3M.
For the radio bezel, be sure to sand down the rubber coating as well. You might want to go with a coarser grit for the rubber coating, just be careful not to scratch underneath.
Use 320 then 400 grit, then 600 wetsand, to a smooth finish.
If you want you could use 1200 grit to make it a really smooth finish.
Clean (can use rubbing alcohol again)
Use Duplicolor adhesive promoter, following the directions on the can of adhesion promoter, do 2 to 3 coats. Remember to keep the adhesion promoter layers very light, or they can create runs that can screw up the finish.
Use Dupicolor bumper primer or SEM vinyl and fabric spray, several light coats.
Wait for coat to tack or dry then add another coat.
Make sure to use either of these kinds of primers because they allow flex..if you don't the paint will chip or crack when your part moves and expands while driving.
Make sure you lightly sand down any bumps or scratches before painting. Let the primer FULLY dry before starting to paint.
Paint 3 coats. Wait for paint to tack or dry before adding more coats.
Finalize with 3 coats of Duplicolor clear enamel.
Be patient and wait a couple days before installing your interior piece if its in an area that you touch often. You want to be sure the paint is completely dry.
Install and enjoy
#9
07-05-2006
Join Date: Apr 2006
Location: LA / San Luis Obispo
Posts: 804
Likes: 0
Received 0 Likes
on
0 Posts
#10
07-05-2006
Join Date: May 2006
Location: Georgetown, MA
Posts: 70
Likes: 0
Received 0 Likes
on
0 Posts
Originally Posted by 1 loud truck
i put switches in mine i could get a better pic if you want
(pic from above)
is that lil thing next to the pass airbag switch an add-on, or stock?
my ranger has a big space there from where the ashtry used to be (not in the truck when i bought it, but not a loss, since i dont smoke)
where would i get one like the one in the picture? i like that idea/design
thanks
#11
07-06-2006

Join Date: Dec 2005
Location: Bay Area, CA
Posts: 730
Likes: 0
Received 0 Likes
on
0 Posts
#13
07-06-2006
Join Date: Nov 2005
Location: MASS
Posts: 157
Likes: 0
Received 0 Likes
on
0 Posts
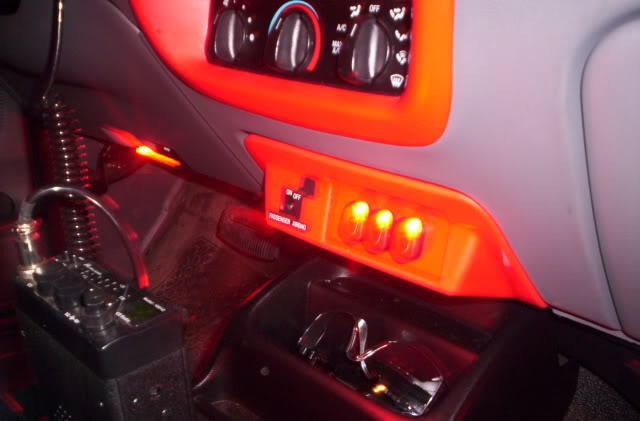
I used a piece of sheet metal bent it to the contour of the cubby drilled holes for switche's 1 switch is for driving light's 1 is for my strobe's and one is for my neon's and i ran i thick bead of silicone to hold it in place so i would not have to put screw's to hold it here is a better pic
#14
07-06-2006
Join Date: Jul 2005
Location: Fairbanks, AK
Posts: 3,256
Likes: 0
Received 0 Likes
on
0 Posts
#15
07-06-2006
Join Date: May 2006
Location: Georgetown, MA
Posts: 70
Likes: 0
Received 0 Likes
on
0 Posts
Originally Posted by Msl747
I think from 2000 on, the ashtray was taken out, and that little "cubby" was put in its place, Its a cool spot to put switches... I just keep my cell there. If you want I bet you could swich one out from a wreck...
I have a '02 and had an ashtray, lol
is there anywhere online i could get the one with the cubby cheap? there arnt many junkyards near my house, and the one in my town dosnt accept cars bc of some stupid town law or something
Edit: And, What is it called???? lol
#16
07-06-2006


Thread
Thread Starter
Forum
Replies
Last Post
turbo
OLD - Interior, Exterior, Electrical, & Misc.
5
03-25-2009 06:06 PM
Hefavitzen
General Ford Ranger Discussion
13
07-08-2006 04:07 PM


