The Carputer Progress Thread
#1
 04-27-2006


The Carputer Progress Thread
EDIT: Please keep the general 'chit-chat' in this thread to a minimum. I appreciate the 'looks cool' and 'great job' comments, but I'd like to keep this thread update-centered and keep it from getting 'watered-down.' If you have questions regarding the system itself, please ask them in this thread:
https://www.ranger-forums.com/forum2...562#post335562
I want to keep this thread from getting too cluttered. END EDIT
Those of you who watch R-F religiously like I do have probably seen that I am embarking on a quest to have a fully functioning personal computer embedded in my truck. I've finally got the money to begin on this project! Seeing as how it is not a very common mod, and because most people ask me 'WTF is a carputer?' I thought it would be fun to chronicle the project in a 'worklog' thread on R-F for your viewing (and hopefully educational) pleasure.
I'm relatively wet behind the ears when it comes to computers, but I've been doing my research and have a good basic knowledge to go on now. You can be sure there will be some mistakes and new learning curves along the way!
Let's first begin with the basic functions I plan to incorporate into my carputer system:
-Basic MP3 music playback
-DVD/CD playback
-DIVX movies
-WiFi internet (known as 'war-driving' to some)
-Bluetooth phone integration
-GPS satellite navigation
-Sirius satellite radio
-touchscreen interface
-Basic emulation (Super Nintendo on my computer)
Down the road, I may choose to (and will certainly have the capability to) add features such as:
-OBDII engine monitoring
-Integrated Voice Control
So now that we've got the basics out of the way, my first parts have come in! Here's a basic run-down of the bare-bones system I purchased.
The System has pre-loaded Operating System (Windows XP SP2), iGuidance 2.1, PowerDVD, all video codecs, and other applications. The hardware consist of:
VIA EPIA M10000 Motherboard
1Gb PC2100 Kingston Memory
M2-ATX Power Supply
80 Gb HDD 3.5"
Black Morex Mini-ITX Case
So far, all of this will probably seem pretty basic to you. Motherboard, hard drive, RAM, power supply, etc. There are a few differences in this equipment that I want to highlight for y'all.
First of all, the motherboard: VIA EPIA M10000
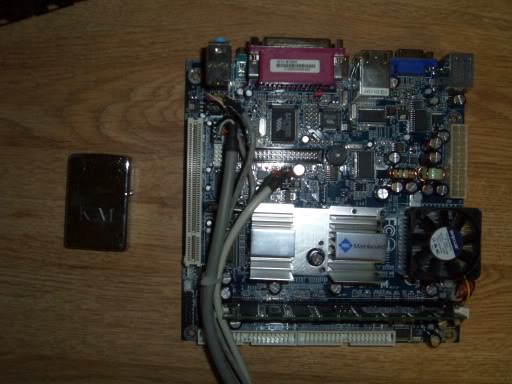
Yes, that is the entire motherboard. And yes, that is a standard-sized Zippo lighter being used for comparison. This motherboard is very small and well-suited for a carputer environment because of its size and its low heat-output. You notice only one fan and 2 heatsinks.
Here are the specs for the M10k from the manufacturer:
Processor
- VIA C3/EDEN EBGA Processor, C3 1GHz with Fan
Chipset
- VIA CLE266 North Bridge
- VT8235 South Bridge
System Memory 1 DDR266 DIMM socket, up to 1GB memory size
VGA Integrated VIA Unichrome AGP graphics with MPEG-2 Accelerator
Expansion Slots 1 x PCI
Onboard IDE 2 X UltraDMA 133/100/66 Connector
Onboard Floppy 1 x FDD Connector
Onboard LAN VIA VT6103 10/100 Base-T Ethernet PHY
Onboard Audio VIA VT1616 6 channel AC'97 Codec
Onboard LAN VIA VT6103 10/100 Base-T Ethernet PHY
Onboard Audio VIA VT1616 6 channel AC'97 Codec
Onboard TV Out VIA VT1622 TV out
Onboard 1394 VIA VT6307S IEEE 1394 Firewire
Onboard I/O Connectors
- 1 USB connectors for 2 additional USB 2.0 ports
- 2 1394 connectors for 2 1394 ports
- Front-panel audio connectors (Mic and Line Out)
- CD Audio-in connector
- FIR connector
- CIR connector
- Wake-on-LAN
- CPU/Sys FAN/Fan 3
- 1 SMBUS connector
- Serial port connector for second com port
Back Panel I/O - 1 PS2 mouse port
- 1 PS2 keyboard port
- 1 Parallel port
- 1 RJ-45 LAN port
- 1 Serial port
- 2 USB 2.0 ports
- 1 VGA port
- 1 RCA port (SPDIF or TV out)
- 1 S-Video port
- 3 Audio jacks: line-out, line-in and mic-in; can be switched to 6 channel output
BIOS - Award BIOS
- 2/4Mbit flash memory
System Monitoring & Management - CPU voltage monitoring
- Wake-on-LAN, Keyboard-Power-on, Timer-Power-on- System power management
- AC power failure recovery
Form Factor
- Mini-ITX (4 layer)
- 17 cm x 17 cm
As you can see, it's not a red-hot gaming PC, but it's got plenty of power to get the job done. The M10k is generally regarded as the basic essentials required for carputing.
The other piece of equipment I'd like to touch on is the M2-ATX power supply.
It is rated at 160 watts. Beyond being a normal ATX power supply, however, it has 2 special properties that are essential for the carputing environment.
The first of these is that it is a DC-DC power supply. Normally computers run on Alternating Current (from a wall outlet in your home) but there is no such luxury in a car. It's important then that your power supply use DC current instead. An alternative option would be to use a power inverter, but those generate lots of heat and are much less reliable for carputing.
The second function (and the one MOST essential) is that the M2-ATX functions as a startup/shutdown controller. There are several power supply problems that arise in the carputing environment. They primarily include engine cranks and under and over-voltage situations. The M2-ATX can operate between very low voltage conditions (Engine crank) and up to very high conditions (load dump). This flexibility keeps the PC running even as the voltage in the car fluctuates.
Another snazzy little feature is an amplifier 'thump' control. When a pc is connected to an amplifier, you will often hear a loud 'thump' through the speakers when the computer is started and sends a signal to the amplifier. The M2-ATX has a control which keeps the amplifier turned off until the computer is booted up.
One more issue I would like to address is the issue of a hard drive. This has been debated back and forth between 3.5" HDDs (normal computers) and 2.5"HDDs (laptop computers). Most people prefer laptop drives because they are generally more resistant to bounces and bumps you will experience. They are, however, usually more expensive and provide less hard disk space. 3.5" drives are cheaper and larger, but some people are wary of their resilience to the rough world of carputing. I am using a 3.5" drive because they're cheap and I have a few laying around. Most people try to mount their drives in manners that will resist vibration and keep the disk plates from slapping eachother on big bumps. I'll go over this more in detail later.
I'm going to finish this off with just a few more shots of random things associated with my project:
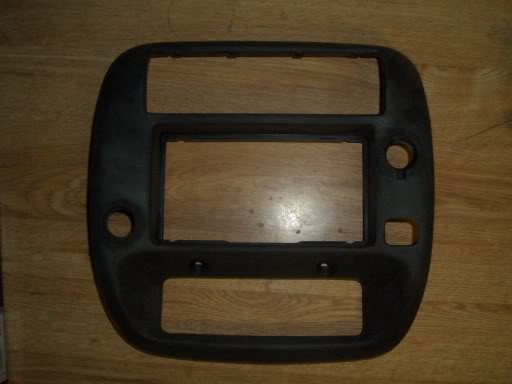
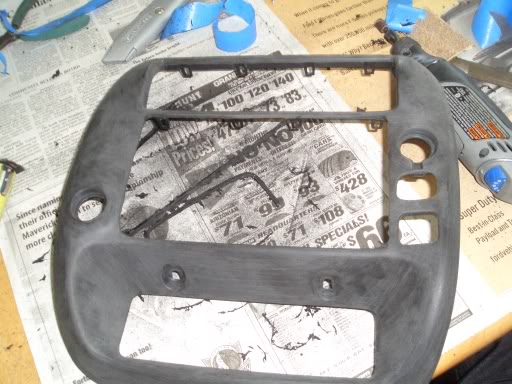
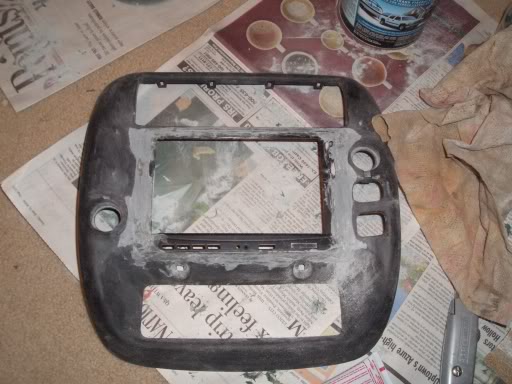
The radio bezel I will be modifying for the touchscreen. I'm also cutting another foglight switch hole to use for my PIAA lights. The rubber coating has already been sanded off. 100 grit sandpaper did a mighty fine job.
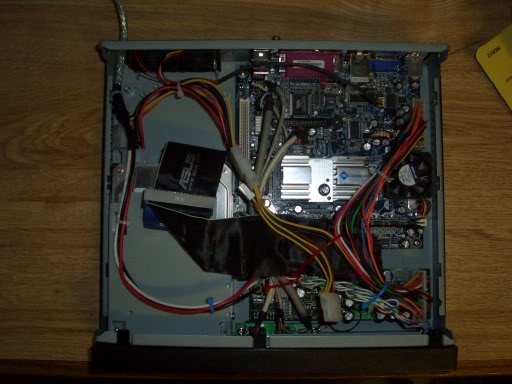
The basic components installed
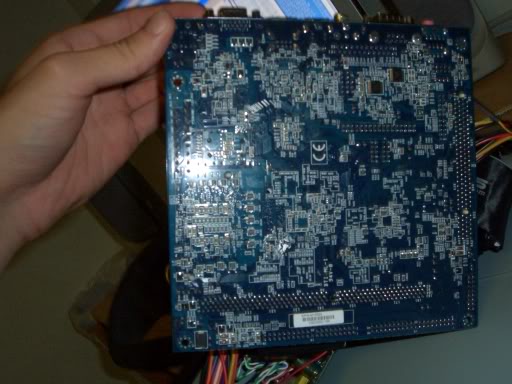
The backside of the motherboard
Total cost so far:
-$500 for the basic system
-$20 for the radio bezel
https://www.ranger-forums.com/forum2...562#post335562
I want to keep this thread from getting too cluttered. END EDIT
Those of you who watch R-F religiously like I do have probably seen that I am embarking on a quest to have a fully functioning personal computer embedded in my truck. I've finally got the money to begin on this project! Seeing as how it is not a very common mod, and because most people ask me 'WTF is a carputer?' I thought it would be fun to chronicle the project in a 'worklog' thread on R-F for your viewing (and hopefully educational) pleasure.
I'm relatively wet behind the ears when it comes to computers, but I've been doing my research and have a good basic knowledge to go on now. You can be sure there will be some mistakes and new learning curves along the way!
Let's first begin with the basic functions I plan to incorporate into my carputer system:
-Basic MP3 music playback
-DVD/CD playback
-DIVX movies
-WiFi internet (known as 'war-driving' to some)
-Bluetooth phone integration
-GPS satellite navigation
-Sirius satellite radio
-touchscreen interface
-Basic emulation (Super Nintendo on my computer)
Down the road, I may choose to (and will certainly have the capability to) add features such as:
-OBDII engine monitoring
-Integrated Voice Control
So now that we've got the basics out of the way, my first parts have come in! Here's a basic run-down of the bare-bones system I purchased.
The System has pre-loaded Operating System (Windows XP SP2), iGuidance 2.1, PowerDVD, all video codecs, and other applications. The hardware consist of:
VIA EPIA M10000 Motherboard
1Gb PC2100 Kingston Memory
M2-ATX Power Supply
80 Gb HDD 3.5"
Black Morex Mini-ITX Case
So far, all of this will probably seem pretty basic to you. Motherboard, hard drive, RAM, power supply, etc. There are a few differences in this equipment that I want to highlight for y'all.
First of all, the motherboard: VIA EPIA M10000
Yes, that is the entire motherboard. And yes, that is a standard-sized Zippo lighter being used for comparison. This motherboard is very small and well-suited for a carputer environment because of its size and its low heat-output. You notice only one fan and 2 heatsinks.
Here are the specs for the M10k from the manufacturer:
Processor
- VIA C3/EDEN EBGA Processor, C3 1GHz with Fan
Chipset
- VIA CLE266 North Bridge
- VT8235 South Bridge
System Memory 1 DDR266 DIMM socket, up to 1GB memory size
VGA Integrated VIA Unichrome AGP graphics with MPEG-2 Accelerator
Expansion Slots 1 x PCI
Onboard IDE 2 X UltraDMA 133/100/66 Connector
Onboard Floppy 1 x FDD Connector
Onboard LAN VIA VT6103 10/100 Base-T Ethernet PHY
Onboard Audio VIA VT1616 6 channel AC'97 Codec
Onboard LAN VIA VT6103 10/100 Base-T Ethernet PHY
Onboard Audio VIA VT1616 6 channel AC'97 Codec
Onboard TV Out VIA VT1622 TV out
Onboard 1394 VIA VT6307S IEEE 1394 Firewire
Onboard I/O Connectors
- 1 USB connectors for 2 additional USB 2.0 ports
- 2 1394 connectors for 2 1394 ports
- Front-panel audio connectors (Mic and Line Out)
- CD Audio-in connector
- FIR connector
- CIR connector
- Wake-on-LAN
- CPU/Sys FAN/Fan 3
- 1 SMBUS connector
- Serial port connector for second com port
Back Panel I/O - 1 PS2 mouse port
- 1 PS2 keyboard port
- 1 Parallel port
- 1 RJ-45 LAN port
- 1 Serial port
- 2 USB 2.0 ports
- 1 VGA port
- 1 RCA port (SPDIF or TV out)
- 1 S-Video port
- 3 Audio jacks: line-out, line-in and mic-in; can be switched to 6 channel output
BIOS - Award BIOS
- 2/4Mbit flash memory
System Monitoring & Management - CPU voltage monitoring
- Wake-on-LAN, Keyboard-Power-on, Timer-Power-on- System power management
- AC power failure recovery
Form Factor
- Mini-ITX (4 layer)
- 17 cm x 17 cm
As you can see, it's not a red-hot gaming PC, but it's got plenty of power to get the job done. The M10k is generally regarded as the basic essentials required for carputing.
The other piece of equipment I'd like to touch on is the M2-ATX power supply.
It is rated at 160 watts. Beyond being a normal ATX power supply, however, it has 2 special properties that are essential for the carputing environment.
The first of these is that it is a DC-DC power supply. Normally computers run on Alternating Current (from a wall outlet in your home) but there is no such luxury in a car. It's important then that your power supply use DC current instead. An alternative option would be to use a power inverter, but those generate lots of heat and are much less reliable for carputing.
The second function (and the one MOST essential) is that the M2-ATX functions as a startup/shutdown controller. There are several power supply problems that arise in the carputing environment. They primarily include engine cranks and under and over-voltage situations. The M2-ATX can operate between very low voltage conditions (Engine crank) and up to very high conditions (load dump). This flexibility keeps the PC running even as the voltage in the car fluctuates.
Another snazzy little feature is an amplifier 'thump' control. When a pc is connected to an amplifier, you will often hear a loud 'thump' through the speakers when the computer is started and sends a signal to the amplifier. The M2-ATX has a control which keeps the amplifier turned off until the computer is booted up.
One more issue I would like to address is the issue of a hard drive. This has been debated back and forth between 3.5" HDDs (normal computers) and 2.5"HDDs (laptop computers). Most people prefer laptop drives because they are generally more resistant to bounces and bumps you will experience. They are, however, usually more expensive and provide less hard disk space. 3.5" drives are cheaper and larger, but some people are wary of their resilience to the rough world of carputing. I am using a 3.5" drive because they're cheap and I have a few laying around. Most people try to mount their drives in manners that will resist vibration and keep the disk plates from slapping eachother on big bumps. I'll go over this more in detail later.
I'm going to finish this off with just a few more shots of random things associated with my project:
The radio bezel I will be modifying for the touchscreen. I'm also cutting another foglight switch hole to use for my PIAA lights. The rubber coating has already been sanded off. 100 grit sandpaper did a mighty fine job.
The basic components installed
The backside of the motherboard
Total cost so far:
-$500 for the basic system
-$20 for the radio bezel
Last edited by Gearhead61; 04-27-2006 at 01:49 PM.
#2
04-27-2006
#3
04-27-2006
Originally Posted by Trigger01
Kyle, is your bezel shiney now or is it just a flat texture. Mine is peeling and I was thinking about peeling the rest off, but I don't know how it looks under the rubber.

#5
04-27-2006
Unregistered User
Posts: n/a
Very cool, but definitely more pics required.. Also, I may ask you if we can split this to two separate threads.. One as a worklog, and one of the general chatter and such.. Reason being is I'm mostly ever usually itnerested in updates, don't care about the general chatter as much.. And I know that's true of many others.. Don't know yet, we'll see how the thread goes..
But, more pics.. I'm interested in the case and such as well.. I'm looking at eventually doing a project based on that board, just don't have the finances right now.. The other major thing that I love about those is its silence.. :)
But, more pics.. I'm interested in the case and such as well.. I'm looking at eventually doing a project based on that board, just don't have the finances right now.. The other major thing that I love about those is its silence.. :)
#7
04-27-2006
Originally Posted by sk0t
Very cool, but definitely more pics required.. Also, I may ask you if we can split this to two separate threads.. One as a worklog, and one of the general chatter and such.. Reason being is I'm mostly ever usually itnerested in updates, don't care about the general chatter as much.. And I know that's true of many others.. Don't know yet, we'll see how the thread goes..
But, more pics.. I'm interested in the case and such as well.. I'm looking at eventually doing a project based on that board, just don't have the finances right now.. The other major thing that I love about those is its silence.. :)
But, more pics.. I'm interested in the case and such as well.. I'm looking at eventually doing a project based on that board, just don't have the finances right now.. The other major thing that I love about those is its silence.. :)
EDIT: I created a new thread regarding discussion. Please send any praise, criticism, questions, donations, or attractive women to that thread. Links to this thread and the discussion thread are now in my signature. So now nobody has any excuse not to put there questions where they belong!
Last edited by Gearhead61; 04-27-2006 at 01:47 PM.
#8
04-27-2006
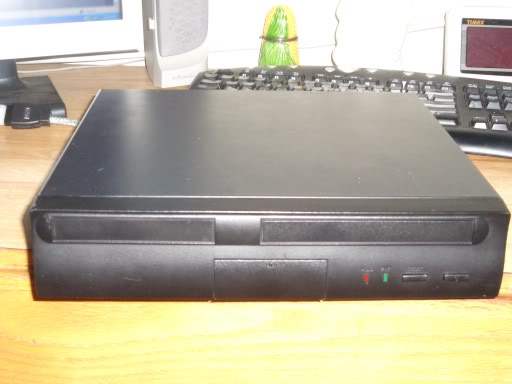
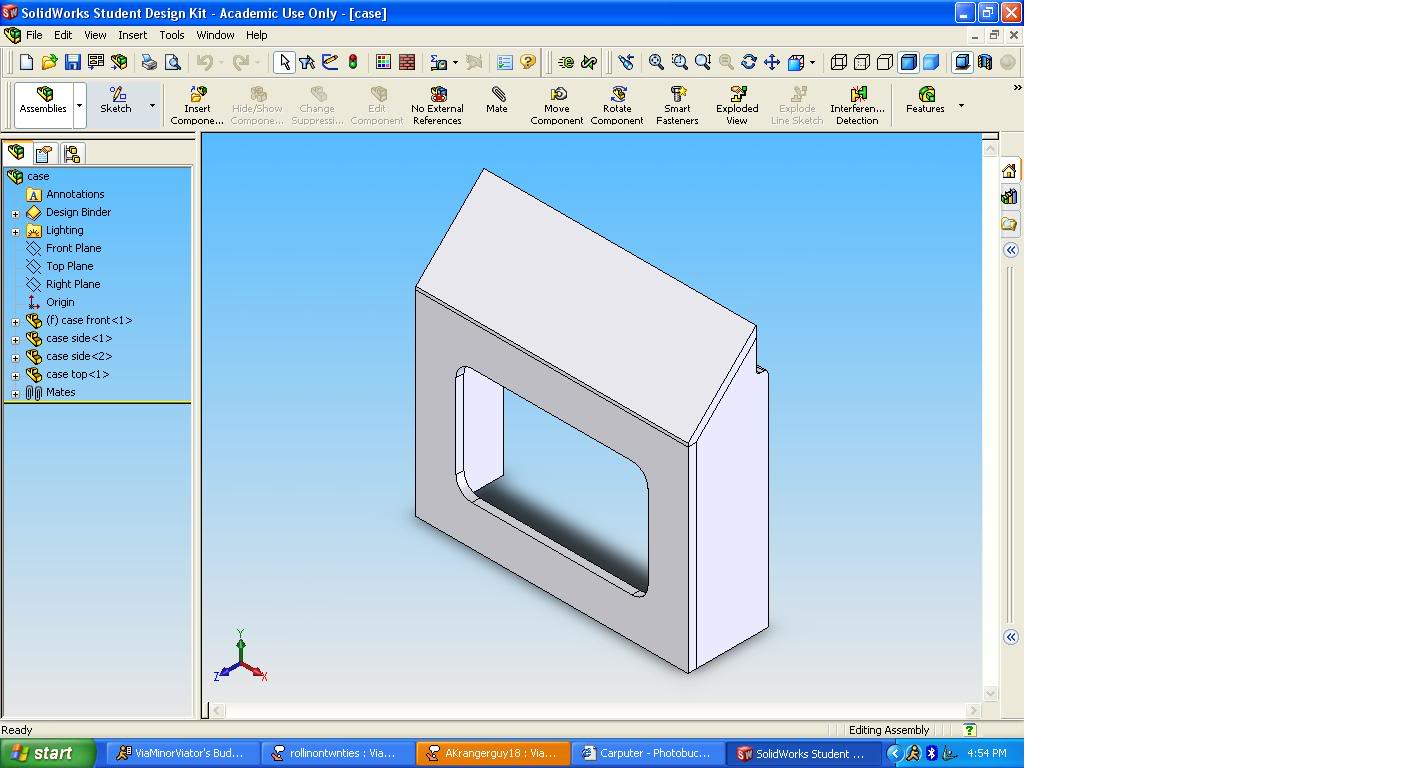
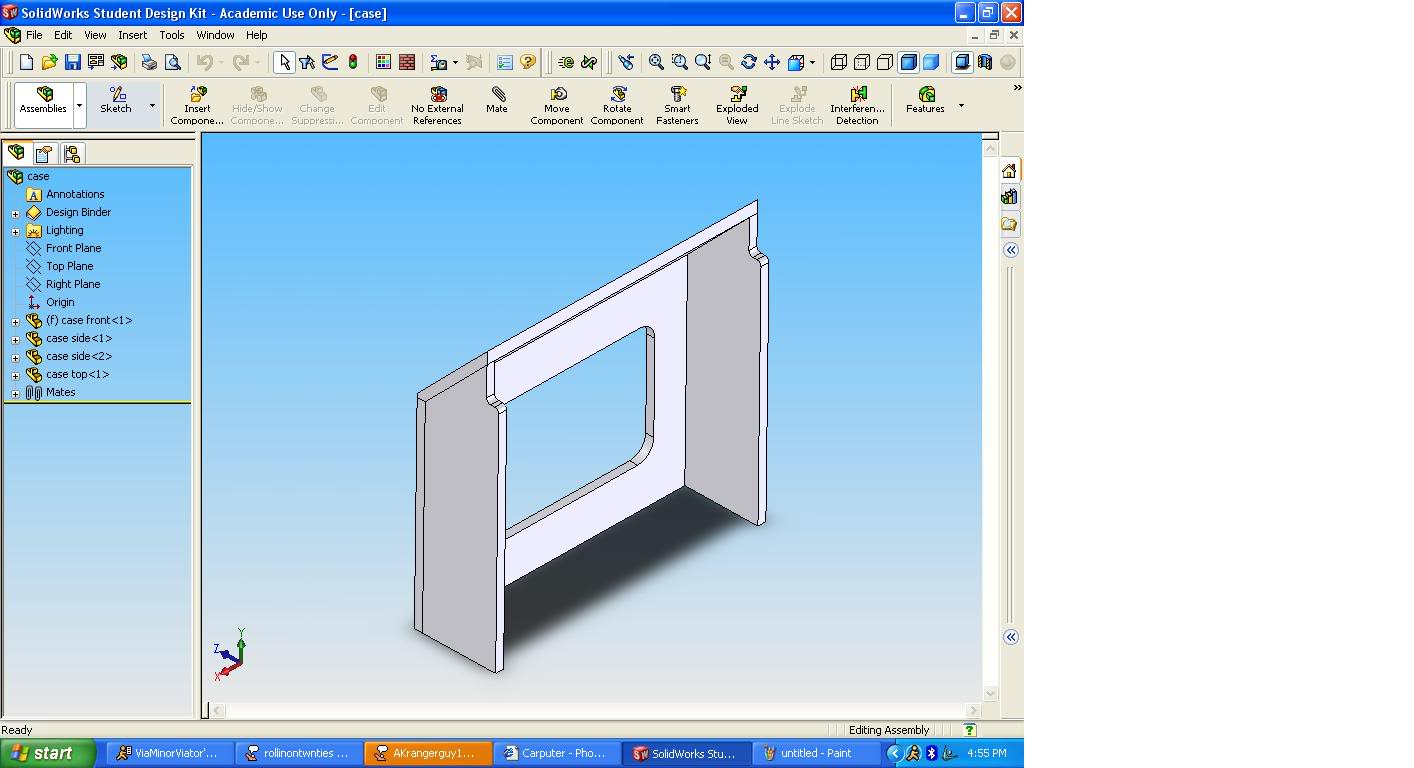
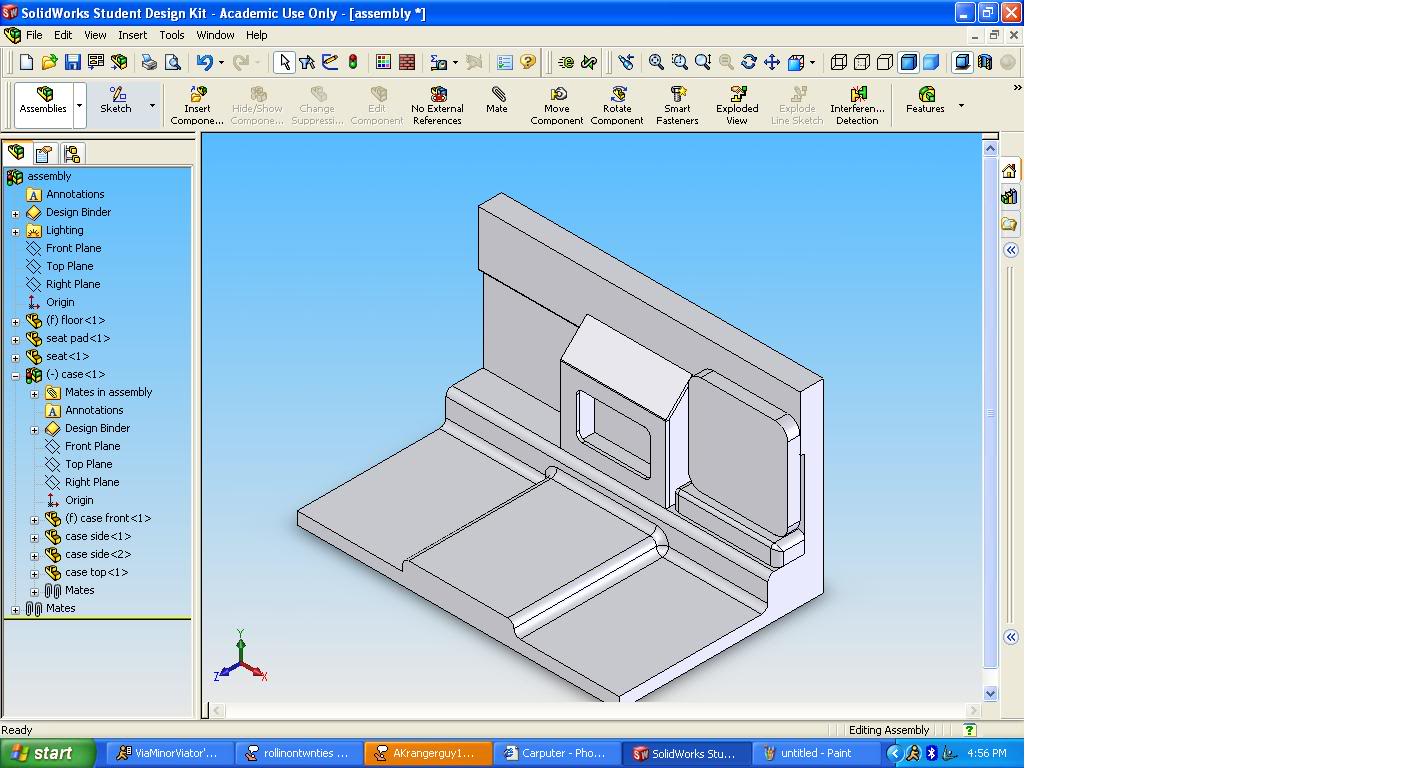
Here are pictures of the case. It's pretty basic. It is a Morex case, but I'm not sure of what model number. It's going to be getting hacked up anyways as I have a few custom ideas in mind for the install. The case is roughly 11 5/8 x 10 5/8 x 2 5/8 inches.
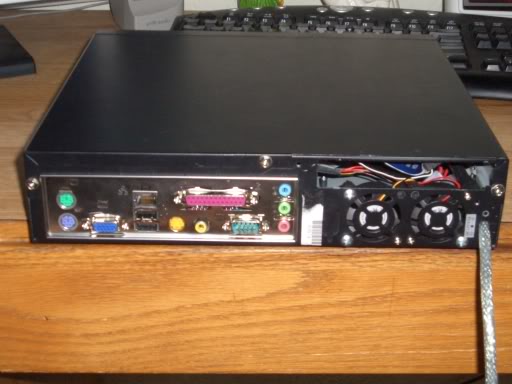
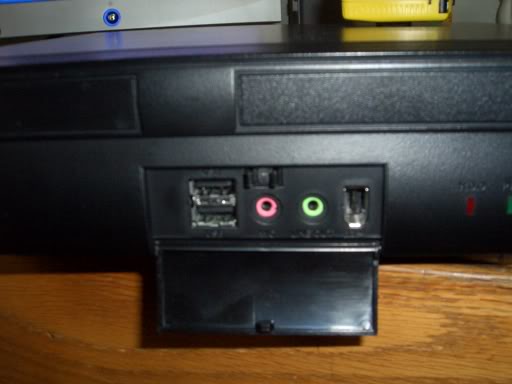
I am planning on remote-wiring this panel here up to the front of the cab where it would be more useful. My thoughts right now are to wire it, along with power and reset buttons and power and HDD LEDs into the cubbyhole next to the airbag switch. They will be easily accessible, but still out of the way and will not clutter up my dash or bezel.
I am planning on remote-wiring this panel here up to the front of the cab where it would be more useful. My thoughts right now are to wire it, along with power and reset buttons and power and HDD LEDs into the cubbyhole next to the airbag switch. They will be easily accessible, but still out of the way and will not clutter up my dash or bezel.
#9
04-28-2006
#10
05-16-2006
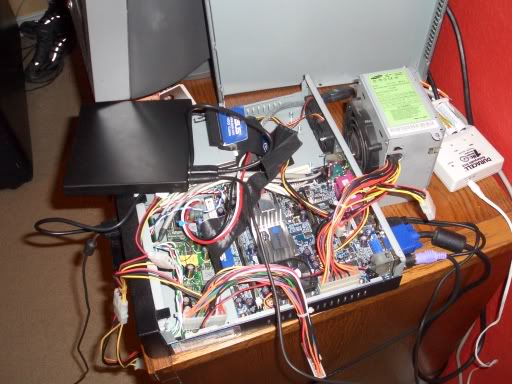
Well I finally got a little bit of progress done! Sadly I don't have pictures of everything I got done today, but I do have a few tidbits.
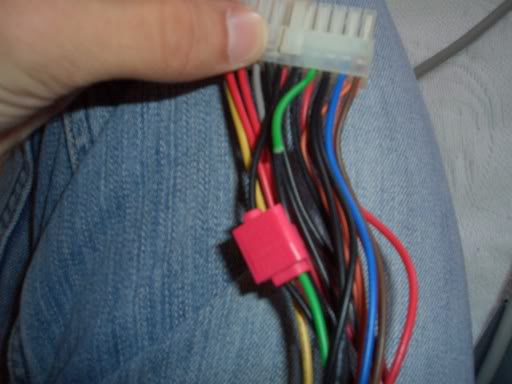
This is the M2-ATX power cables I modified to run through a molex connector so I can more easily remove the carputer once it is installed (instead of having to pull the M2-ATX cables off the board... they're on VERY snugly).
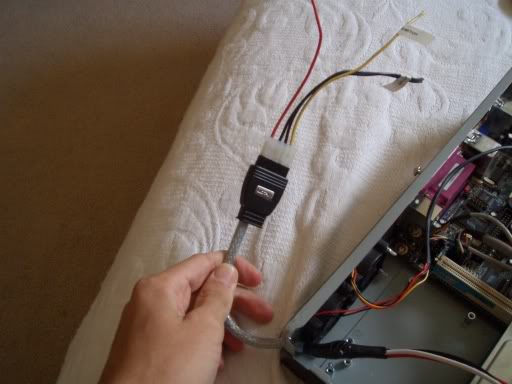
This is a little splice I had to do to get a home PSU to work with the M2-ATX so I could get the computer running and check out the software on it.
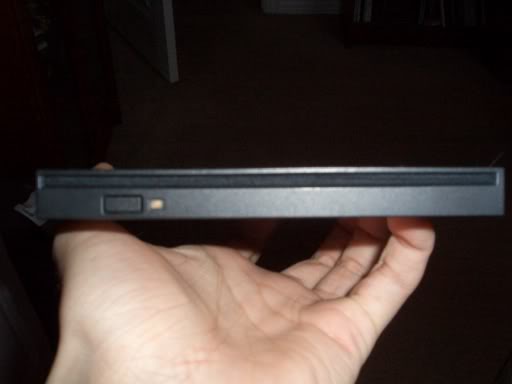
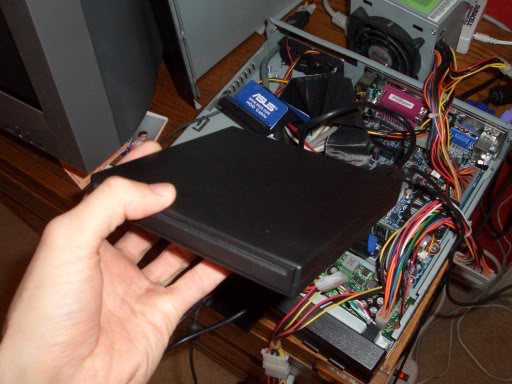
This is the slimline slot-loading DVD/ROM unit I picked up for $60 shipped. It needs an IDE adapter to work with the rest of the system, and I just ordered that off eBay for $10. It's about 1/2" thick!
I got the system running and checked out the installed software, but i don't have any pictures of it, since it's programmed and skinned for a Nissan 350Z! Once I get my own software up and running on it I will have some pictures of that!
This is the M2-ATX power cables I modified to run through a molex connector so I can more easily remove the carputer once it is installed (instead of having to pull the M2-ATX cables off the board... they're on VERY snugly).
This is a little splice I had to do to get a home PSU to work with the M2-ATX so I could get the computer running and check out the software on it.
This is the slimline slot-loading DVD/ROM unit I picked up for $60 shipped. It needs an IDE adapter to work with the rest of the system, and I just ordered that off eBay for $10. It's about 1/2" thick!
I got the system running and checked out the installed software, but i don't have any pictures of it, since it's programmed and skinned for a Nissan 350Z! Once I get my own software up and running on it I will have some pictures of that!
#11
06-05-2006
Well some more parts have come in. I've been wrestling with the software on this sucker and it just gets harder and harder everytime. I'm almost to the point of reformatting and starting over from scratch! I have been trying to use a program called nLite to slim down my installation of Windows XP to keep my boot times down and keep the speed and performance of the computer up. I'm afraid I just don't know enough about computers yet though! I've been doing a ton of reading, and it looks like I will be doing a ton more reading coming up. I'm still stuck between my choices for a front end system. I'm trying to decide between Centrafuse, which is what came loaded on the system, and Road Runner, which is generally regarded as the best front end. I'm having trouble with Road Runner running very slow for me though.
Anyways, I've got a few pictures of some of the new stuff that has come in:
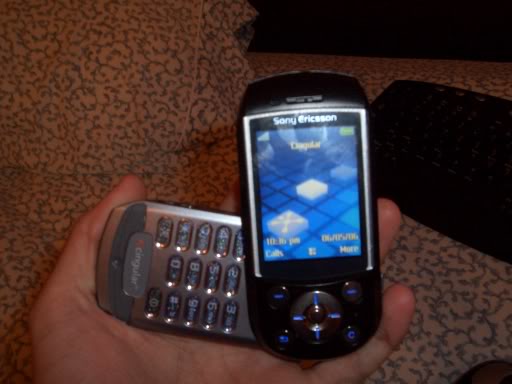
My new Sony Ericsson s710a. It's got some snazzy features and the ability to work with PhoneControl.NET to allow the carputer to control my phone via bluetooth. It's also got a remote control function that will allow me to control the media player on the carputer using the phone!
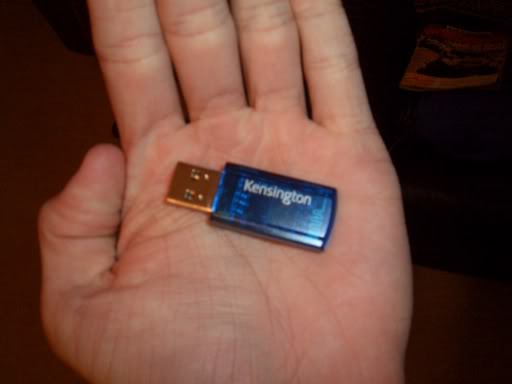
Kensington Bluetooth dongle. This lets my carputer connect to my phone and other devices via bluetooth.
Slim DVD drive with USB enclosure. This lets me hook my slot-loading DVD drive to the carputer using a USB cable instead of the standard 50 pin connection (my computer doesn't have any 50 pin connectors!)
The cluster-f*ck of wires and **** on my desk.
Anyways, I've got a few pictures of some of the new stuff that has come in:
My new Sony Ericsson s710a. It's got some snazzy features and the ability to work with PhoneControl.NET to allow the carputer to control my phone via bluetooth. It's also got a remote control function that will allow me to control the media player on the carputer using the phone!
Kensington Bluetooth dongle. This lets my carputer connect to my phone and other devices via bluetooth.
Slim DVD drive with USB enclosure. This lets me hook my slot-loading DVD drive to the carputer using a USB cable instead of the standard 50 pin connection (my computer doesn't have any 50 pin connectors!)
The cluster-f*ck of wires and **** on my desk.
#13
06-06-2006

Join Date: Apr 2006
Location: Ketchum,Ok
Posts: 80
Likes: 0
Received 0 Likes
on
0 Posts
#14
06-06-2006
Join Date: May 2005
Location: MI
Posts: 3,200
Likes: 0
Received 0 Likes
on
0 Posts
#15
06-07-2006
Well I had a bit of a software epiphany last night, and after somehow managing to delete 95% of my MP3 files trying to get this software to work, it's about time! Don't mind the size of the software or my computer backdrop. On the carputer the screen res is different, and the touchscreen is a wide screen ratio, so the software will fit fine on that... I'm working from my desktop right now to make sure I can get everything going the way I like.
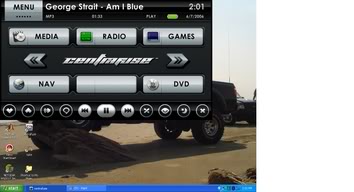
The main GUI menu for the carputer.
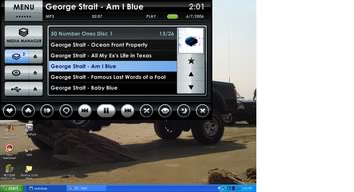
Music player/media manager

GPS Nav Screen. Yes. that's a German map. I haven't loaded the GPS software here, only a small sample map. I still need to buy my GPS unit.
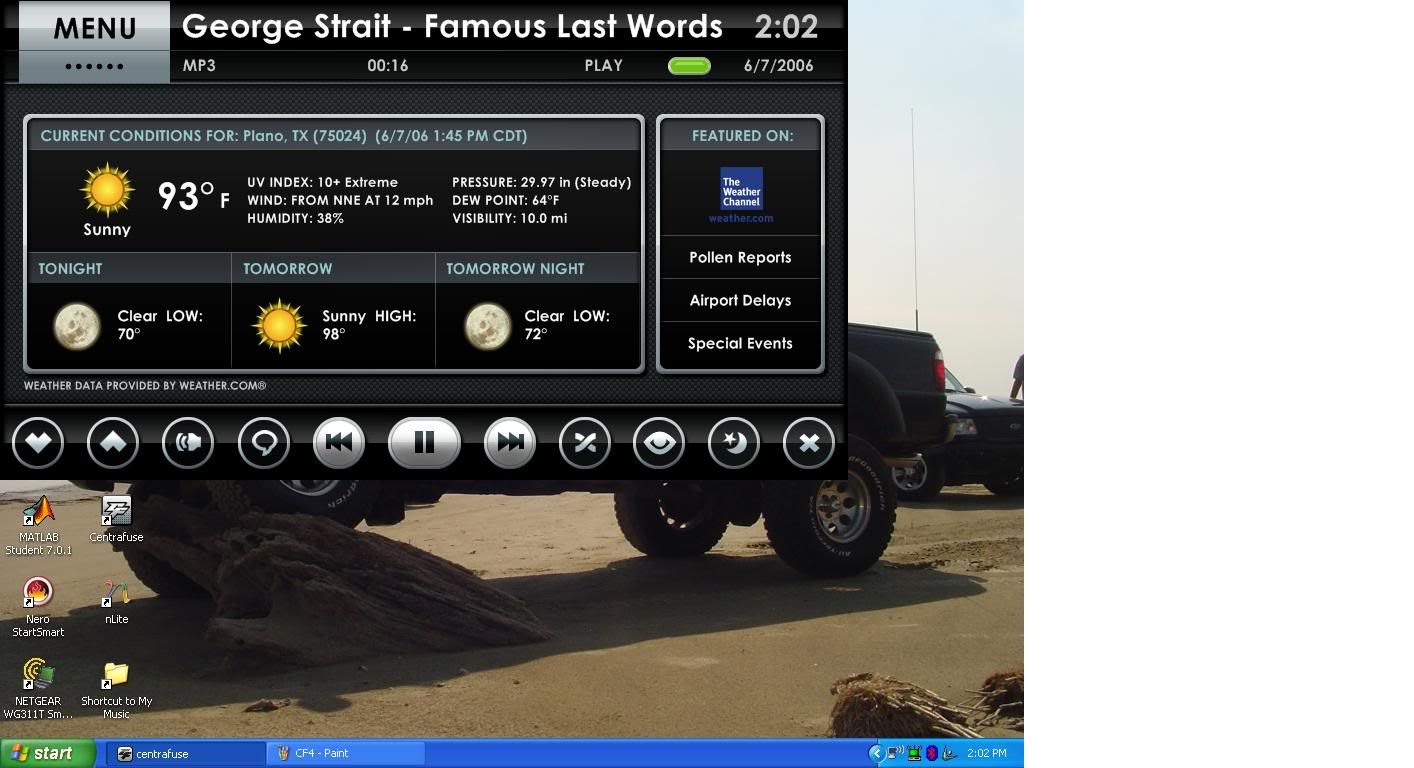
Centrafuse connects to the internet when there is a connection available and can give me automatic weather updates.
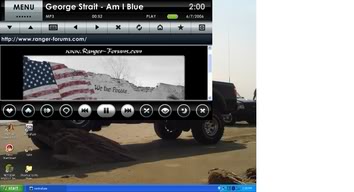
Web surfing through a touchscreen interface!
The main GUI menu for the carputer.
Music player/media manager
GPS Nav Screen. Yes. that's a German map. I haven't loaded the GPS software here, only a small sample map. I still need to buy my GPS unit.
Centrafuse connects to the internet when there is a connection available and can give me automatic weather updates.
Web surfing through a touchscreen interface!
#17
06-14-2006
Well I've gotten alot of goodies in the past few days, so I think I'm about done buying stuff. I'll need some USB/VGA extension cords, wires, and the like, but y'all don't really care about that stuff I'm sure.
EnGenius USB WiFi adapter with external antenna
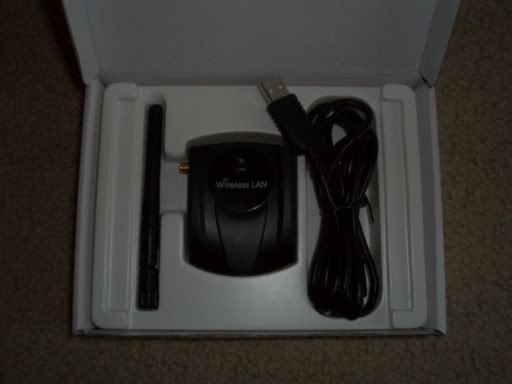
This puppy is about 6 times more powerful than your standard USB wireless adapter, and comes with an external antenna so I can have the option of adding a larger antenna down the road.
BU-353 GPS Mouse
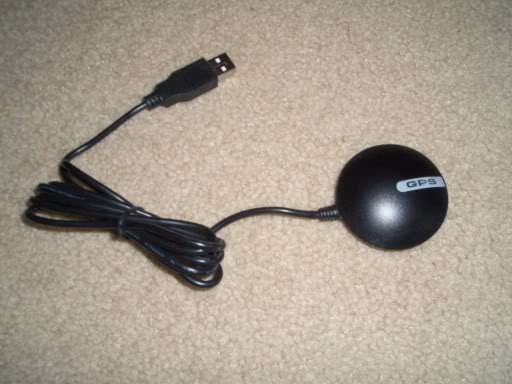
My GPS unit, allows my truck to be tracked by GPS satellites
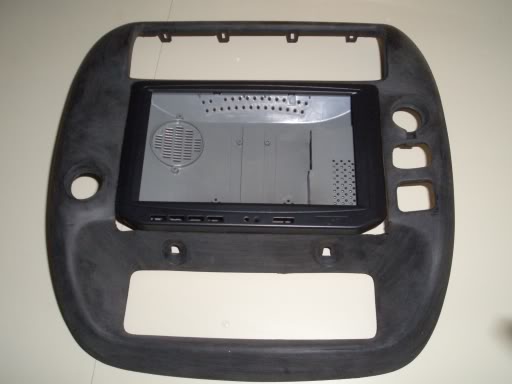
Xenarc 700TSV
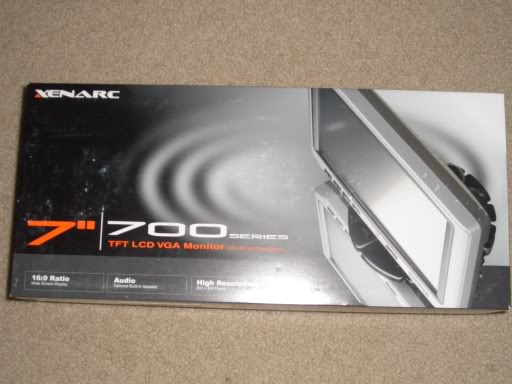
My display and touchscreen interface. It is a VGA monitor with 2 composite video inputs (think PS2 or rearview camera). Top of the line quality and lasts more than 35x longer than its predecessor
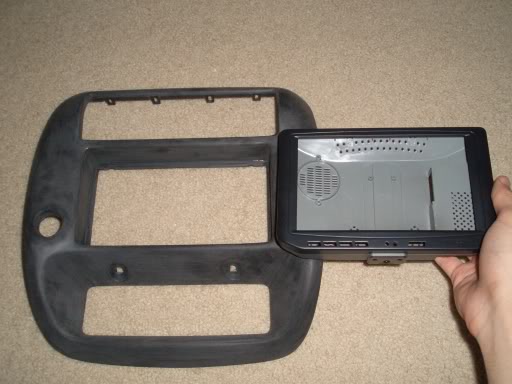
I purchased an extra Xenarc housing to use during the molding process to keep my original in good condition (and so I can use the screen on my bench test system). As you can see, it's not going to be an easy fit...
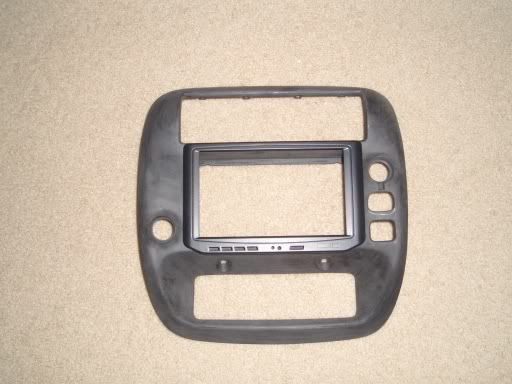
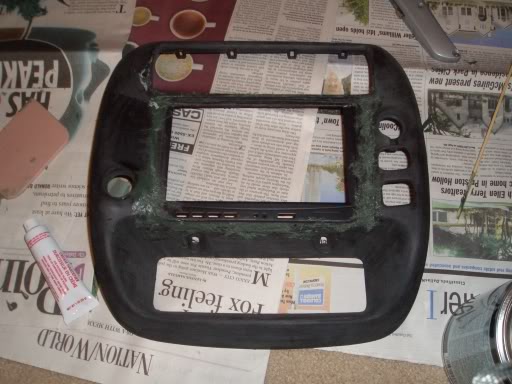
But with a little cutting and alot of sanding, you end up with some of this:
And then this:
And finally, it fits!

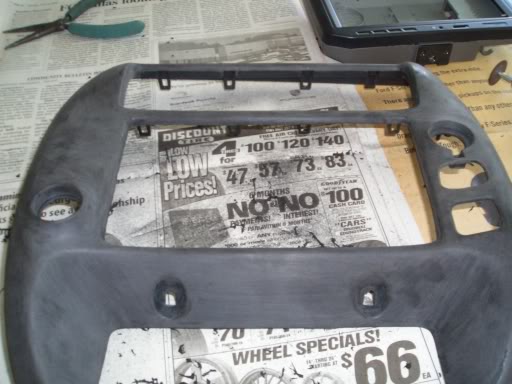
Next step is to use this gunk to make it look nice and pretty, like it's supposed to be there. Stay tuned!
EnGenius USB WiFi adapter with external antenna
This puppy is about 6 times more powerful than your standard USB wireless adapter, and comes with an external antenna so I can have the option of adding a larger antenna down the road.
BU-353 GPS Mouse
My GPS unit, allows my truck to be tracked by GPS satellites
Xenarc 700TSV
My display and touchscreen interface. It is a VGA monitor with 2 composite video inputs (think PS2 or rearview camera). Top of the line quality and lasts more than 35x longer than its predecessor
I purchased an extra Xenarc housing to use during the molding process to keep my original in good condition (and so I can use the screen on my bench test system). As you can see, it's not going to be an easy fit...
But with a little cutting and alot of sanding, you end up with some of this:
And then this:
And finally, it fits!
Next step is to use this gunk to make it look nice and pretty, like it's supposed to be there. Stay tuned!
#18
06-14-2006
Join Date: Aug 2005
Location: Houston, Tx
Posts: 2,199
Likes: 0
Received 0 Likes
on
0 Posts
#19
06-15-2006
All I can say right now is:
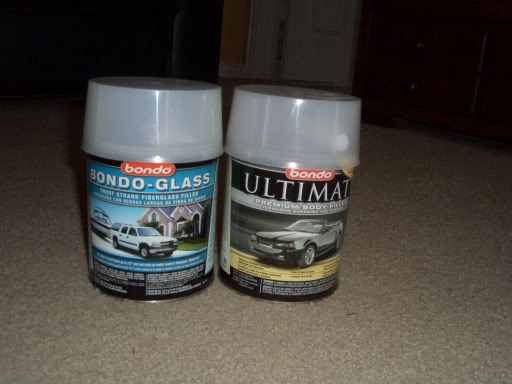
Me-> <-Bondo
I'm starting to get the hang of it though. I had 3 different layers of fiberglass reinforced bondo, and now I am on my 4th application of regular bondo to try and make it all pretty. If this last one turns out alright, I think it's on to the marathon of sanding, starting with 80 grit and moving all the way up to 420 grit. Here's some shots of where I've been and where I'm at.
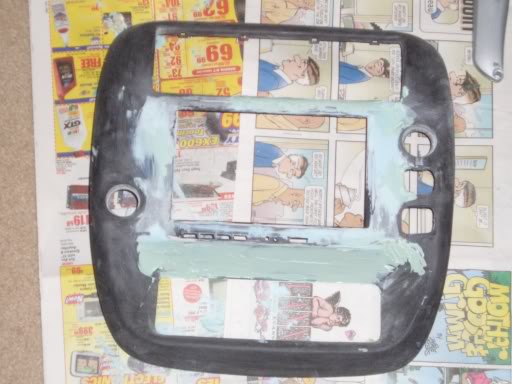
Me->
<-BondoI'm starting to get the hang of it though. I had 3 different layers of fiberglass reinforced bondo, and now I am on my 4th application of regular bondo to try and make it all pretty. If this last one turns out alright, I think it's on to the marathon of sanding, starting with 80 grit and moving all the way up to 420 grit. Here's some shots of where I've been and where I'm at.
#20
06-15-2006
#21
06-15-2006

Join Date: Dec 2005
Location: Nowhere
Posts: 3,481
Likes: 0
Received 0 Likes
on
0 Posts
#23
06-15-2006
#25
06-15-2006


