Harvest Gold 1999 Ranger
#51
 02-03-2016


#52
02-03-2016
#53
02-03-2016
Small update. Before I buy anything else, I decided to try and dry the lens first. I poured some rubbing alcohol inside the lens and sloshed it around a bit, pouring it out and letting it evaporate. I should see an improvement tomorrow. My thought there being, if I didn't let the water leave the lens, then the gaskets will only sustain the problem.
And, as if I didn't have that to work with, my belt is squealing now. It rained a week ago and it hasn't shut up since. I sprayed water on the belt and of course that shuts it up until the water leaves. That tells me if nothing else it's not a bearing. Tomorrow I'm going to take a look at it under the sun and see if there's any obvious misalignment. I'm looking to buy a gatorback belt, because that belt should stay quiet 24/7 being the city driver it is. Irritates me, because this belt is new. We bought it very shortly, within a month, of buying the truck as it had a similar issue. Was squealing when we bought it.
New idler pulley, new tensioner and tensioner pulley and a new belt. Right now I'm blaming the belt itself.
#55
02-04-2016
This morning, started the truck up and inspected the pulleys. There does not appear to be any misalignment and of course it was quiet as a church mouse.
Went around town to three different autoparts stores and even Sears Auto but not one place sells the gatorback. Only one person knew what I was talking about.
Btw, the rubbing alcohol made a HUGE improvement. There's still a little bit of water but so small you really have to get it it's face and look to see it. I'll be running to the junk yard this weekend likely so I'll grab some gaskets there anyway as well as some sockets. Maybe I can get an alternator while I'm there.
#56
02-05-2016
Well, I've got a project going on that's turning out to be more work than I anticipated.
This morning I took off and headed to autozone. Picked up a new power steering pump and grabbed four quarts of Mercon V.
Came home and tore in. Took off both front wheels and supported the control arms on jack stands so I could turn the wheel lock to lock with no resistance. Well, I couldn't reach the engine bay then, so I popped both wheels off and now it sits about like it would with wheels on.
Everything went fairly smooth except for one stubborn line. Mounted up the new pump in it's home and reconnected all the lines then went to put the pulley back on.
When it almost bottomed out I quickly realized, it's BACKWARDS.

So now I have a problem. Went online and autozone wants less than ten dollars for a new one. So, tomorrow (because not tonight) I'm going to take the AC compressor off then the power steering pump bracket off so I can remove it from the vehicle.
I'll clamp the pulley itself into my bench vice and sawzall the pulley itself in half. The hard part will be that bearing/bushing in the center, which a dremel might be better suited.
I'll try that first. Then I can get the new pulley and take my old pump for it's core. Once I have the new pulley I can press it on properly and put everything back on. Probably the first time anyone has ever used a sawzall during a power steering pump replacement.
This morning I took off and headed to autozone. Picked up a new power steering pump and grabbed four quarts of Mercon V.
Came home and tore in. Took off both front wheels and supported the control arms on jack stands so I could turn the wheel lock to lock with no resistance. Well, I couldn't reach the engine bay then, so I popped both wheels off and now it sits about like it would with wheels on.
Everything went fairly smooth except for one stubborn line. Mounted up the new pump in it's home and reconnected all the lines then went to put the pulley back on.
When it almost bottomed out I quickly realized, it's BACKWARDS.
So now I have a problem. Went online and autozone wants less than ten dollars for a new one. So, tomorrow (because not tonight) I'm going to take the AC compressor off then the power steering pump bracket off so I can remove it from the vehicle.
I'll clamp the pulley itself into my bench vice and sawzall the pulley itself in half. The hard part will be that bearing/bushing in the center, which a dremel might be better suited.
I'll try that first. Then I can get the new pulley and take my old pump for it's core. Once I have the new pulley I can press it on properly and put everything back on. Probably the first time anyone has ever used a sawzall during a power steering pump replacement.
#57
02-06-2016
Anyone who does the same stupid thing I did, don't waste your time trying to take the whole bracket off. The pulley itself is made from a rather easy to break material, something plastic-like. It can easily be cut with a hacksaw and cracked apart by hand to get it off the bushing.
From there you can remove the pump from the vehicle and remove the bushing from the shaft using the pulley puller. From there you can use your new pulley, pressed on the correct way around.
That being said, the pump is mounted in Gold Dust and is all snugged up nice. No whine and it steers like a brand new truck, using Mercon V atf of course. Oddly enough I didn't even use one full quart, more like 7/8ths of a quart. Oh well. I've got it for when I do my transmission flush.
#58
02-07-2016
#59
02-07-2016
It is, and it feels a bit stronger too. Not much, but a noticeable amount. No leaks either, so that's nice.
I still want to flush the system out though. Given I used less than a quart, that tells me there's still a crap ton of old ATF in the system. Maybe if I remove the low pressure line (easily removed with pliers) it'll shoot the crud out so I can pour new in. Maybe next weekend. Tried of messing with it this weekend, lol.
I still want to flush the system out though. Given I used less than a quart, that tells me there's still a crap ton of old ATF in the system. Maybe if I remove the low pressure line (easily removed with pliers) it'll shoot the crud out so I can pour new in. Maybe next weekend. Tried of messing with it this weekend, lol.
#60
02-07-2016
Next weekend I have more plans I hope to carry out, weather permitting.
Like many other diffs, axels, and wheel wells, they all turn that ugly brown. Mine were that way too but I only applied a bandaid by just spraying cheap black paint over it. And that works, I suppose, but I know I can do better.
Now that I have an angle grinder with a wire wheel I plan on doing some serious cleaning up on the exposed areas and spraying some slightly better rustolem paint and primer. I also plan on doing this to the wheel wells, all four corners as well as any other parts painfully seen.
I also would like to give my engine bay a good detailing. Simple green, garden hose, and a brush. I may do the engine tomorrow. Little prep involved.
Something else I've got in mind for when I've got a bit more cash on hand.....
https://www.ranger-forums.com/interi...system-104555/
Even though at the moment I don't have anything demanding, I'd like to have something like this done. I'd also like to add a deep cycle battery in conjunction with a fairly good inverter permanently installed in the center console. That would be great for vacation I think.
I just need to find a way for the deep cycle battery to not be connected when I start the engine but be connected to the accessories and such as well as the alternator for charging.
#61
02-09-2016
Well, Gold Dust has two new battle scars. The bottom corner of the tailgate is pushed out a bit and needs to be bent back in somehow, and the fiberglass on the bedside (tailgate area on the right side) has a little hickey. Nothing too severe and hardly noticeable, but scarred none the less. Unfortunately that's a 500 dollar fix, so I'm gonna skip out on that. I have no doubt that I'd be pleased and satisfied but sheesh that's steep.
In other news, I have a 130 amp alternator in my possession now. Had it tested at Advance Auto and it came back O.K. so after a good cleaning with a brush it's ready to be put on. At the same time I'd like to run some 1 gauge wire and do the how-to I posted about previously. Gotta find a way to get the rust off this pulley though. Bugs me.

Also, here's the part I mentioned. Finally got it in my hands. Woot!

In other news, I have a 130 amp alternator in my possession now. Had it tested at Advance Auto and it came back O.K. so after a good cleaning with a brush it's ready to be put on. At the same time I'd like to run some 1 gauge wire and do the how-to I posted about previously. Gotta find a way to get the rust off this pulley though. Bugs me.
Also, here's the part I mentioned. Finally got it in my hands. Woot!
Last edited by TheArcticWolf1911; 02-09-2016 at 02:19 PM.
#62
02-09-2016
Something crossed my mind. For a while now I've been thinking of exhaust, specifically the muffler.
I have a sawzall and an angle grinder now, so I'm thinking about chopping my muffler off and replacing it with another muffler that sounds better. Maybe a flowmaster or something. I'm not concerned with any fancy exhaust looks. I'm comfortable with it exiting where it usually does or even not exiting in a visible area at all.
All I need is either access to a welder or an alternative method of attachment. What that would be, I don't know as I'm a total noob with exhaust work.
Just been bouncing around in my head.
EDIT:
Decided to get an idea about how a 3.0 would sound that way via youtube. ....not impressed. Gonna shelf that until I get a better engine. 4.0 sohc swap first. I would do the five, but all the aftermarket parts I'd need (exhaust manifold, oil filter angle adapter, etc) scares me off a bit. 4.0 is going to be easier I'm sure. I really really want the sound of the 5.0 but.... Wow. It's a bit to think about. It's been rattling around in my mind for a while, and either way I can't afford such a project at this point in time so I guess moot point but, still.
Last edited by TheArcticWolf1911; 02-09-2016 at 09:44 PM.
#63
02-10-2016
I'm glad that alternator turned out to be a good one and it cleaned up NICE too! I never had any doubt that it was bad, but it was still idea to have it tested.
You made out like a bandit just paying $0.00 bucks for it. Can't beat that.
I'm looking forward to seeing that beautiful silver gauge cluster in Gold Dust, I'm sure she'll like it.
You made out like a bandit just paying $0.00 bucks for it. Can't beat that.
I'm looking forward to seeing that beautiful silver gauge cluster in Gold Dust, I'm sure she'll like it.
#64
02-10-2016
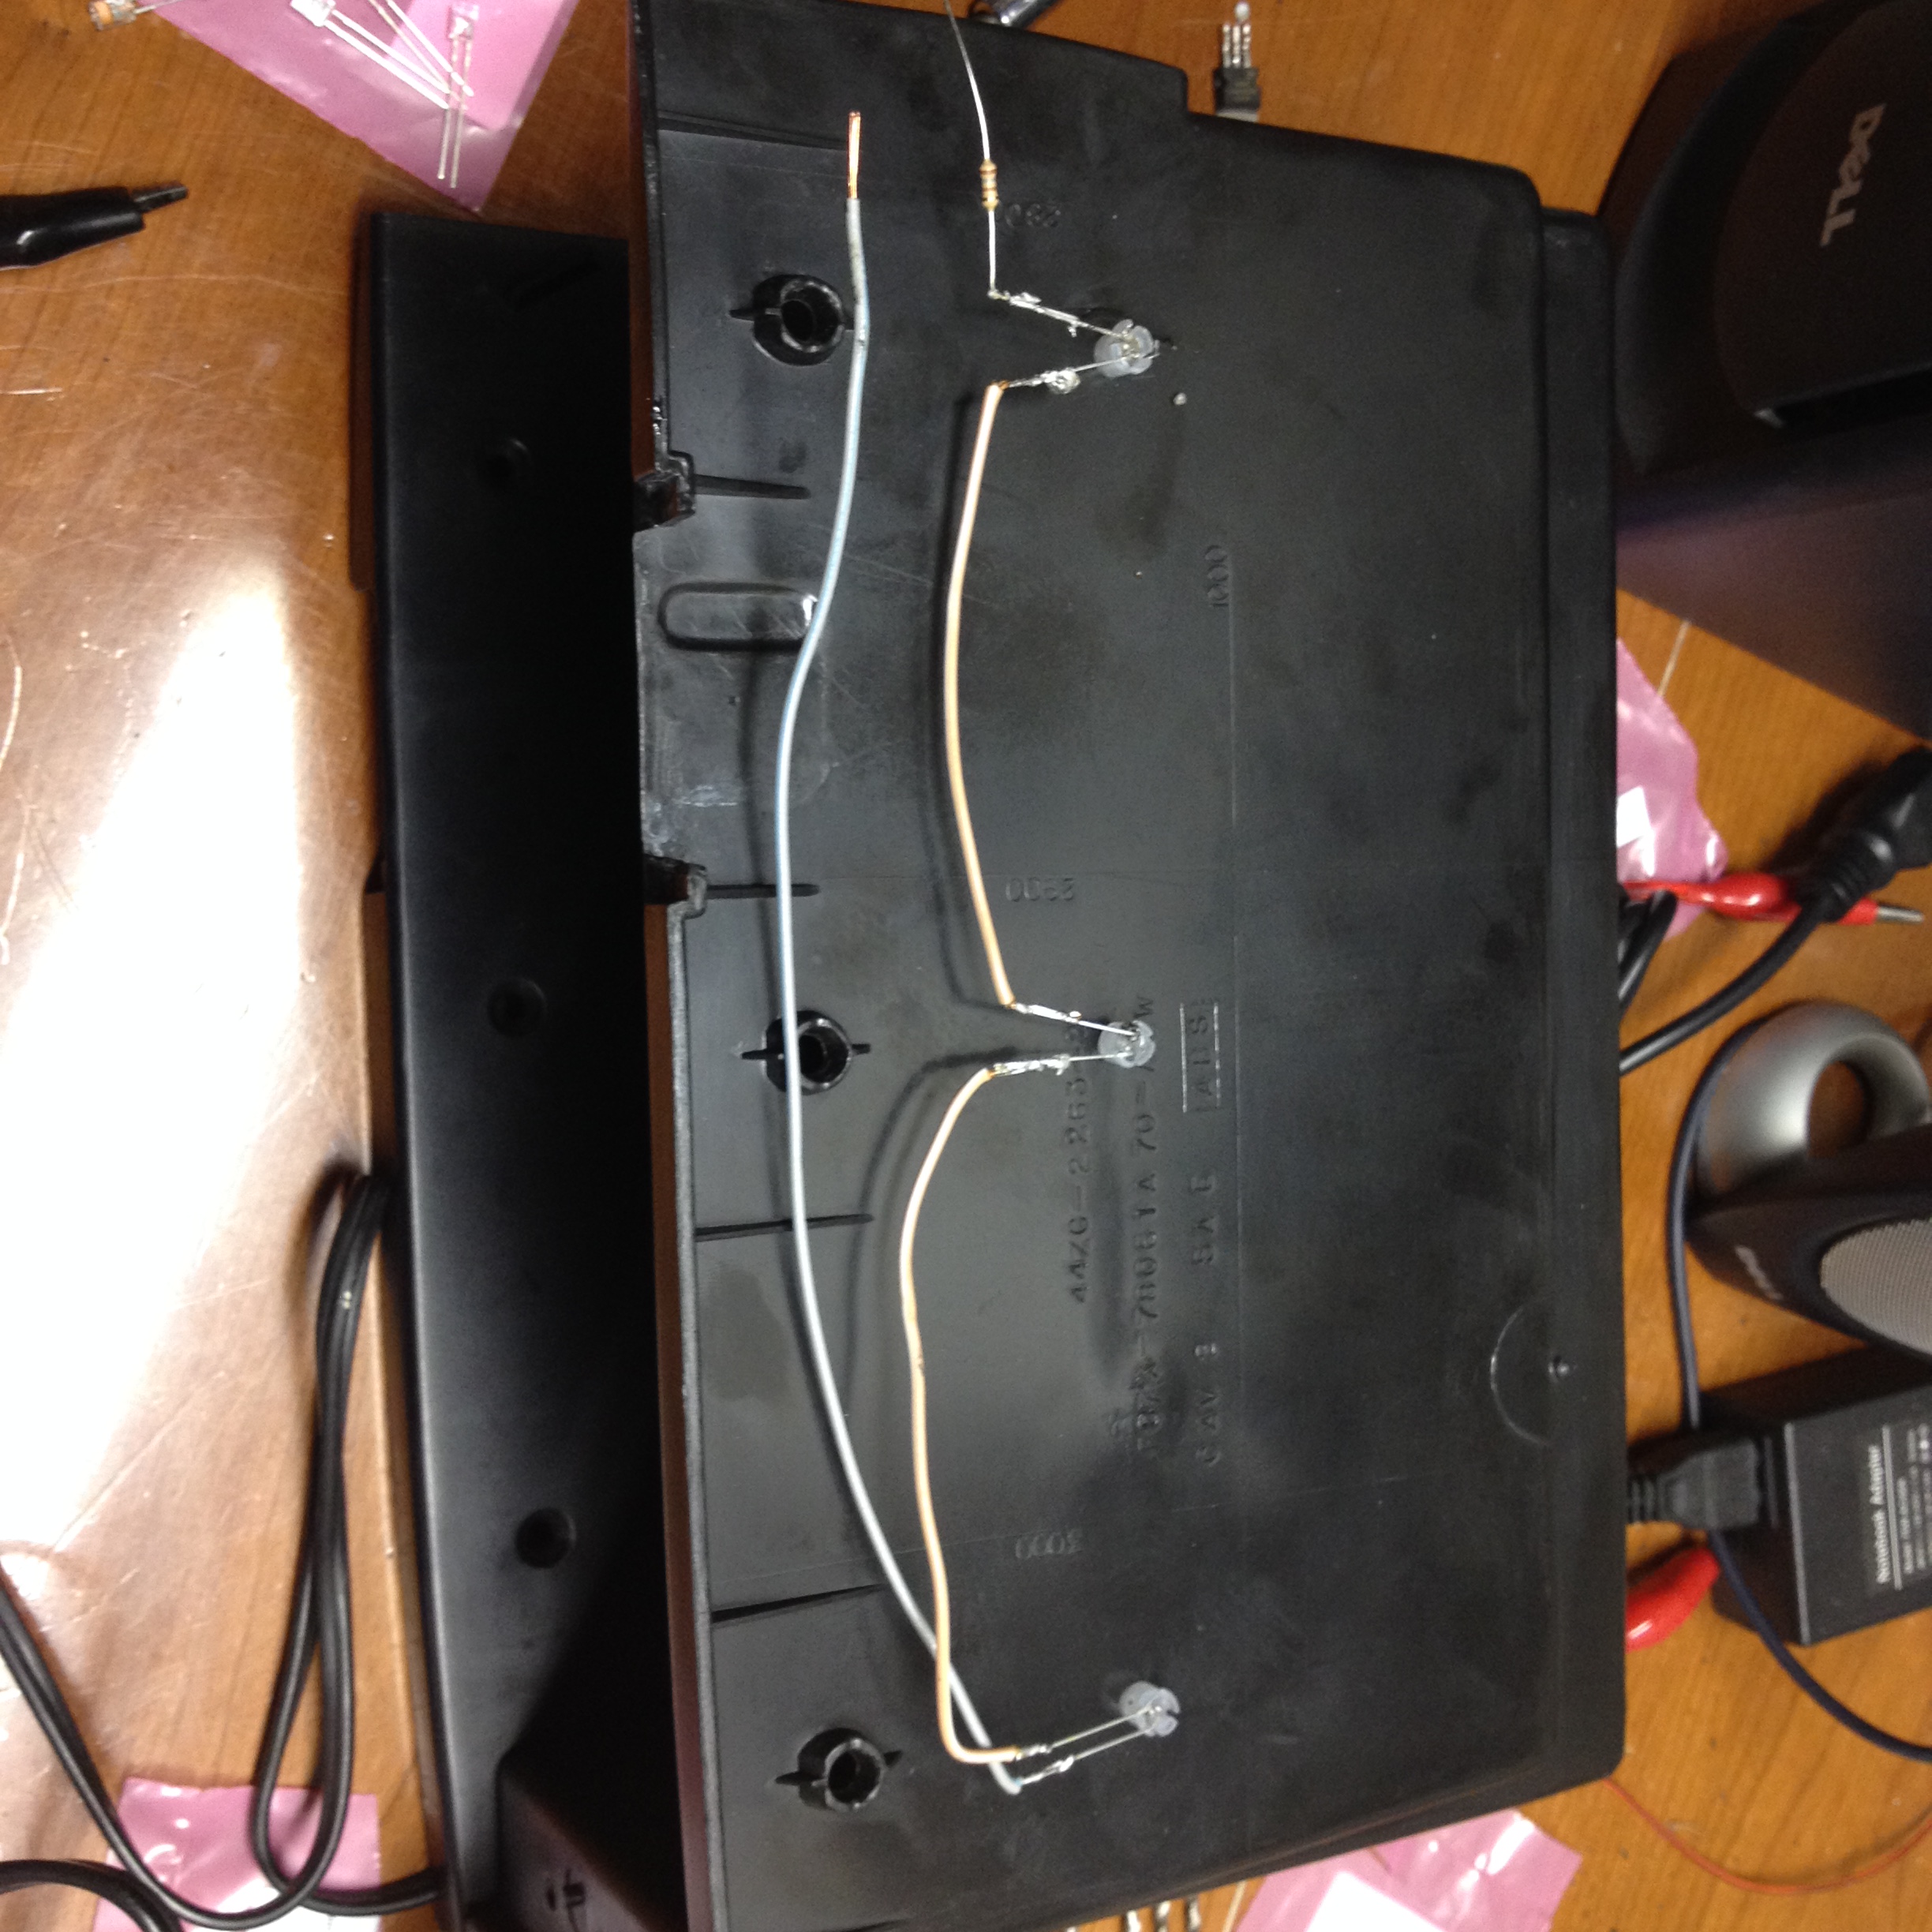
Today I decided to get started on a couple things. First thing I did was swap in my new alternator and put my old 95 amp alternator aside. The 130 amp alternator is quite a bit bigger than the old one but it still fits nice and cozy under the radiator hose. All the plugs and such match up the same. Not much to say about it, other than pulleys. I opted to use the original pulley after a good cleaning with a wire brush on a drill to take off the rust. The 130 amp alternator pulley is about the same diameter but considerably wider. Wider however isn't a problem in my case as the ribs line up nicely without any squeals.
After that was done I began work on my center console, the switch panel I probably mentioned earlier. I'll be going over the center console in as much detail as I can once it's finally finished after three months.
I've got the USB module and the two push button switches wired, and I've taken the night off for the lock switches. I know what happens when I'm tired.
Instead of spending hours trying to reuse the incomplete wiring harness for the door locks I opted to make my own relay pack for each of the two switches, independent of one another. This is the diagram I'm following for such.
I'm choosing to solder directly to the tabs of the relays. Not only because I dislike crimp connectors, but I'm also short on crimp connectors anyway.
#65
02-11-2016
Full length console is complete! After three months....


Now to go into detail. The console itself bolted right in as expected. I opted to not use the rear bracket at all, instead using the eyelets up front into the floor with some fair size bolts going into the floorpan. Not much to say here.
Inside the console itself are six, 5mm wired in two pairs of three, one set for each side. the two sets are wired in parallel. An individual set is wired in series. They're wired to come on with the dash lighting.


Since I often have a furry passenger sitting in back on the aptly named 'dog board' I opted to keep the blower motor so my passenger could get a breeze even if I'm comfortable. Also keeps air circulating in the cab if i so choose. It's wired to a single pole, double throw switch, seen here.
The fan is wired onto it's own fuse tap, active only when the key is in the 'run' position. I used two large relays to control it, using the switch to activate either relay respectively. Although in hindsight, the fan draws so little the relays are not necessary.

On the console itself, there are two door lock switches, oem. each side is independent of each other, controlling it's respective side. Right side controls the right door, left side controls the left door, using the relay diagram I pictured previously. I used full size relays for sake of ease although the smaller relays could be used just as easily. They're wired into their own circuit via fuse tap, fused at 5 amps.
the right most pushbutton controls the amber led strips, left most switch activating the radio, regardless of what state the key is in. the battery saver is used in both applications. The usb module in the center is, too, run off the battery saver.


The usb module does come with a 'gasket' of sorts but I opted not to use it.

The plate is an old license plate. Constructed as seen here.

The bottom was melted due to a cigarette anyway so no losses.
Both the cup holder and the cubby plastic has had the rubber coating removed and sanded smooth, but with visual scratches for aesthetics. No clearcoat, no paint. A heatgun and a nylon brush works wonders to remove the rubber. A hairdryer and toothbrush would also work.
Although not pictured, I did have grounding issues. So in the end, I used a 1 gauge lug heated with a propane torch (on the bench) and given a bit of solder, clamped closed a bit with ease, then taken to the grounding wires, crimped the rest of the way and bolted to one of the dash bolts which the console uses. Not only does it keep the wires together but it also grounds out on the dash itself.
I'll definitely be using these lugs again when I do that upgrade. btw, if anyone is wondering, the dimensions for a lock switch (oem) for mounting is 52x33 centimeters. This is slightly undersize but gives room for adjustments with a file.
Also, for positioning the two door lock switches and usb module, I used millimeter graph paper. works flawlessly. The two pushbuttons were an afterthought.
Now to go into detail. The console itself bolted right in as expected. I opted to not use the rear bracket at all, instead using the eyelets up front into the floor with some fair size bolts going into the floorpan. Not much to say here.
Inside the console itself are six, 5mm wired in two pairs of three, one set for each side. the two sets are wired in parallel. An individual set is wired in series. They're wired to come on with the dash lighting.
Since I often have a furry passenger sitting in back on the aptly named 'dog board' I opted to keep the blower motor so my passenger could get a breeze even if I'm comfortable. Also keeps air circulating in the cab if i so choose. It's wired to a single pole, double throw switch, seen here.
The fan is wired onto it's own fuse tap, active only when the key is in the 'run' position. I used two large relays to control it, using the switch to activate either relay respectively. Although in hindsight, the fan draws so little the relays are not necessary.
On the console itself, there are two door lock switches, oem. each side is independent of each other, controlling it's respective side. Right side controls the right door, left side controls the left door, using the relay diagram I pictured previously. I used full size relays for sake of ease although the smaller relays could be used just as easily. They're wired into their own circuit via fuse tap, fused at 5 amps.
the right most pushbutton controls the amber led strips, left most switch activating the radio, regardless of what state the key is in. the battery saver is used in both applications. The usb module in the center is, too, run off the battery saver.
The usb module does come with a 'gasket' of sorts but I opted not to use it.
The plate is an old license plate. Constructed as seen here.
The bottom was melted due to a cigarette anyway so no losses.
Both the cup holder and the cubby plastic has had the rubber coating removed and sanded smooth, but with visual scratches for aesthetics. No clearcoat, no paint. A heatgun and a nylon brush works wonders to remove the rubber. A hairdryer and toothbrush would also work.
Although not pictured, I did have grounding issues. So in the end, I used a 1 gauge lug heated with a propane torch (on the bench) and given a bit of solder, clamped closed a bit with ease, then taken to the grounding wires, crimped the rest of the way and bolted to one of the dash bolts which the console uses. Not only does it keep the wires together but it also grounds out on the dash itself.
I'll definitely be using these lugs again when I do that upgrade. btw, if anyone is wondering, the dimensions for a lock switch (oem) for mounting is 52x33 centimeters. This is slightly undersize but gives room for adjustments with a file.
Also, for positioning the two door lock switches and usb module, I used millimeter graph paper. works flawlessly. The two pushbuttons were an afterthought.
#66
02-12-2016


#67
02-15-2016
Two new things.
At the moment, I have a problem with my window crank. My new 'power' door handle bezel is in the way of the crank, which I didn't anticipate. I'll have to come up with some form of solution. Considering a different type of handle all together.
Something better. I learned that my speakers are NOT stock. Apparently (at least the door speakers) are fitted with Pioneer custom fit speakers. I have yet to see the rears. Never the less I don't need to buy speakers now, just a headunit.
#68
02-15-2016
#69
02-15-2016
Thousand parts bought the one on the passenger side for me. I had the one on the driver's side previously. Liked it so much I wanted to install another. Both of them came off chevy blazers.
And an extension wouldn't help me. The power bezel itself sticks out too far and gets in the way of the window crank; something I didn't account for.
So, I opted to remove the panel, cut and cover the wires for the switch, pull the fuse for that switch and put my old door handle bezel back on. I'm probably better off that way.
#70
02-17-2016

#71
02-17-2016
Little update. I plan on putting the cluster in within this month. However, I want to have everything I'll need before I take my dash apart. That being said, having the dash apart would be a good time to upgrade my head unit since the bezel has to come out anyway.
I've got my eyes on an alpine for 200 bucks from bestbuy. Here's the link.
Alpine CD - Built-In Bluetooth - In-Dash Receiver with Detachable Faceplate Black CDE-163BT - Best Buy
This oughta kick those pioneers the way they were meant to be.
I've got my eyes on an alpine for 200 bucks from bestbuy. Here's the link.
Alpine CD - Built-In Bluetooth - In-Dash Receiver with Detachable Faceplate Black CDE-163BT - Best Buy
This oughta kick those pioneers the way they were meant to be.
#72
02-18-2016
Got bored today, decided to mess with a propane torch and an aluminum pop can or two. I had only begun to use a propane torch recently and that being said I'm not entirely sure what one is capable of, but I figured the best way to learn is to have a little fun.
That being said, the whole time I was wearing gloves, safety glasses, and whatever it was I was heating was above a large bucket of water.
So I hung a can by some soft wire, and torched the bottom out of the can but I noticed something happening to the top of the can. It wasn't deforming, rather turning a very nice burnt bronze color. An idea popped into my head, then. Blued steel parts for my truck.
Since my chrome door log pegs are starting to look a little gnarly, I thought I'd get some steel coupling nuts, or something along those lines, blue them, and use those. I'm still practicing this bluing thing with scrap steel I have, getting a feel for it and all that. It oughta look pretty cool.
EDIT: Also, applied this while I waited for some metal to chill out in water.
Last edited by TheArcticWolf1911; 02-18-2016 at 08:30 PM.
#73
02-20-2016
Went to bestbuy to pick out a head unit. The Alpine I had selected must have been damaged or something internally, because that one I listened to sounded awful. The 26 dollar headunit I have sounded better. And no, it wasn't the speakers, because I tried a couple other speakers and a couple other headunits and they all sounded better.
Next I tried a JVC for 80 bucks. That sounded really good, I really liked it, but I listened to a couple others. I listened to a sony for ~218 with a built in class D amplifier, and that too was rather disappointing.
Granted, these kiosks leave a bit to be desired, but there it seemed like the more expensive the head unit, the worse it sounded. And yes, before anyone asks, we did try the equalizer every time, using the same songs played from my iphone via 3.5 male to male cable via aux.
I ended up with this head unit here for a shade under 100 dollars. I initially wanted to spend around 150 or better, but I decided to let my ears decide.
#74
02-22-2016
Installed the headunit on Sunday. I'll give my final verdict on it at the end of the month, but so far I'm very impressed. For under 100 dollars, it certainly preforms very well in a setup where an amp isn't desired. It's capable of rattling the doors if you let it.
I'll have a pic or two of it installed tomorrow. Neglected to take one after install
The same day I decided to tear into my dash and try out that silver cluster with my blue LEDs. Unfortunately, the green tint filters out a ton of the blue making any illumination non-existent or real close.
So, I'm faced with two options. I either take the faces off and the needles like I did with my factory cluster and throw accuracy out the window, or I spend 35-40 dollars in brighter blue LEDs to overcome the green filter. I'm leaning towards the free solution of throwing accuracy out the window for the best results. With the free method, that also allows me to put different needles on if I so choose, should the orange clash with the blue. We'll have to see.
EDIT: Forgot to mention.
I had spoke a few posts ago (I believe) about installing an inverter in my center console. Well, that's changed a bit. One downfall of the explorer full length console is the inside of it is incredibly cramped, given the duct work doubling as it's main structure keeping it together along with some metal brackets inside. Considering all the wires I have in there already, it would be wise to install it elsewhere. I can get a 400 watt continuous inverter from harbor freight for less than 30 dollars. The inverter comes equipped with battery clips for attaching to a lead acid battery. However, I would ditch these in a hurry, but keep them around for another project. From what I've seen, these clamps connect onto the inverter via eyelets which for me is great.
However, there's some complications that quickly arise. I would want a line from the battery coming into the cab for this wire instead of riding off of other circuits. This new wire would be controlled by a relay, stature of which determiend by how current-hungry this inverter is. The relay of course would be controlled by an existing circuit, which won't draw much if anything above 5 amps. It ought not for a pesky relay. However, I would have to get this cable into the cab either through the firewall. I don't like the idea of drilling through my firewall. Grounding would be the easiest, as I could simply ground it out on one of the seat bolts, given it bolts directly into the floor and under the passenger seat on the floor is where this inverter would go. While I really want this setup, I'm having trouble justifying it. In the winter, I could leave the engine running with a small space heater in the floor to warm the vehicle's interior up while it isn't moving, but I would only use it a couple times a year.
Something else that is of concern to me, is if this draws a good bit of current, it may be necessary to rig up a house battery for this to run off of which is a whole 'nother can of worms I don't even want to get into. I'll just have to think about this.
Anybody else ever do something similar to this?
Last edited by TheArcticWolf1911; 02-22-2016 at 09:50 PM.
#75
02-23-2016
Decided to sand the color off the faces today. Posted a how-to for this as well for anybody who doesn't know how.
I'd like to put some different needles on. I don't care for the orange. Considering either different needles all together or painting a set.
Found these on ebay. Little pricey but this is the general look I want.
Chevrolet GMC GM Truck SUV Custom Instrument Cluster Gauge Needle Set Blue | eBay

I'd like to put some different needles on. I don't care for the orange. Considering either different needles all together or painting a set.
Found these on ebay. Little pricey but this is the general look I want.
Chevrolet GMC GM Truck SUV Custom Instrument Cluster Gauge Needle Set Blue | eBay


