Safari Pacific MX2 Buildip
#751
 08-05-2011


it was only Zach and one of his other buddy's. i sure had a good time talking with him about his profession. i wished he cooked up a meal. he was on his way up to a couple expo's in Washington and Oregon. he stopped in chico to do some finishing touches on his new bumper and winch.
#752
08-11-2011

#753
08-24-2011

Join Date: Jul 2008
Location: Temecula, CA
Posts: 115
Likes: 0
Received 0 Likes
on
0 Posts
Onto the bed top tent... Since I've gotten the tent life has been a little easier on the truck. Not nearly the same amount of weight. The only problem with the tent is the cover is only held together by a couple rolls of gorilla tape. I bought it used off craigslist and the owner said he hadn't used it in a while. The tape has held up ok, though does leak. I'm still on the fence whether I want to make a hard aluminum cover or just make a new canvas one.
Open

Closed

So far I've only used the tent mounted directly onto the bed rails, where it flips off to the rear. While this works it makes it a pain to access my gear in the bed. I mocked up the tent to flip off to the side and see how well it works. Some old ammo cans worked out to be the right height. Overall its not too bad. I would have easier access to my gear and a little extra height in the bed, but it hangs passed the tailgate since its longer width wise.


Open
Closed
So far I've only used the tent mounted directly onto the bed rails, where it flips off to the rear. While this works it makes it a pain to access my gear in the bed. I mocked up the tent to flip off to the side and see how well it works. Some old ammo cans worked out to be the right height. Overall its not too bad. I would have easier access to my gear and a little extra height in the bed, but it hangs passed the tailgate since its longer width wise.
Last edited by safaripacific; 08-24-2011 at 10:48 AM.
#754
08-24-2011
Join Date: Jul 2008
Location: Temecula, CA
Posts: 115
Likes: 0
Received 0 Likes
on
0 Posts
Either way I end up going, the spare tire now sits up too high. If I keep the tent low (back flip) I'd like the tire lower so its not a big wind sail. And if I do mount the tent high (side flip) the tire's in the way.

So I start by cutting off the tire mount from the swing arm.

I ended up cutting off a bit too much, so I had to add a bigger diameter tube to get an extra 1/2 inch.

The top of the tire is now about the hight of the 5lb propane tank.

So I start by cutting off the tire mount from the swing arm.
I ended up cutting off a bit too much, so I had to add a bigger diameter tube to get an extra 1/2 inch.
The top of the tire is now about the hight of the 5lb propane tank.
Last edited by safaripacific; 08-24-2011 at 10:57 AM.
#755
08-24-2011
Join Date: Jul 2008
Location: Temecula, CA
Posts: 115
Likes: 0
Received 0 Likes
on
0 Posts


#756
08-24-2011
Join Date: Nov 2008
Location: san jose, Costa Rica
Posts: 1,319
Likes: 0
Received 0 Likes
on
0 Posts
#758
08-24-2011
i vote for the second set up. just for security reasons and you still have the ability to see out the back window. i would also design a supper low pro side hinged al lid to give you access to the bed. have it hing off the pass side because the tire gate gives the bed a lot of support.
i also say make a new cover. if you made and al cover. what would you do with it?
i really dig the new direction your taking with it.
i also say make a new cover. if you made and al cover. what would you do with it?
i really dig the new direction your taking with it.
#759
08-24-2011
Join Date: Nov 2008
Location: san jose, Costa Rica
Posts: 1,319
Likes: 0
Received 0 Likes
on
0 Posts


#762
09-03-2011
Join Date: Jul 2008
Location: Temecula, CA
Posts: 115
Likes: 0
Received 0 Likes
on
0 Posts
i vote for the second set up. just for security reasons and you still have the ability to see out the back window. i would also design a supper low pro side hinged al lid to give you access to the bed. have it hing off the pass side because the tire gate gives the bed a lot of support.
i also say make a new cover. if you made and al cover. what would you do with it?
i really dig the new direction your taking with it.
i also say make a new cover. if you made and al cover. what would you do with it?
i really dig the new direction your taking with it.
I did have another idea along the same lines as this. To make the aluminum shell taper up to the roof, so I'd get better gas mileages. Not sure if I'll do it. Got bored and messed around with photoshop.
You may want to talk to my friend Hernando in Colombia (iguana4x4.com) he imports stuff from australia and your kind of close.
Slowly getting it back. Combination of making money again and losing weight. Yeah, I chubbed up a bit from travel/eating....haha

#764
09-15-2011
Join Date: Nov 2008
Location: san jose, Costa Rica
Posts: 1,319
Likes: 0
Received 0 Likes
on
0 Posts
and havent u thought bout building a aluminium rack to keep that tent up high and giving u chance to get some alum. ramps (recovery) and more chance to keep some water containers empty but have them for any emergency.
but truck looking great! and to be honest i like alot the idea of having the tent low but i rather also have it up high to be able to get those "changing rooms" that might also work as a place to eat bug free!, dry etc.
edit>
already saw ur thinkgint bout the aluminium racks already
but truck looking great! and to be honest i like alot the idea of having the tent low but i rather also have it up high to be able to get those "changing rooms" that might also work as a place to eat bug free!, dry etc.
edit>
already saw ur thinkgint bout the aluminium racks already
#765
05-07-2012
Join Date: Jul 2008
Location: Temecula, CA
Posts: 115
Likes: 0
Received 0 Likes
on
0 Posts
Its been quite a while since I've done anything to my truck or taken any sort of trip. These past few years have given me a good beat down with having my truck and trip backing self destruct, loosing my grandfather to cancer then a year later loosing my father to a heart attack. Being on the verge of bankruptcy the past few months hasn't helped. Its hard to believe in 2009 I had my truck at the SEMA Show and was in the works with Ford for sponsorship. I was on top of the world and it all came crashing down. Throughout my life I've had my fair share of challenges, setbacks and generally stuff blowing up in my face. All of which I've managed to trudge through and arrive at the end a wiser and better person. The recent events in my life are no exception. I've learned some hard lessons and it's time to move on. Being the type of person I am, I'll be writing about some of the lessons I've learned and why I changed things. So now it's time to get back working on the truck.
With my hiatus of travel since October 2011, I decided to take a day drive near my home this past weekend. I headed out to the hills behind my house and popped out near Vail Lake. Though this wasn't a huge trip, it was nice to get back on dirt and just go.


With my hiatus of travel since October 2011, I decided to take a day drive near my home this past weekend. I headed out to the hills behind my house and popped out near Vail Lake. Though this wasn't a huge trip, it was nice to get back on dirt and just go.
#766
05-07-2012
Join Date: Jul 2008
Location: Temecula, CA
Posts: 115
Likes: 0
Received 0 Likes
on
0 Posts
The day after my little trip I decided to clean the truck as I hadn't touched anything since November. I parked the truck on a small concrete pad that use to be a dog run or something. This concrete pad might also be a little project for myself. Hopefully I'll be building myself a small garage out of it. For now its a nice clean flat surface to work on.

Anyhow, once I pulled all my gear out of the truck and Action Packers, I laid it all out. Figured I'd do another one of those here what I use photos. I've slimmed down what I carry big time. Lots of the tools and gear was really not necessary. Now I'm down to two bags. The first bag (black, lower row) contains tools. The second bag (grey, top row) contains tire repair tools.
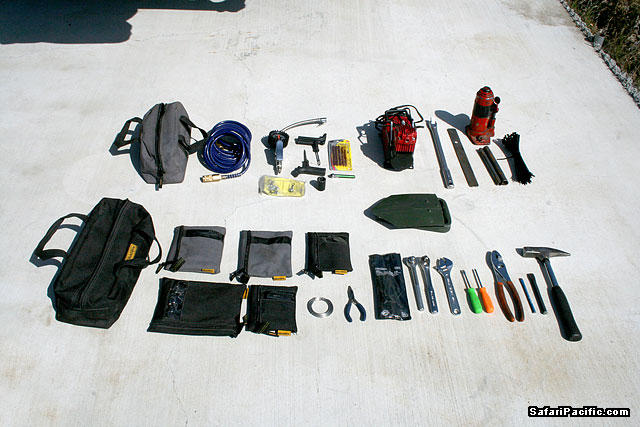
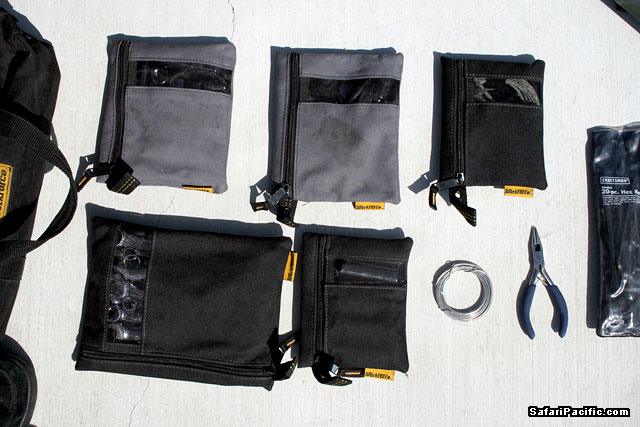
In the tool bag are smaller pouches that contain like items. One pouch is for wrenches, one is for metric sockets, another is for standard sockets, specialty items and extensions are in one and the final pouch is an electrical repair kit. Of the tools I only carry the exact sizes the truck actually has. I also only carry 3/8 ratchet sized sockets. This allows me to limit carrying items that are really not needed. I have a breaker bar, mainly for change tires, though I carry the 1/2 to 3/8 adapter if I need some extra leverage on a stubborn bolt.
Tool Bag
Wrench Pouch
- Slim 3/4in-1/4in Wrenches
- Slim 18mm-6mm Wrenches
Metric Socket Pouch
- 18mm-9mm Deep Sockets
- 15mm-10mm Sockets (12 Point)
Standard Socket Pouch
- 3/4in-3/8in Deep Sockets
Specialty and Extension Pouch
- 3in x 3/8 Extension
- 6in x 3/8 Extension
- 1/2 to 3/8 Adapter
- 1/2 stubby extension
- Spark Plug Socket
- Spark Plug Gap Tool
Electrical Repair Kit Pouch
- Digital Multimeter
- 20 Feet Extra Wire
- Electrical Tape
- Heat Shrink Tube
- Cable Ties (Zip Ties)
Loose items in the Tool Bag
- Pick Hammer
- Pliers
- Needle Nose Pliers (with cutters)
- Phillips Screwdriver
- Flat Screwdriver
- Hex Key Wrenches
- 1/2 Inch Chisel
- 1/4 Inch Chisel
- Adjustable Wrench (8in)
- Ratchet (I carry two, so if one breaks)
- Stainless Steel Wire
Tire Repair Bag
- Coil Air Line with Quick Release Fittings
- ARB Air Chuck with Gauge
- Tire Plugs
- Tire Plug Reamer & Install Tool
- Extra No-Loss Valve Caps
- Extra Valve Stems
- Valve Stem Tool
- 3/4 Lug Nut Socket (use with breaker bar)
- Extra Pressure Gauge
Other Items
- Air Compressor
- Breaker Bar
- 1 inch Steel Strap (comes in handy removing pulleys and other uses)
- Bottle Jack (Taped to keep from leaking)
- Long Cable Ties
- Folding Shovel
Other Items not picture
- Recovery Strap
- Gorilla Tape
Anyhow, once I pulled all my gear out of the truck and Action Packers, I laid it all out. Figured I'd do another one of those here what I use photos. I've slimmed down what I carry big time. Lots of the tools and gear was really not necessary. Now I'm down to two bags. The first bag (black, lower row) contains tools. The second bag (grey, top row) contains tire repair tools.
In the tool bag are smaller pouches that contain like items. One pouch is for wrenches, one is for metric sockets, another is for standard sockets, specialty items and extensions are in one and the final pouch is an electrical repair kit. Of the tools I only carry the exact sizes the truck actually has. I also only carry 3/8 ratchet sized sockets. This allows me to limit carrying items that are really not needed. I have a breaker bar, mainly for change tires, though I carry the 1/2 to 3/8 adapter if I need some extra leverage on a stubborn bolt.
Tool Bag
Wrench Pouch
- Slim 3/4in-1/4in Wrenches
- Slim 18mm-6mm Wrenches
Metric Socket Pouch
- 18mm-9mm Deep Sockets
- 15mm-10mm Sockets (12 Point)
Standard Socket Pouch
- 3/4in-3/8in Deep Sockets
Specialty and Extension Pouch
- 3in x 3/8 Extension
- 6in x 3/8 Extension
- 1/2 to 3/8 Adapter
- 1/2 stubby extension
- Spark Plug Socket
- Spark Plug Gap Tool
Electrical Repair Kit Pouch
- Digital Multimeter
- 20 Feet Extra Wire
- Electrical Tape
- Heat Shrink Tube
- Cable Ties (Zip Ties)
Loose items in the Tool Bag
- Pick Hammer
- Pliers
- Needle Nose Pliers (with cutters)
- Phillips Screwdriver
- Flat Screwdriver
- Hex Key Wrenches
- 1/2 Inch Chisel
- 1/4 Inch Chisel
- Adjustable Wrench (8in)
- Ratchet (I carry two, so if one breaks)
- Stainless Steel Wire
Tire Repair Bag
- Coil Air Line with Quick Release Fittings
- ARB Air Chuck with Gauge
- Tire Plugs
- Tire Plug Reamer & Install Tool
- Extra No-Loss Valve Caps
- Extra Valve Stems
- Valve Stem Tool
- 3/4 Lug Nut Socket (use with breaker bar)
- Extra Pressure Gauge
Other Items
- Air Compressor
- Breaker Bar
- 1 inch Steel Strap (comes in handy removing pulleys and other uses)
- Bottle Jack (Taped to keep from leaking)
- Long Cable Ties
- Folding Shovel
Other Items not picture
- Recovery Strap
- Gorilla Tape
#767
05-07-2012
Join Date: Jul 2008
Location: Temecula, CA
Posts: 115
Likes: 0
Received 0 Likes
on
0 Posts
Onto the spare parts and fluids. I haven't slimmed down in this area, though I've never carried too much to begin with.

Spare Parts
- Alternator
- Serpentine Belt
- Upper & Lower Radiator Hose (these are hard to find for my motor)
- Front Brake Pads (In grey pouch)
- Head Light Bulbs (In plastic case with electrical tape holding it closed)
- Fuses and Small Bulbs (small pelican case)
Fluids & Extra
- One Quart Oil
- One Quart ATF (Ford manuals use ATF)
- Hand pump for ATF
- 0.5 Liter Brake Fluid (Fiji Water Bottle doesn't like like the original brake fluid bottle)
- 0.5 Liter Power Steering Fluid (In another Fiji bottle for same reason)
- RainX
- Gasket Maker (I usually have coolant system problems)
- Extra Hose Clamps
- JB Weld
- Scotch Bright
- Rope (Bull Line)
- Terry Cloths (I like these as they suck up fluids/grime better)
- Jumper Cables (was easier to fit in this case rather than tools)
#768
05-07-2012
Join Date: Jul 2008
Location: Temecula, CA
Posts: 115
Likes: 0
Received 0 Likes
on
0 Posts
One of the big area's I've axed unnecessary junk is in the cooking department. For a larger rig that can handle weight I'd still prefer a larger kitchen setup. Though with the Ranger needing to be light I had to cut back to the necessities. One item I do continue to carry is my Jet Boil. That is the best for quick meals, and I use it the most. Especially when the weather rolls in, you can cook inside. My more elaborate cooking setup has slimmed down to fit all in my GSI Bugaboo kit. I've learned to pack everything in this thing, minus the stove fuel. And on that note, I've ditched propane all together and gone with an alcohol stove and a 50 pesos Colombian coin. This alone frees up a larger stove, propane bottle and the extra items along with it. The stove, stand and lighters fit in a small pouch. The actual fuel I use is denatured alcohol.

All the small items floating around in the last photo all fit into the cook set. Spices, utensils, can opener and all.

Nice and simple.

Items
- Jet Boil (with one fuel can attached, which last a long time)
- MSR Fuel Can with Denatured Alcohol
- GSI Bugaboo Cook Set for 2
Inside the Cook Set
- Two Sea to Summit forks/spoons/knives
- Can Opener
- Alcohol Stove (aka penny stove made from aluminum soda cans)
- Stainless Steel Wire Stand (thin wire on one side connects the 2 pieces and allows for folding flat)
- Two Lighters (have matches too)
- Spices
- Two Aluminum Plates (not in picture, though can be used as a flat surface for penny stove or eating)
All the small items floating around in the last photo all fit into the cook set. Spices, utensils, can opener and all.
Nice and simple.
Items
- Jet Boil (with one fuel can attached, which last a long time)
- MSR Fuel Can with Denatured Alcohol
- GSI Bugaboo Cook Set for 2
Inside the Cook Set
- Two Sea to Summit forks/spoons/knives
- Can Opener
- Alcohol Stove (aka penny stove made from aluminum soda cans)
- Stainless Steel Wire Stand (thin wire on one side connects the 2 pieces and allows for folding flat)
- Two Lighters (have matches too)
- Spices
- Two Aluminum Plates (not in picture, though can be used as a flat surface for penny stove or eating)
Last edited by safaripacific; 05-07-2012 at 12:46 PM.
#769
05-07-2012
Join Date: Nov 2011
Location: North Louisiana
Posts: 330
Likes: 0
Received 0 Likes
on
0 Posts
#770
05-07-2012
#771
05-07-2012
Join Date: Jul 2008
Location: Temecula, CA
Posts: 115
Likes: 0
Received 0 Likes
on
0 Posts
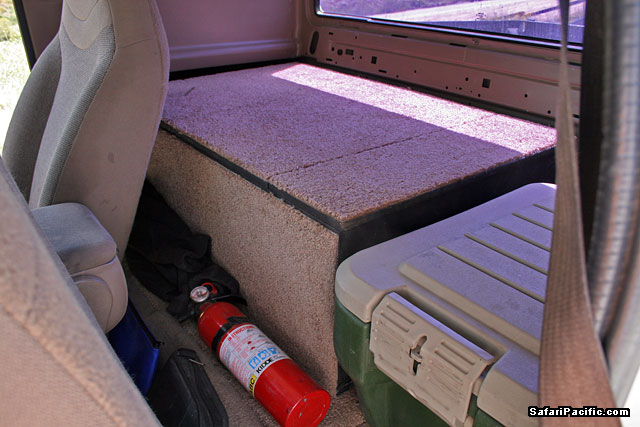
Time to pack it all back in the truck. I've gone back to using the MDF box I originally built for the Ranger. It weighs in at 63 lbs, so it has some mass though not too terrible. I covered the box with tan carpet, close to the same color as the existing interior. This keeps everything hidden at first glance. I think the coolest part of the box are the hinges I used. I just happen to come across them when someone I knew had the contract to get rid of all the items in a few retail stores that closed. The hinges allow for a near seamless lid. On the driver side I also will continue to carry the tan/green Action Packer. That will contain all of the spare fluids and parts to prevent any leaks from going all over the interior of the truck.

In the left compartment I have my sleeping bag, pillow, cold weather jacket, beanie, clothes, maps and my backpack. My backpack usually has my clothing. I carry enough clothing for 3 days, so that's 2 sets packed in the bag and what I'm wearing. On some trips I carry my netbook which also fits in the Maxpedition bag. Over to the right is the center compartment where I have all my tools, tire stuff and all the items in the tool photo. Other items in the center compartment are; Orange filters for Lightforce Lights, couple Rest Stop bags for #2, Nalgene 1 liter bottle for #1, recovery strap and gloves.

The far right compartment has all the cooking stuff and a Fiji bottle with dish soap. Yes, another Fiji bottle. I like them because the plastic is thicker than most bottles and the lids don't leak even with brake fluid. I'll also use the extra space in the compartment to toss in a few days worth of food. Longer trips I'll just keep food that doesn't fit behind the seats or utilize the unused space in the tool compartment. Even if I'm home I still keep a couple cans of chili and some granola bars. Better to have it and not use it than not have it and need it.

There's some extra space behind the Action Packer. Perfect size for a second battery, which I'll be adding at some point. I'll be using a regular size battery since I don't have the fridge on the truck anymore.

All packed up and lids closed. Looks nice and clean.
In the left compartment I have my sleeping bag, pillow, cold weather jacket, beanie, clothes, maps and my backpack. My backpack usually has my clothing. I carry enough clothing for 3 days, so that's 2 sets packed in the bag and what I'm wearing. On some trips I carry my netbook which also fits in the Maxpedition bag. Over to the right is the center compartment where I have all my tools, tire stuff and all the items in the tool photo. Other items in the center compartment are; Orange filters for Lightforce Lights, couple Rest Stop bags for #2, Nalgene 1 liter bottle for #1, recovery strap and gloves.
The far right compartment has all the cooking stuff and a Fiji bottle with dish soap. Yes, another Fiji bottle. I like them because the plastic is thicker than most bottles and the lids don't leak even with brake fluid. I'll also use the extra space in the compartment to toss in a few days worth of food. Longer trips I'll just keep food that doesn't fit behind the seats or utilize the unused space in the tool compartment. Even if I'm home I still keep a couple cans of chili and some granola bars. Better to have it and not use it than not have it and need it.
There's some extra space behind the Action Packer. Perfect size for a second battery, which I'll be adding at some point. I'll be using a regular size battery since I don't have the fridge on the truck anymore.
All packed up and lids closed. Looks nice and clean.
#772
05-07-2012
Join Date: Jul 2008
Location: Temecula, CA
Posts: 115
Likes: 0
Received 0 Likes
on
0 Posts
Thanks! I appreciate that. Yeah, I needed to disappear for a while. Though I'm back and motivated to get things rolling again. It may not happen as fast as it use too since I'm having to restart my business basically. They're will be progress though.

#774
05-07-2012
#775
05-11-2012
Join Date: Jul 2008
Location: Temecula, CA
Posts: 115
Likes: 0
Received 0 Likes
on
0 Posts
Thanks. Yep, is all the essential gear. All the extra things you "think" you need never really end up getting used and just load the truck down.
Thanks. I'm not sure about June, though I'm hoping sometime this summer I can head on a trip up north. It all depends if I can pull some funds together. I'm having to pretty much start my business all over again, so its slow going. Thanks for the invite.
Thanks. I'm not sure about June, though I'm hoping sometime this summer I can head on a trip up north. It all depends if I can pull some funds together. I'm having to pretty much start my business all over again, so its slow going. Thanks for the invite.


