Solid Axle Swap started!!!
#1
 01-13-2009


Join Date: Apr 2007
Location: Apison, TN
Posts: 483
Likes: 0
Received 0 Likes
on
0 Posts
Solid Axle Swap started!!!
Well guys, as some of you may know, I got a new (to me) 96 Ranger extended cab. It has a 5.0 swap and everything on the truck is professionally done, and I do mean EVERYTHING. Lol. Well, I was unhappy with the TTB front for the 4x4, and turns out, the spider gears were trashed anyway. I had already planned to do the swap even before I found out that the front diff was messed up, but that just confirmed this idea. I got started on it Sunday at a buddy's shop, so here we go...
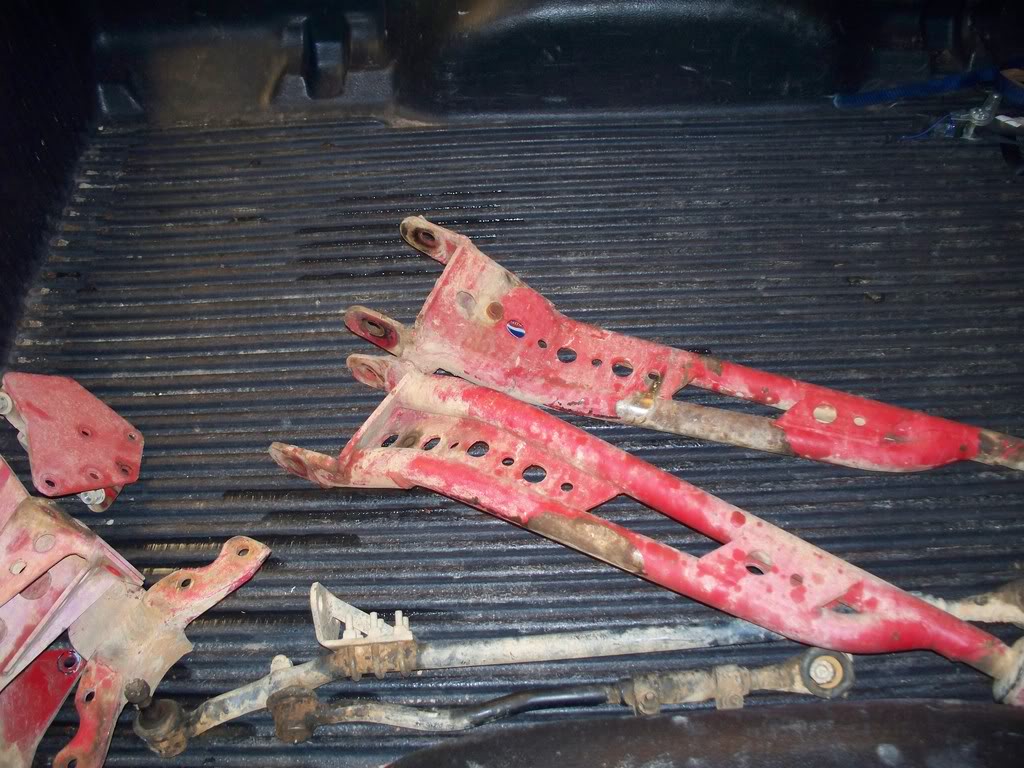
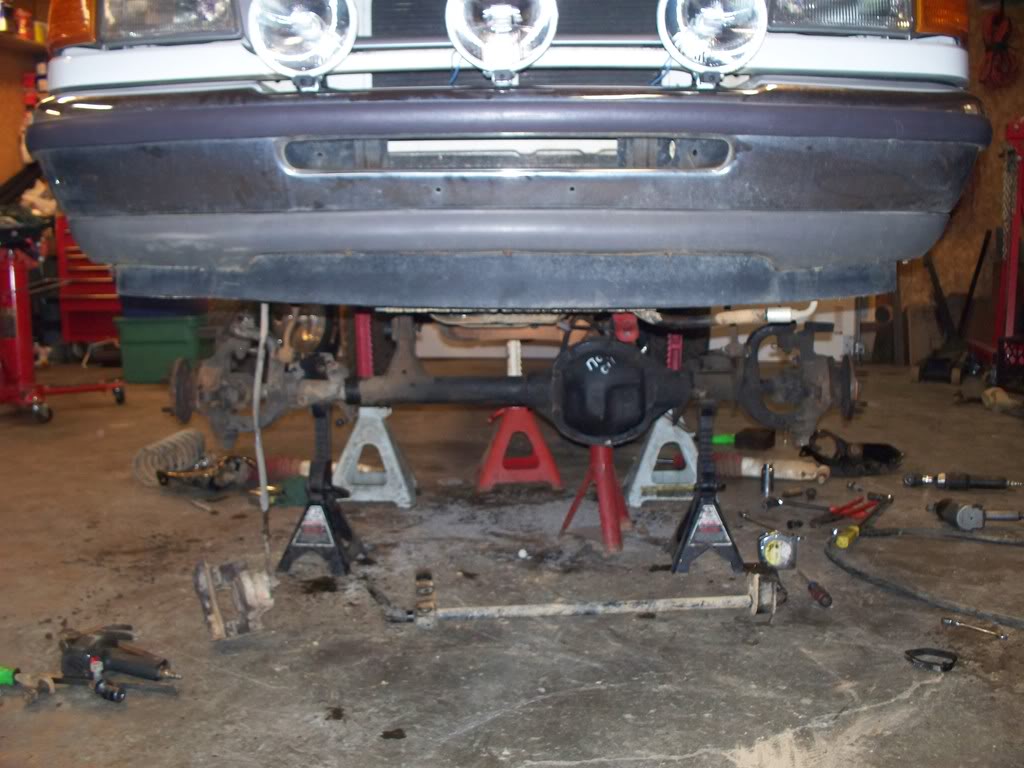
The first step was to remove all the TTB, the drop brackets, TTB arms, radius arms, radius arm brackets, even the transmission cross-member (the extended radius arm kit included a cross-member to replace the factory one. It bolted to the Radius arm brackets that were further back on the frame than stock) We also had to remove the stock coil buckets so that they could be relocated 4.5 inches forward of the stock location. This was done to compensate for the spring perches on the Dana 30, which are mounted forward of the center line of the axle, where as the Ford setup centers the spring on the TTB arm. Only 2.5 inches was for that problem. Even with 33's the tires would hit the back of the fender-well at full stuff. So since I will be running 35's after this, we decided to move the axle forward 2 inches. Here are some pictures:
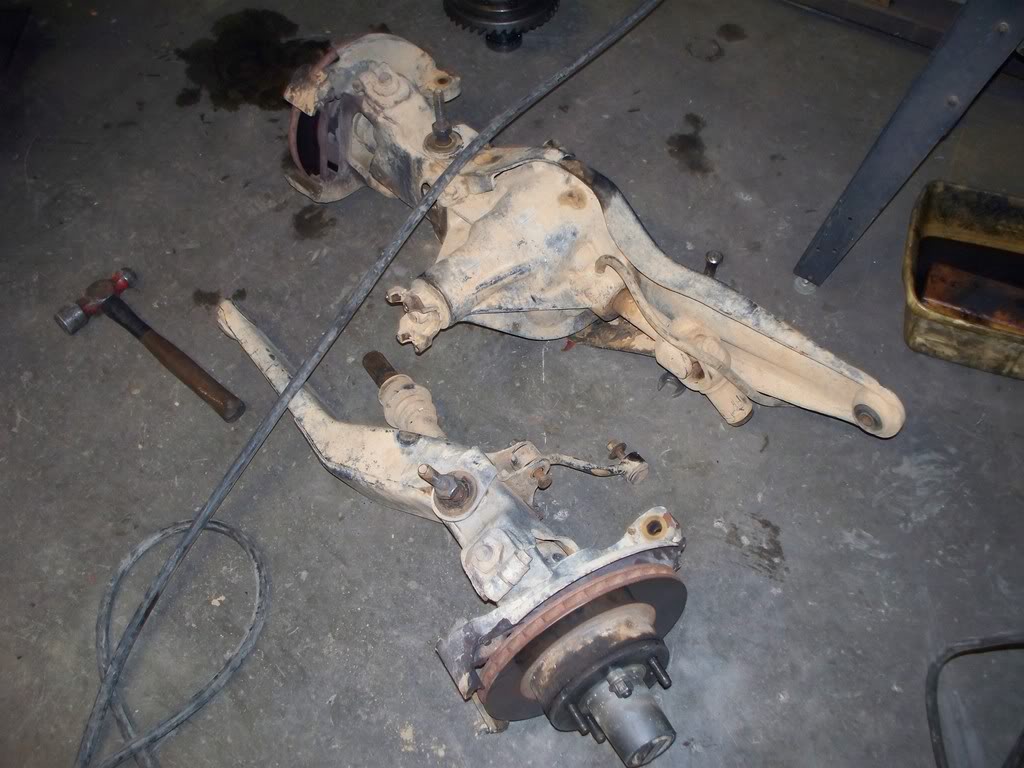
We slid the axle under and got it where we needed it so that mock up could begin. Here you can .see the pass. coil bucket has been removed:
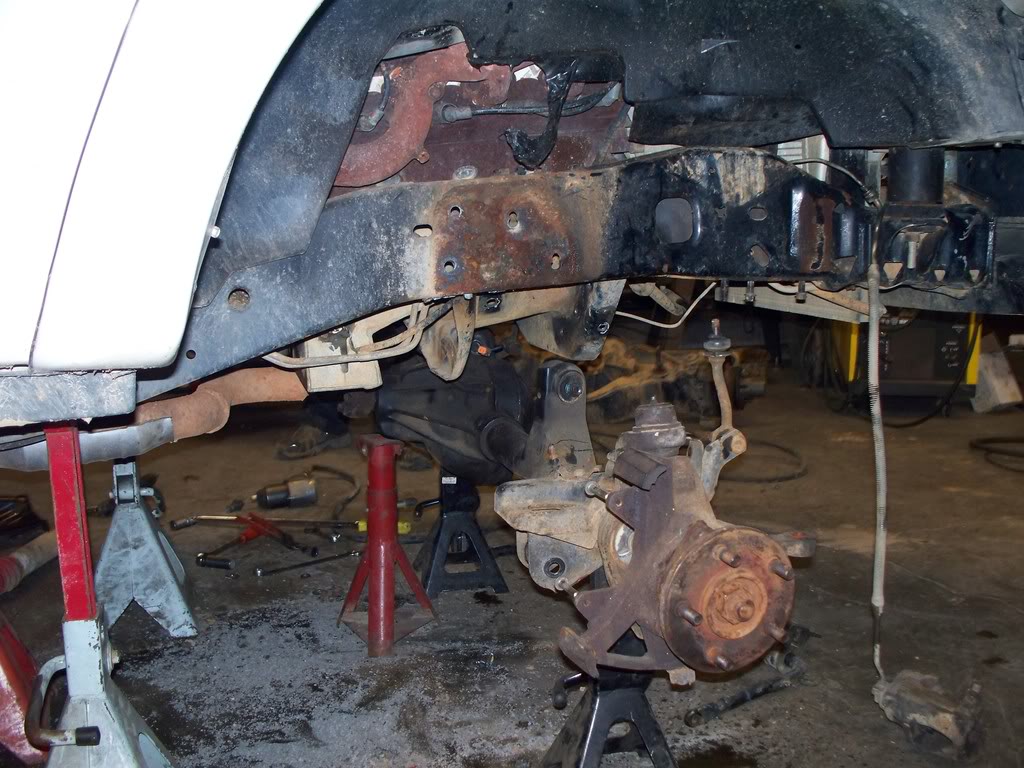
The passenger side was easy to move forward...
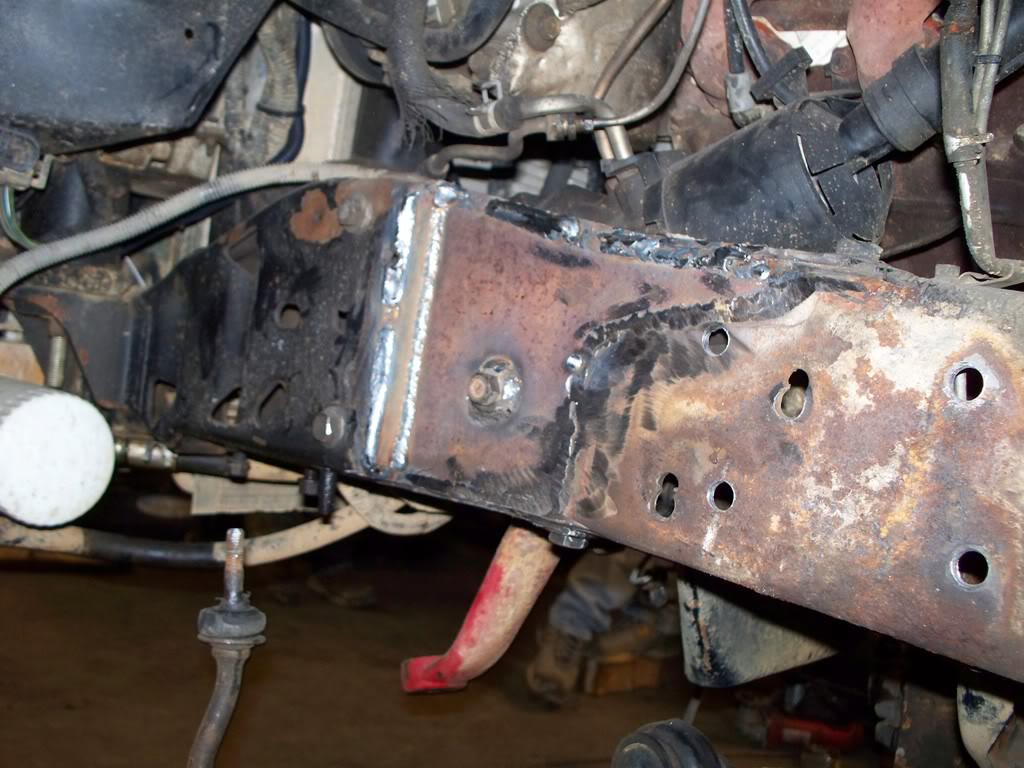
However, the driver's side was a MAJOR pain in the ***...
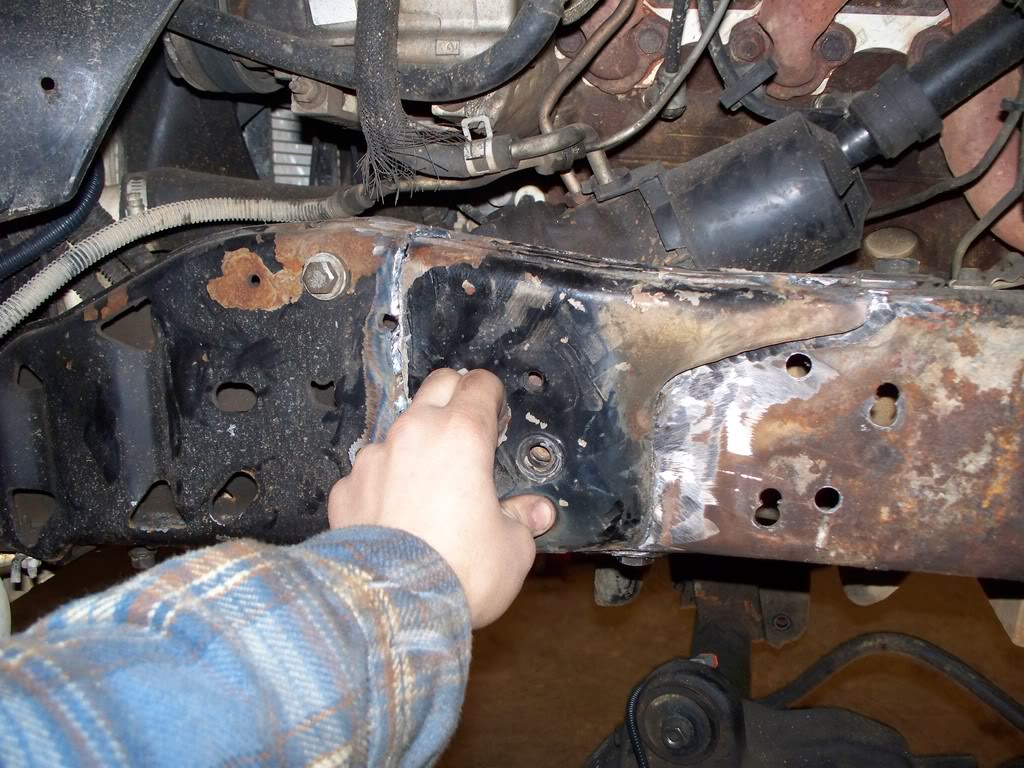
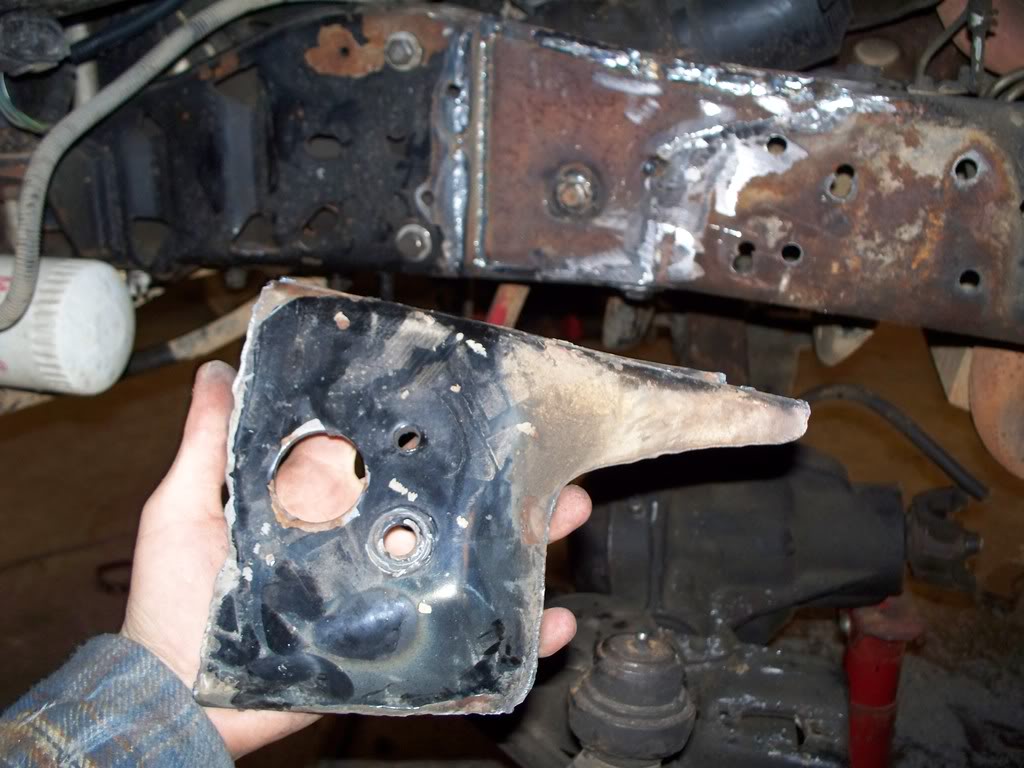
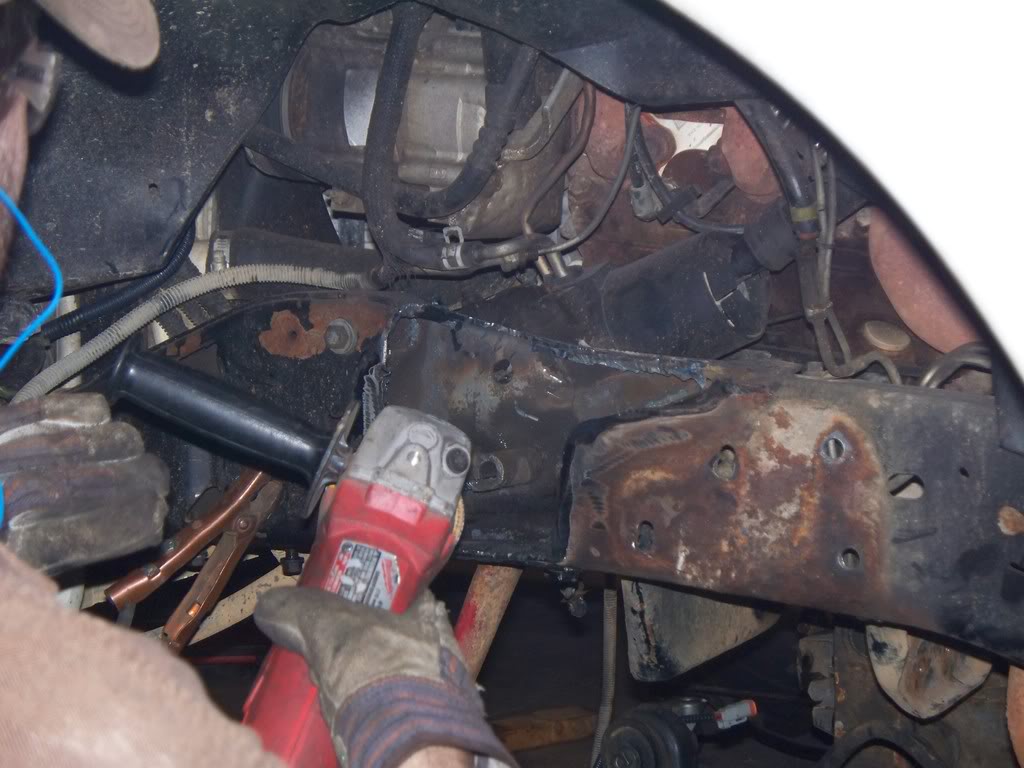
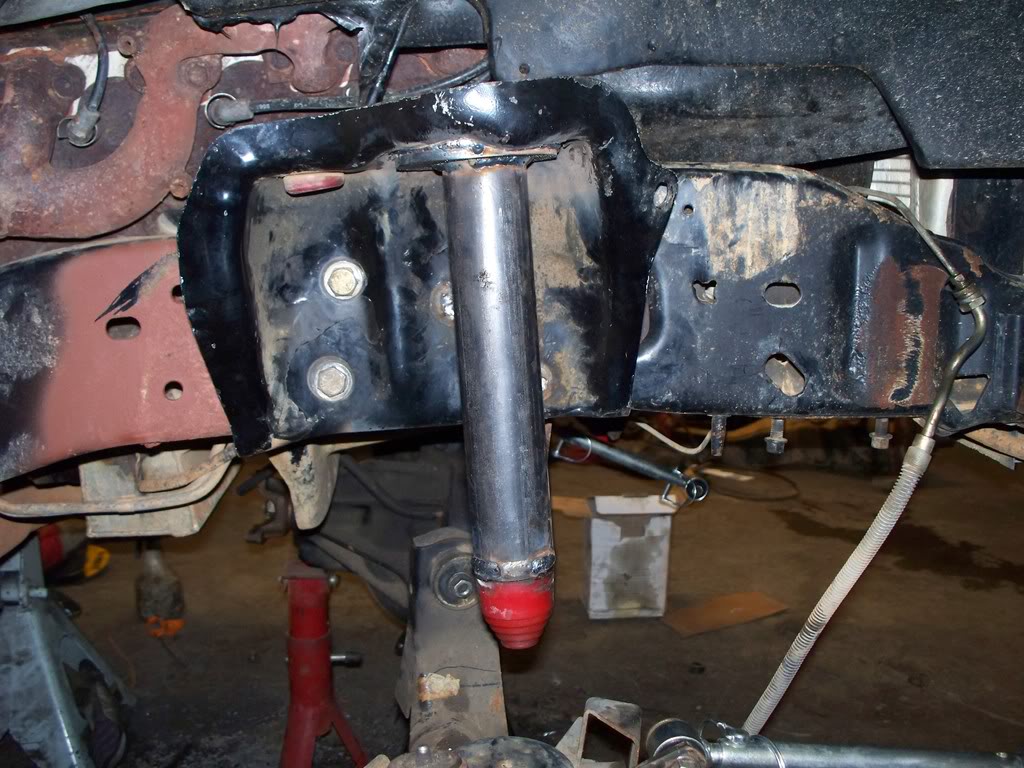
Yep, you guessed it... we had to notch the frame out because from the factory, it kicks out to maintain its thickness, yet still clear the steering box. That wasn't going to work for us, so the "kick-out" needed to be cut out and turned into a flat frame rail just like the pass. side. Don't worry, we only removed what we needed, and it was all boxed back in with 1/4" A572 structural grade steel. Yep it has a minimal yield strength of 40,000 PSI, which is way more than a stock Ranger Frame. Here it is boxed all in and good to go for the bucket reinstall...
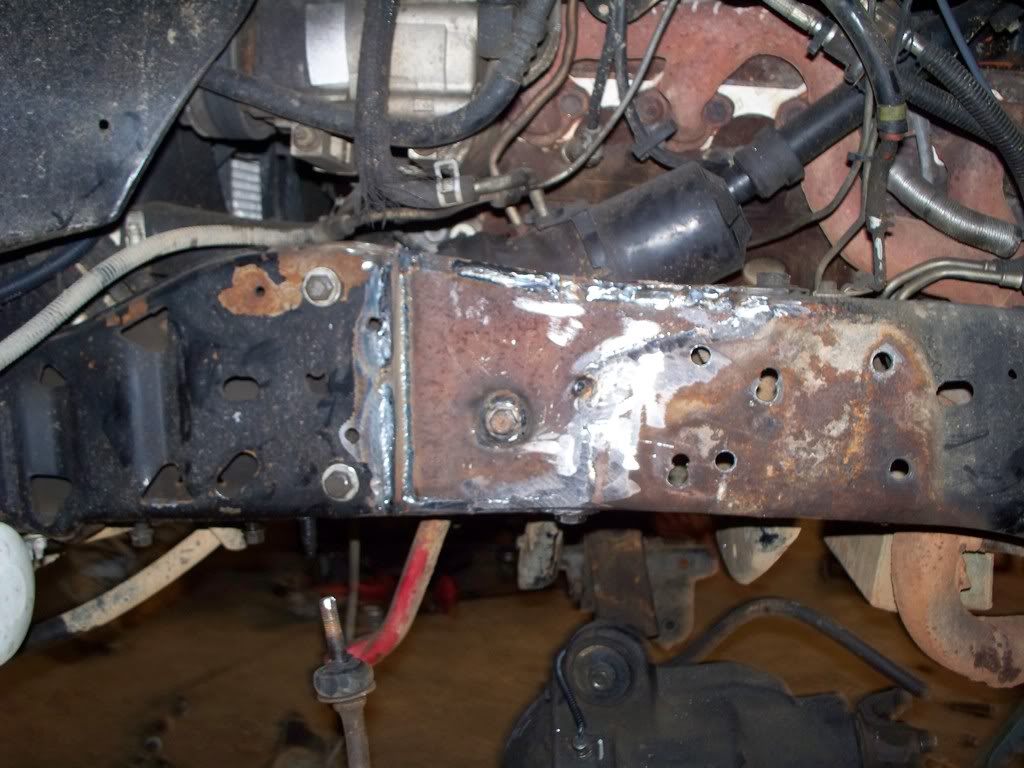
We were then able to install the drivers side coil bucket.
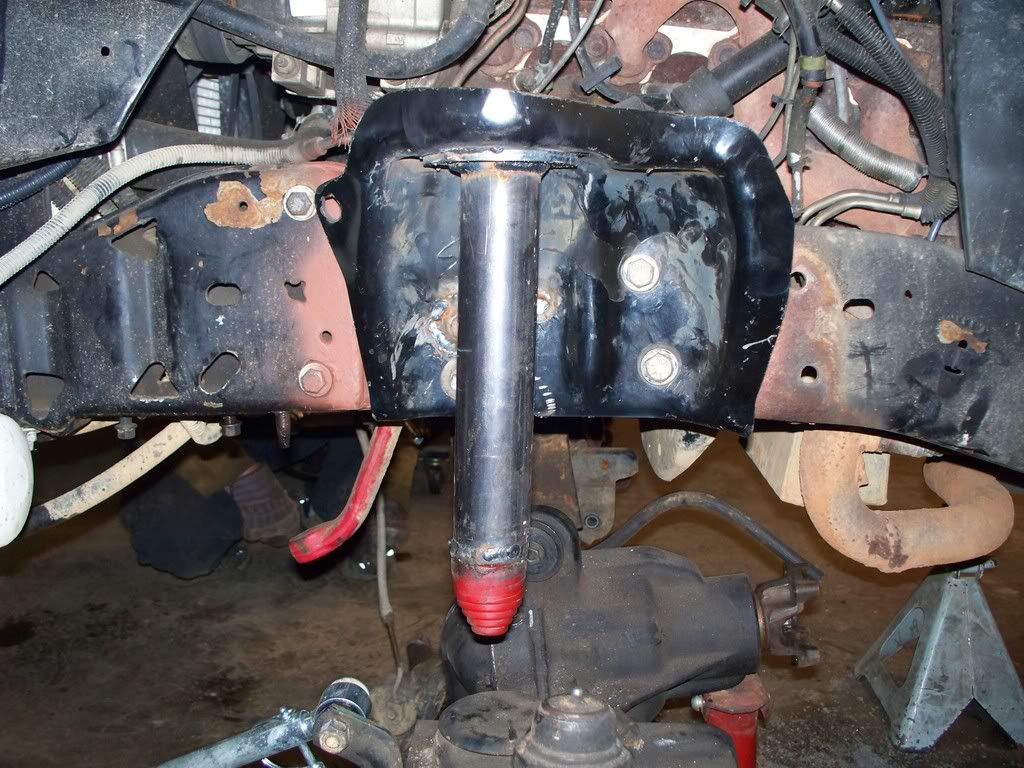
It will look something like this after it is all installed...
That's it for now. All that's left is to make the steering arms, drivers side radius arm, passenger side lower link, rear link brackets, track bar, and the relocation of the sway bar and the remote oil filter. I'll be sure to do another update once more progress is made.
The first step was to remove all the TTB, the drop brackets, TTB arms, radius arms, radius arm brackets, even the transmission cross-member (the extended radius arm kit included a cross-member to replace the factory one. It bolted to the Radius arm brackets that were further back on the frame than stock) We also had to remove the stock coil buckets so that they could be relocated 4.5 inches forward of the stock location. This was done to compensate for the spring perches on the Dana 30, which are mounted forward of the center line of the axle, where as the Ford setup centers the spring on the TTB arm. Only 2.5 inches was for that problem. Even with 33's the tires would hit the back of the fender-well at full stuff. So since I will be running 35's after this, we decided to move the axle forward 2 inches. Here are some pictures:
We slid the axle under and got it where we needed it so that mock up could begin. Here you can .see the pass. coil bucket has been removed:
The passenger side was easy to move forward...
However, the driver's side was a MAJOR pain in the ***...
Yep, you guessed it... we had to notch the frame out because from the factory, it kicks out to maintain its thickness, yet still clear the steering box. That wasn't going to work for us, so the "kick-out" needed to be cut out and turned into a flat frame rail just like the pass. side. Don't worry, we only removed what we needed, and it was all boxed back in with 1/4" A572 structural grade steel. Yep it has a minimal yield strength of 40,000 PSI, which is way more than a stock Ranger Frame. Here it is boxed all in and good to go for the bucket reinstall...
We were then able to install the drivers side coil bucket.
It will look something like this after it is all installed...
That's it for now. All that's left is to make the steering arms, drivers side radius arm, passenger side lower link, rear link brackets, track bar, and the relocation of the sway bar and the remote oil filter. I'll be sure to do another update once more progress is made.
#2
01-13-2009
Join Date: May 2008
Location: Wauseon,Ohio
Posts: 760
Likes: 0
Received 0 Likes
on
0 Posts


#6
01-13-2009
Join Date: Apr 2007
Location: Apison, TN
Posts: 483
Likes: 0
Received 0 Likes
on
0 Posts
When I get into something, I usually hit it really hard, sometimes this is good, other times this is bad. Sometimes my addiction and passion for Automotive related hobbies can get me in trouble at work and college. Anyway, I don't have any pictures left, I'll have to get some more later. The truck isn't with me right now, its an hour away at my buddy's shop, Tellico Tubes. He is an awesome fabricator that builds off road vehicles. His passion is early broncos, but he will work on anything. Hopefully he has trimmed the front cross member and build a new one for the transmission sometime before tomorrow evening. I have to take the heim joints (aka rod ends) and tube inserts up to him, along with some bushings, so that he can finish it while im in Michigan snowmobiling this weekend. This is good for me because my truck will be done when I get back, but its bad for you guys because I won't be able to get actual build-up pics, only "finished" pics. I do plan on pressure washing the axle really well once it's all done. Then Ill give it a new coat of black paint. All of the links will be red after I get done with it.
#8
01-13-2009
Join Date: Apr 2007
Location: Apison, TN
Posts: 483
Likes: 0
Received 0 Likes
on
0 Posts
Yes, Im keeping the coils, hence why we went through hell to move the coil buckets forward 4.5 inches lol. The Cherokee axle's spring perches are the exact same width center to center as the Rangers spring buckets, so the coil setup is actually relatively simple, and it makes for a much better riding and handing suspension. You guys got to remember, this is my daily driver, so I have to design and build this thing to still be street friendly. It will still have a sway bar, but it has disconnects, also robbed off of a Jeep (well a Rubicon Express Jeep Lift).


#12
01-13-2009
Join Date: Apr 2007
Location: Apison, TN
Posts: 483
Likes: 0
Received 0 Likes
on
0 Posts
Zach, your 4.0 makes more power than my 5.0 lol. I know why you guys are saying bah about the 30, but I have my reasons other than simplicity. For instance, I had just bought a brand new set of wheels for my other ranger that I wrecked. Now, If I would've went with something else, I would've had to get different wheels, and then have the rear re-drilled to match the front, which would cost quite a bit, and make getting replacement parts more challenging. I don't plan to wheel this thing all the time, but it will get used quite a bit. When I break it, I'll upgrade. But here is the very convenient thing is that my suspension design bolts right up to the stock jeep style mounts, so any Jeep replacement axle (Such as a 33 spline Genuine gear Dana 44, or a Mopar Performance Crate Axle) will bolt right in. I just have a lot more options with using the Jeep parts. The way I look at this is that I got $130 bucks in the whole axle assembly, with new brakes. Then I spent $700 on the locker and gear for it, which I can sell very easily if I ever decide to go to a 44. Again, this will be my daily driver, and I have to keep the body straight and the paint shiny, so it won't get beat on like my jeep does. Actually, thats why I have it, If I really want to get agressive, ill take it out instead. But that's just a few of the reasons I went this way.
#13
01-13-2009
Join Date: Feb 2007
Location: castle rock, colorado
Posts: 263
Likes: 0
Received 0 Likes
on
0 Posts
i heard about the dana 30 fitting perfect and i thought bout it but read that a built 30 is strong as a stock 44... so that turned me away cause one day i will have a straight axle with some big tires... so i wouldnt want to spend a ton of money on a axel i will out grow, i would rather put some extra time and bout the same money and make that ****er last...
#14
01-13-2009
Join Date: Feb 2007
Location: castle rock, colorado
Posts: 263
Likes: 0
Received 0 Likes
on
0 Posts
#15
01-14-2009
Join Date: Apr 2007
Location: Apison, TN
Posts: 483
Likes: 0
Received 0 Likes
on
0 Posts
#16
01-14-2009
Join Date: Jul 2007
Location: Colorado
Posts: 1,727
Likes: 0
Received 0 Likes
on
0 Posts
#17
01-14-2009
I thought this was gonna be another "what do i do" thread but its not!
You seem to know what you're doing! Keep it comin.
The stock u joints are the same on the D44 and the D30 or so I've been told, but the shafts, ring gear and ball joints? are all bigger and stronger.. but still weak compared to a 60..
You seem to know what you're doing! Keep it comin.
i heard about the dana 30 fitting perfect and i thought bout it but read that a built 30 is strong as a stock 44... so that turned me away cause one day i will have a straight axle with some big tires... so i wouldnt want to spend a ton of money on a axel i will out grow, i would rather put some extra time and bout the same money and make that ****er last...
#18
01-14-2009
I thought this was gonna be another "what do i do" thread but its not!
You seem to know what you're doing! Keep it comin.
The stock u joints are the same on the D44 and the D30 or so I've been told, but the shafts, ring gear and ball joints? are all bigger and stronger.. but still weak compared to a 60..
You seem to know what you're doing! Keep it comin.
The stock u joints are the same on the D44 and the D30 or so I've been told, but the shafts, ring gear and ball joints? are all bigger and stronger.. but still weak compared to a 60..
The XJ, MJ, WJ, might be another all have the larger 297X U joints but not all again.
Ring gear, axle tube, bearings, Inner Cs, balljoints are all bigger.

#20
01-17-2009
Join Date: Apr 2007
Location: Apison, TN
Posts: 483
Likes: 0
Received 0 Likes
on
0 Posts
My axle has the same U joints (spicer 297X). Supposedly, they are the weak link even in a 30. Actually, thats all Ive ever seen break in one. My axle is reverse rotation (high pinion) which means that when the axle is rotating forward, the pinion is push the ring gear instead of pulling it. This puts all the load on the larger inner pinion bearing, which makes it stronger than a TJ or ZJ low pinion 30. The cross shaft and spider gears are also a weak link in the 30s, but I have eliminated those parts with the ECTED locker. So this means that the stock 27 spline axles and u joints are the weak link. When they break, I will upgrade to chromoly shafts and some better joints. I think it will live just fine after that. But it will work just fine for now.
As far as pictures, I forgot the camera the other night, so I wasn't able to get any more. We were able to get the radius arm/lower links done, the rear brackets for the links are done, and it actually set on its own weight that night after I left. We found out that Jeep style steering is also going to work out perfectly, so that will save Fabrication time, and ultimately, quite a bit of money. Oh, and you will never believe it, but after all the movement of the front axle, it turns out that a Stock front Cherokee driveshaft will bolt right in and is the perfect length. Lol, my Ranger is turning into a Jeep on the front! But that's ok, like I said before, there is more aftermarket parts for Jeep than any other manufacturer in the world, so it makes upgrading very very easy. Like the stock jeep steering I mentioned... the stock tie rod is JUNK. But a Heavy duty 1.5", .25" Wall DOM piece with 3/4 ton tie rod ends is only $100, compared to a steering kit I bought from Ballistic Fabrication that was $269... so see, it saves a lot of money by using as many Jeep parts as possible. And everything is sooo close to being a perfect bolt in that is just seems stupid to pass it up or overlook the convenience of it.
As far as pictures, I forgot the camera the other night, so I wasn't able to get any more. We were able to get the radius arm/lower links done, the rear brackets for the links are done, and it actually set on its own weight that night after I left. We found out that Jeep style steering is also going to work out perfectly, so that will save Fabrication time, and ultimately, quite a bit of money. Oh, and you will never believe it, but after all the movement of the front axle, it turns out that a Stock front Cherokee driveshaft will bolt right in and is the perfect length. Lol, my Ranger is turning into a Jeep on the front! But that's ok, like I said before, there is more aftermarket parts for Jeep than any other manufacturer in the world, so it makes upgrading very very easy. Like the stock jeep steering I mentioned... the stock tie rod is JUNK. But a Heavy duty 1.5", .25" Wall DOM piece with 3/4 ton tie rod ends is only $100, compared to a steering kit I bought from Ballistic Fabrication that was $269... so see, it saves a lot of money by using as many Jeep parts as possible. And everything is sooo close to being a perfect bolt in that is just seems stupid to pass it up or overlook the convenience of it.
#21
01-17-2009
Join Date: Feb 2007
Location: castle rock, colorado
Posts: 263
Likes: 0
Received 0 Likes
on
0 Posts
#22
01-18-2009
Join Date: Apr 2007
Location: Apison, TN
Posts: 483
Likes: 0
Received 0 Likes
on
0 Posts
Im working on the pics... Im in MI right now, and wont be back in Chattanooga until Tuesday night, when I will be picking up the truck. So it will probably be Wed before I can get more pictures. I talked to my buddy (the fabricator) today and he kinda ran into some problems... The Jeep steering is working, but it is going to require a custom adjuster for the drag link. It is no big deal, I just have to order a tube insert that will fit the threads on the drag link and weld into a piece of DOM. The problem is that the pitman arm on the Ford box had a bigger hole than the Jeep ball joint, so he had to drill it out and use a 7/8 heim and some high misalignment spacers. But, the stock adjuster on the drag link is too short which will cause the steering wheel to be turned while the truck is going straight. But once I order the tubing insert I will be able to make a new adjuster out of DOM that is longer. Also, due to the fact that the Ford pitman arm faces forward, and the Jeep backwards, it causes a few problems as well... On the jeep, when the steering is cycled, the drag link moves forward, but with the forward facing Ford pitman arm, it causes the drag link to move twards the axle, which caused interference with the Jeep sway bar mounts, and the factory Track bar location. So he had to cut off the passenger side upper link mount (which we weren't planning on using anyway) and mount the track bar right on top of the tube further back than the stock jeep location (which is on the bottom front of it stock). He still has to figure something out for the sway bar mounts... So it kinda sucks, because it is moving futher and further away from a bolt in ordeal, and making all of these custom brackets and steering is going to get costly. It will also make upgrading a bigger pain in the *** if I ever decide to upgrade to a Dana 44. Oh well, Im not there so I have no control over the situation. I just told him to do whatever he needed to in order to make it work. However, tonight he did make the transmission cross member and a skid plate for the transfer case. Tomorrow he said he might haul it to the exhaust shop to get the down pipe on the drivers side re-run to clear the front driveshaft better.
#23
01-20-2009
Join Date: Apr 2007
Location: Apison, TN
Posts: 483
Likes: 0
Received 0 Likes
on
0 Posts
Well, just picked up the truck... all I can say now is that it is FREAKING AWESOME! So very much better than before. I drove it an hour home and everything seems good, It is a little more swirly than before, but I think its just because the front Rubicon express springs are softer than the other springs that were used with the lift kit. But, its just one of those things that I'll just have to get used to. But anyway, I'll get you some pics of it tomorrow after I get it all cleaned up, and then you guys can let me know what you think.
#25
01-20-2009


