Ball Joint replacement tricks/tips please
#1
 05-02-2013


Ball Joint replacement tricks/tips please
Probably will do all the ball joints on the '03 4x4 either this weekend or next, have all new Moog (grease able) replacements, lower ball joints and upper control arm/ball joint assemblies. Having an 11 month old little girl around the house means things don't get done on much of a timely manner anymore but that's ok...haha. Couple questions I have...
Is it necessary to remove the tie rod from the steering knuckle or is there enough room to set everything off to the side to get the bottom ball joint out? Also I think I may have to make a trip to Harbor Freight for a set of big snap ring pliers. Dont wanna screw up the new ones.
Is beating the old bottom BJ out with a hammer faster than setting up the ball joint press I am gonna loan out from the parts store? I think I'd rather use the impact and the rental press to re-install the new one instead of the floor jack and hammer method.
Is it necessary to keep support on the lower control arm with a jack to keep the torsion bar from unloading while everything is apart? Seems like the shocks and sway bar links should hold it just fine. Just always a little precautions when working around loaded torsion bars and coil springs when I'm beating on stuff nearby with a BFH.
Looks like there should be plenty of room to set the CV/front drive axle out of the way to access the lower BJ. Anyone know off hand the torque spec for the big 1 1/4 center nut once everything is back together? Is it like a step torque process like a wheel bearing?
Thanks for the help. Just been a bit since I did ball joints and never on a 4x4. Looks pretty simple but wanted to make sure.
#2
05-02-2013

I haven't done that to my Ranger but I did replace them on my 89 Mustang. Lots of heat and a big hammer. I placed a jack stand right at the end of the lower control arm and put that castle nut back on the ball joint to get more surface to hit on. I was able to remove the strut on the Mustang and the spring wasn't in the way like it is on the Ranger. You can rent the ball joint press, it a very large C-clap with different sized sockets to press the new all joint in. I did a quick You Tube search, there is a 2 parter on there of a 2003 Ranger upper and lower ball joint replacements... lots of how to's on there...
Last edited by Jrevans2002; 05-02-2013 at 10:21 PM.
#3
05-02-2013
1. Yes it is necessary to remove tie rod end from the spindle. just a pin and nut, easy
2. Remove the ring on the lower ball joint, and hammer away. lube it up a little too. Press not necessary, I have never used one (freeze the new ball joints!!! makes life easier, let them freeze for 4+ hours)
3&4 no clue what youre trying to say because your interchanging 2 wheel vocabulary and 4 wheel vocabulary. can not compute
#4
05-03-2013
1. Yes it is necessary to remove tie rod end from the spindle. just a pin and nut, easy
2. Remove the ring on the lower ball joint, and hammer away. lube it up a little too. Press not necessary, I have never used one (freeze the new ball joints!!! makes life easier, let them freeze for 4+ hours)
3&4 no clue what youre trying to say because your interchanging 2 wheel vocabulary and 4 wheel vocabulary. can not compute
2. Remove the ring on the lower ball joint, and hammer away. lube it up a little too. Press not necessary, I have never used one (freeze the new ball joints!!! makes life easier, let them freeze for 4+ hours)
3&4 no clue what youre trying to say because your interchanging 2 wheel vocabulary and 4 wheel vocabulary. can not compute
Freezing them...good idea.
#5
05-03-2013
Got the drivers side done this evening, have to wait until tomorrow or Sunday to do the pass. side. Took about 2-3 hours but I can probably knock out the other side much quicker now that I've learned. The only issue I had was getting the bottom of the steering knuckle out of the lower ball joint. Beat on it for awhile with a BFH and finally just heated it up with a berzomatic/map gas, smacked it once and came right on out.
I found new appreciation for my DeWalt cordless 1/2" drive impact. Would have been damn near impossible without that.
I got the new upper control arms in as close as I could to the position the old ones came out but it's definitely gonna need an alignment once this is all done. Never had one since I owned it and found no receipts from the previous owner so probably needs done anyway. Hopefully with the best Moog stuff (grease able fittings) I could buy I wont have to do this job again anytime soon.
Fortunately the hubs/wheel bearings still feel and appear OK as do all the CV boots and tie rod ends....I'm not sure if I'd ever be able to get the hub out of the steering knuckle. Those bolts don't look like they're ever gonna move again.
Took it for a short drive and other than a final check on all the bolts, hub nut torque, and everything else once I get the other side done all seems well.
Also just put brand new rotors and pads on it last week so it should be good to go for a long time.
Last edited by klc317; 05-03-2013 at 08:34 PM.
#6
05-04-2013

Join Date: Nov 2011
Location: Copper Cliff, Ontario
Posts: 112
Likes: 0
Received 0 Likes
on
0 Posts
I did the driverside hub on my 07 and the bolts looked about the same, thought they would never come out. put my breaker bar on there but with limited room, it was no use, so grabbed the map gas torch heated for a bit and hit them with a long handle ratchet, came right out. one needed my electric impact due to clearance issues, but still came right out. Hopefully yours will be as easy.
#7
05-04-2013

Join Date: Jan 2011
Location: lake tapps, wa
Posts: 523
Likes: 0
Received 0 Likes
on
0 Posts
#8
05-04-2013
Put the jack on the end of the lower arm right where the ball joint is. It'll go right into place once you jack it up from that point.
#9
05-04-2013
Got the pass. side done within an hour or so, Came apart and went together super easy after learning from the drivers side. Everything feels good and drives fine but I am gonna get it aligned this week...I'm sure the camber/caster is out due to me changing the upper arms. Got it where it looks decent but thats not good enough. At least the rattle noise of the drivers side lower being bad and shifting up and down as I'd drive is all gone.
Last edited by klc317; 05-04-2013 at 06:40 PM.
#10
05-04-2013
I did the driverside hub on my 07 and the bolts looked about the same, thought they would never come out. put my breaker bar on there but with limited room, it was no use, so grabbed the map gas torch heated for a bit and hit them with a long handle ratchet, came right out. one needed my electric impact due to clearance issues, but still came right out. Hopefully yours will be as easy.
#11
05-04-2013
Join Date: Jan 2011
Location: lake tapps, wa
Posts: 523
Likes: 0
Received 0 Likes
on
0 Posts
Already did that and it didn't work I had to loosen the torsion adjustment bolt then got it up and now with the cv in it won't flex in far enough it's like my axle is too long this has been a nightmare I should have taken it to the shop and just paid paid for it get done I'm pretty good with my hands but this has just been ridiculous
#12
05-05-2013
Already did that and it didn't work I had to loosen the torsion adjustment bolt then got it up and now with the cv in it won't flex in far enough it's like my axle is too long this has been a nightmare I should have taken it to the shop and just paid paid for it get done I'm pretty good with my hands but this has just been ridiculous
#13
08-28-2013

Installing the upper ball joint is a little trickier than many suppose. The control arm bushings must be tightened in the vehicle loaded position. Here's a diagram and mention of this issue:
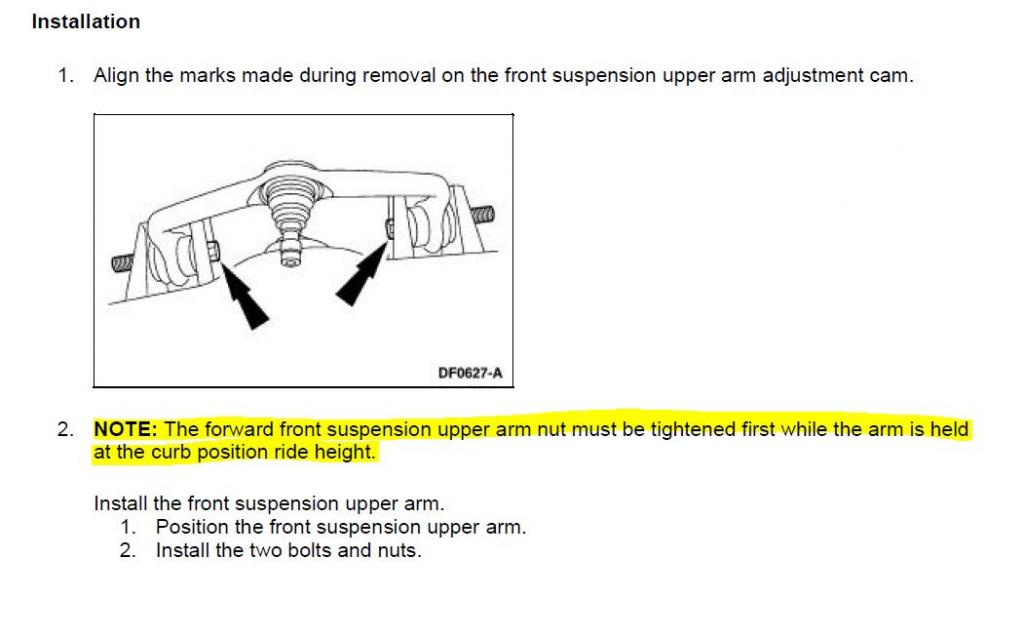
"Curb Height" means that the control arm bushings must be preloaded before torqueing or they will wear prematurely.
So how do you do that when your vehicle is sitting on jack stands or you have a jack under the control arm?
The first thought, is to jack up the control arm, but that only lifts your vehicle higher into the air.
Here's what I did on a BMW of mine which required the same procedure:
1. Take a measurement from the center of the hub to the lip of the fender while the vehicle sitson the ground:

2. Built wooden car ramps as follows:

Bottom 2 x 12 board is 27" long followed by an 18" board and then a 2 x 2 stop.
3. Drive your truck onto the ramps and then jack and remove the tire while supporting the lower control arm with a jack or stand. This will give you an add'l 3 inches of height.
4. Now proceed to remove the old control arm from the spindle and chassis and install the new one but not applying final torque to the control arm bolts.
5. Put the tire/lugs back on the truck and slowly lower it so that the upper control arm ball joint mates with the spindle. Double check your hub to fender measurement. Now tighten those control arm bolts to proper torque.
It maybe possible to not use the wooden ramps if you can obtain clearance to get your torque wrench into position and apply sufficient torque.

Once torqued take the tire back in the air and finish the install.
This procedure twists the control arm bushings into the correct position when the vehicle is brought to the ground. Otherwise, you will have over-twisted rubber bushings that will wear faster.

Thread
Thread Starter
Forum
Replies
Last Post
auto.guru
General Ford Ranger Discussion
0
07-15-2014 04:46 PM
RFG
General Ford Ranger Discussion
1
04-08-2010 03:37 PM
desimunda
Drivetrain Tech
1
11-06-2007 08:45 PM


