My Nav, Amp, Camera & Sub Installation
#1
 01-11-2012


Join Date: Dec 2009
Location: Toronto, ON
Posts: 65
Likes: 0
Received 0 Likes
on
0 Posts
My Nav, Amp, Camera & Sub Installation
Hi All,
Last week as I was putting my stereo upgrade into my '09 Ranger Sport, I snapped a few pictures as I went along, in the hope that this can help others with similar projects.
First step was to pick the new components. Mainly, I was replacing a JVC KDR-800 single-DIN unit that I installed a couple of years ago. I had installed the hands-free microphone, Sirius SC-C1 unit and four Polk 5x7s at the time as well, and these would remain in place.
I also wanted to improve the bass response and overall power of the system so this upgrade would also include an amp and sub.
I selected:
As I waited for my order to arrive, I planned the wiring layout so I could make sure I had everything I needed and so I wouldn't forget to run any wires or make any connections while I had the truck taken apart.

As for the sub, I wasn't confident in my ability to build the box so I enlisted Kromer Radio in Toronto (http://www.kromerradio.com) to design and install a custom single 10" sealed sub box to fit in the space for the jack. This part didn't happen until yesterday, due to their shop schedule.
The rest of the work, I did myself in my tiny, unheated garage.
Testing the amp for fit. These Class D amps are tiny for the amount of power they kick out, but this one didn't quite fit under the driver's seat...

...but it fit just right under the passenger seat with plenty of clearance for seat movement and away from my kid's muddy boots. That said, I'd still need to fabricate mounts of some sort due to the uneven floor.

Still planning the wiring, I took out the big fuse box to access the firewall so I could pass the power cable through (a suggestion found on this forum).
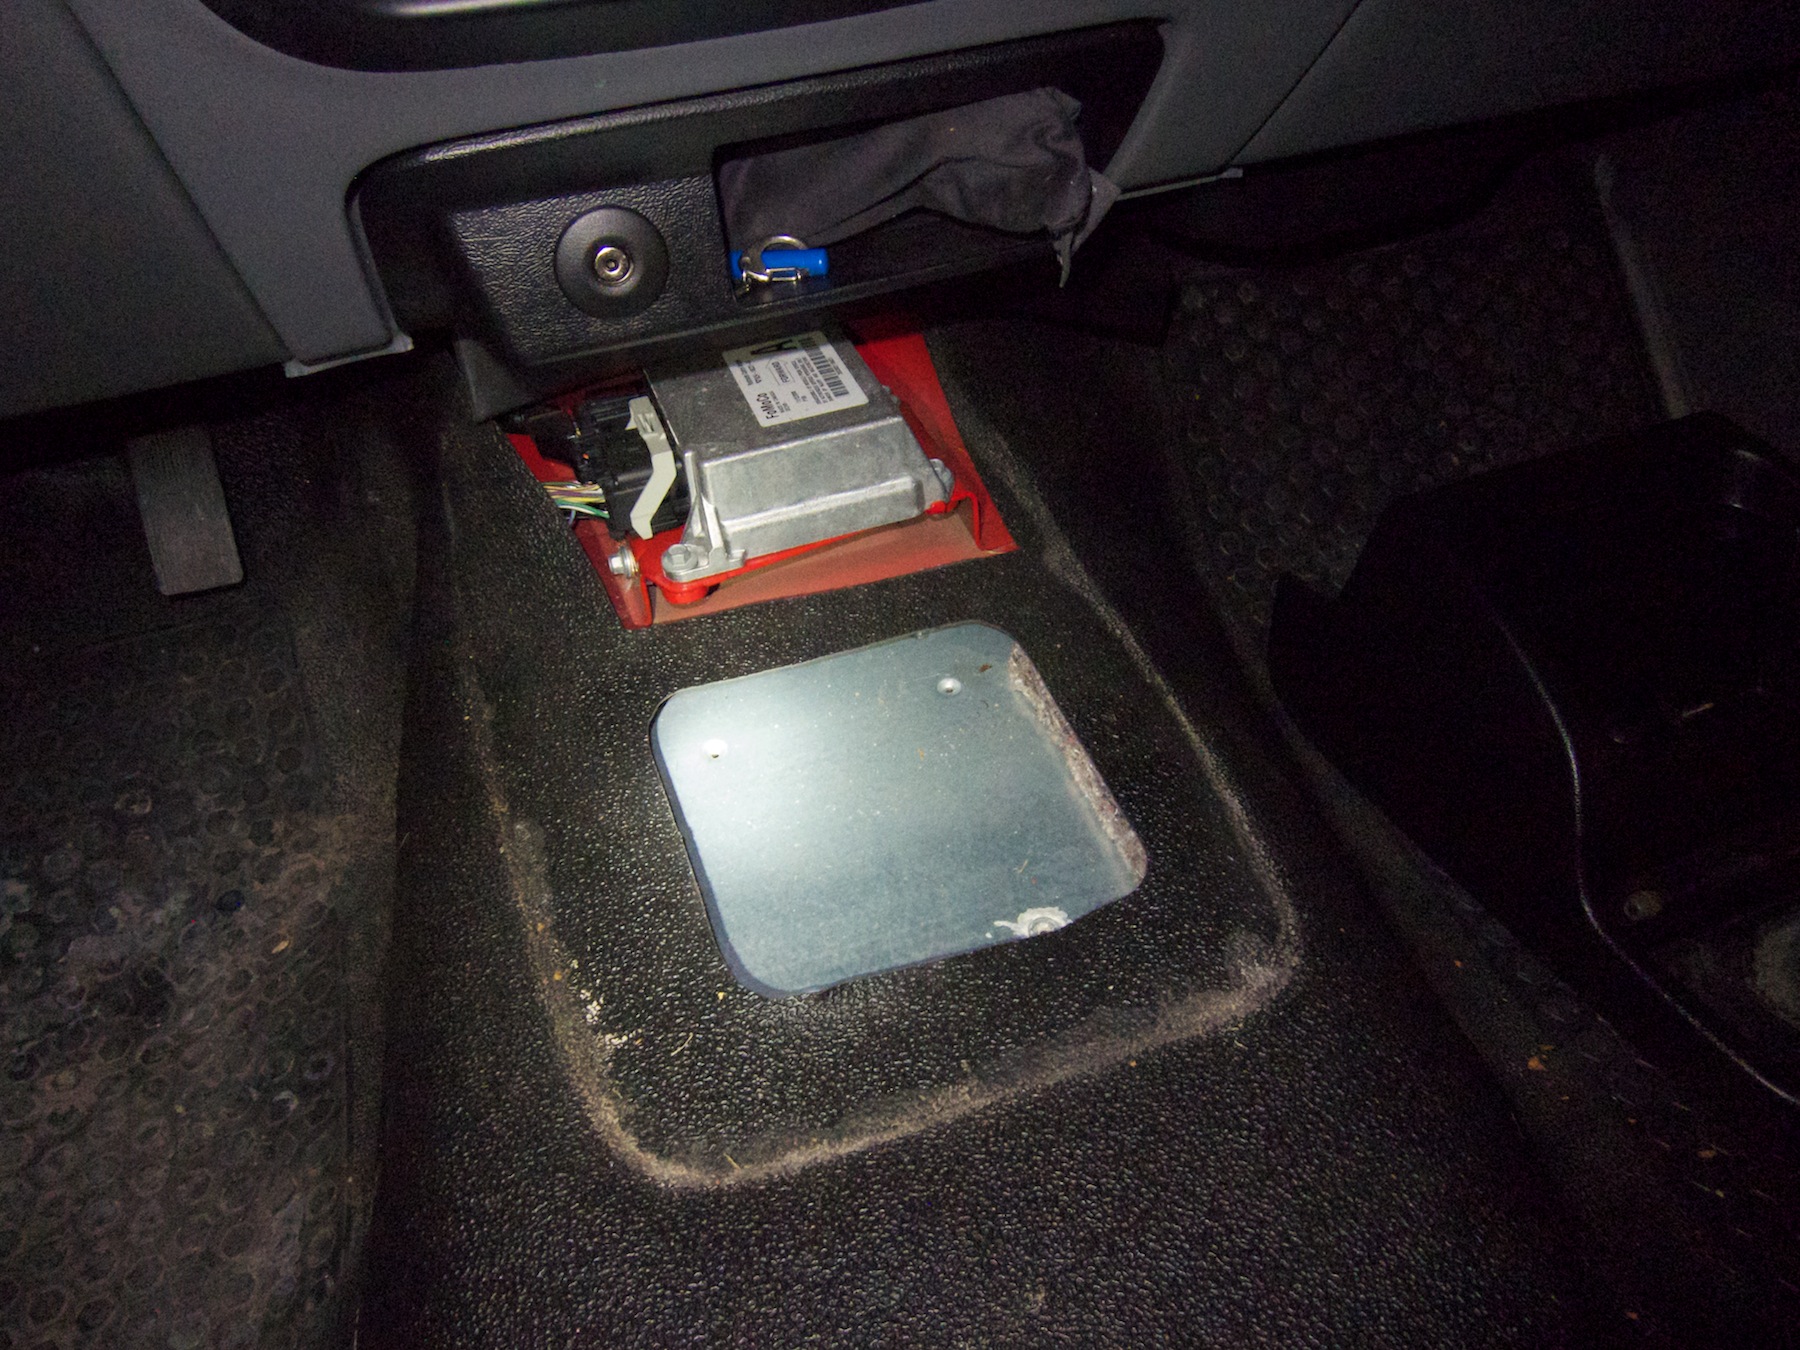
I also needed a good path for the reverse camera cable and reverse light signal to come into the cab. I took the little tray console out and decided to run the cable through the removable steel plate that fills the hole on automatics. I figured this was a nice spot as it could come through the floor in a spot that wouldn't put pressure on the wires.
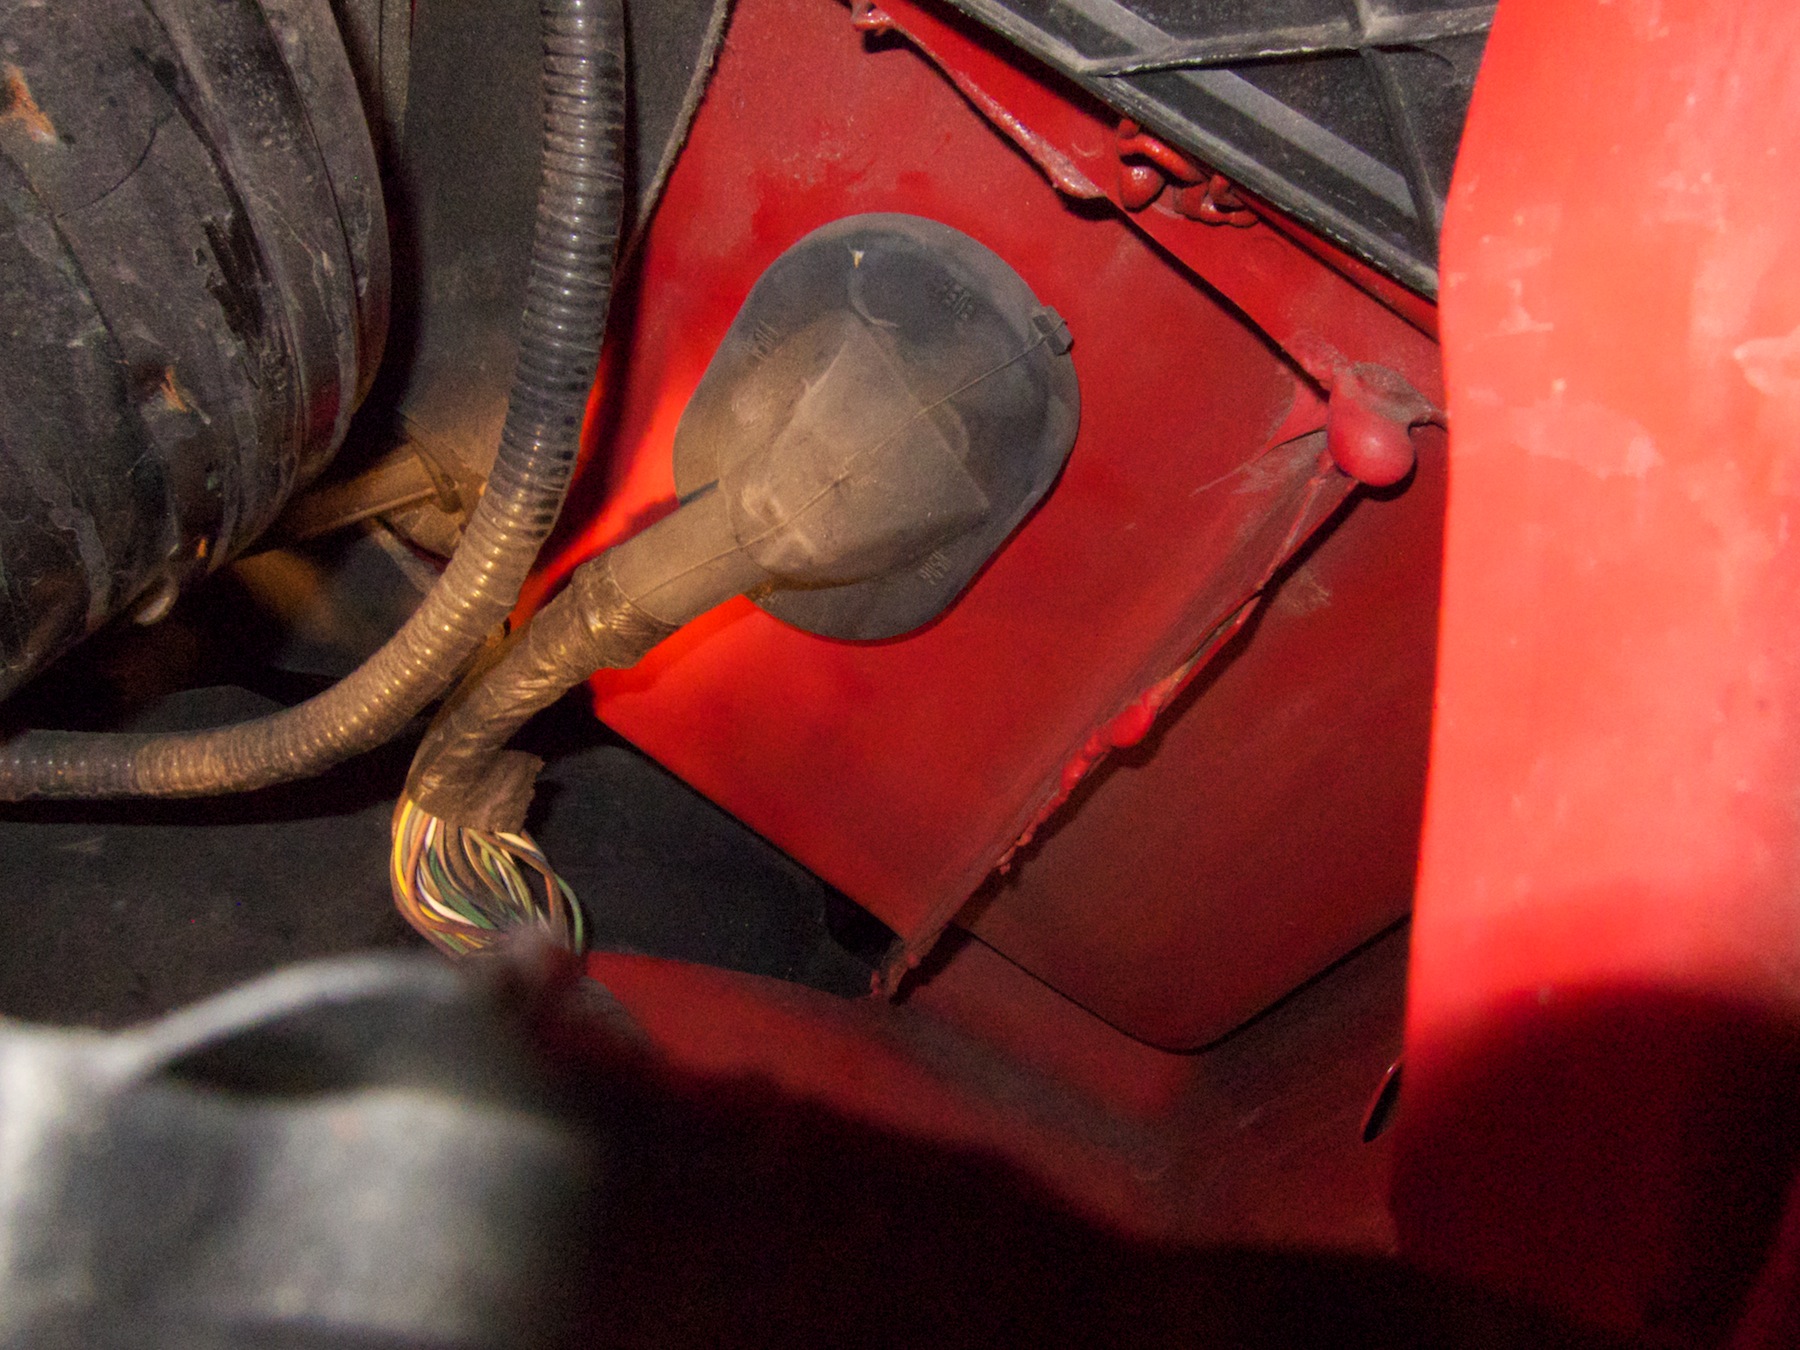
Here's how the power cable looked after I ran it through the firewall (seen from inside)
(seen from the engine compartment)

For most of the wiring, I used an E2 amplifier wiring kit I picked up at Canadian Tire: (http://www.canadiantire.ca/AST/brows....jsp?locale=en). It's the cheapest way I've found to get all the cabling you need for a typical installation and it seems to be of decent quality.
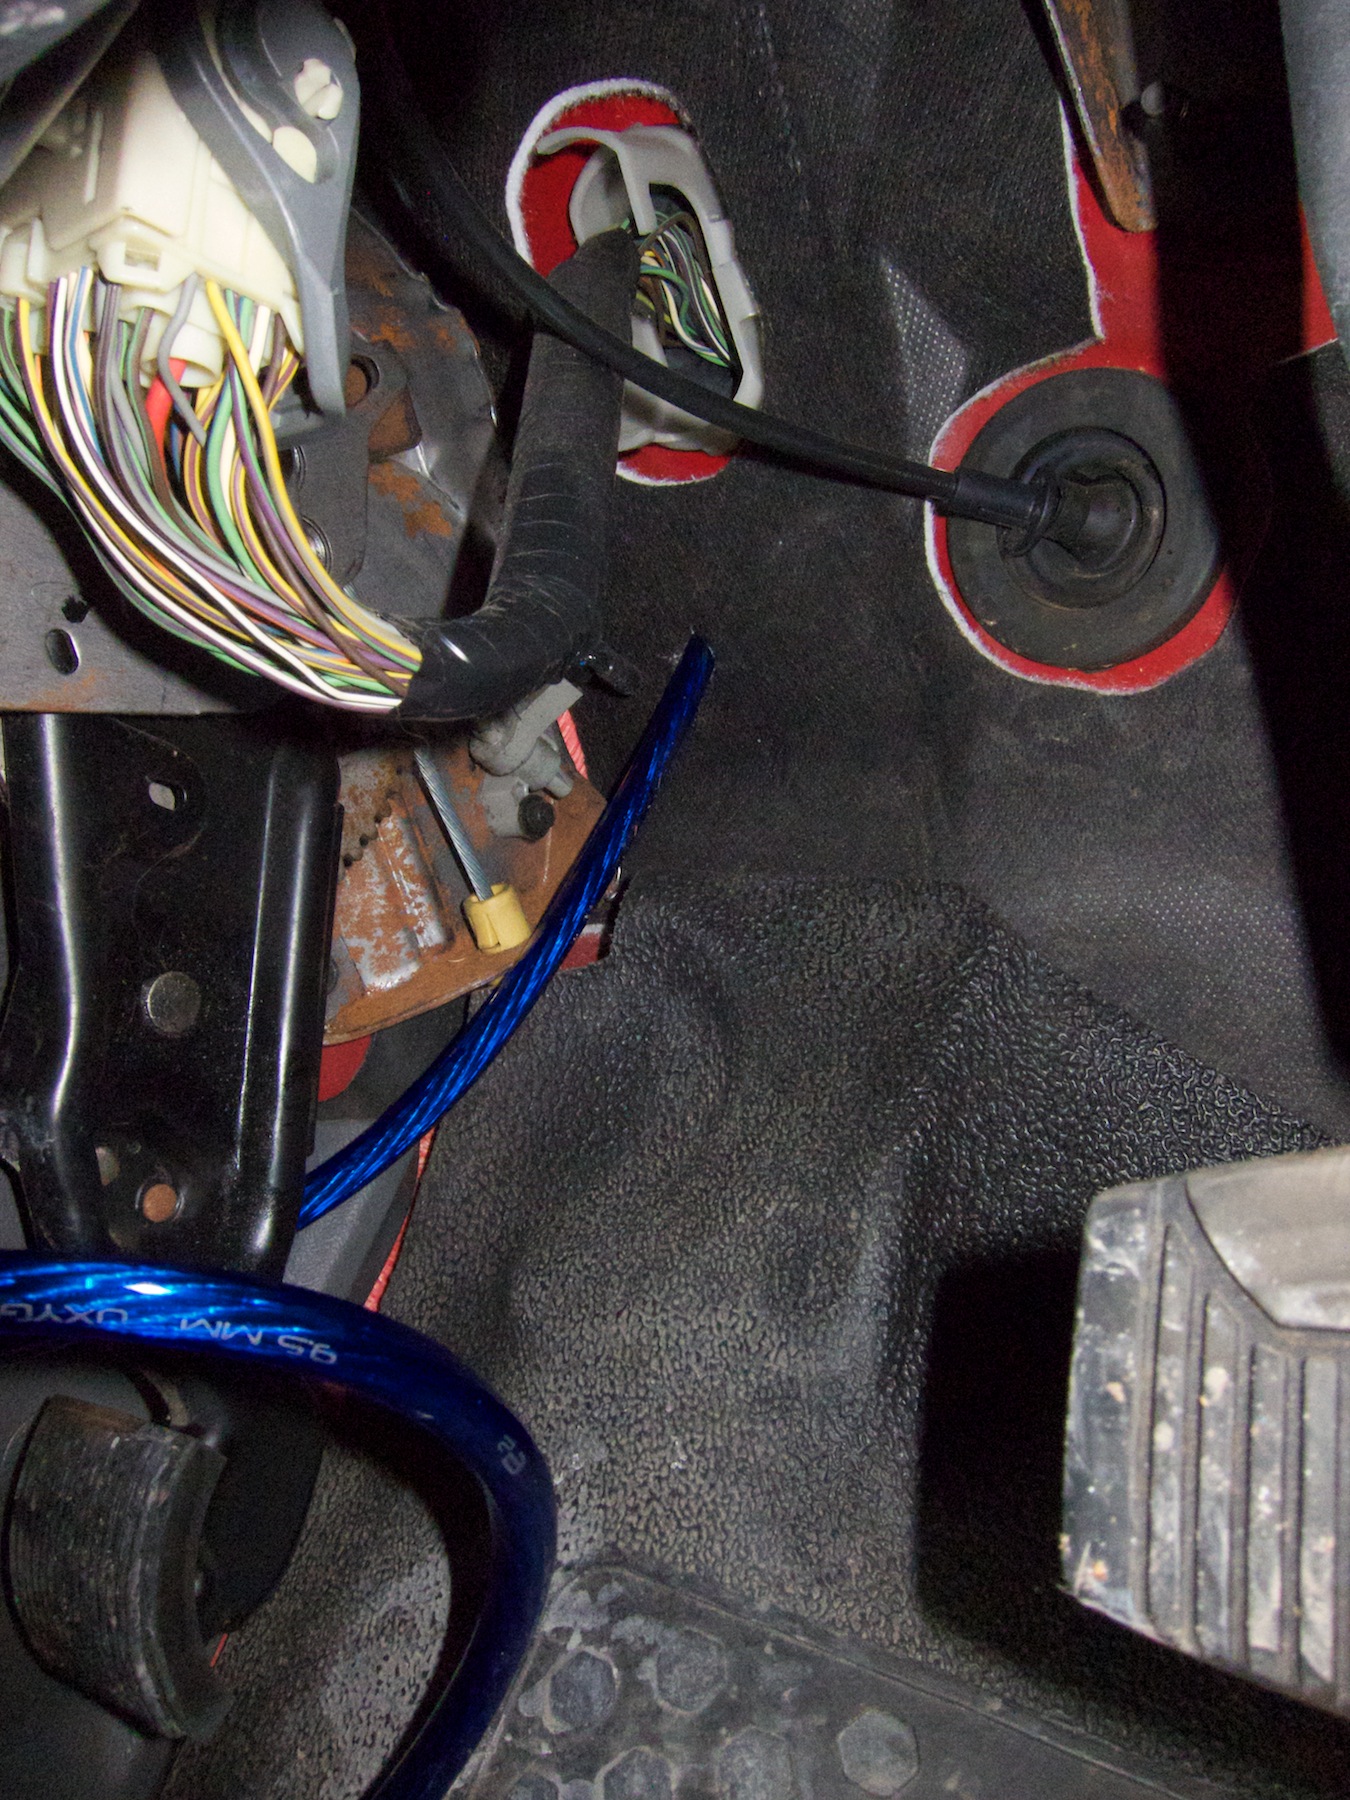
Here's how the reverse camera and reverse signal wire looked fed through the hole I made (always use rubber grommets!) You can see in this photo the clip for the tester I was using to try and identify the reverse lead in the big wiring harness that runs along the transmission tunnel under the carpet. This took a fair bit of trial and error because I didn't have a wiring diagram. I tried all the wires that might have matched the colour of the lead that goes to the reverse bulb at the back of the truck, taping them up after trying them with the tester. I was trying this hard because there isn't any easy way to get at the transmission switch to splice into the wiring.
It was under the truck that I finally found an accessible point in the wiring harness going to the back that had the correct wire (as opposed to tapping into that same at the back of the truck.) There's a connector that I unfastened from the crossmember right in front of the transfer case, letting me pull the harness away to work on it more easily.
Yes, folks, the reverse light wire is black with a yellow stripe on it, same colours as at the back-up bulb socket. This photo shows where I spliced into it.

I didn't take any photos of the license plate frame camera installation and running the cable for because the temperature dropped way below freezing and I had to work with the garage door open so I'd have room. I could barely feel my hands, let alone take pictures. :-P Anyway, I ran the cable inside the driver's side frame rail, using wire ties wherever it wasn't supported. I used one of those long thin flexible grabber tools to pull it through tight spots.
When the camera was installed and plugged in, I turned my attention to finding a good path for the power cable under the dash. As I did this, I found myself so uncomfortable upside down on the driver's seat that I decided just to take both seats out. I'm glad I did this because it really made the rest of the job easier, particularly the amp installation.
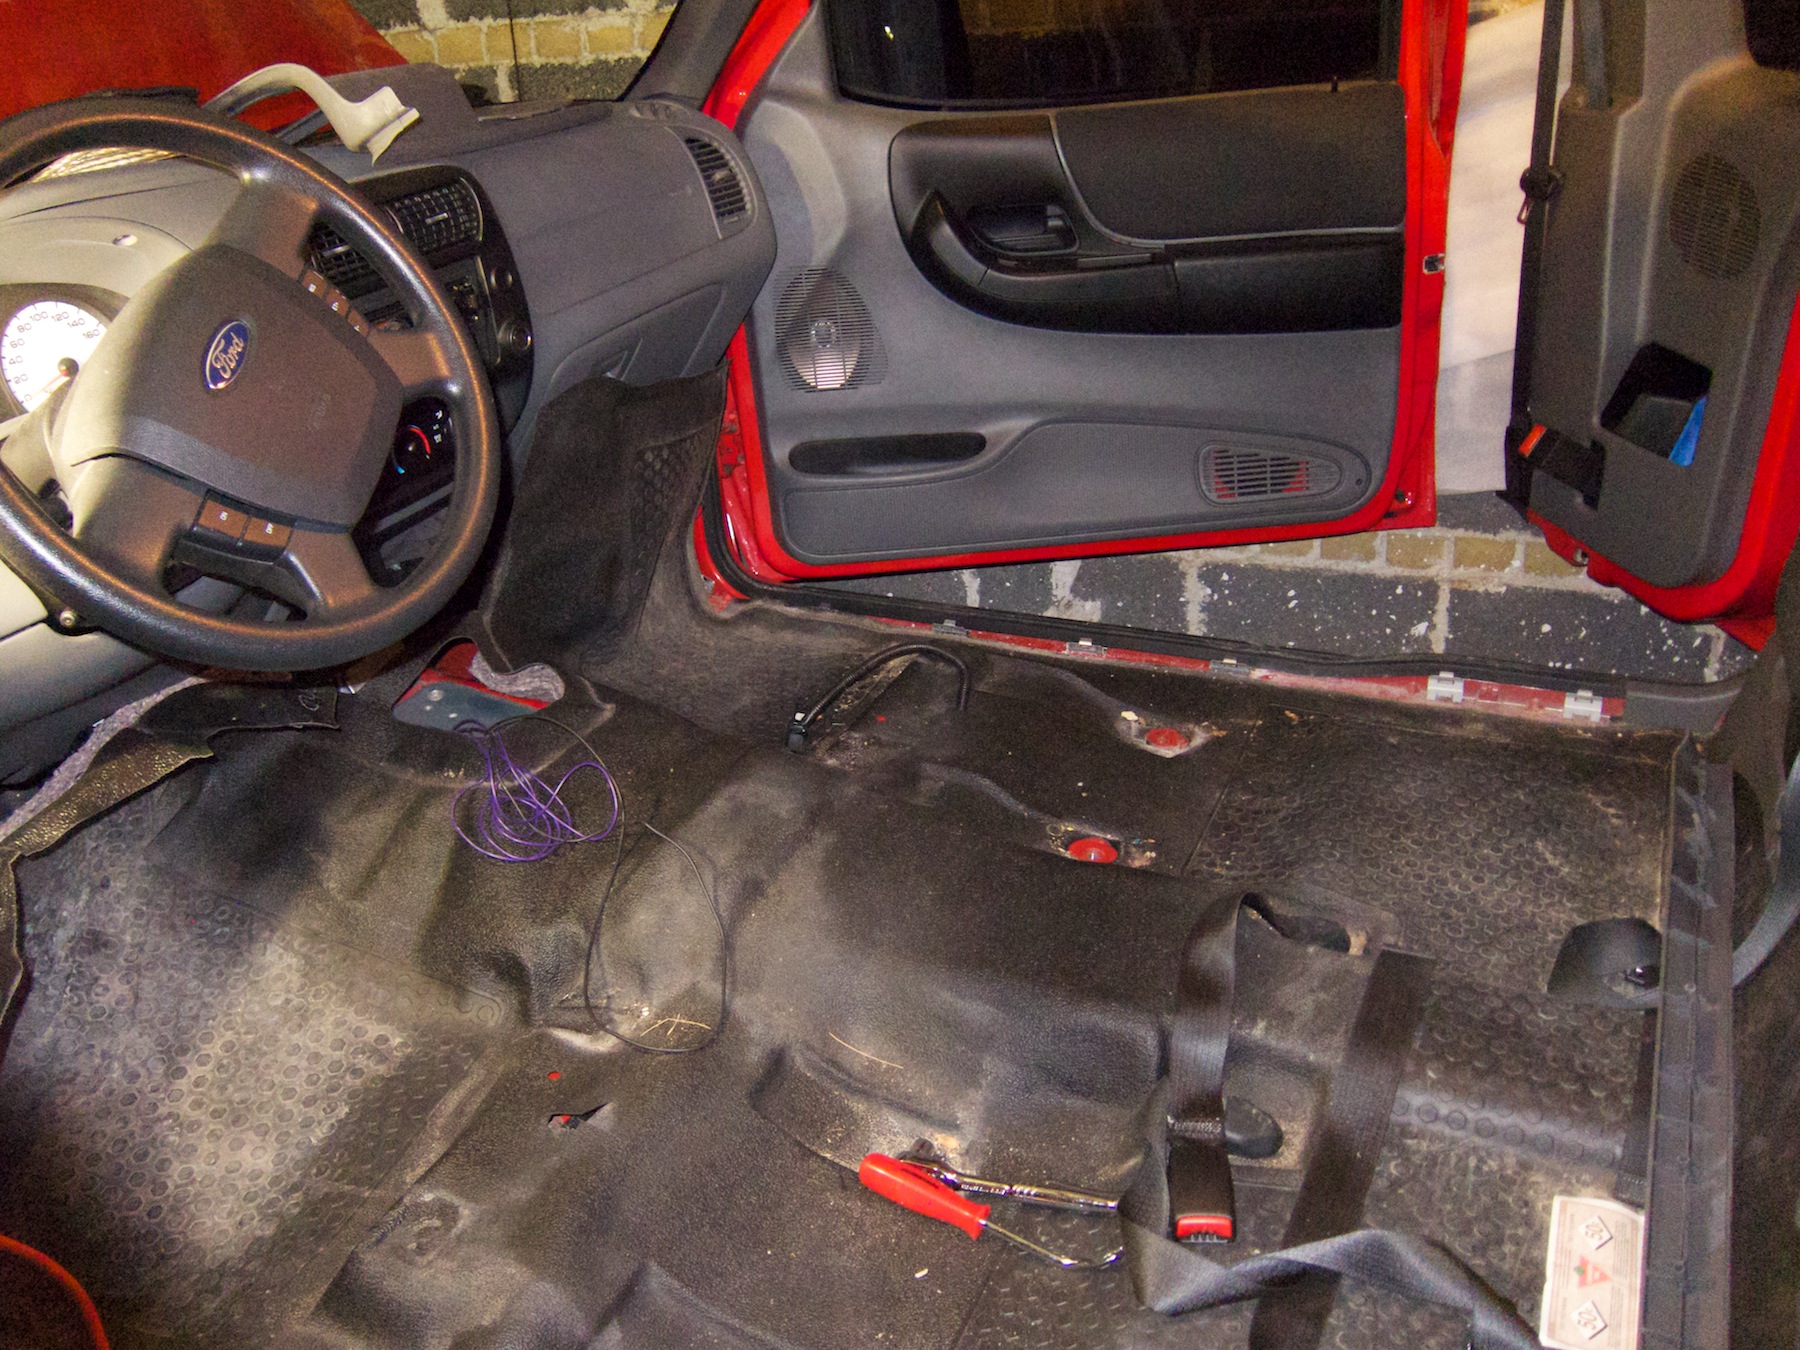
In the following photos you can see my wiring plan printed for reference and some of the cable runs. The power supply came across under the dashboard, then under the carpet along the tunnel on the driver's side, with the amp remote wire, then across to the passenger seat area along the back of the structural reinforcement. The front speaker cables came down from the head unit area along the passenger side of the transmission tunnel, keeping audio signals and power cables separate. Line-level audio cables travelled across the passenger side dashboard and then down along the door opening under the trim.
I duct-taped the cables to the sheet metal to ensure everything stayed in place after I put the carpet back down.

This is just a different angle of the same mess. You can see I used a label maker to mark both ends of all my cables so I'd know what they are later. You can also see the ground screw I tapped into the reinforcing beam after sanding away a bit of paint for good contact.

In this shot you can see the carpet is back down and all amp cables are coming through a slit I cut in the carpet near where the amp would be mounted.

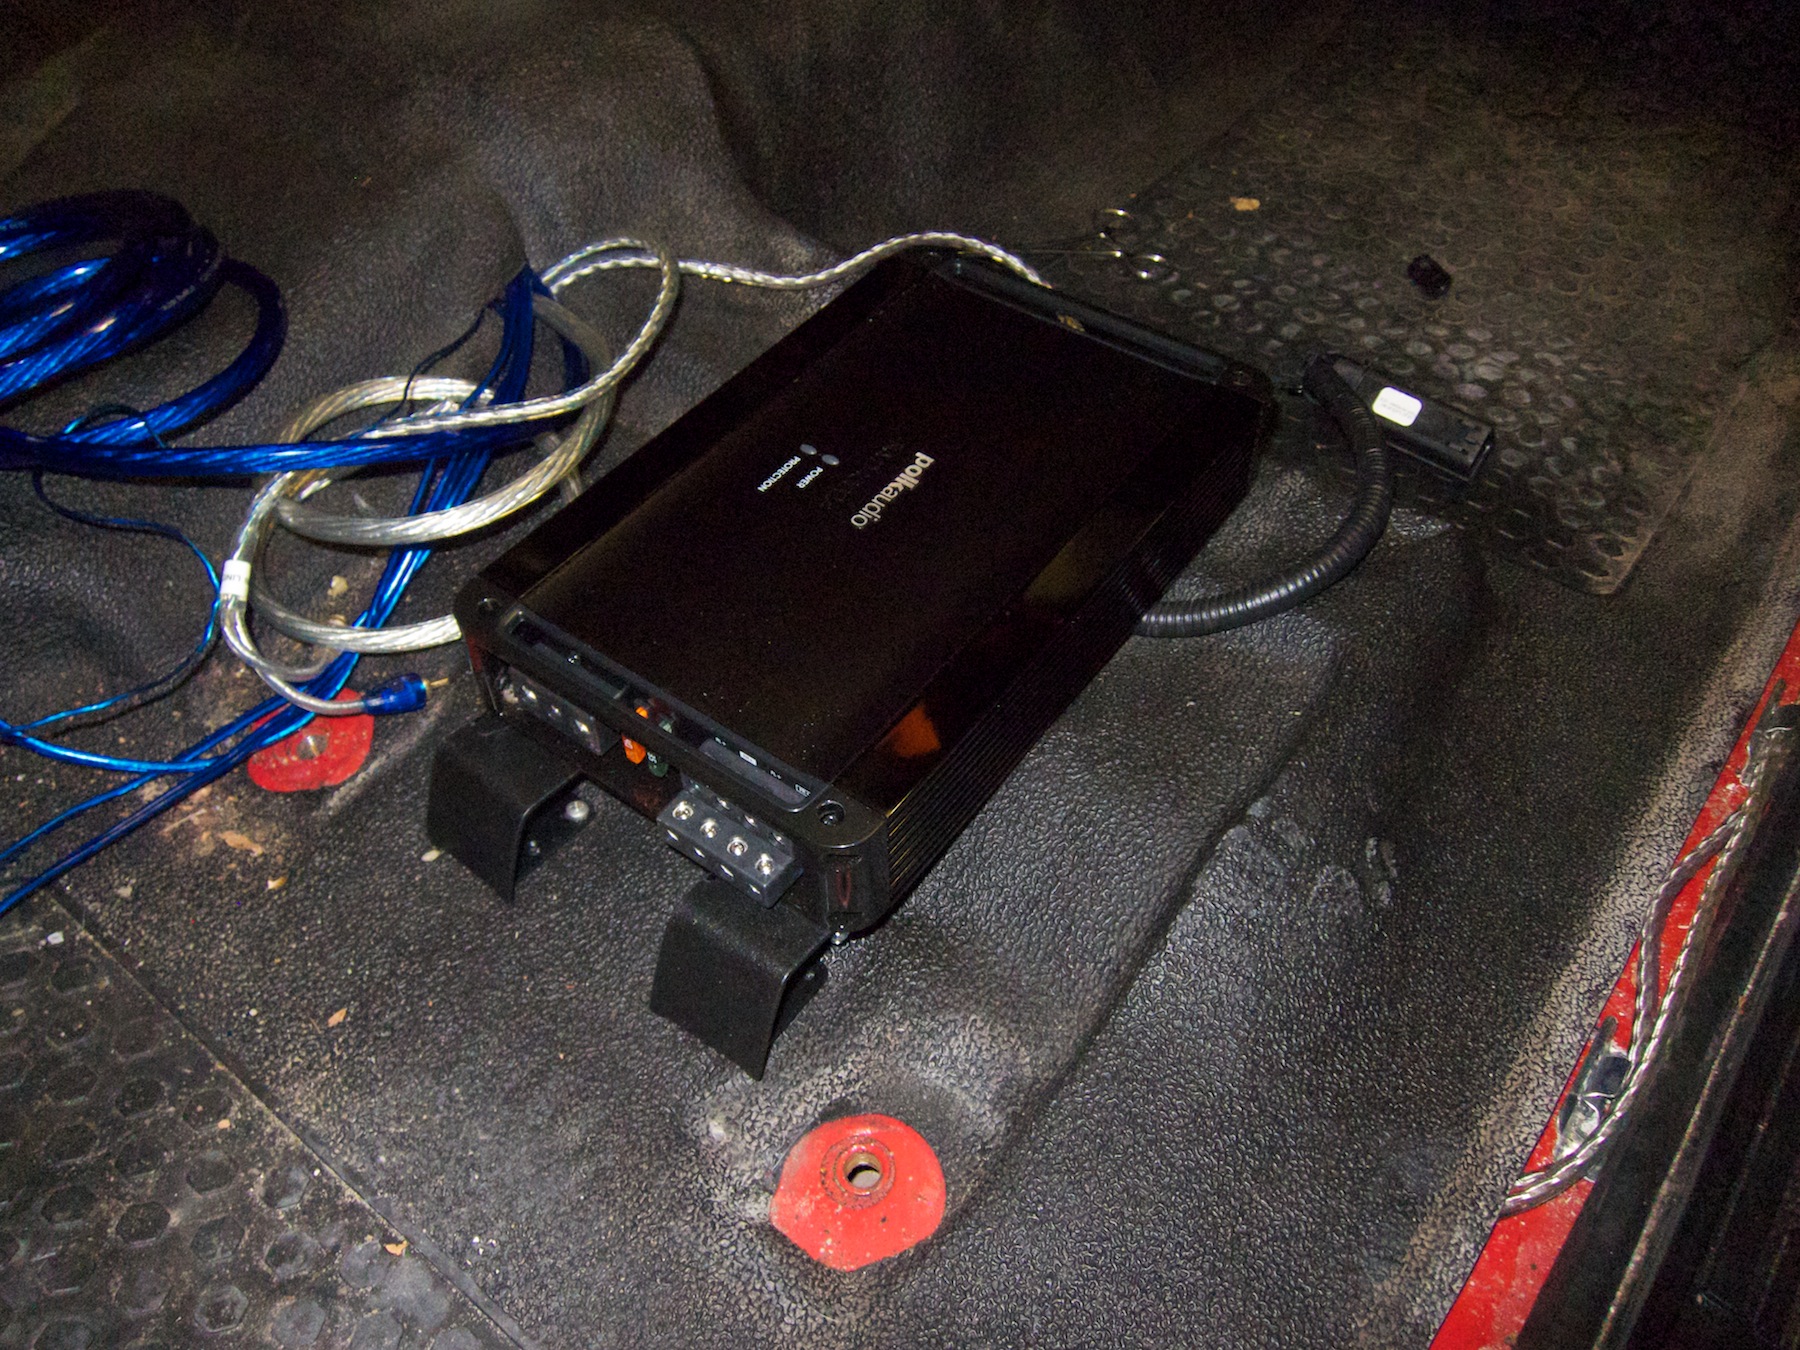
And then, mounting the amp. This shot shows the mounts I fabricated from some rack unit mounts that I bent to the right angle/height and then painted with a few coats of spray-on bed liner.

You can see with the amp in place why those mounts were necessary to hold the back of the amp up. The front of the amp screws directly into the reinforcing beam that crosses the floor, so I didn't actually need to drill into the floor itself.
I spent the next little while at my workbench soldering the wiring harness for the head unit together. I used quick-disconnects for anything going into the main harness, including reverse light signal, front speaker cables from the amp, remote cable, etc. The parking brake switch wire is just connected to the ground wire within the harness. Photo of the harness in place as I'm still working on the last few connections:

My old deck had its own AUX IN jack on its face, but the new one has it on the back so I rewired the factory AUX IN jack (unused since I had removed the factory deck) to connect to the back input. As I was testing the factory jack to figure out which wire was which, I found that two of the 4 leads appear to come from the ground ring on a standard stereo 1/8" plug. I could be wrong, but it might mean that this jack can support a 1/8" A/V connector. I didn't have the right kind of cable to wire up to find out, but since the AUX IN on the DNX 6980 is of the A/V type that accepts video, I think the factory AUX IN jack can send both video and audio to the deck if I replace the wire. I'll find out some other time, though - i'm not in a rush to use the video input.

Other work I did at the workbench but didn't photograph was mounting the head unit in the bezel using the adaptor kit that came with the deck. I very carefully and slowly used a Dremel tool to cut the top and bottom plastic tabs from the bezel radio opening, per the mounting kit instructions and then fiddled around with the kit to get the head unit in. There was a bit of trial and error here, too, I found out, because it's a really tight fit and you have to align the side mounts from the kit *just so* or you can't snap in the trim ring when you think you're done. Overall, not too painful an experience but it took about twice as long as I expected it to.
Back at the truck, after completing and double-checking all of the connections, I tested the head unit, amp and reverse camera before putting everything back together, i.e. trim and seats. Most things worked, but I wasn't sure about the Sirius; it was giving me a "Check Sirius" error, and since this was a new deck, I thought this might be because the truck didn't have signal in the garage. I put everything back together because everything else worked, then backed the truck outside to try it again. No luck, same error. In the end, I had to pull the bezel off and reach behind the head unit to push the Kenwood/Sirius adaptor cable in properly. That did the trick and everything started to work. Snap it back in and DONE!
Here's the finished install pics:
Head unit

Amp

Back-up camera

Custom box built by Kromer, with 4ohm Hertz Energy ES250, complete with cup holders! The grille is on order.

Overall, I'm really satisfied with the end result and it sounds better than I expected it to, considering it's just a single 10".
Anyway, there it is. Happy to fill in any detail that might be helpful. Thanks to the other forum members whose posts helped me figure this all out.
Cheers!
Last week as I was putting my stereo upgrade into my '09 Ranger Sport, I snapped a few pictures as I went along, in the hope that this can help others with similar projects.
First step was to pick the new components. Mainly, I was replacing a JVC KDR-800 single-DIN unit that I installed a couple of years ago. I had installed the hands-free microphone, Sirius SC-C1 unit and four Polk 5x7s at the time as well, and these would remain in place.
I also wanted to improve the bass response and overall power of the system so this upgrade would also include an amp and sub.
I selected:
As I waited for my order to arrive, I planned the wiring layout so I could make sure I had everything I needed and so I wouldn't forget to run any wires or make any connections while I had the truck taken apart.
As for the sub, I wasn't confident in my ability to build the box so I enlisted Kromer Radio in Toronto (http://www.kromerradio.com) to design and install a custom single 10" sealed sub box to fit in the space for the jack. This part didn't happen until yesterday, due to their shop schedule.
The rest of the work, I did myself in my tiny, unheated garage.
Testing the amp for fit. These Class D amps are tiny for the amount of power they kick out, but this one didn't quite fit under the driver's seat...
...but it fit just right under the passenger seat with plenty of clearance for seat movement and away from my kid's muddy boots. That said, I'd still need to fabricate mounts of some sort due to the uneven floor.
Still planning the wiring, I took out the big fuse box to access the firewall so I could pass the power cable through (a suggestion found on this forum).
I also needed a good path for the reverse camera cable and reverse light signal to come into the cab. I took the little tray console out and decided to run the cable through the removable steel plate that fills the hole on automatics. I figured this was a nice spot as it could come through the floor in a spot that wouldn't put pressure on the wires.
Here's how the power cable looked after I ran it through the firewall (seen from inside)
(seen from the engine compartment)
For most of the wiring, I used an E2 amplifier wiring kit I picked up at Canadian Tire: (http://www.canadiantire.ca/AST/brows....jsp?locale=en). It's the cheapest way I've found to get all the cabling you need for a typical installation and it seems to be of decent quality.
Here's how the reverse camera and reverse signal wire looked fed through the hole I made (always use rubber grommets!) You can see in this photo the clip for the tester I was using to try and identify the reverse lead in the big wiring harness that runs along the transmission tunnel under the carpet. This took a fair bit of trial and error because I didn't have a wiring diagram. I tried all the wires that might have matched the colour of the lead that goes to the reverse bulb at the back of the truck, taping them up after trying them with the tester. I was trying this hard because there isn't any easy way to get at the transmission switch to splice into the wiring.
It was under the truck that I finally found an accessible point in the wiring harness going to the back that had the correct wire (as opposed to tapping into that same at the back of the truck.) There's a connector that I unfastened from the crossmember right in front of the transfer case, letting me pull the harness away to work on it more easily.
Yes, folks, the reverse light wire is black with a yellow stripe on it, same colours as at the back-up bulb socket. This photo shows where I spliced into it.
I didn't take any photos of the license plate frame camera installation and running the cable for because the temperature dropped way below freezing and I had to work with the garage door open so I'd have room. I could barely feel my hands, let alone take pictures. :-P Anyway, I ran the cable inside the driver's side frame rail, using wire ties wherever it wasn't supported. I used one of those long thin flexible grabber tools to pull it through tight spots.
When the camera was installed and plugged in, I turned my attention to finding a good path for the power cable under the dash. As I did this, I found myself so uncomfortable upside down on the driver's seat that I decided just to take both seats out. I'm glad I did this because it really made the rest of the job easier, particularly the amp installation.
In the following photos you can see my wiring plan printed for reference and some of the cable runs. The power supply came across under the dashboard, then under the carpet along the tunnel on the driver's side, with the amp remote wire, then across to the passenger seat area along the back of the structural reinforcement. The front speaker cables came down from the head unit area along the passenger side of the transmission tunnel, keeping audio signals and power cables separate. Line-level audio cables travelled across the passenger side dashboard and then down along the door opening under the trim.
I duct-taped the cables to the sheet metal to ensure everything stayed in place after I put the carpet back down.
This is just a different angle of the same mess. You can see I used a label maker to mark both ends of all my cables so I'd know what they are later. You can also see the ground screw I tapped into the reinforcing beam after sanding away a bit of paint for good contact.
In this shot you can see the carpet is back down and all amp cables are coming through a slit I cut in the carpet near where the amp would be mounted.
And then, mounting the amp. This shot shows the mounts I fabricated from some rack unit mounts that I bent to the right angle/height and then painted with a few coats of spray-on bed liner.
You can see with the amp in place why those mounts were necessary to hold the back of the amp up. The front of the amp screws directly into the reinforcing beam that crosses the floor, so I didn't actually need to drill into the floor itself.
I spent the next little while at my workbench soldering the wiring harness for the head unit together. I used quick-disconnects for anything going into the main harness, including reverse light signal, front speaker cables from the amp, remote cable, etc. The parking brake switch wire is just connected to the ground wire within the harness. Photo of the harness in place as I'm still working on the last few connections:
My old deck had its own AUX IN jack on its face, but the new one has it on the back so I rewired the factory AUX IN jack (unused since I had removed the factory deck) to connect to the back input. As I was testing the factory jack to figure out which wire was which, I found that two of the 4 leads appear to come from the ground ring on a standard stereo 1/8" plug. I could be wrong, but it might mean that this jack can support a 1/8" A/V connector. I didn't have the right kind of cable to wire up to find out, but since the AUX IN on the DNX 6980 is of the A/V type that accepts video, I think the factory AUX IN jack can send both video and audio to the deck if I replace the wire. I'll find out some other time, though - i'm not in a rush to use the video input.
Other work I did at the workbench but didn't photograph was mounting the head unit in the bezel using the adaptor kit that came with the deck. I very carefully and slowly used a Dremel tool to cut the top and bottom plastic tabs from the bezel radio opening, per the mounting kit instructions and then fiddled around with the kit to get the head unit in. There was a bit of trial and error here, too, I found out, because it's a really tight fit and you have to align the side mounts from the kit *just so* or you can't snap in the trim ring when you think you're done. Overall, not too painful an experience but it took about twice as long as I expected it to.
Back at the truck, after completing and double-checking all of the connections, I tested the head unit, amp and reverse camera before putting everything back together, i.e. trim and seats. Most things worked, but I wasn't sure about the Sirius; it was giving me a "Check Sirius" error, and since this was a new deck, I thought this might be because the truck didn't have signal in the garage. I put everything back together because everything else worked, then backed the truck outside to try it again. No luck, same error. In the end, I had to pull the bezel off and reach behind the head unit to push the Kenwood/Sirius adaptor cable in properly. That did the trick and everything started to work. Snap it back in and DONE!
Here's the finished install pics:
Head unit
Amp
Back-up camera
Custom box built by Kromer, with 4ohm Hertz Energy ES250, complete with cup holders! The grille is on order.
Overall, I'm really satisfied with the end result and it sounds better than I expected it to, considering it's just a single 10".
Anyway, there it is. Happy to fill in any detail that might be helpful. Thanks to the other forum members whose posts helped me figure this all out.
Cheers!
Last edited by ecrase2500; 01-12-2012 at 04:21 AM.

#3
01-11-2012
Join Date: Dec 2009
Location: Toronto, ON
Posts: 65
Likes: 0
Received 0 Likes
on
0 Posts

#5
01-11-2012
#7
01-12-2012
Join Date: Dec 2009
Location: Toronto, ON
Posts: 65
Likes: 0
Received 0 Likes
on
0 Posts
Thanks! <TX>TORKIT, the sound is clean, precise, powerful, and musical. I was actually surprised. I've put other systems in other past vehicles of mine (multi amp setups, dual subs, components, etc) and this is probably the best sounding one yet.
It won't win any SPL competitions but it's still way more power than an older dude like me really should have if I want to preserve my hearing. :)
It won't win any SPL competitions but it's still way more power than an older dude like me really should have if I want to preserve my hearing. :)


#9
01-12-2012
Join Date: Dec 2009
Location: Toronto, ON
Posts: 65
Likes: 0
Received 0 Likes
on
0 Posts


#13
08-08-2016
Join Date: Dec 2009
Location: Toronto, ON
Posts: 65
Likes: 0
Received 0 Likes
on
0 Posts
I'll also see if I can post some pics with the a measuring tape so I can share the rough dimensions.
#14
08-15-2016
Join Date: Dec 2009
Location: Toronto, ON
Posts: 65
Likes: 0
Received 0 Likes
on
0 Posts
OK, I fished out the old receipt and it was more expensive than I'd remembered, at $120 for materials (not counting the 10" sub) and 5.5 hours of labour at $69 = $379.50. That's Canadian dollars in 2012, which, coincidentally, was when the Loonie matched the greenback pretty closely.
Here are pics taken with a measuring tape so you can see the rough dimensions. You can see what a few years of wear did to the carpeting, too. Hope this helps!


Here are pics taken with a measuring tape so you can see the rough dimensions. You can see what a few years of wear did to the carpeting, too. Hope this helps!

Thread
Thread Starter
Forum
Replies
Last Post
djyox
Audio & Video Tech
6
11-29-2007 01:37 PM


