How To: Hurst Shifter Install
#1
 06-27-2005


How To: Hurst Shifter Install
Mod: Hurst Shifter Install
Difficulty: 2/5 (attention to detail and instruction are needed)
Time: ~2hours
Author:George Novak (SilverTank)
Please direct all questions and comments to the author.
This How To covers the installation of a Hurst Shifter (Part #391-5020) into my truck. This was a 7 hour install, due to the documentation and testing that was done. Regular install should be under 2 hours. A very big thanks to my bro Mark for helping with this one. I owe you big time.
NOTE: Always READ all the instructions that were provided by the manufacturer BEFORE attempting any modifications.
Tools/Equipment needed:
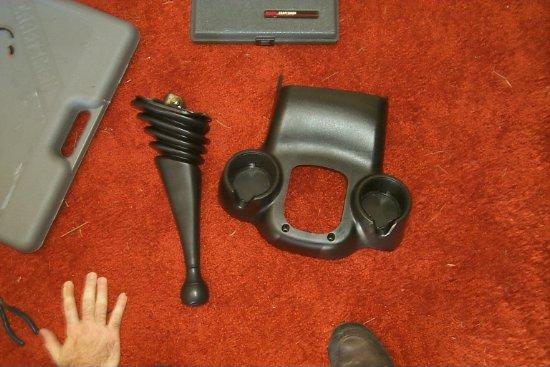
Here's the whole kit from Hurst. My initial impression was very satisfied, as all parts are well constructed. Every part needed for the install was included, and there were no damaged items.

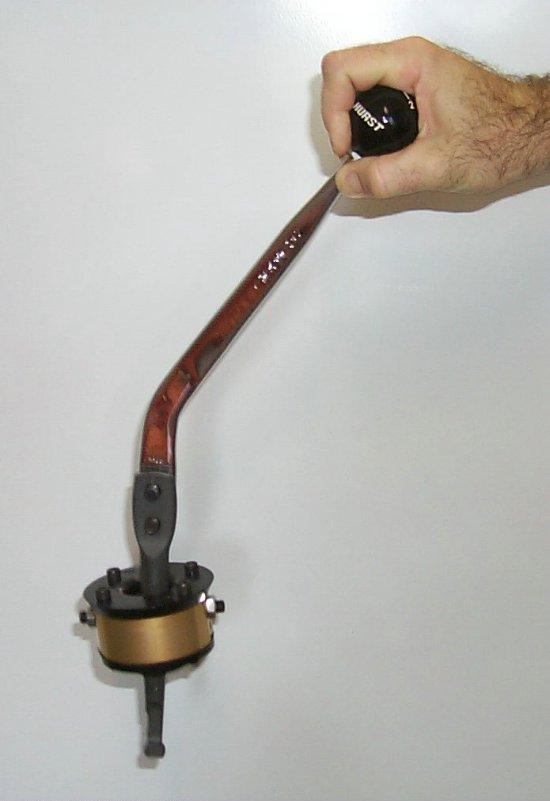
Here's the shifter itself. It has a billet steel arm with a billet aluminum shift cup. Inside are plastic pieces designed to absorb some of the sounds that performance shifters tend to produce.
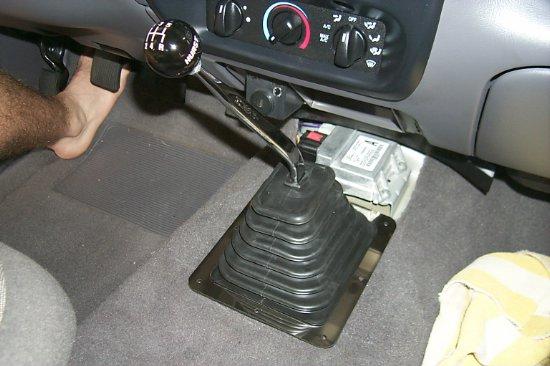
First you must remove the factory shifter. There are two screws in the console under the front of the boot. You only get a small amount of room, but it's enough to remove the bolt that holds the factory shift arm.

Here's a better look at the bolt you are trying to remove in the previous picture. Remove the nut from the side facing the passenger door, then screw it onto the other side of the bolt (driver's side).
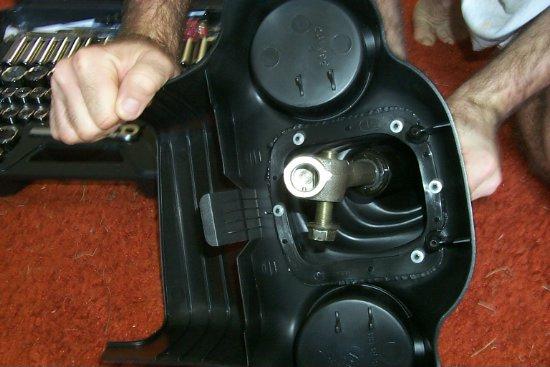
The bolt has a cam that will pull out as you tighten then nut. With the bolt removed, you can take off the entire shifter console. The big plastic tongue in the front of the console goes into the floor plate, it makes later assembly a bit challenging.

After you remove the console, you will see the inner factory boot and plastic plate. The plate has "Explorer front" and "Ranger front" embossed on it. It has 4 Phillips bolts that you have to remove. Note the slot in the plate for the console tongue.

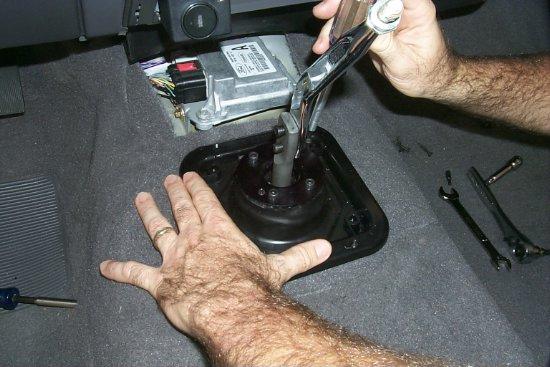
With the plate removed, you can next see the shifter base. Fold down the floor insulation around the base, so you can access it better.

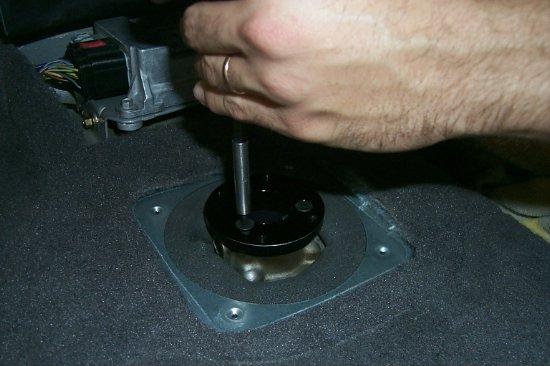
Here's a better view of the stock shifter base. Remove the 3 T30 Torx screw in the top of the cap.

After you remove the screws, pull the shifter base out of the transmission. Use a shop towel or gloves, as the notches in the top are very sharp.

Just to prove that I wasn't kidding about the last statement! The stock shifter base will give you two nice deep cuts if you're not careful.

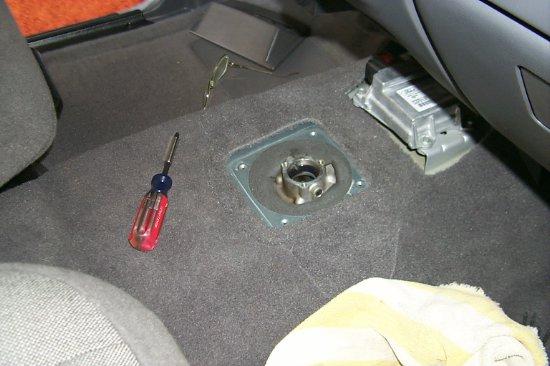
You have now removed the stock shifter assembly. Make sure you cover the hole, so nothing drops down inside.
This is the base of the stock shifter. You can see that the entire assembly is all steel, and the pivot point is under the cap. The Hurst shifter moves that pivot point higher, resulting in a shorter throw.

Next we measure from the underside of the mounting flange to the selector tip on both shifters. In some cases the stock unit will be shorter and you must use the enclosed spacer. Mine were the same size.

Next, remove the 4 hex bolts in the Hurst shifter and gently separate the bottom mounting plate. Be careful with the rubber oil seal.
Now install the Hurst mounting plate to the top of your transmission. Make sure the three mounting holes are lined up.

Now gently press or tap the plate into the place. It should mate perfectly with the transmission hole.

Install the 3 supplied flat countersunk screws.
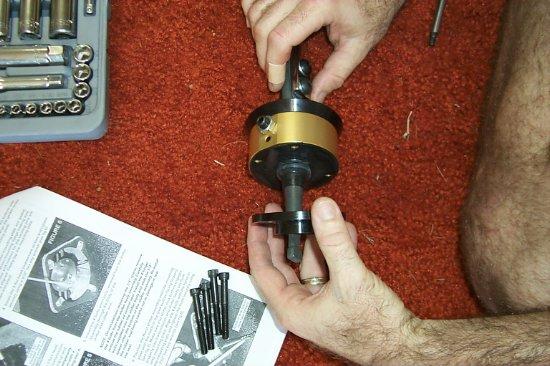
Now reassemble the Hurst shifter. Make sure the notch in the shifter bottom faces forward, and that you do not damage the rubber oil seal. Push the 4 bolts down into the mounting plate.

Now tighten the bolts down evenly to protect the rubber oil seal. When tight, there should be no gaps between the mounting plate and the shifter cup.

Next, test the shifter by engaging all gears. It should move to all gears, and fully engage without problems.

Now, adjust the front and rear stop bolts, so that they make contact when the shifter is firmly in 2nd gear (front stop bolt) and 3rd gear (rear stop bolt)

Here's a close up to show the front stop bolt and how it should be adjusted.

Time to decide if you want to use the Hurst Super Boot or factory console. It's not too hard to decide, as Ford now has the Restraint Control Module bolted to the floor. Unless you want to cover the module with carpet, I suggest the factory console.
The first destructive modification is to cut the stock inner boot to accommodate the Hurst shifter. You must make the hole 2-1/2 inches. Use sharp scissors to cut the boot.

Now, push the modified stick boot down over Hurst shifter and secure it using the factory screws.
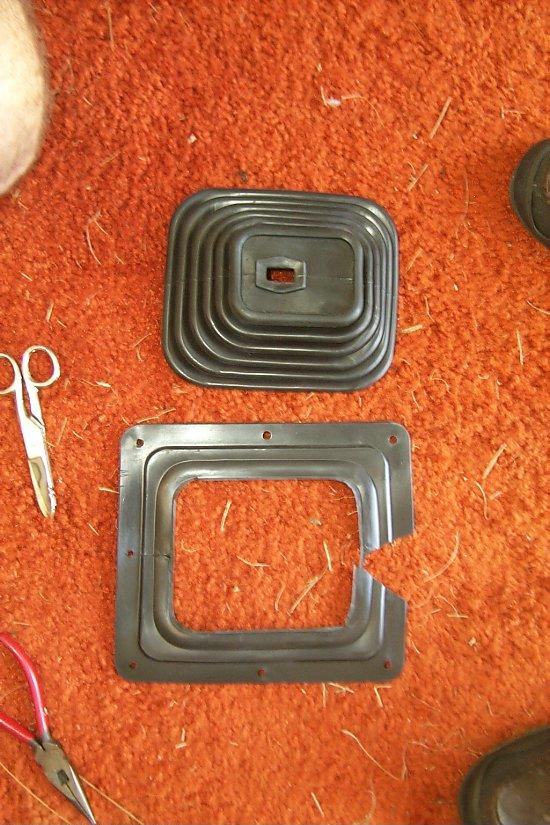
Next destructive mod. You must remove the factory boot from the console. It is held on with metal rings over plastic nubs. No matter how you try, the plastic nubs will break off as you remove the rings. Take off all the rings and remove the factory boot.

Here's the factory boot removed from the console. You will note how heavy the shifter arm feels. That's because all the sound deadening is located around the shift arm. This is how Ford controls the vibrations and sounds from the transmission.
Here's a closer look at the insulation around the factory shift arm. The Hurst does not have this, so there will be gear mesh sounds coming from it. You may also experience the occasional rattle

Now, cut the last fold off the Hurst Super Boot, so that it can fit into the factory console.

The Hurst instructions say you can leave 5 folds at the top, but the new Ford console doesn't have room. I used a magazine photo that shows 4 folds. Now remove the boot from the console and install the Hurst metal decorative plate.

You will only use the top 4 folds, but I left two at the bottom for a better fit.
The best way is to first install the factory console, then install the Hurst boot. Just get the console in place, then fold the boot into it. Now, drop the console tongue into the floor plate and reinstall the two rear screws.

Mod Complete:

The finished mod from the rear. You will be quite impressed by the reduced shift throws and precision of gear selection. You will hear gear meshing, so don't be alarmed unless you hear obvious grinding

Here's a Visio diagram that details the changes made by the Hurst shifter. Throws are significantly reduced over the stock shift pattern. (Diagram courtesy of Mark Jones (RedDog)

Good photo of the before and after (Thanks Mark!)

Edited by Jason Gonderman (rngprerunner) for grammar and format.
Difficulty: 2/5 (attention to detail and instruction are needed)
Time: ~2hours
Author:George Novak (SilverTank)
Please direct all questions and comments to the author.
This How To covers the installation of a Hurst Shifter (Part #391-5020) into my truck. This was a 7 hour install, due to the documentation and testing that was done. Regular install should be under 2 hours. A very big thanks to my bro Mark for helping with this one. I owe you big time.
NOTE: Always READ all the instructions that were provided by the manufacturer BEFORE attempting any modifications.
Tools/Equipment needed:
- Basic Screwdrivers
- Basic Socket Set
- Torx Bits
Here's the whole kit from Hurst. My initial impression was very satisfied, as all parts are well constructed. Every part needed for the install was included, and there were no damaged items.
Here's the shifter itself. It has a billet steel arm with a billet aluminum shift cup. Inside are plastic pieces designed to absorb some of the sounds that performance shifters tend to produce.
First you must remove the factory shifter. There are two screws in the console under the front of the boot. You only get a small amount of room, but it's enough to remove the bolt that holds the factory shift arm.
Here's a better look at the bolt you are trying to remove in the previous picture. Remove the nut from the side facing the passenger door, then screw it onto the other side of the bolt (driver's side).
The bolt has a cam that will pull out as you tighten then nut. With the bolt removed, you can take off the entire shifter console. The big plastic tongue in the front of the console goes into the floor plate, it makes later assembly a bit challenging.
After you remove the console, you will see the inner factory boot and plastic plate. The plate has "Explorer front" and "Ranger front" embossed on it. It has 4 Phillips bolts that you have to remove. Note the slot in the plate for the console tongue.
With the plate removed, you can next see the shifter base. Fold down the floor insulation around the base, so you can access it better.
Here's a better view of the stock shifter base. Remove the 3 T30 Torx screw in the top of the cap.
After you remove the screws, pull the shifter base out of the transmission. Use a shop towel or gloves, as the notches in the top are very sharp.
Just to prove that I wasn't kidding about the last statement! The stock shifter base will give you two nice deep cuts if you're not careful.
You have now removed the stock shifter assembly. Make sure you cover the hole, so nothing drops down inside.
This is the base of the stock shifter. You can see that the entire assembly is all steel, and the pivot point is under the cap. The Hurst shifter moves that pivot point higher, resulting in a shorter throw.
Next we measure from the underside of the mounting flange to the selector tip on both shifters. In some cases the stock unit will be shorter and you must use the enclosed spacer. Mine were the same size.
Next, remove the 4 hex bolts in the Hurst shifter and gently separate the bottom mounting plate. Be careful with the rubber oil seal.
Now install the Hurst mounting plate to the top of your transmission. Make sure the three mounting holes are lined up.
Now gently press or tap the plate into the place. It should mate perfectly with the transmission hole.
Install the 3 supplied flat countersunk screws.
Now reassemble the Hurst shifter. Make sure the notch in the shifter bottom faces forward, and that you do not damage the rubber oil seal. Push the 4 bolts down into the mounting plate.
Now tighten the bolts down evenly to protect the rubber oil seal. When tight, there should be no gaps between the mounting plate and the shifter cup.
Next, test the shifter by engaging all gears. It should move to all gears, and fully engage without problems.
Now, adjust the front and rear stop bolts, so that they make contact when the shifter is firmly in 2nd gear (front stop bolt) and 3rd gear (rear stop bolt)
Here's a close up to show the front stop bolt and how it should be adjusted.
Time to decide if you want to use the Hurst Super Boot or factory console. It's not too hard to decide, as Ford now has the Restraint Control Module bolted to the floor. Unless you want to cover the module with carpet, I suggest the factory console.
The first destructive modification is to cut the stock inner boot to accommodate the Hurst shifter. You must make the hole 2-1/2 inches. Use sharp scissors to cut the boot.
Now, push the modified stick boot down over Hurst shifter and secure it using the factory screws.
Next destructive mod. You must remove the factory boot from the console. It is held on with metal rings over plastic nubs. No matter how you try, the plastic nubs will break off as you remove the rings. Take off all the rings and remove the factory boot.
Here's the factory boot removed from the console. You will note how heavy the shifter arm feels. That's because all the sound deadening is located around the shift arm. This is how Ford controls the vibrations and sounds from the transmission.
Here's a closer look at the insulation around the factory shift arm. The Hurst does not have this, so there will be gear mesh sounds coming from it. You may also experience the occasional rattle
Now, cut the last fold off the Hurst Super Boot, so that it can fit into the factory console.
The Hurst instructions say you can leave 5 folds at the top, but the new Ford console doesn't have room. I used a magazine photo that shows 4 folds. Now remove the boot from the console and install the Hurst metal decorative plate.
You will only use the top 4 folds, but I left two at the bottom for a better fit.
The best way is to first install the factory console, then install the Hurst boot. Just get the console in place, then fold the boot into it. Now, drop the console tongue into the floor plate and reinstall the two rear screws.
Mod Complete:
The finished mod from the rear. You will be quite impressed by the reduced shift throws and precision of gear selection. You will hear gear meshing, so don't be alarmed unless you hear obvious grinding
Here's a Visio diagram that details the changes made by the Hurst shifter. Throws are significantly reduced over the stock shift pattern. (Diagram courtesy of Mark Jones (RedDog)
Good photo of the before and after (Thanks Mark!)
Edited by Jason Gonderman (rngprerunner) for grammar and format.
Last edited by 98liftedranger; 11-27-2011 at 11:42 PM.
#2
05-27-2014

Join Date: Mar 2011
Location: Pittsburgh, PA
Posts: 3
Likes: 0
Received 0 Likes
on
0 Posts
Thanks for great installation instructions with photos. Very helpful, indeed. I replaced the factory shifter in my 2011 Ranger in about two hours. One thing I noticed after a day of driving was a movement in the shifter stick of about 1 inch when engaged in any gear. Removed the boot and discovered that the two bolts attaching the chrome stick handle to the shifting mechanism were loose. I removed the bolts, applied some blue Loctite, and re-tightened the bolts. Problem solved. The is the second time that I have experienced this same problem with a Hurst shifter.
Last edited by assembler_head; 05-27-2014 at 03:56 PM.
#3
01-19-2017

Join Date: Jan 2017
Location: Valparaiso IN
Posts: 2
Likes: 0
Received 0 Likes
on
0 Posts
#4
01-20-2017
Join Date: Mar 2011
Location: Pittsburgh, PA
Posts: 3
Likes: 0
Received 0 Likes
on
0 Posts
Hurst Leak
Yes, I did have a leak issue. It was an issue with the gasket. The shifter itself had an internal buzz/rattle that drove me crazy. So rather than deal with the gasket leak, I pulled the Hurst shifter and re-installed the Ford chrome handled FX4 shifter and **** that I had previously used to replace the factory shifter. I miss the tight shifter pattern, but the noise and leak made the shifter impractical for me.
#5
01-21-2017


Just my honest opinion on the Hurst, but for $300, it's absolutely ridiculous that they are as noisy and as prone to leaks as it is. I fully understand that a mechanical shifter with no insulation will make noise, but I'd be much happier with it if the shifter was at the $200 mark. And that's not even taking into consideration the leaking and the lack of a vent issues.
#6
06-17-2019

Member
Join Date: Jun 2019
Location: Wahiawa, HI
Posts: 3
Likes: 0
Received 0 Likes
on
0 Posts
Core Shifters
Just in case there is anyone looking for an alternative to Hurst shifters for Rangers up to 2011, there is a company called Core which make billet bases which utilizes Hurst 4106 handles for less than the price of a Hurst. I'll leave the link below. It solves the leak issues of the Hurst. Hope this helps.
https://core-shifters.com/products/c...w-m5r1-5-speed
https://core-shifters.com/products/c...w-m5r1-5-speed
#7
04-16-2020

#8
04-16-2020
Member
Join Date: Jun 2019
Location: Wahiawa, HI
Posts: 3
Likes: 0
Received 0 Likes
on
0 Posts
Hi Toydog. Its a good system since the base is one piece. I had leak with the original two piece Hurst base. I bought replacement Core Base and redid the install. Works great so far. Easy install and no leak issues. I think not having the gasket between the two pieces like Hurst helps prevent leaks. I would recommend it highly. Hope this helps you.
#9
05-14-2020

Member
Join Date: May 2010
Location: St. Charles, MO
Posts: 10
Likes: 0
Received 0 Likes
on
0 Posts
I would like to have a short throw, but keep the stock stick. I would like to keep the interior as factory looking as possible.
From the pictures it looks like it might be possible with a little bit of machining on the Hurst short throw base; basically cutting off the top "two bolt" mount, then maybe some resizing of the rod to fit the factory shift rod assembly.
Has any one done this? Or for those that have done the full Hurst mod, do you think my idea is feasible?

Thread
Thread Starter
Forum
Replies
Last Post


