How To: Replace Your Fuel Filter
#1
 05-02-2009


How To: Replace Your Fuel Filter
What you will need:
A new fuel filter
Special fuel filter tool if your truck was built before 2004 (I think)
SAFETY GLASSES!!!!!! (full wrap around or a pair of goggles would be best.
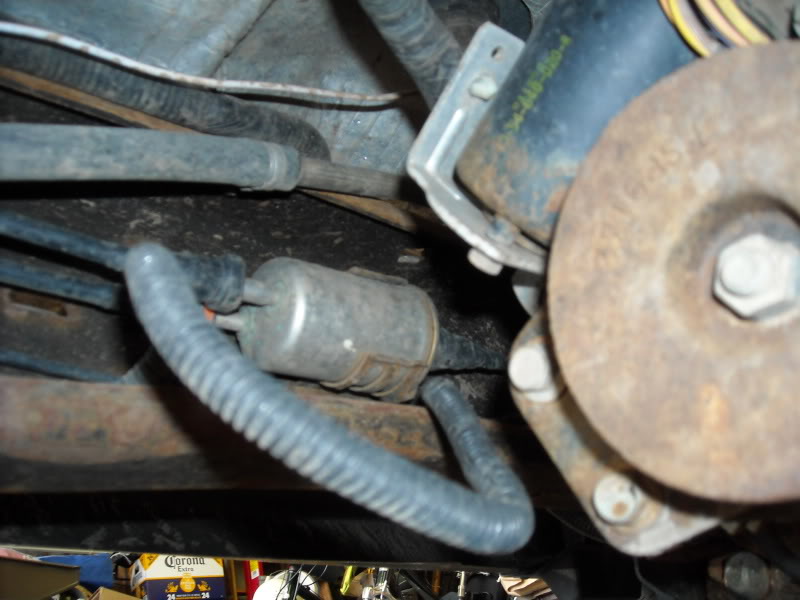
STEP 1, Locating the filter:
Look on the drivers side frame rail under the back of the cab and you will see a metal can the size of a pop can. That is your fuel filter.
STEP 2, placing your eye protection on your face:
This step is an ABSOLUTE MUST! DO NOT SKIP IT!
If you have decided to go with glasses, unfold them and and put the arms over your ears. They should rest comfortably on your nose. If you are going with goggles (highly advised over glasses) pull the elastic back and place goggles on face.
This step is EXTREMELY IMPORTANT. There is pressure still in your fuel system and it will spray out. I know this first hand as it shot me strait in the face. Make sure you are wearing eye protection.
STEP 3, Disconnecting the fuel pump power:
Open up your fuse box (under hood) and pull out the fuse for the fuel pump while the truck is running. The truck will stall out. This will relieve the pressure in the system.
STEP 4, removing the old filter:
On 04 and up turcks:
You will see either a green or an orange thing on the fuel line connectors. PUSH these in and pull the hoses back. You may need to use a screw driver to push them, or your freakishly long finger nails. DO NOT try to pull them out. I broke one of mine off, luckily the new filter came with clips (that I shouldn't have needed) to replace my one broken one.
On 03 and older trucks:
Um, I guess there is a special tool that you need. I dont know though I have never changed a fuel filter on one of them.
STEP 4.5, clean up the gas:
In my case I got gas shot directly in my face. Once you are done cleaning it off of your face and off of your camera because you decided to make a how-to, continue on to step 5.
STEP 5, Putting in the new filter:
The new filter looks like this, you will need to go to a auto parts store for this one, they dont sell them at Wal-Mart:
Simply clip the hoses back into the filter. On the end with 2 nipples, one is large and one is small. The connectors are the same way. It's stupid proof.
STEP 6, starting the truck:
Plug the fuel pump fuse back in, and hop in the truck. Turn the key to RUN but do not start it. Let it sit for 5 seconds or so and then crank the engine. It may take a couple seconds to fire because of the air in the system being pushed out. You may at this time decided to run some fuel injector cleaner through your system, it wouldnt hurt but I decided to skip it.
STEP 7, rewards:
Stand back and have yourself a cookie, you deserve it.
NOTE: I do not think my filter had ever been changed. After changing it I am now getting an extra 2 MPG (My scan gauge is telling me so). I dunno if its actually because of the filter or not but Im pretty happy about it.
A new fuel filter
Special fuel filter tool if your truck was built before 2004 (I think)
SAFETY GLASSES!!!!!! (full wrap around or a pair of goggles would be best.
STEP 1, Locating the filter:
Look on the drivers side frame rail under the back of the cab and you will see a metal can the size of a pop can. That is your fuel filter.
STEP 2, placing your eye protection on your face:
This step is an ABSOLUTE MUST! DO NOT SKIP IT!
If you have decided to go with glasses, unfold them and and put the arms over your ears. They should rest comfortably on your nose. If you are going with goggles (highly advised over glasses) pull the elastic back and place goggles on face.
This step is EXTREMELY IMPORTANT. There is pressure still in your fuel system and it will spray out. I know this first hand as it shot me strait in the face. Make sure you are wearing eye protection.
STEP 3, Disconnecting the fuel pump power:
Open up your fuse box (under hood) and pull out the fuse for the fuel pump while the truck is running. The truck will stall out. This will relieve the pressure in the system.
STEP 4, removing the old filter:
On 04 and up turcks:
You will see either a green or an orange thing on the fuel line connectors. PUSH these in and pull the hoses back. You may need to use a screw driver to push them, or your freakishly long finger nails. DO NOT try to pull them out. I broke one of mine off, luckily the new filter came with clips (that I shouldn't have needed) to replace my one broken one.
On 03 and older trucks:
Um, I guess there is a special tool that you need. I dont know though I have never changed a fuel filter on one of them.
STEP 4.5, clean up the gas:
In my case I got gas shot directly in my face. Once you are done cleaning it off of your face and off of your camera because you decided to make a how-to, continue on to step 5.
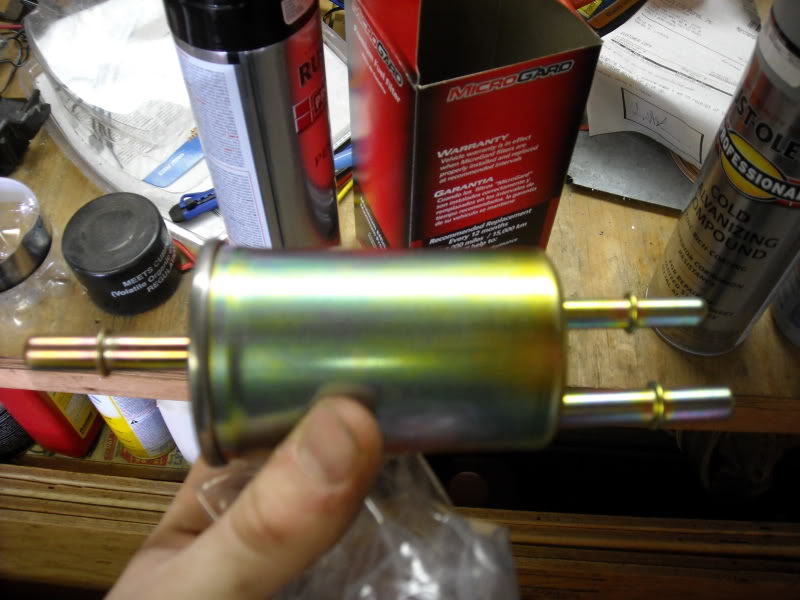
STEP 5, Putting in the new filter:
The new filter looks like this, you will need to go to a auto parts store for this one, they dont sell them at Wal-Mart:
Simply clip the hoses back into the filter. On the end with 2 nipples, one is large and one is small. The connectors are the same way. It's stupid proof.
STEP 6, starting the truck:
Plug the fuel pump fuse back in, and hop in the truck. Turn the key to RUN but do not start it. Let it sit for 5 seconds or so and then crank the engine. It may take a couple seconds to fire because of the air in the system being pushed out. You may at this time decided to run some fuel injector cleaner through your system, it wouldnt hurt but I decided to skip it.
STEP 7, rewards:
Stand back and have yourself a cookie, you deserve it.
NOTE: I do not think my filter had ever been changed. After changing it I am now getting an extra 2 MPG (My scan gauge is telling me so). I dunno if its actually because of the filter or not but Im pretty happy about it.
Last edited by malydeen; 05-02-2009 at 06:08 PM.
#2
05-04-2009

My 02 has the green and orange push-in disconnect tabs, so that system goes back farther than 04.
If you cycle the ignition several times (around 4) with it in the on position for a few seconds, it will fire right up when you try to start it after a fuel filter change. The fuel pump shuts off automatically after a few seconds when the ignition is turned on without starting the engine. So, cycling only one time will not build up full pressure.
If you cycle the ignition several times (around 4) with it in the on position for a few seconds, it will fire right up when you try to start it after a fuel filter change. The fuel pump shuts off automatically after a few seconds when the ignition is turned on without starting the engine. So, cycling only one time will not build up full pressure.
#3
05-27-2009
My 02 has the green and orange push-in disconnect tabs, so that system goes back farther than 04.
If you cycle the ignition several times (around 4) with it in the on position for a few seconds, it will fire right up when you try to start it after a fuel filter change. The fuel pump shuts off automatically after a few seconds when the ignition is turned on without starting the engine. So, cycling only one time will not build up full pressure.
If you cycle the ignition several times (around 4) with it in the on position for a few seconds, it will fire right up when you try to start it after a fuel filter change. The fuel pump shuts off automatically after a few seconds when the ignition is turned on without starting the engine. So, cycling only one time will not build up full pressure.
Safety goggles/glasses are VERY important. I got a face full of fuel the first time I replaced mine. You can disconnect the fuel shut off relay (found behind the passenger kick panel in my 01)and crank the engine a few times to relieve some pressure, but there's still slight pressure in the lines.
#4
07-08-2009

I've got a KD Tools #3321 which has both sizes for the lines you need to disconnect. I think this thing fits every Ford fuel line. I used it on my SHO, a 2001 Expy, 2004 and 2006 Rangers. IIRC, I picked it up at O'Reilly's for about $10 - 12. You can also find plastic ones, but I don't think they work as well.
One more point to add: If you remove the filter from the bracket prior to disconnecting the lines, you will find the extra little bit of slack makes it much easier.
And another point: Save the little plastic caps that come on the new filter, and use them to cover the fittings on the old filter when you disconnect the lines. This way, you only get a little gas on your hands, and not all the way down in your armpit.
#5
09-30-2012

Join Date: Dec 2008
Location: Orlando, Fl.
Posts: 11
Likes: 0
Received 0 Likes
on
0 Posts
I have a 2002 3.0 and i dont need any special tools to change mine. I start by decompressing the fuel at the cap on the fuel rail simply by removing the cap and carefully pushing down into it with a rag wrapped around a Phillips head screw driver (no rag means spray everywhere). then some slight pressure at the fuel filter connectors and its off. (push in, squeeze connector, pull off). at least then the fuel coming out of the filter doesnt spray everywhere, just sorta drips out a little bit


#8
01-16-2019


Join Date: Jan 2011
Location: Baton Rouge, LA
Posts: 19
Likes: 0
Received 0 Likes
on
0 Posts
Fuel filter change tips
I just changed mine on my 2011 STX SuperCab 4.0L 2WD at 81,500 miles.
1) I wouldn�t fool with the emergency shut off switch in the passenger toe kick. Just pull the fuse (position 23, 30A on a 2011) from the power distribution center under the hood near the master cylinder while the truck is running and it will die due to lack of fuel (pressure). I love the 2011 retainer system - no tool. Just squeeze opposing push butttons and pull the line away. It helps to push the line toward the filter BEFORE squeezing to help the retainer clear the rim around the line that holds it on. Also, I recommend first removing the line toward the back of the truck which is the single line because, 1) it is easier to access and 2) it allows the filter to be bent downward to drain the gas into a suitable container. I used an oil pan. Once the single side line is removed which is easier to remove with the filter still in its clamp, then pull the filter out of its clamp and remove the other 2 lines. Again, push line toward filter, then squeeze, then pull out. I smeared clean engine oil on the filter nipples as directed by Ford. This insures the o-ring inside the lines don�t move or become distorted during re-insertion which would cause a leak.
My truck had previously been sold twice as a Ford Certified Used Truck so I�m inclined to think the filter has been changed before. It was less dirty than I expected and the filter material was still strong and intact. I cut it open with a hack saw and inspected the paper filter. Based on how small it is (a little bigger than a D size battery) I will be charging it every 30,000 as directed by Ford to keep my fuel system clean and not strain the pump. This part and the 20 minutes it took me to change it, it simply too cheap to not replace.
#9
10-05-2019

Member
My 15 year old filter
My vehicle has a Nov. 5, 2004 build date so changing the filter on Oct. 4, 2019 makes it 15 years old with only 49,195 mi.
1) I watched Chris Fix's video and followed the suggestion to empty the tank as much as possible
2) I had the cheap, white plastic "split collar" type tools from Harbor Freight and they worked just fine.
2a) I missed the part about the orange or green tab being the push in type. Oh well.
3) I pulled the pump supply fuse and the engine died almost immediately.
3a) It began raining so the truck remained nose-up on ramps for 24 hours perhaps contributing to the few mere drops of fuel I saw.
3b) The EYE PROTECTION WAS IN PLACE. Thanks for stressing that.
4) I apply the thinnest smear of silicone grease to the nipples because I think an O-ring has to glide over each one to make a seal.
4a) I've always relubed, corrosion sprayed or otherwise prepped any and all connectors I remake.
4b) I wonder if the huge underhood electric connectors are dry and corroded. Remember, it's a 2005!
5) My original filter appeared to be stainless steel. I cut it open with a Porta-Band.
5a) The medium was super dark brown with a black coating on the tank side. This dark color was the same as that on a video in which the fuel filter was at 150,000 miles.
While I do not know any filter medium characteristics I'm happy to have a 15 year old filter out of my vehicle.
What the black coating was is another thing I do not know. It could be a resin to block moisture or a coating of residue.
I guess I should fill up and calculate "before and after" mileage. If I see a 2 mpg benefit, you'll hear from me.
Next up: A pan drop and trannie filter change.
Hugs & Kisses, G&K
Last edited by Georgeandkira; 10-05-2019 at 01:40 PM. Reason: corrections
#10
06-10-2020

#11
06-10-2020
Member
#12
06-11-2020

1) Locate the filter, should be inside the driver's side frame rail about a foot or two behind the front wheel.
2) Verify that the new filter matches the old one, should be the same size and have the same connections. Then, with the engine running, locate and pull the fuel pump relay and let the engine die. This will help relieve some pressure and minimize the gas mess when you take the lines off.
3) Disconnect the fuel lines. I believe you need a special tool for this, at least I did for my 96. It is cheap and easy to use. Keep in mind that you will likely spill gas everywhere, so have a catch tray handy or park over gravel you don't care about. It is also usually a good idea to do this with your gas tank as empty as is reasonable.
4) Pull the old filter out
5) Put the new one in, connecting the lines the same way they came off of the old one.
6) Put the relay back in and prime the fuel pump and you are ready to go.
Here is a video that I found that is supposed to match an 00 ranger.
Also here is a solid video by ChrisFix that explains everything pretty well. (He also has a lot of other super helpful videos)
Hopefully this can be of some help to you.
#13
09-18-2023
Member
OK, I've read it all but I still need some help. I remember changing the fuel filter on my '86 and it went smooth and just like described. Now I've got an '88 2.3 fuel injected XLT extended cab with dual tanks and I'm having problems. I went to O'Reiley's and picked up a filter that was the basic 1 in and 1 out but when I crawled under it I don't see the filter. I see the fuel pump in the frame rail right below the drivers floorboard then behind that, in the frame rail, is another what looks like a screw on filter, almost like an oil filter. After doing more research some say that is a "fuel reservoir" and I shouldn't try to remove it. Can somebody that has some experience with the same model truck help me out and tell me what my next step should be? Thanks in advance.

Thread
Thread Starter
Forum
Replies
Last Post
2003stealthedge
General Ford Ranger Discussion
11
11-06-2005 06:03 PM


