
How To: Taurus Fan Install - 2speed

How To: Taurus Fan Install - 2speed
I wrote this up in Feb. so I might have gotten a little rusty on things, feel free to ask q's and i'll do my best.
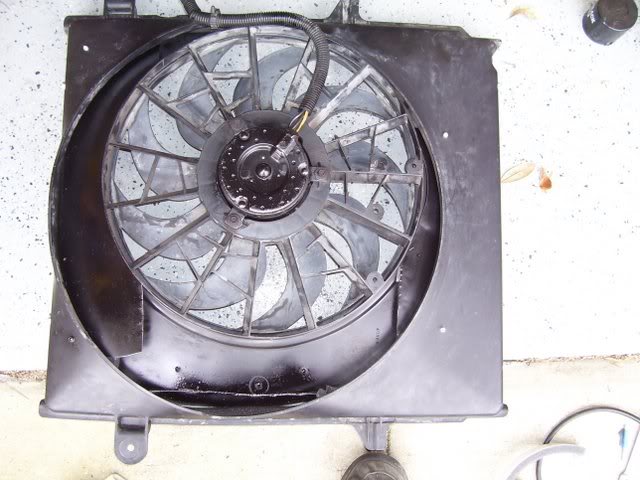
Grabbed a 2-speed Taurus fan from the local junkyard for $15, out the door.
First thing i did was all the wiring in the truck, this is the schematic that i used to do so. What i wanted was the high speed to come on when my a/c was turned off. To do that, however, easiest way i found, was to add a third relay.
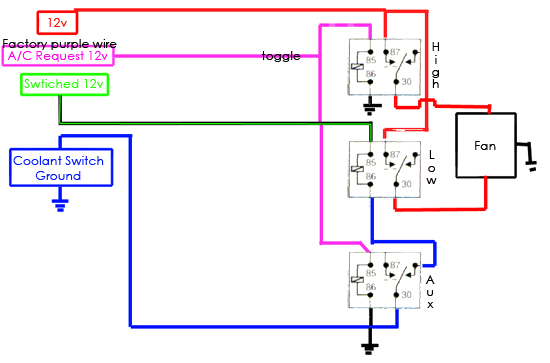
Relay Control Wiring
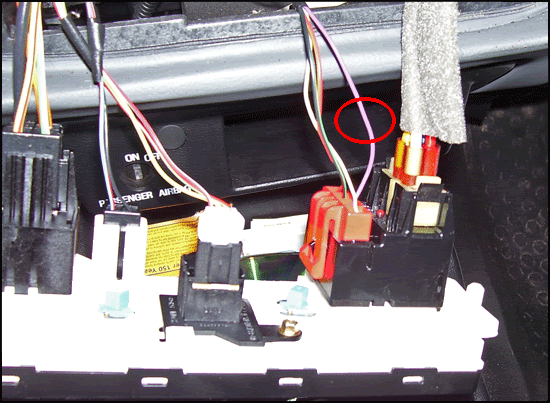
For the switched 12v source i used the Black w/Light Green tracer wire that is located in the HVAC control.
For the 'A/C Request' power, i used the solid Purple wire, also located in the HVAC controls. Not the Purple w/Yellow tracer wire.
For the Coolant Temp ground I used a adjustable switch that controls the ground for my relay. Picked it up from the local Advanced auto parts for $17.
Actual wiring:
I wanted to use a toggle switch for the 'a/c request' circuit so that if i was cruising down the highway for an extended time, i could go ahead and turn the 'high speed' off. Thanks to the speed of the air passing through at cruising speeds.
High speed power circuit got nothing but 10gauge (can hold a constant 55a, safetly. Yes, overkill..) wire. It has a 30a circuit breaker which has no problem running the fan.
Low speed i am running a 20a fuse and 14ga wire (can hold consistant 32a, safely)
Relay control circuits got 16ga wiring
Relays I am running are rated for 70amps (aka HUGE/overkill, but not a bad thing). I picked those up from the junkyard as well as the connecting sockets.
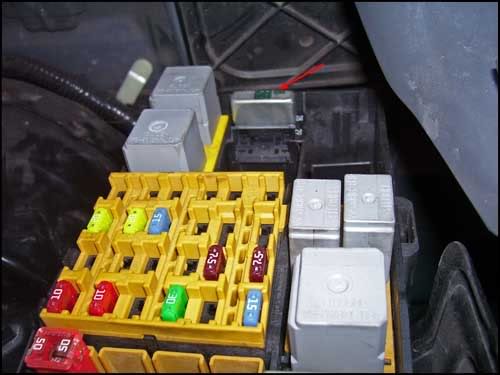
My circuit breaker is located in the stock fuse box, and the low speed is just an inline fuse holder which is not in the right slot there
IDing your fan's wires
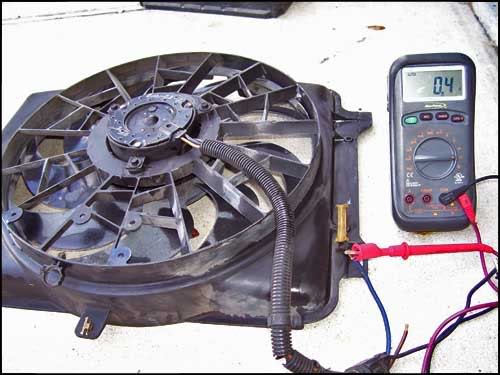
Incase you have different wire colors on your fan, you'll need to get an ohm meter out and check the resistance to figure out your wires.
Black = Ground
Blue + Black = High speed (low resistance)
Brown w/Yel + Black = Low speed (higher resistance)
Mounting
Now my fan mounting isn't the most beautiful work of art. It is functional however. Which is what most of us care about. I removed the stock fan clutch (I removed my clutch by taking a long crescent wrench, snugged it to the nut, and smacked the end of the wrench 3x clockwise and it broke the fan loose from the water pump) and shroud.
Laid the shroud out and the fan. I found my best method was to mount the fan lengthwise across the radiator in the stock shroud, and cut accordingly. Problem with the taurus fan in the stock shroud, is the hole for the clutch fan is huge.
I got a $5 sheet of 26ga steel from Lowes, and a pair of tin snips. With the fan laying in the stock shroud i made templates of what size plates i needed to cover the open areas with cardboard and a sharpie. Traced it on the steel, and cut it out. Fairly simple, i've hardly worked with metal..not hard to do. I then just pop riveted the steel to the stock shroud to keep it there.
To seal the entire fan to the shroud so no air 'sneeks' in between the fan and radiator, i used 1/2" foam tape from lowes. Look in weatherstripping. Works wonders.
To mount the fan in place in the shroud i got two 10" pieces of 1/4-20 All thread, and a pack of 1/4-20 nuts. Drilled through the stock shroud and the taurus fan and used four of those to keep it in place. Adjusted it around using the nuts along the all-thread to where i wanted it. Snugged 'em down, its in there just fine.
Installed, stock bolts and all. Clears everything, and works beautiful

If there is interest i do have a few more pics i can fit in somewhere. Hope it helps someone
-Mike
Grabbed a 2-speed Taurus fan from the local junkyard for $15, out the door.
First thing i did was all the wiring in the truck, this is the schematic that i used to do so. What i wanted was the high speed to come on when my a/c was turned off. To do that, however, easiest way i found, was to add a third relay.
Relay Control Wiring
For the switched 12v source i used the Black w/Light Green tracer wire that is located in the HVAC control.
For the 'A/C Request' power, i used the solid Purple wire, also located in the HVAC controls. Not the Purple w/Yellow tracer wire.
For the Coolant Temp ground I used a adjustable switch that controls the ground for my relay. Picked it up from the local Advanced auto parts for $17.
Actual wiring:
I wanted to use a toggle switch for the 'a/c request' circuit so that if i was cruising down the highway for an extended time, i could go ahead and turn the 'high speed' off. Thanks to the speed of the air passing through at cruising speeds.
High speed power circuit got nothing but 10gauge (can hold a constant 55a, safetly. Yes, overkill..) wire. It has a 30a circuit breaker which has no problem running the fan.
Low speed i am running a 20a fuse and 14ga wire (can hold consistant 32a, safely)
Relay control circuits got 16ga wiring
Relays I am running are rated for 70amps (aka HUGE/overkill, but not a bad thing). I picked those up from the junkyard as well as the connecting sockets.
My circuit breaker is located in the stock fuse box, and the low speed is just an inline fuse holder which is not in the right slot there
IDing your fan's wires
Incase you have different wire colors on your fan, you'll need to get an ohm meter out and check the resistance to figure out your wires.
Black = Ground
Blue + Black = High speed (low resistance)
Brown w/Yel + Black = Low speed (higher resistance)
Mounting
Now my fan mounting isn't the most beautiful work of art. It is functional however. Which is what most of us care about. I removed the stock fan clutch (I removed my clutch by taking a long crescent wrench, snugged it to the nut, and smacked the end of the wrench 3x clockwise and it broke the fan loose from the water pump) and shroud.
Laid the shroud out and the fan. I found my best method was to mount the fan lengthwise across the radiator in the stock shroud, and cut accordingly. Problem with the taurus fan in the stock shroud, is the hole for the clutch fan is huge.
I got a $5 sheet of 26ga steel from Lowes, and a pair of tin snips. With the fan laying in the stock shroud i made templates of what size plates i needed to cover the open areas with cardboard and a sharpie. Traced it on the steel, and cut it out. Fairly simple, i've hardly worked with metal..not hard to do. I then just pop riveted the steel to the stock shroud to keep it there.
To seal the entire fan to the shroud so no air 'sneeks' in between the fan and radiator, i used 1/2" foam tape from lowes. Look in weatherstripping. Works wonders.
To mount the fan in place in the shroud i got two 10" pieces of 1/4-20 All thread, and a pack of 1/4-20 nuts. Drilled through the stock shroud and the taurus fan and used four of those to keep it in place. Adjusted it around using the nuts along the all-thread to where i wanted it. Snugged 'em down, its in there just fine.
Installed, stock bolts and all. Clears everything, and works beautiful
If there is interest i do have a few more pics i can fit in somewhere. Hope it helps someone
-Mike
Last edited by 98liftedranger; Nov 27, 2011 at 11:33 PM.


The stock fan runs straight off the engine water pump pulley. So the engine is turning it, constantly. This causes a parasitic drag on the engine and has been known to 'free up' a little more power and offer a slight mpg gain due to this 'clutch' fan not turning all the time. The electric taurus fan runs off, electricity of course, and offers very minimal drag on the engine (only drag is from a little more current needed from the alternator). It provides cooling based on the systems needs. Also I gained faster/cooler air conditioning with the high speed wired up with the a/c. It draws more air at idle and slower engine rpms than the clutch fan does, moving more air through the condensor, which means a more efficient air conditioning.
Here is my 'controller' black edge. Excuse the mud/dirt/etc!
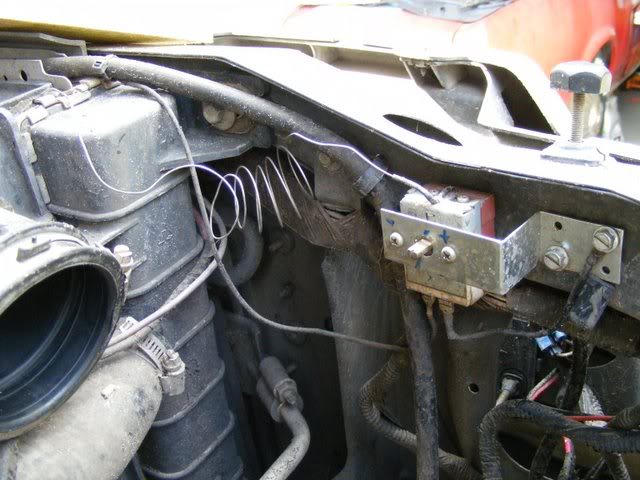

Another method to 'set' it to a certain temp would be to stick the probe into a pan of water on the stove with a thermometer and a multimeter...adjust it to temp. The only issue with that is the probe isnt actually going into the coolant...so it will be close, but not as exact as using the live data.
Member

Joined: Jan 2011
Posts: 523
Likes: 0
From: lake tapps, wa

what is the reason for having the fan only run in one speed mode when your running the a/c what difference does it make from having the fan run on two or one ???? i don't understand ?
Could you throw up a few more pics if possible
Could you throw up a few more pics if possible
Last edited by boyd_835; Jan 25, 2013 at 01:50 PM.
Member

Joined: May 2010
Posts: 2,322
Likes: 2
From: Lawrence, Kansas
Prolly so there is not to much draw the the alternator. Something like that.
I'm needing this mod in the Arizona summer. Can anyone tell me an easy way to see if a fan is a two speed? Would it just be any fan with three wires coming out of it? I'm heading to the junkyard this week.

For those who are not electrical geeks, you can buy great controllers that are already designed to control either two individual fans, or one fan that has a low/high (2 speed) fan. One good controller on the market is the Ron Francis AR-88 controller. It comes with all you'll need, minus the fan(s). It even has a temp probe with an eyelet that mounts under an intake manifold bolt (better than a probe that you stick through the radiator fins). It has an easy setting to adjust when the high speed fan comes on (button on its circuit board that you press to set for a temperature range).
Just don't cut corners when wiring an e-fan up; use relays (good controller kits have these on their circuit boards), and correct guage wiring. These e-fans have a startup voltage/amp draw that can get to 30 amps on initial spinup. The wrong guage wiring, or not using relays can spell disaster in the way of an electrical fire if you don't do this as explained in this write up.
I used a mark IV fan (simular to the Taurus), and there's no need to build the shield around it and the stock fan shroud. Simply center the mark IV/Taurus e-fan in the center of the stock Rangers shroud, then use long nuts/bolts with plastic spacer bushings to bolt it within the rangers shroud.
This OP's post is a great write up. This 2 speed fan works fantastic in our trucks, as well as the F150's. I ran this setup in my 2005 F150 for years. In my current 2000 Ranger, the roar of the clutch fan (new one was installed) drove me nuts!
Last edited by bucko; Jun 27, 2014 at 03:41 AM.
In using a controller, be very careful in what you buy! There is a cheap $49.00 Hayden controller that has a bad reputation for its controller failing after a couple of months. Also I'd stay away from controller kits that offer the probe that's jabbed into the radiator fins. Instead, look for the temp probes that use an eyelet that is slipped under an intake manifold bolt. An excellent contoller is the Ron Francis AR-88. It comes with everything you'll need, accept for the 2 speed fan. It prices out at around $120.00, but has all the proper guage wiring; each wire is labled with what it's used for (.i.e. the purple wire is the A/C trigger, and is labled every 5 inches with "A/C clutch"). The adjustments to vary the high speed turn on based on engine coolant temp requirements is done wth a push button on its circuit board; each press changes the high speed "on" by 5 degrees. This kit is fool proof!
And for those who are hesitant to buy a used electric fan from a junk yard, don't worry, as the electric motor is easily removed and can be replaced. Replacement 2 speed electric motors are sold by Summit racing, Jeggs, and even your local parts store can get you one.
Last edited by bucko; Jun 27, 2014 at 04:20 AM.

Member
Joined: Aug 2020
Posts: 16
Likes: 2
From: Unicoi
For those who are not electrical geeks, you can buy great controllers that are already designed to control either two individual fans, or one fan that has a low/high (2 speed) fan. One good controller on the market is the Ron Francis AR-88 controller. It comes with all you'll need, minus the fan(s). It even has a temp probe with an eyelet that mounts under an intake manifold bolt (better than a probe that you stick through the radiator fins). It has an easy setting to adjust when the high speed fan comes on (button on its circuit board that you press to set for a temperature range).
Just don't cut corners when wiring an e-fan up; use relays (good controller kits have these on their circuit boards), and correct guage wiring. These e-fans have a startup voltage/amp draw that can get to 30 amps on initial spinup. The wrong guage wiring, or not using relays can spell disaster in the way of an electrical fire if you don't do this as explained in this write up.
I used a mark IV fan (simular to the Taurus), and there's no need to build the shield around it and the stock fan shroud. Simply center the mark IV/Taurus e-fan in the center of the stock Rangers shroud, then use long nuts/bolts with plastic spacer bushings to bolt it within the rangers shroud.
This OP's post is a great write up. This 2 speed fan works fantastic in our trucks, as well as the F150's. I ran this setup in my 2005 F150 for years. In my current 2000 Ranger, the roar of the clutch fan (new one was installed) drove me nuts!
Just don't cut corners when wiring an e-fan up; use relays (good controller kits have these on their circuit boards), and correct guage wiring. These e-fans have a startup voltage/amp draw that can get to 30 amps on initial spinup. The wrong guage wiring, or not using relays can spell disaster in the way of an electrical fire if you don't do this as explained in this write up.
I used a mark IV fan (simular to the Taurus), and there's no need to build the shield around it and the stock fan shroud. Simply center the mark IV/Taurus e-fan in the center of the stock Rangers shroud, then use long nuts/bolts with plastic spacer bushings to bolt it within the rangers shroud.
This OP's post is a great write up. This 2 speed fan works fantastic in our trucks, as well as the F150's. I ran this setup in my 2005 F150 for years. In my current 2000 Ranger, the roar of the clutch fan (new one was installed) drove me nuts!
I know this is an old thread but i have heard the Mark IV fans wouldnt fit between the radiator and waterpump without touching..?? Have heard the raurus fans work great tho just not sure what year Taurus to get a fan from..? Do you need to even keep the stock fan shroud if your using an electric fan? Having the stock shroud on there won't make the electric fan pull anymore air thru the radiator outside of its own shroud. I see no use whatsoever in keeping that stock shroud and just fabbing up some brackets to mount the fan to the radiator.

Thread
Thread Starter
Forum
Replies
Last Post
elutheros
Engine & Drivetrain
1
Jul 19, 2023 08:08 AM
winks
General Technical & Electrical
10
Oct 10, 2007 08:08 AM
buzzair
General Ford Ranger Discussion
28
Jun 8, 2007 05:00 PM


