Aluminum Fab
#1
 01-23-2012


Aluminum Fab
I had a couple of fabrication projects that I was working on this weekend.
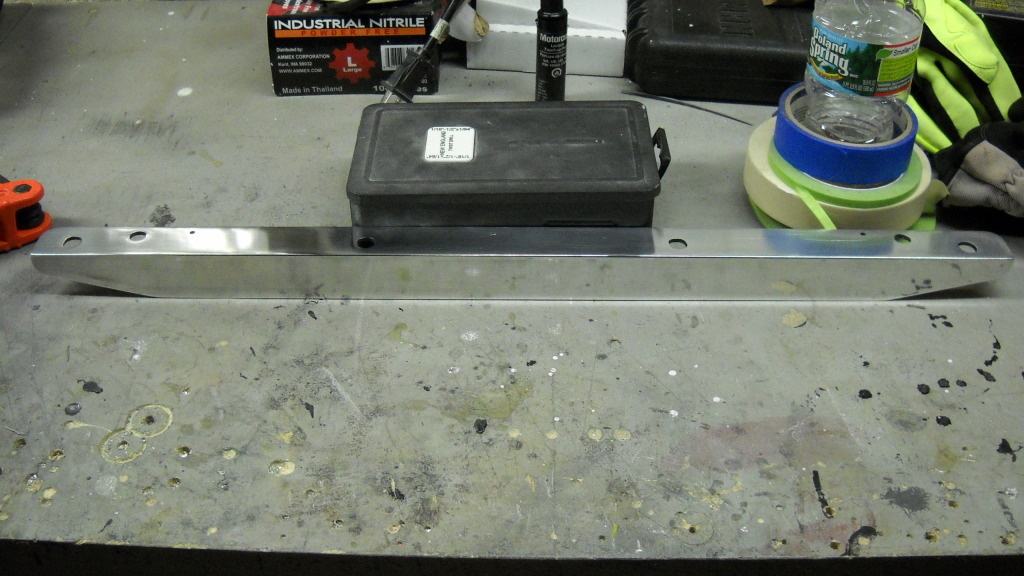
First, I re-did the light bar for the front of my truck. Used some 1/4"x2" aluminum stock (actually, these are braces for a System One truck rack).

Trimmed to size, and re-bent them. This is a modular set-up--this part attaches to the back edge of the bumper utilizing existing holes.

This is the other half of the modular mount--attaches to the bumper mount with countersunk 10-32 SS screws and T-Nuts.


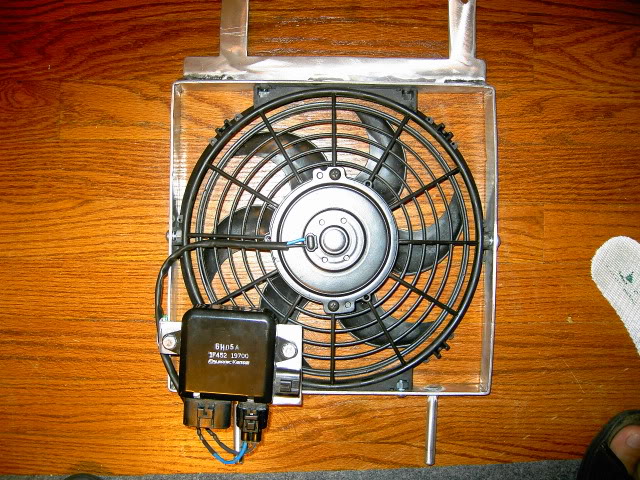
The actual light bar is made from a piece of 1/8" x 1-1/4" aluminum angle stock. I originally made this last summer when i got my 4 Hellas; it was coated with rustoleum spray-on bedliner. I scrapped all of the bedliner off, the spent about an hour sanding the anodizing off (this sucked!), then wet-sanded with 400-grit.
Polished everything up with Busch Aluminum Polish. THIS STUFF ROCKS!!
Assembled light bar--can remove it in minutes if needed; remove the 8 screws, and disconnect the weatherpak connectors.


I also fabbed-up this trim piece/mount for a filler on the back edge of my PowerDome project. Some different 1/4"x2" aluminum flat stock, with 1/8" of it removed to fit around the 'glass filler panel. Again, sanded off the anodizing(still sucked) and polished.

I didn't just want to use a couple of ugly nuts to attach the mount to the filler, so i fabbed-up this piece and tapped a couple of holes for the mount to screw into.

The last project happened by accident--I had this 4.0 emblem on my Expo intake cover, and it looked pretty good, but i decided to remove it and add some decals that match the ones going on the PowerDome--Jeep Wrangler 4.0L/ Honda SOHC.

While i was removing the emblem, it started pulling the clear coat, along with the Hydroimage-F**K!!
I was able to get the emblem off and minimize the damage, but it looked like Hell.

Grabbed a piece of 1/16" aluminum sheet, made a cardboard template, and got it to fit just right. Then i polished it, added the decals,

and mounted the plate to the intake cover using SS machine screws. It actually ties in pretty well with everything that i have going on under the hood of my truck.

I wish I could say that i had this bitchin' shop with all sorts of cool machines, but I don't. This was all hand work--I didi all of this with a hacksaw, corded drill, a rasp, and misc. files.
MikeR
First, I re-did the light bar for the front of my truck. Used some 1/4"x2" aluminum stock (actually, these are braces for a System One truck rack).
Trimmed to size, and re-bent them. This is a modular set-up--this part attaches to the back edge of the bumper utilizing existing holes.
This is the other half of the modular mount--attaches to the bumper mount with countersunk 10-32 SS screws and T-Nuts.
The actual light bar is made from a piece of 1/8" x 1-1/4" aluminum angle stock. I originally made this last summer when i got my 4 Hellas; it was coated with rustoleum spray-on bedliner. I scrapped all of the bedliner off, the spent about an hour sanding the anodizing off (this sucked!), then wet-sanded with 400-grit.
Polished everything up with Busch Aluminum Polish. THIS STUFF ROCKS!!
Assembled light bar--can remove it in minutes if needed; remove the 8 screws, and disconnect the weatherpak connectors.
I also fabbed-up this trim piece/mount for a filler on the back edge of my PowerDome project. Some different 1/4"x2" aluminum flat stock, with 1/8" of it removed to fit around the 'glass filler panel. Again, sanded off the anodizing(still sucked) and polished.
I didn't just want to use a couple of ugly nuts to attach the mount to the filler, so i fabbed-up this piece and tapped a couple of holes for the mount to screw into.
The last project happened by accident--I had this 4.0 emblem on my Expo intake cover, and it looked pretty good, but i decided to remove it and add some decals that match the ones going on the PowerDome--Jeep Wrangler 4.0L/ Honda SOHC.
While i was removing the emblem, it started pulling the clear coat, along with the Hydroimage-F**K!!
I was able to get the emblem off and minimize the damage, but it looked like Hell.
Grabbed a piece of 1/16" aluminum sheet, made a cardboard template, and got it to fit just right. Then i polished it, added the decals,
and mounted the plate to the intake cover using SS machine screws. It actually ties in pretty well with everything that i have going on under the hood of my truck.
I wish I could say that i had this bitchin' shop with all sorts of cool machines, but I don't. This was all hand work--I didi all of this with a hacksaw, corded drill, a rasp, and misc. files.
MikeR


#4
01-23-2012


#6
01-24-2012

#8
01-24-2012

#9
01-24-2012
I swapped-out the phillips head screws for some socket head ones today--the phillips were way too easy for some scumbag with a screwdriver to remove and walk off with my light bar and 4 500FFs; they'd at least have to work a little harder to find an allen key!
This stuff won't be going back on the truck until it warms up a lot. I'm thinking about spraying some clear lacquer on the aluminum so I won't ahve to be constantly polishing it.
MikeR
This stuff won't be going back on the truck until it warms up a lot. I'm thinking about spraying some clear lacquer on the aluminum so I won't ahve to be constantly polishing it.
MikeR
#10
01-25-2012
Nice work.
Question, why did you add the extra “extension” to the light bar mounting, the four bolt piece ?
Seems that the two bolts further out would have held it in place ?
Just asking for my fabrication files.
Thks and looks great, the 4.0 badge and the cover, nice.
Question, why did you add the extra “extension” to the light bar mounting, the four bolt piece ?
Seems that the two bolts further out would have held it in place ?
Just asking for my fabrication files.
Thks and looks great, the 4.0 badge and the cover, nice.
Last edited by Scrambler82; 01-26-2012 at 05:36 AM.
#11
01-28-2012
I wanted to make it "modular" because 1) it's easier to snake it behind the bumper if the bracket is shorter, 2) if I need to adjust the length (again) at a later date, I just need to make new end plates, and 3) the bolts just look cool.
I fabbed up Version 2.0 of the intake cover plate--I used a piece of 1/4" stock this time--it's much beefier and I like it better that the 1st version. I'll get some lacquer on all the pieces once it's warm enough to spray.
By the way, if anybody's interested in the 4.0 HiPo badges, I have 2 (one without tape)-both in A1 condition--make an offer.
MikeR


#14
01-29-2012
I wanted to make it "modular" because 1) it's easier to snake it behind the bumper if the bracket is shorter, 2) if I need to adjust the length (again) at a later date, I just need to make new end plates, and 3) the bolts just look cool.
I fabbed up Version 2.0 of the intake cover plate--I used a piece of 1/4" stock this time--it's much beefier and I like it better that the 1st version. I'll get some lacquer on all the pieces once it's warm enough to spray.
By the way, if anybody's interested in the 4.0 HiPo badges, I have 2 (one without tape)-both in A1 condition--make an offer.
MikeR
I fabbed up Version 2.0 of the intake cover plate--I used a piece of 1/4" stock this time--it's much beefier and I like it better that the 1st version. I'll get some lacquer on all the pieces once it's warm enough to spray.
By the way, if anybody's interested in the 4.0 HiPo badges, I have 2 (one without tape)-both in A1 condition--make an offer.
MikeR
looks good.
#15
01-29-2012

Thread
Thread Starter
Forum
Replies
Last Post


