Ranger Explorer 4.0L Supercharger Install - How To Step by Step
#1
 01-29-2014


Ranger Explorer 4.0L Supercharger Install - How To Step by Step
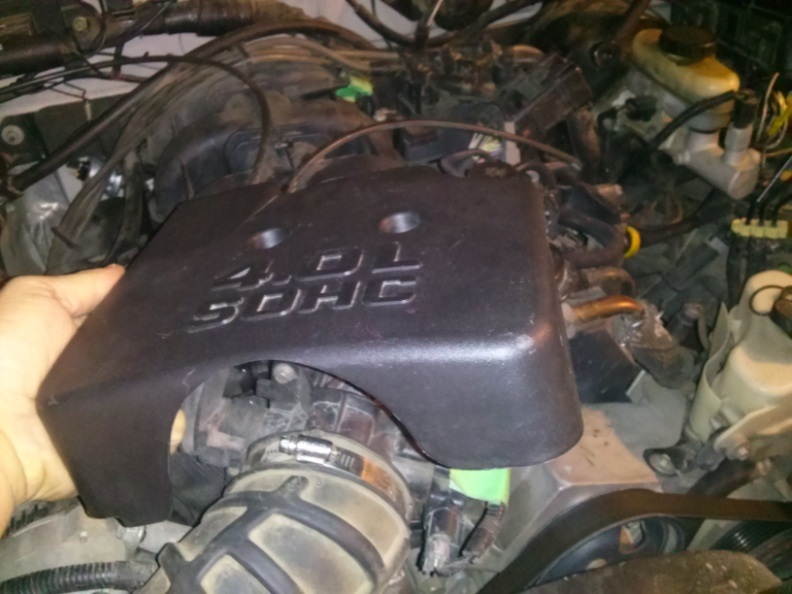
Ok. I'm new to this forum but I haven't seen a complete and thorough "how to" supercharger install for the 4.0L SOHC engine (specifically for Ford Ranger/2dr Explorer/Sport Trac & B4000).
So... here it goes. If you obtain a Moddbox Installation kit and any Eaton M90 supercharger (89-95 either style inlet), follow the following instructions and you're good to go. No tune required. 100% bolt-on mod. You can get your installation kit here:
ModdBoxModdBox - Engineering your driving experience @
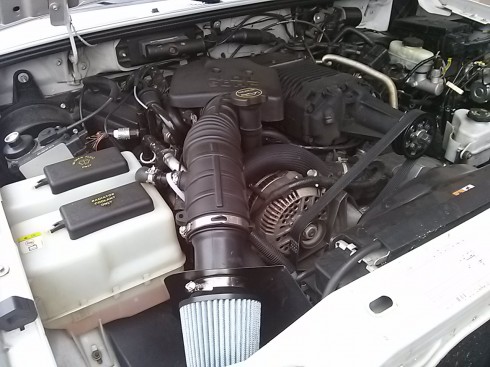
I've also decided to post the "final result" first. If you like it.. proceed to read the "how to".
Here's a road test of the 3.5 psi pulley equipped with no cooling equipment installed.
Here's the Dyno. 215 hp & 237 lbft at the rear wheels.
Kit Photo:

Installed Photos:
**ps. Apologies for some linked & odd sized photos... resizing them all for the embedding options is alot of work for this many photos. For a more uniform reading experience, click here:
Install Instructions 4.0L V6 Cologne @ ModdBox
If you have any questions comments, feel free to comment or PM me :)
INSTALLATION NOTES
You must read the instruction manual at least 2 times prior to proceeding.
It is important to familiarize yourself with the ModdBox Supercharger Kit installation. It is the responsibility of the installer to properly install the Supercharger Kit. For your safety and the asurety of a proper installation, ModdBox recommends that this product only be installed by a qualified professional, access to pneumatic tools, and a strong familiarity with automotive service procedures.
91 or higher octane gasoline is required at all times.
You must use fuel of 91 octane or higher. If your vehicle does not running 91 or higher octane, you must run your vehicle till empty and refill with the required octane at least 2 times prior to installation.
Any previously installed aftermarket tuning equipment must be removed and the vehicle returned to an as stock condition before installing the supercharger.
Any equipment that directly modifies the fuel mixture or ignition timing of the engine can cause severe engine damage if used in conjunction with ModdBox Supercharger Kit. This includes, but is not limited to: ignition boxes, air/fuel controllers, OBDII programmers, and any other device that modifies signals to and/or from the ECU. Aftermarket bolt-on equipment such as underdrive pulleys or air intake kits will also conflict with the operation of the supercharger and must be removed prior to installation. Use of any of these products with the ModdBox Supercharger Kit could result in severe engine damage.
REFERENCE ABBREVIATIONS
EGR � Exhaust Gas Recirculation
HVAC � Heating Ventilation & Air Conditioning
IAC � Idle Air Control
MAF � Mass Air Flow
TPS � Throttle Position Sensor
Vac - Vacuum
TOOLS REQUIRED
Tools Required:
Standard metric socket set
Needle Nose Pliers
T-30 Torx Bit
Fluid Funnel
Flat Head Screw Driver
Punch
...will add more soon
STOCK REFERENCE DIAGRAMS
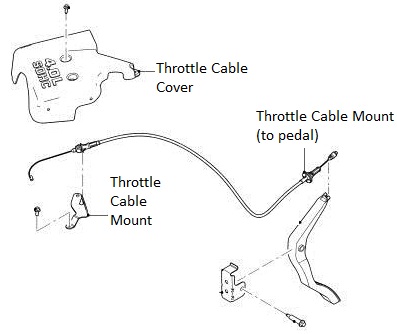
Stock Throttle Cable Reference Diagram
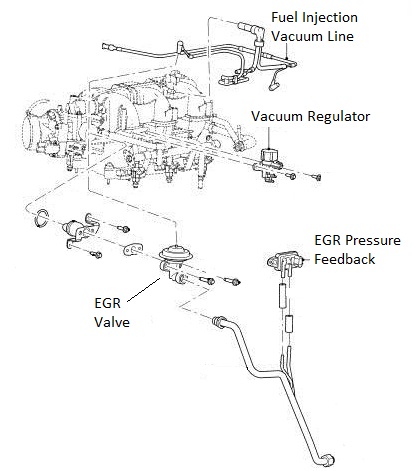
Stock EGR System Reference Diagram
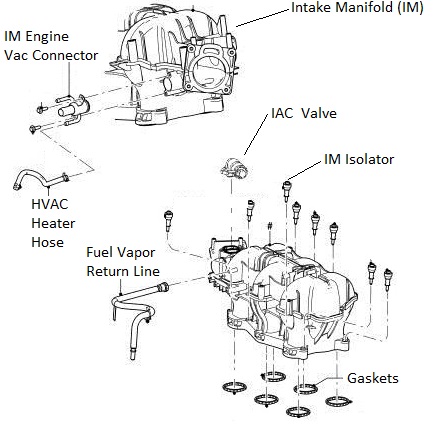
Stock Intake Manifold Reference Diagram
Stock Air Box Reference Diagram

Stock Throttle Reference Diagram

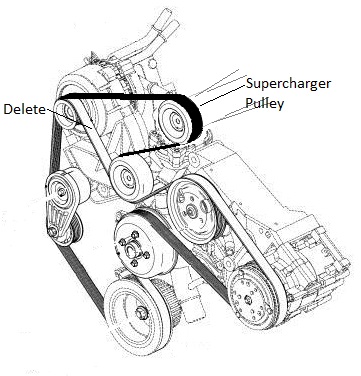
Belt Diagram Reference Diagram (Dark Belt Showing the ModdBox Orientation)

MODDBOX SUPERCHARGER KIT PARTS
ModdBox Supercharger Bypass Valve
http://modd.me/wp-content/uploads/2013/09/CAM04401.jpg
ModdBox 255lph Fuel Pump
http://modd.me/wp-content/uploads/20...dbox255lph.jpg
ModdBox Heat Shield
http://modd.me/wp-content/uploads/20...heatShield.jpg
ModdBox 70mm Air Filter
http://modd.me/wp-content/uploads/20...yAirFilter.jpg
ModdBox Throttle Cable and Cruise Control Mount
http://modd.me/wp-content/uploads/20...eInstall-7.jpg
ModdBox 3.0 & 3.5 psi Supercharger Pulleys
http://modd.me/wp-content/uploads/2013/11/CAM04371.jpg
ModdBox Supercharger Pulley Quick Adapter
http://modd.me/wp-content/uploads/20...apterPully.jpg
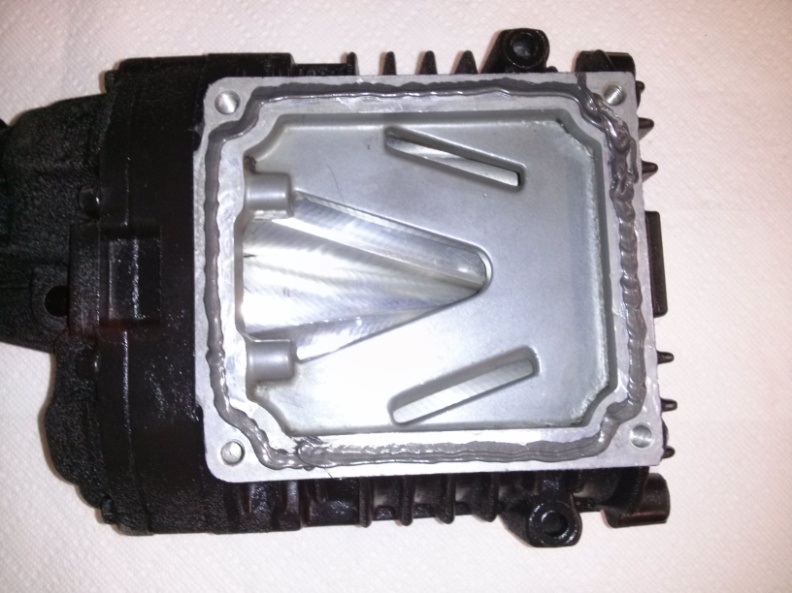
ModdBox Plenum Bottom Plate
http://modd.me/wp-content/uploads/20...eInstall-9.jpg
ModdBox Plenum Top Plate
http://modd.me/wp-content/uploads/20...Install-10.jpg
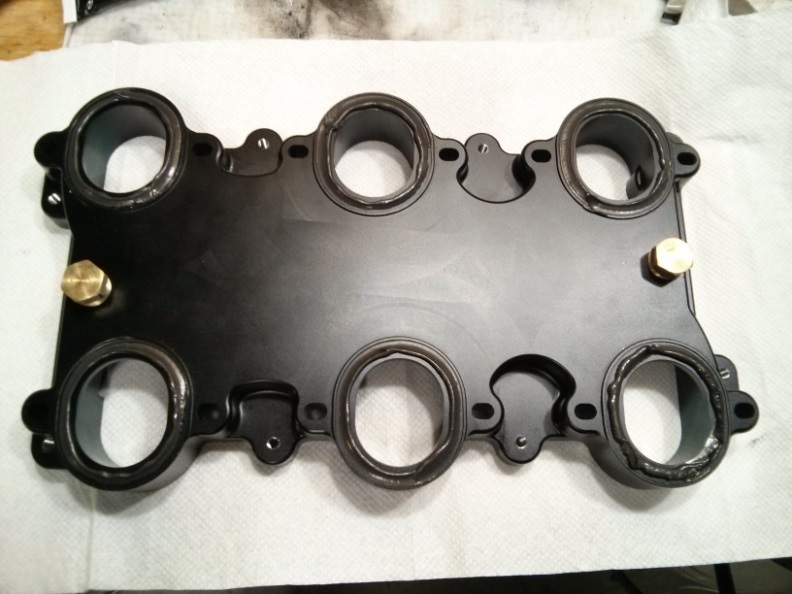
ModdBox Intake Manifold
http://modd.me/wp-content/uploads/20...Install-11.jpg
ModdBox Intake Manifold Top
http://modd.me/wp-content/uploads/20...Install-12.jpg
ModdBox M22-1.5mm EGR Extension
http://modd.me/wp-content/uploads/2013/11/CAM04413.jpg
Black Silicone Liquid Gasket
http://modd.me/wp-content/uploads/2013/11/CAM04389.jpg
6pk Serpentine Belt
http://modd.me/wp-content/uploads/2013/11/6pkBelt.jpg
1/4" Electrical Loom
16 ga wire & connections
Heater Hose
Fuel Hose
Hardware and Fittings
INSTALLATION STEPS
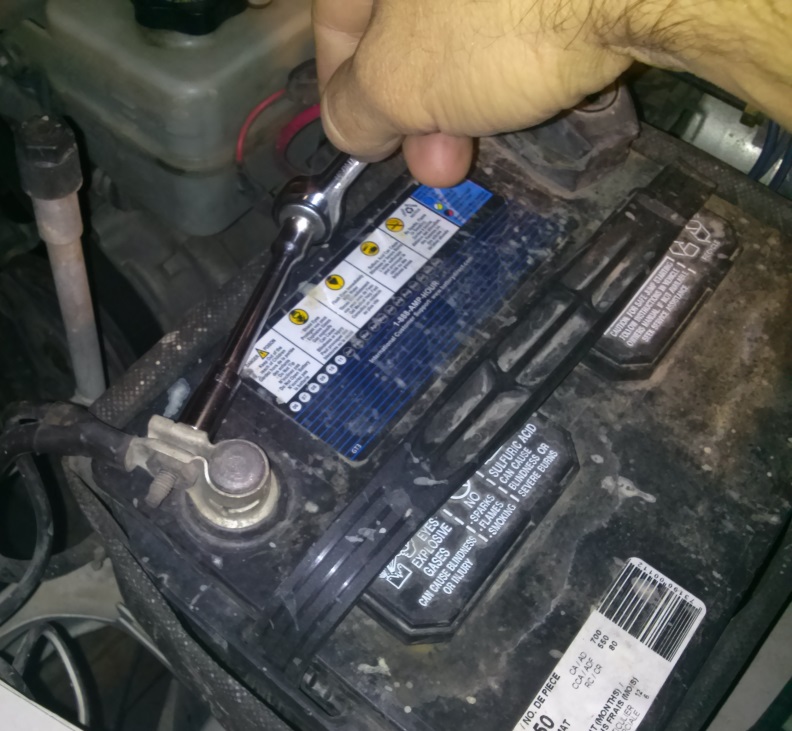
Remove the negative battery cable (1 bolt). Secure it to the side of the battery to prevent any accidental contact with the negative terminal.
Remove the Throttle Body Cover (2 bolts). If your model is equipped with a second Crank Case Ventilation hose, you will be required to remove the hose clips on the side of the Throttle Body Cover (not shown here).
Loosen the hose clamp and disconnect the Intake Tube from the Stock Air Box Assembly.

Loosen the hose clamp and disconnect the Intake Tube from the Throttle Body.

Disconnect the Crank Case Vent Hose(s) and remove the Intake Tube. Set the Intake Tube aside for later use. Some models have a second Crank Case Vent Hose. For more information, see the Stock Setup Diagrams provided at the beginning of this instruction manual.

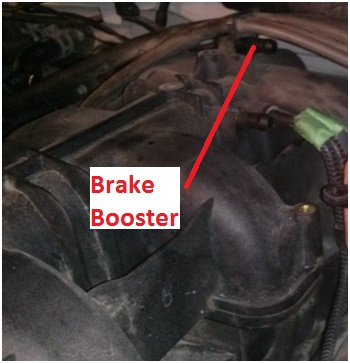
Remove the Brake Booster Line from the back of the Intake Manifold. Tape and label if necessary.
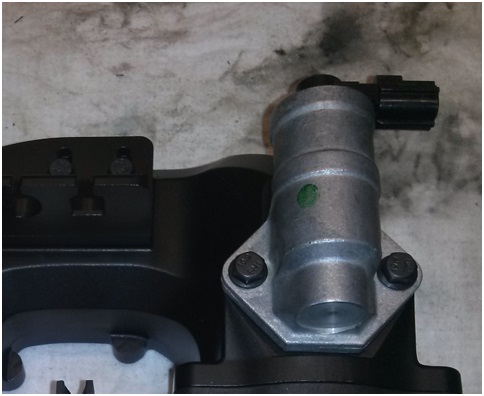
Unplug the cable connected to the IAC Valve.

Unbolt and remove the IAC Valve (2 bolts). Set the IAC Valve aside for later use.

Unplug the Vac line connected to the EGR. Tape and label the Vac Line if necessary.

Unbolt the EGR Valve (2 � 12mm bolts).

Remove EGR Valve by disconnecting the EGR Tube. Set the EGR Valve aside for later use.
Unplug the TPS Sensor. Tape and label the plug if necessary.
Remove the Throttle Cable from the Throttle Body Valve. The cable can be slipped free by manually actuating the valve 90 degrees and providing slack in the cable.

Unbolt the Throttle Body Valve (4 bolts). Set the Throttle Body Valve aside for later use.

Disconnect the Throttle Cable and the Cruise Control Cable.

Disconnect the electrical wire mount from the left side of the Intake Manifold.
Locate the plastic Radiator Rock Shield located underneath the engine bay. Remove the bolts and set it aside.
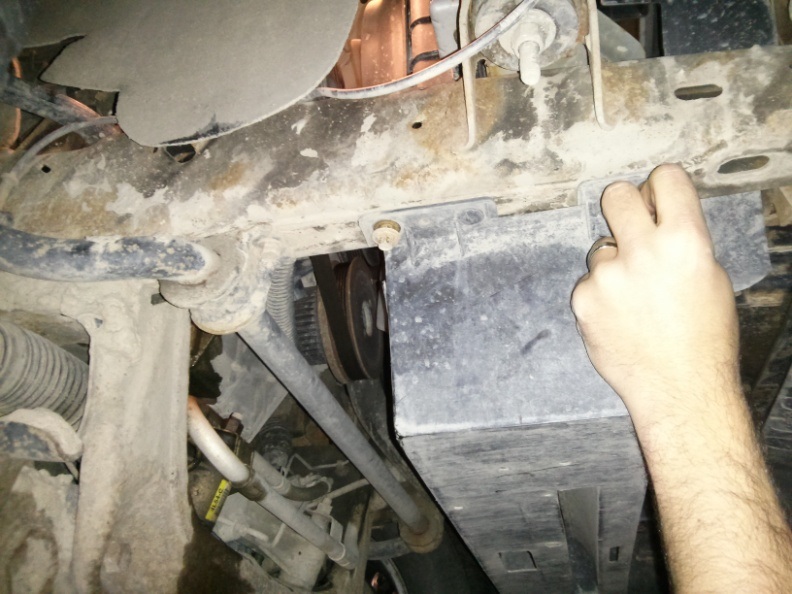
Locate the plastic Radiator Drain Valve at the bottom passenger side of the Radiator. Turn this plug and release only approximately a 3/4 gallon of coolant fluid (~3L). This is to allow the removal and relocation of coolant lines in the proceeding steps.

Remove the HVAC Heater Hoses (2x 1/4� diameter) and the Intake Manifold Engine Vac Line (5/8� diameter) from the Hose Connector Fitting. Tape and label the hoses if necessary.

Remove the Hose Connector Fitting. Set the Hose Connector Fitting aside for later use.

Locate the 1 5/8� diameter Radiator to Thermostat Coolant Hose.
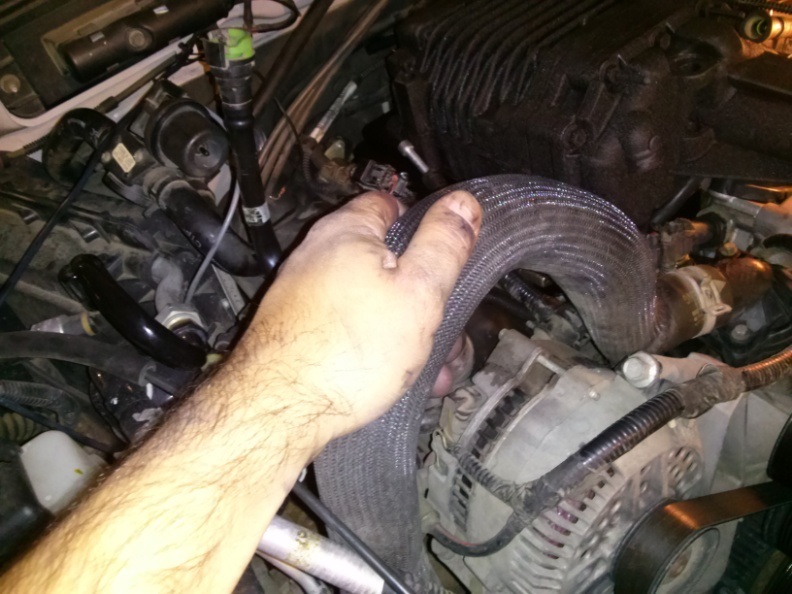
Relocate the Coolant Hose to be in front of the Oil Cap and around the AC Line as illustrated. Cut approximately 5� to 6� off of the hose and re-secure it to the radiator.
Be sure the hose will not conflict with the belt. If not equipped with AC, secure the hose with restraining straps if necessary. Do not dispose of the 1 5/8� hose. The remaining hose will be needed in a later step.

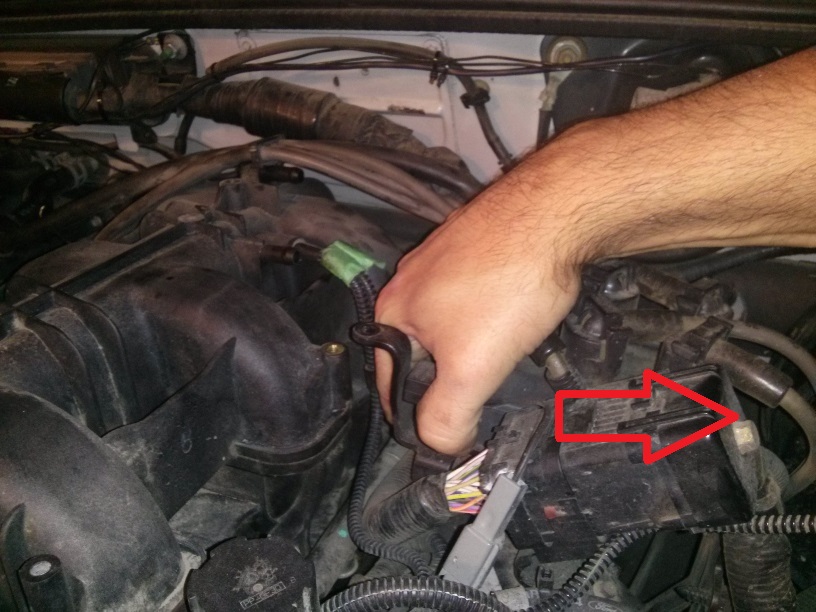
Remove the Fuel Injection Vac Line located on the right side of the Intake Manifold. Tape and label it if necessary.
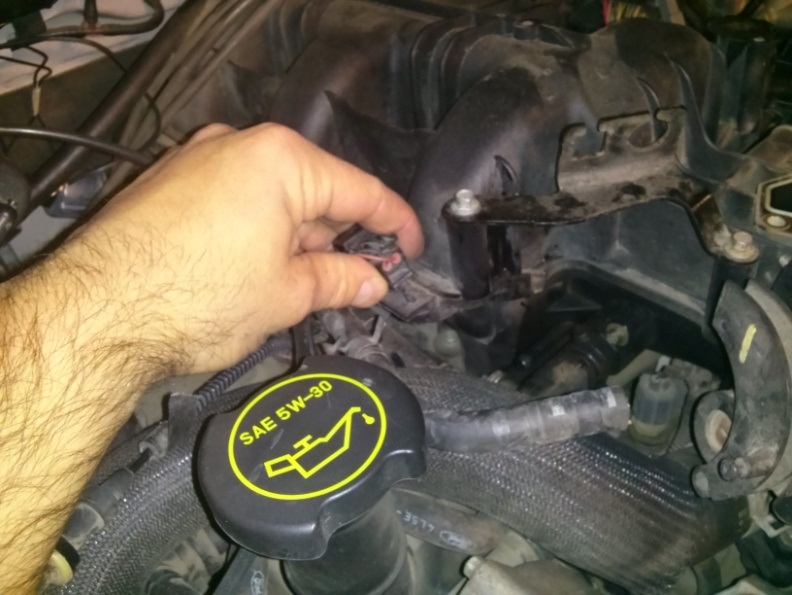
Pry off the Ignition Wire Mount located at the top of the Intake Manifold.

Unbolt the Ignition Wire Flange Mount.

With the Ignition Wire Flange Mount disconnected from the Intake Manifold, proceed to pry the Ignition Wire Flange Mount approximately 2 inches toward the driver side. This additional clearance will aid in the removal of the stock Intake Manifold as well as providing ample space for the future EGR Valve.
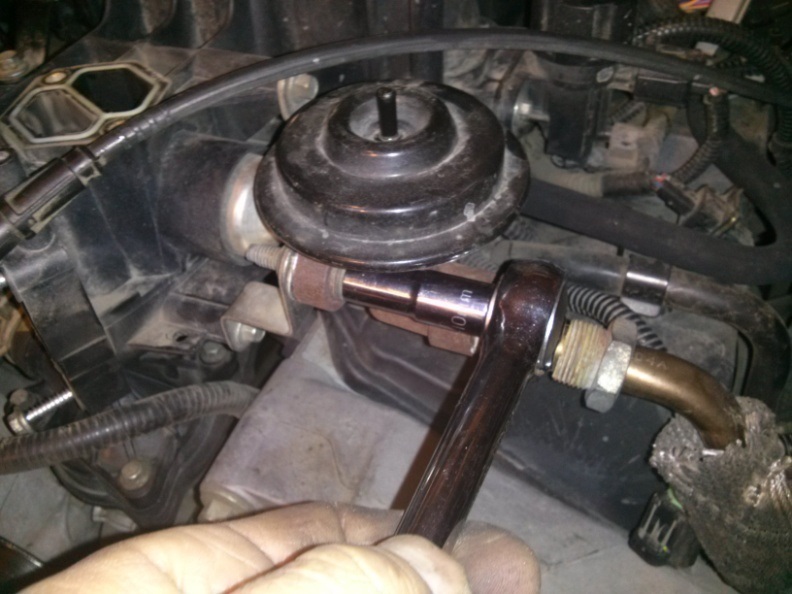
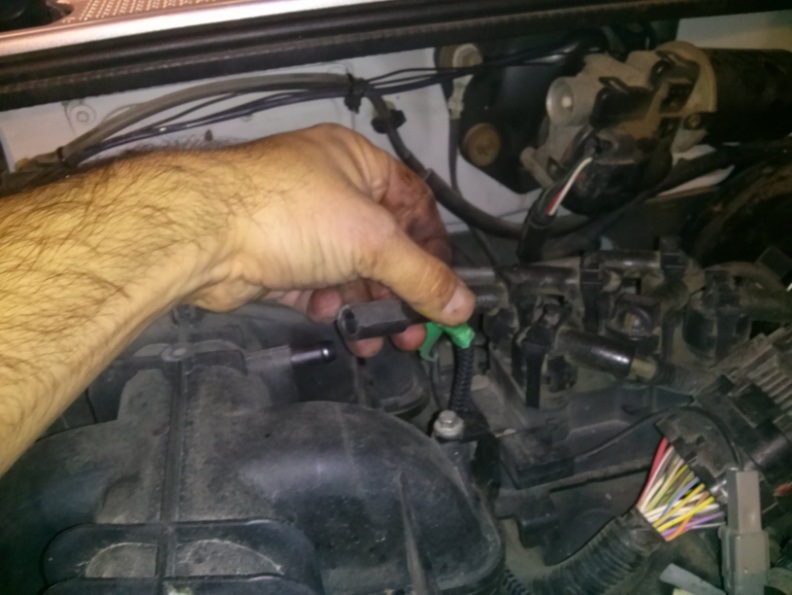
Unbolt the Vacuum Regulator (2 bolts) located towards the front drivers side of the Intake Manifold.

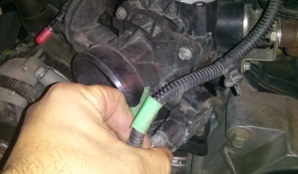
Remove the Fuel Vapor Return Line. This fitting is equipped with a simple push-style fitting. Simply push in the large curved shape and the fitting should pull off.
Remove the Throttle Cable and Cruise Control Cable Mount (2-bolts).

Loosen the Intake Manifold Bolts (12 � T30 Torx bolts). Note that these bolts do not remove completely. Once turned out of the Engine Block, the bolts remain connected to the Intake Manifold. Caution: You do not want to strip these bolts. It is advisable to inspect the Torx heads and use a vacuum to remove any dirt that may have accumulated inside the head. It may be necessary to use a machinist scribe or similar pointed object to loosen and vacuum out any dirt that may be residing inside the Torx heads before attempting to remove.

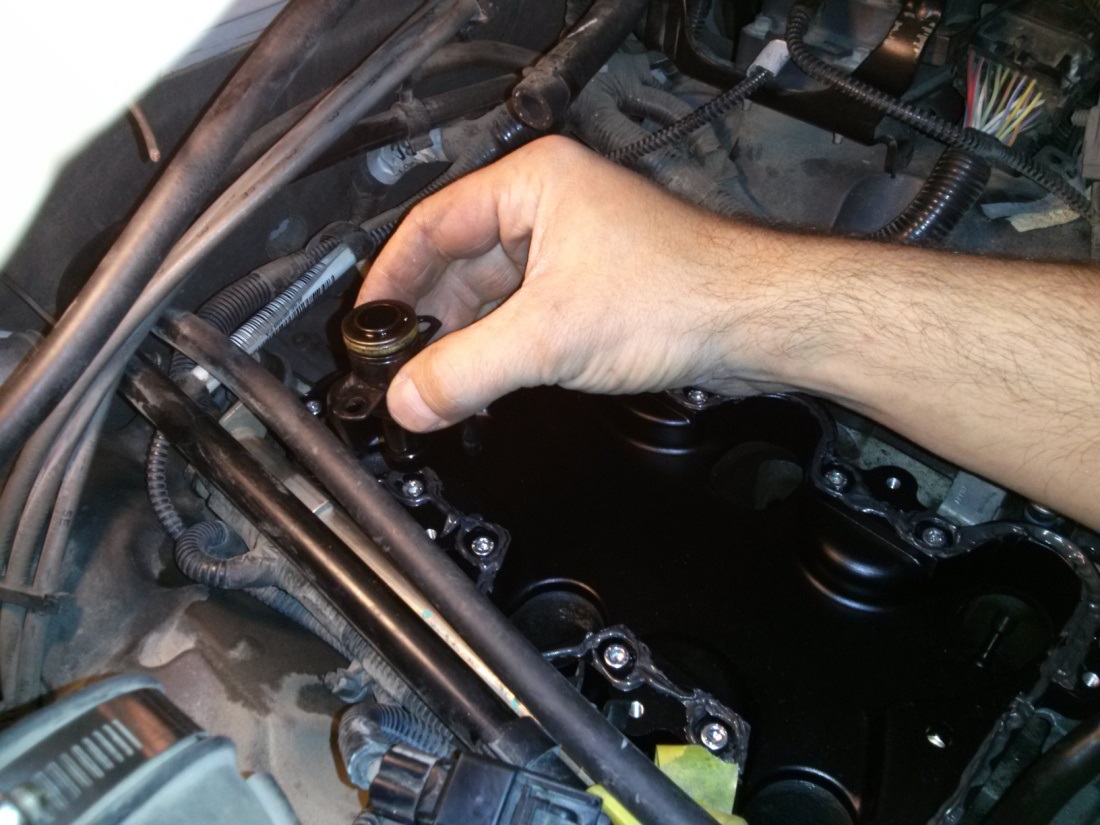
Lift out the Intake Manifold.

Caution: Do not drop anything into the Intake Ports. Before Proceeding, fill the Intake Ports with rags or paper towel. Clean and vacuum the area if necessary. Be sure to clean the Engine Block�s mating faces.
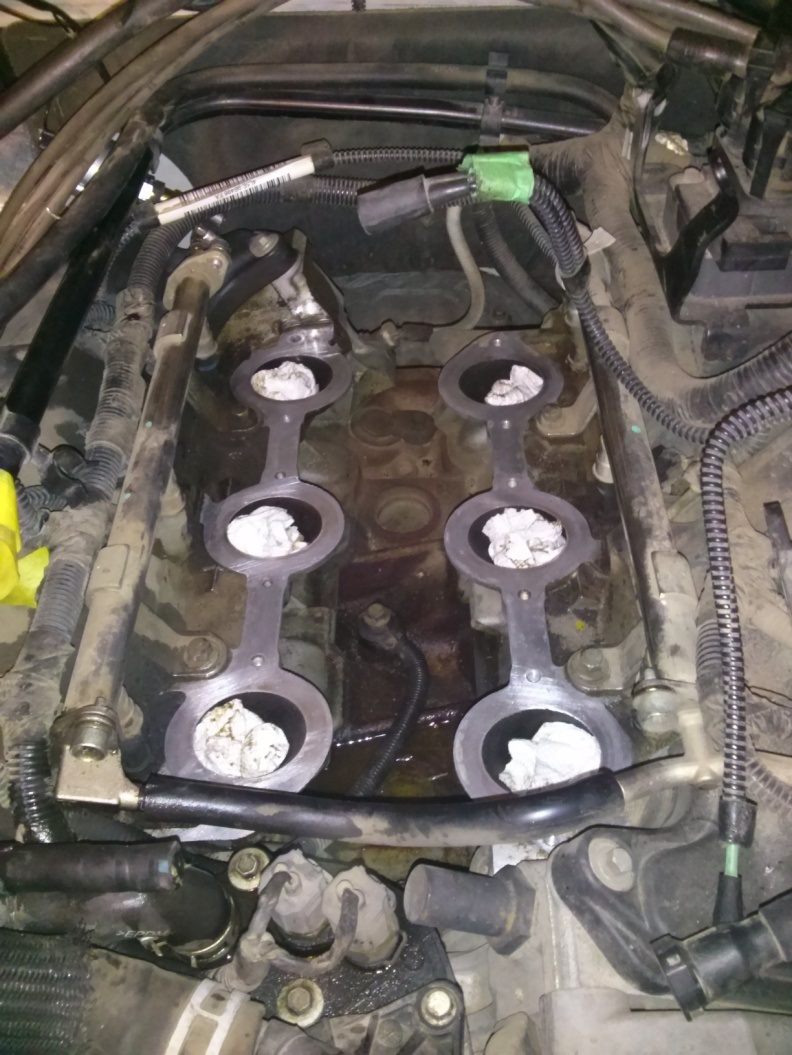
You are now ready to being modding your 4.0L J
Obtain the provided ModdBox stainless steel Supercharger Pulley Adaptor. Slip the supercharger Adapter onto your Eaton M90 Supercharger shaft until it binds (either an 89-93 oval or 94-95 rectangular style M90). The pulley is designed to have an interference fit which will cause the pulley to jam once it slips halfway onto the shaft. Use the stock Eaton M90 Supercharger lock nut to ratchet the pulley down the remaining length of the shaft until the Adapter hits the stop on the shaft. You may also want to use a press if you have one available. It is recommended that you use a low torque setting on an air or electric hammer-ratchet to suck the pulley down to the stop. If you do not have an automatic ratchet, you may carefully use a piece of soft lumber to stop the motion of the supercharger rotors. This will allow you to ratchet down the supercharger lock nut with a standard ratchet. Caution: Be sure that no debris falls into your Eaton M90 Supercharger. The tolerances on your supercharger are only a few thousandths of an inch and may be damaged if material falls or gets sucked into the supercharger housing. Even rotating the rotors by hand can often pull enough air to suck debris into the rotors. Use a vacuum to clear your rotors prior to installation.
<photo coming soon>
Obtain the provided ModdBox 6PK Custom Pulley and slip it onto the Supercharger Pulley Adaptor. Use the provided M5x16mm socket head cap screws.
<photo coming soon>
Locate the provided Black Liquid Gasket. Apply a thin bead of the gasket to the Eaton M90 Supercharger flange as illustrated.
Obtain the ModdBox Plenum Top Plate and bolt it to the base of the Eaton M90 Supercharger & Pulley Assembly. Use the provided M8x40mm socket head cap screws. Clean any excess gasket material.

Use the extra 1 5/8� diameter Radiator Hose that was remaining from a previous step. Measure out and cut a length of hose as is required for your supercharger:
For the 94�-95� Eaton M90 Supercharger (rectangular inlet): 1-7/8�
For the 89�-93� Eaton M90 Supercharger (oval inlet): 2-5/8�
Use one of the 2� stainless hose clamps to secure the hose to the Plenum Top Plate. Loosely place the other 2� diameter stainless hose clamp on the hose. Place the entire assembly aside for later use.

Obtain the ModdBox Plenum Base Plate. Apply a small bead of the provided Black Liquid Gasket around each Intake Port hole as shown.
Caution! The Plenum Base Plate is NOT reversible. Before placing the Plenum Base Plate on the Engine Block, be sure the wider ridge dimension (shown below) is placed at the back of the engine bay towards the firewall. If this is reversed, your supercharger pulley will not line up with your other engine pulleys.
Optional: If you have purchased a ModdBox Intercooler Kit, remove the 1/4�NPT plugs and replace them with the provided 1/4�NPT hose fittings. Refer to the ModdBox Intercooler Kit Installation Manual for further instructions.

Place the Plenum Base Plate onto the Engine Block in the correct orientation (shown in the previous step). Align the Inlet Ports with the Plenum Bottom Plate holes. Use the supplied M6x30mm socket head cap screws and loosely bolt down the Plenum Base Plate to the Engine Block (you will need to verify the alignment of the supercharger pulley before tightening the bolts).

Place and align the Eaton M90 Supercharger and Plenum Top Plate Assembly onto the Plenum Base Plate. Visually inspect the alignment of the supercharger pulley and the other engine pulleys. A miss-alignment of approximately 1/16� is acceptable due to the length of pulley to the adjacent pulleys and the lack of ribs on the idler pulley. If the alignment of your pulley is more than approximately 1/16�, you can fine tune the alignment of the Plenum Base Plate. Simply adjust the Plenum Bottom Plate as required (they are fitted with slotted holes) and torque it down to the Engine Block.
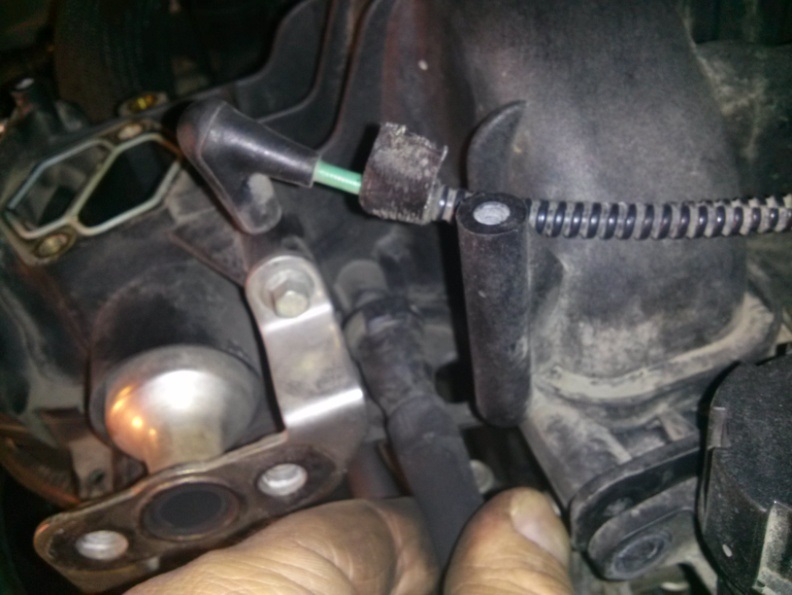
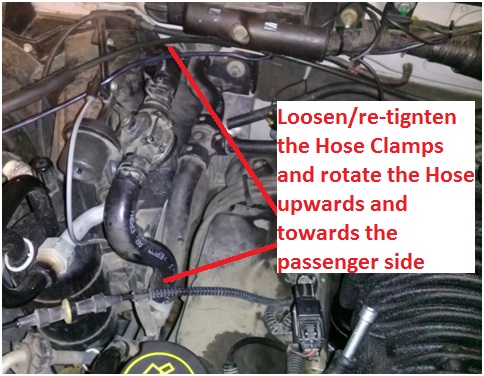
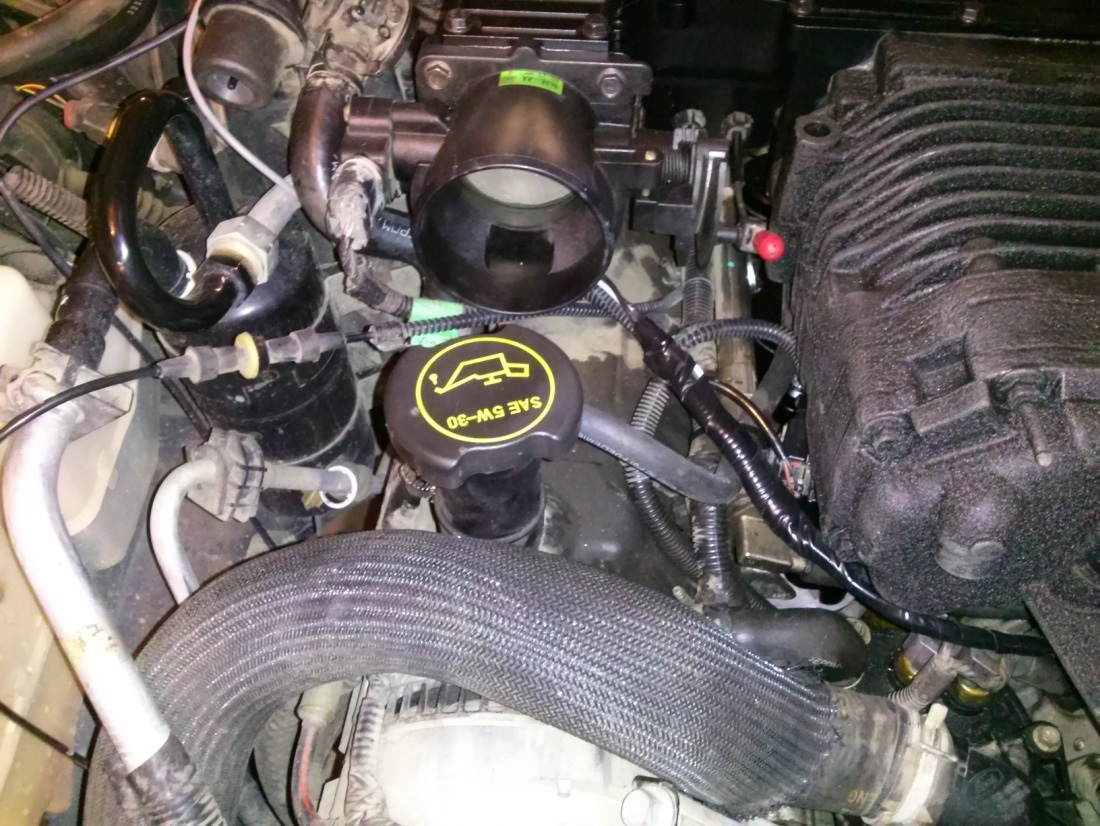
Locate the HVAC Heater Hoses (2x 1/4� diameter) that were removed from the Hose Connector Fitting and the Intake Manifold in a previous step. The hoses need to be reconnected to the Hose Connector Fitting in a new location approximately 3� above the rear-passenger side Inlet Port on the engine block (Inlet Port to combustion chamber). Review the illustration below for reference.
Cut the 1/4� diameter HVAC Heater Hose that originates from near the firewall. Be sure to leave at least a few extra inches to allow room for error. Reconnect the 1/4? diameter hose to the Hose Connector Fitting. Note: You can connect to either 1/4? barb on the fitting.


The Intake Manifold Engine Vac line (the 5/8� diameter hose that was connected to the Hose Connector Fitting and Intake Manifold) will need to be shortened and re-connected to the Hose Connector Fitting. This 5/8� Vac line consists of rubber hose AND plastic rigid tube that runs around behind the Intake Manifold. The plastic section of this line running along the firewall needs to be cut at approximately the centerline of the Intake Manifold. Reference the photo below and proceed to cut the 5/8� plastic tube. Use the provided piece of 5/8� hose (9� length) and connect one end to the 5/8� plastic line and the other to the Hose Connector Fitting. Secure both ends of the hose with a hose clamp.


(Note: the second 1/4? hose shown will be described in the next step)
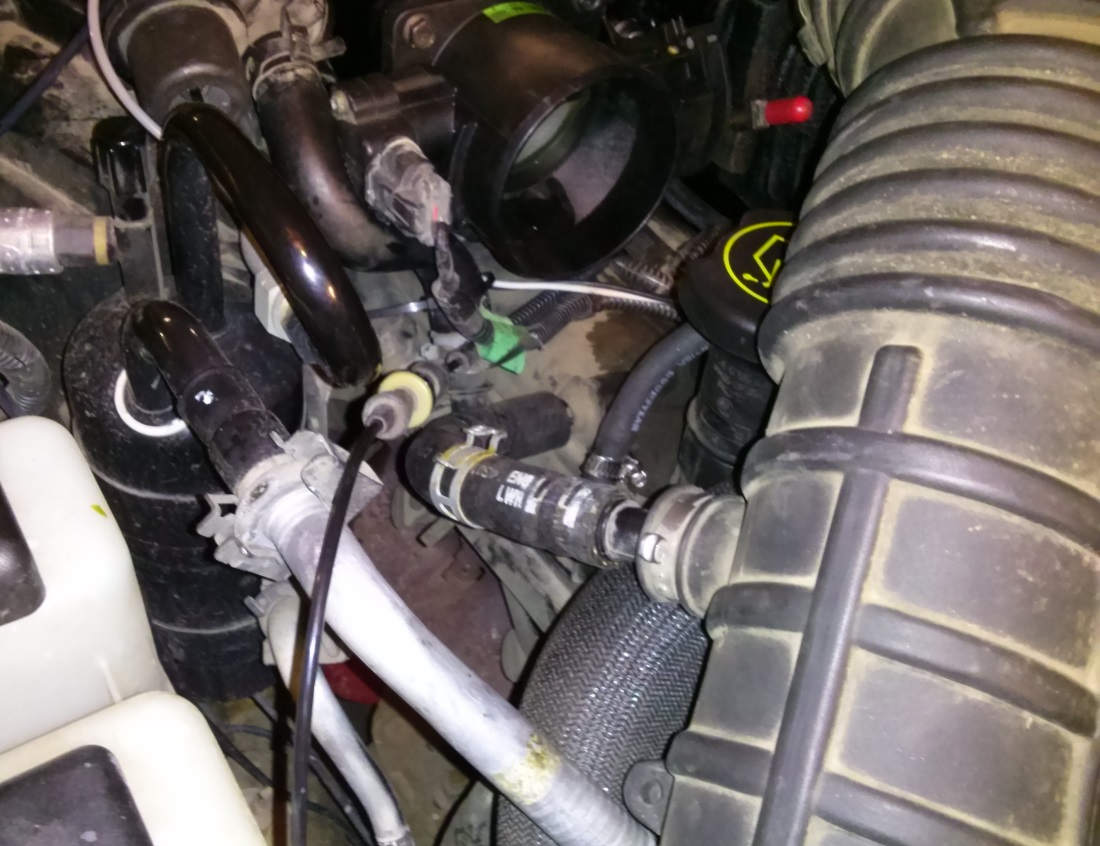
Locate the remaining 1/4� diameter HVAC Heater Hose (it originates from in behind the alternator as illustrated). Remove and replace this hose with the provided 1/4� hose (24� long). Connect the other hose end to the Hose Connector Fitting. Secure both hoses with hose clamps.


Remove the rags or paper towels in your Engine Inlet Ports then proceed with the installation of the Supercharger Assembly. Apply a thin bead of Black Liquid Gasket along the Plenum Base Plate (already aligned and bolted to the Engine Block). Caution: Be sure to apply gasket material around all the bolt holes (as illustrated in the photo below). The gasket material must be extended to the inside edge of the mating face as shown on the bottom-left of the photo below. Failure to do so will result in a leak in your Intake Manifold Assembly.

(Note: Engine rags/paper towels removed from engine ports prior to installing Plenum Top Plate)
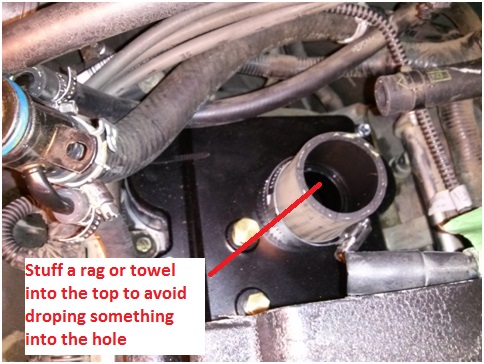
Obtain the Eaton M90 Supercharger Assembly (already assembled in a previous step). Place the assembly onto the Plenum Base Plate and bolt it down with the provided M6x30mm flange bolts. Caution: Do not drop anything into the 1 5/8� hose on the Plenum Top Plate. Debris may fall into your Engine Inlet Ports. Place a small rag or paper towel into the hose to make sure nothing falls in (make sure the rag does not fall in).
Optional Step. The provided 1/4�NPT and 1/8�NPT ports have been included for the installation of a Boost Sensor and Manifold Temperature Sensor. If you have a purchased monitoring equipment from ModdBox (or a third-party), it is advisable to install the necessary fittings now. Once the Intake Manifold is installed, these ports are less accessible and some disassembly may be required.
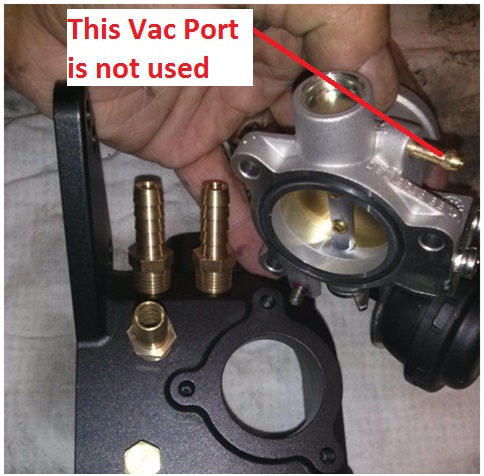
Obtain the ModdBox Intake Manifold (the hollow �C� shaped CNC part). Use the provided M5x16mm socket head cap screws and bolt the Supercharger Bypass Valve to the ModdBox Intake Manifold.
Connect the Supercharger Bypass Valve Vacuum Hose to the ModdBox Intake Manifold and the Valve Actuator.


(Note: Ignore the 1 5/8� hose, it should be connected to the Plenum Base Plate)
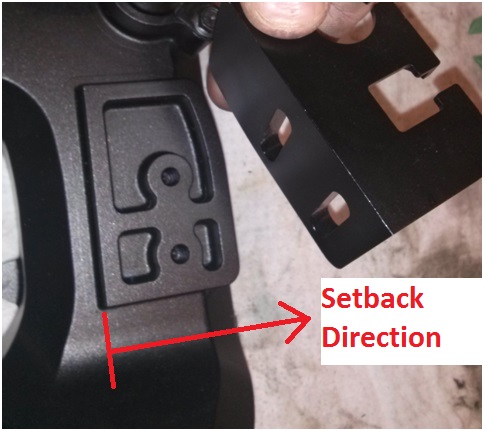
Install the ModdBox Cruise Control/Throttle Cable Mount to the Moddbox Intake Manifold. Use the provided M6x12mm socket head cap screws. Note: For models with newer throttle cables, the mount can be aligned with the base (factory offset). However, older models vehicles should be setback approximately 1/8� to 1/4� back to compensate for the creep (stretching) in the throttle cable.
Install the stock IAC Valve on to the ModdBox Intake Manifold using the M6x12mm socket head cap screws.
Optional Step. A 1/8�NPT port has been provided for a Water/Methanol Injection Nozzle. If you have purchased a ModdBox Water/Methanol Injection Kit (or a third party kit), it is advisable to install the necessary fittings now. Once the Intake Manifold is installed, these ports are less accessible and some disassembly may be required.

Proceed with the ModdBox Intake Manifold installation by adjusting the illustrated hoses as described below.

Clear the future Throttle Cable and Cruise Control Cable location of any loose hose, ignition cables, electrical wires, fittings, etc. Be sure to fasten these components securely and away from the action of the throttle body. Caution: Failure to keep this area clear could result in your throttle sticking open! Be sure this area is kept clear and that all components in the engine bay are kept secure.

Note the orientation of the Hose Connector fitting in relationship to the ModdBox Intake Manifold.

Take the ModdBox Intake Manifold Assembly and connect the Hose Connector (already connected to two 1/4? hoses and one 5/8� hose) using the M5x10mm socket head cap screws.

Locate the Stock Throttle Cable and Cruise Control Cable (if equipped). Connect the cables to the ModdBox Cable Mount as illustrated. Snap-in the Throttle Cable to the slot on the passenger side. The Cruise Control Cable must be snapped into the driver side slot.

(Note: Contrary to the photo, it�s easier to bolt on the Throttle Body after the assembly is bolted to the supercharger)
Locate your Throttle Position Sensor Plug and Idle Air Control Valve Plug.
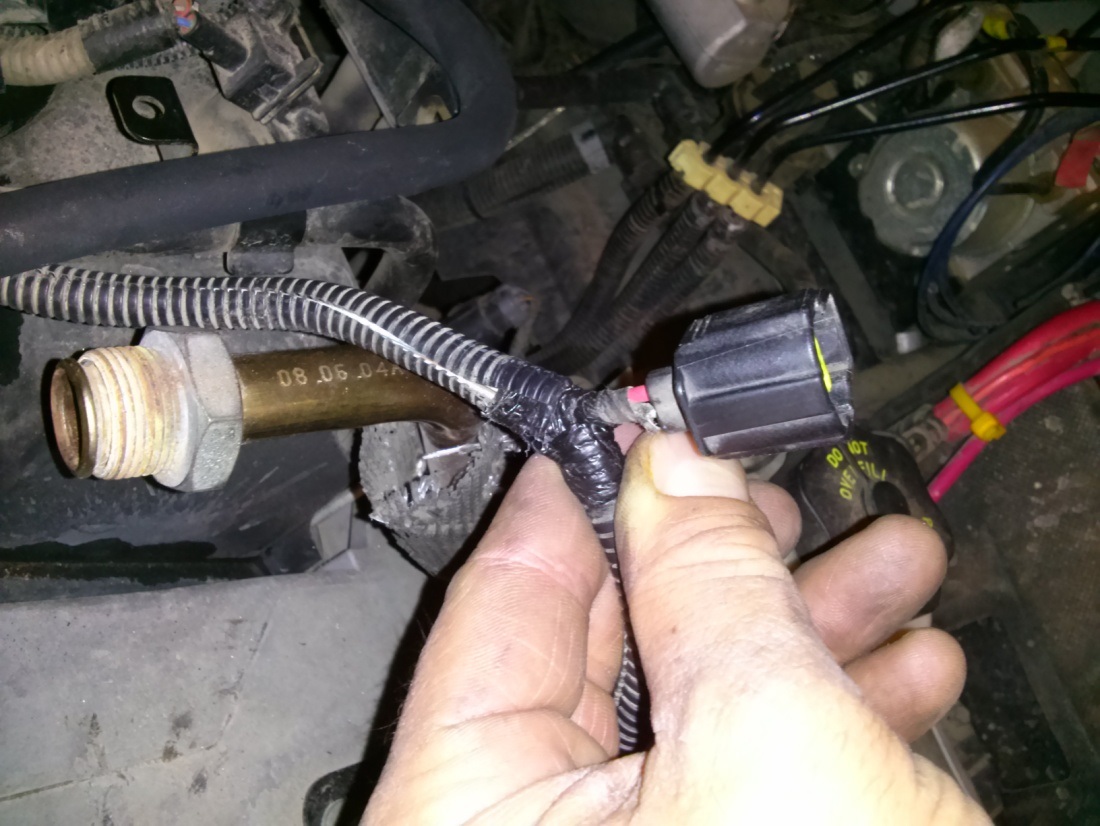
Carefully expose the wires from the plastic guard and electrical tape.

Take the Idle Air Control Valve Plug Wire and cut it approximately 3� from the plug end. Splice in approximately 3� of wire to extend the wire to the new IAC location and plug it in. Use the provided tie-downs to secure the wire away from any moving parts. Caution: Make sure you do not reverse the polarity of the wires.

Apply the supplied Liquid Gasket to the ModdBox Intake Manifold as illustrated.

Line up the 1 5/8� Supercharger Bypass Hose and press the assembly down. Secure the 2� Hose Clamp to the Supercharger Bypass Valve. Caution: Do not drop anything into the Supercharger Bypass opening in the Plenum Top Plate. It may fall into an engine inlet port which could cause damage to your engine. Remove any rag or paper towel that you may have placed in the tube.

(Note: It may be easiest to have the tube connected to the Plenum Top Plate as suggested earlier)
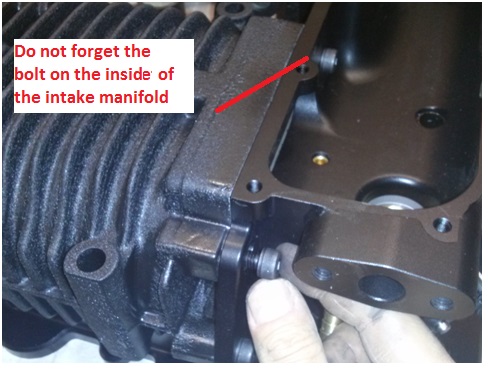
Bolt down the ModdBox Intake Manifold Assembly to the back of the supercharger using the provided M8x25mm socket head caps screws.

Bolt the Stock Throttle Body onto the the Intake Manifold as shown using the provided M6x16mm socket head caps screws.

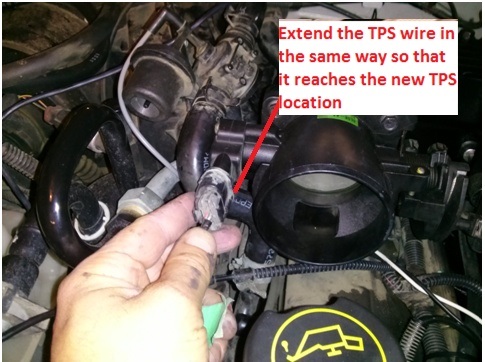
Locate the TPS plug wire and cut it approximately 3� from the plug end. Splice in approximately 3� of wire to extend the wire to the new IAC location and plug it in. Use the provided 1/4" loom and tie-downs to secure the wire away from any moving parts. Caution: Make sure you do not reverse the polarity of the wires.
Place a thin bead of Black Liquid Gasket on the ModdBox Intake Manifold�s mating face as illustrated.

Place and bolt up the ModdBox Intake Manifold Cover with the provided M6x12mm socket head cap screws.

Locate and connect the Brake Booster Hose to the provided 3/8� barb located on the back driver side of the ModdBox Intake Manifold.

Locate the Fuel Injection Vac Line and connect it to the 3/8� barb located beside the Supercharger Bypass Valve.


Locate the Fuel Vapor Return Line. Cut off the press fit connection and reconnect it to the remaining 3/8� barb on the ModdBox Intake Manifold. Secure the hoses with the provided hose clamps.


Locate the Stock EGR Valve. Connect the valve to the provided Stainless Steel EGR Extension.

Use the provided M8x25mm bolts and secure the EGR Valve to the ModdBox Intake Manifold as illustrated.

Reconnect the EGR Vac Line.

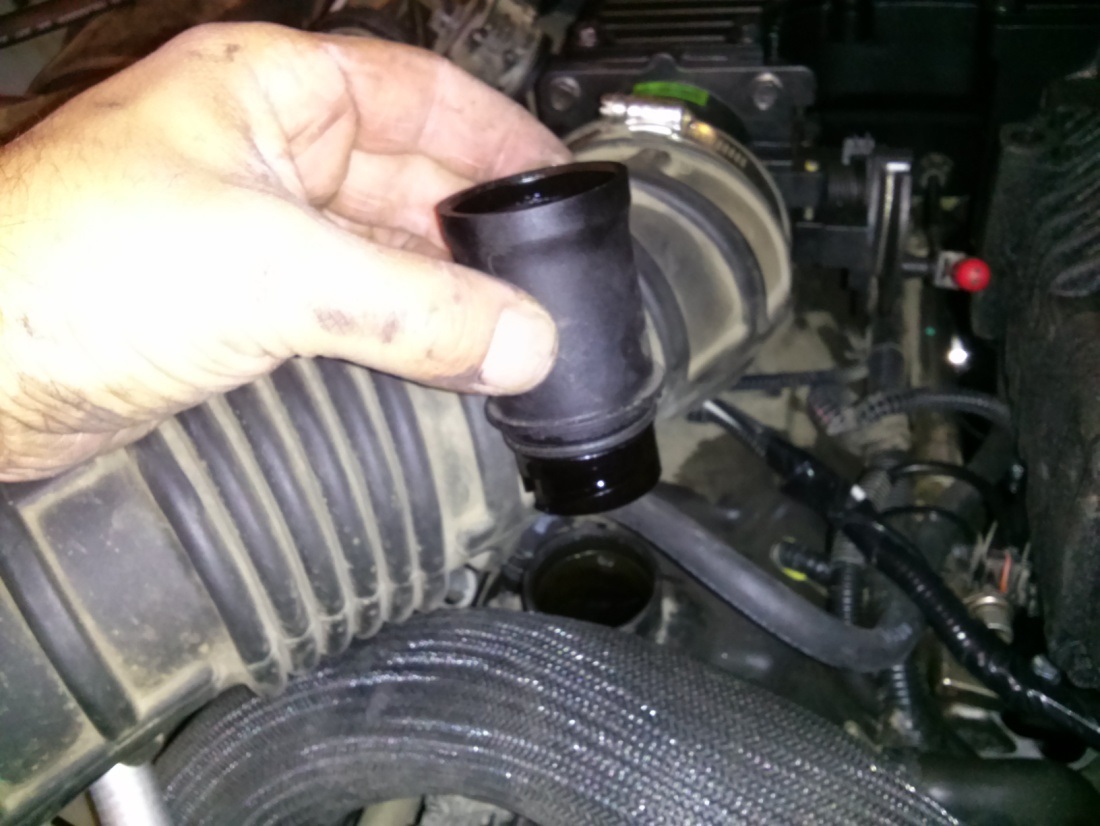
Use the provided 5/8� hose (16� long) and connect one end to the Crank Case Ventilation Tube. The Stock Crank Case Ventilation Tube can be removed by pressing the plastic spring release on the end of the fitting.

Connect the other end of the Crank Case Vent Hose to the Stock Intake Tube. Secure both ends with a hose clamp.
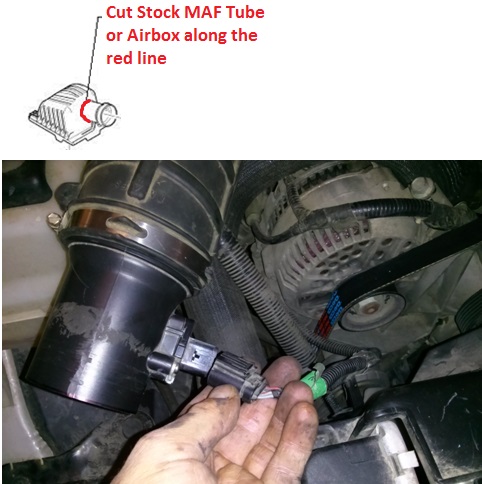
Remove your vehicle�s Stock Airbox Assembly (see stock diagrams for more details). Use a saw to cut the Stock MAF Tube approximately 1� in front of the MAF mount. Re-connect the MAF tube to the Stock Intake Tube. Plug the MAF back into the electrical socket. See illustration below.
(Note: Some models will be equipped with a flange between the airbox and the MAF)
Connect the downstream side of the Stock Intake Tube to the Throttle Body. Secure both hose clamps.

Optional. Your oil cap is easily accessible but it will rub against the stock Intake Tube when you perform maintenance. Although this is minor, you may want to extend the oil cap. Did you know your oil cap has already been extended upwards with a 2.5� extension? You may want to buy an additional extension to raise it up another 2.5� to clear the Intake Tube. See illustration below.
(Optional Ford Part #: ML5E-6765-AA)
Bolt the ModdBox Intake Heat Shield to the bolt located behind the passenger side headlight assembly. Secure the Intake Shield to the radiator coolant hose with the provided strap. Place your 70mm ModdBox Cold Air Intake Filter to the Stock MAF Tube and secure the hose clamp.

Replace the Stock Fuel Pump with the Moddbox 255lph Fuel Pump. See description here:
Install Instructions 4.0L V6 Cologne @ ModdBox
Re-install Radiator Rock Shield. Replace the 3/4 gallon (~3L) of coolant back to into the radiator cap.
Slack your Belt Tensioner using a 3/8� Box Wrench or Belt Removal Tool. Remove the Stock belt and replace it with the ModdBox 6PK Belt as illustrated below.
Optional. Obtain your stock throttle body cover. Cut the cover as shown in the below diagram. Remove one M6 bolt from your ModdBox Intake Manifold Cover and bolt down the throttle body cover.

CONNECTION CHECK LIST
EGR Vac Line
EGR Electrical Plug
EGR Stainless Line
Crank Case Vent Hose (may be 2 depending on your model)
IAC Electrical Plug
TPS Electrical Plug
Electrical wires (from side of Intake Manifold) should be secured away from the Throttle Cable and Cruise Control cables.
Fuel Vapor Return Line
Fuel Injection Vacuum Line
Brake Booster Line
more edits to come... for the most up-to-date information... click here:
Install Instructions 4.0L V6 Cologne @ ModdBox

So... here it goes. If you obtain a Moddbox Installation kit and any Eaton M90 supercharger (89-95 either style inlet), follow the following instructions and you're good to go. No tune required. 100% bolt-on mod. You can get your installation kit here:
ModdBoxModdBox - Engineering your driving experience @
I've also decided to post the "final result" first. If you like it.. proceed to read the "how to".
Here's a road test of the 3.5 psi pulley equipped with no cooling equipment installed.
Here's the Dyno. 215 hp & 237 lbft at the rear wheels.
Kit Photo:
Installed Photos:
**ps. Apologies for some linked & odd sized photos... resizing them all for the embedding options is alot of work for this many photos. For a more uniform reading experience, click here:
Install Instructions 4.0L V6 Cologne @ ModdBox
If you have any questions comments, feel free to comment or PM me :)
INSTALLATION NOTES
You must read the instruction manual at least 2 times prior to proceeding.
It is important to familiarize yourself with the ModdBox Supercharger Kit installation. It is the responsibility of the installer to properly install the Supercharger Kit. For your safety and the asurety of a proper installation, ModdBox recommends that this product only be installed by a qualified professional, access to pneumatic tools, and a strong familiarity with automotive service procedures.
91 or higher octane gasoline is required at all times.
You must use fuel of 91 octane or higher. If your vehicle does not running 91 or higher octane, you must run your vehicle till empty and refill with the required octane at least 2 times prior to installation.
Any previously installed aftermarket tuning equipment must be removed and the vehicle returned to an as stock condition before installing the supercharger.
Any equipment that directly modifies the fuel mixture or ignition timing of the engine can cause severe engine damage if used in conjunction with ModdBox Supercharger Kit. This includes, but is not limited to: ignition boxes, air/fuel controllers, OBDII programmers, and any other device that modifies signals to and/or from the ECU. Aftermarket bolt-on equipment such as underdrive pulleys or air intake kits will also conflict with the operation of the supercharger and must be removed prior to installation. Use of any of these products with the ModdBox Supercharger Kit could result in severe engine damage.
REFERENCE ABBREVIATIONS
EGR � Exhaust Gas Recirculation
HVAC � Heating Ventilation & Air Conditioning
IAC � Idle Air Control
MAF � Mass Air Flow
TPS � Throttle Position Sensor
Vac - Vacuum
TOOLS REQUIRED
Tools Required:
Standard metric socket set
Needle Nose Pliers
T-30 Torx Bit
Fluid Funnel
Flat Head Screw Driver
Punch
...will add more soon
STOCK REFERENCE DIAGRAMS
Stock Throttle Cable Reference Diagram
Stock EGR System Reference Diagram
Stock Intake Manifold Reference Diagram
Stock Air Box Reference Diagram
Stock Throttle Reference Diagram
Belt Diagram Reference Diagram (Dark Belt Showing the ModdBox Orientation)
MODDBOX SUPERCHARGER KIT PARTS
ModdBox Supercharger Bypass Valve
http://modd.me/wp-content/uploads/2013/09/CAM04401.jpg
ModdBox 255lph Fuel Pump
http://modd.me/wp-content/uploads/20...dbox255lph.jpg
ModdBox Heat Shield
http://modd.me/wp-content/uploads/20...heatShield.jpg
ModdBox 70mm Air Filter
http://modd.me/wp-content/uploads/20...yAirFilter.jpg
ModdBox Throttle Cable and Cruise Control Mount
http://modd.me/wp-content/uploads/20...eInstall-7.jpg
ModdBox 3.0 & 3.5 psi Supercharger Pulleys
http://modd.me/wp-content/uploads/2013/11/CAM04371.jpg
ModdBox Supercharger Pulley Quick Adapter
http://modd.me/wp-content/uploads/20...apterPully.jpg
ModdBox Plenum Bottom Plate
http://modd.me/wp-content/uploads/20...eInstall-9.jpg
ModdBox Plenum Top Plate
http://modd.me/wp-content/uploads/20...Install-10.jpg
ModdBox Intake Manifold
http://modd.me/wp-content/uploads/20...Install-11.jpg
ModdBox Intake Manifold Top
http://modd.me/wp-content/uploads/20...Install-12.jpg
ModdBox M22-1.5mm EGR Extension
http://modd.me/wp-content/uploads/2013/11/CAM04413.jpg
Black Silicone Liquid Gasket
http://modd.me/wp-content/uploads/2013/11/CAM04389.jpg
6pk Serpentine Belt
http://modd.me/wp-content/uploads/2013/11/6pkBelt.jpg
1/4" Electrical Loom
16 ga wire & connections
Heater Hose
Fuel Hose
Hardware and Fittings
INSTALLATION STEPS
Remove the negative battery cable (1 bolt). Secure it to the side of the battery to prevent any accidental contact with the negative terminal.
Remove the Throttle Body Cover (2 bolts). If your model is equipped with a second Crank Case Ventilation hose, you will be required to remove the hose clips on the side of the Throttle Body Cover (not shown here).
Loosen the hose clamp and disconnect the Intake Tube from the Stock Air Box Assembly.
Loosen the hose clamp and disconnect the Intake Tube from the Throttle Body.
Disconnect the Crank Case Vent Hose(s) and remove the Intake Tube. Set the Intake Tube aside for later use. Some models have a second Crank Case Vent Hose. For more information, see the Stock Setup Diagrams provided at the beginning of this instruction manual.
Remove the Brake Booster Line from the back of the Intake Manifold. Tape and label if necessary.
Unplug the cable connected to the IAC Valve.
Unbolt and remove the IAC Valve (2 bolts). Set the IAC Valve aside for later use.
Unplug the Vac line connected to the EGR. Tape and label the Vac Line if necessary.
Unbolt the EGR Valve (2 � 12mm bolts).
Remove EGR Valve by disconnecting the EGR Tube. Set the EGR Valve aside for later use.
Unplug the TPS Sensor. Tape and label the plug if necessary.
Remove the Throttle Cable from the Throttle Body Valve. The cable can be slipped free by manually actuating the valve 90 degrees and providing slack in the cable.
Unbolt the Throttle Body Valve (4 bolts). Set the Throttle Body Valve aside for later use.
Disconnect the Throttle Cable and the Cruise Control Cable.
Disconnect the electrical wire mount from the left side of the Intake Manifold.
Locate the plastic Radiator Rock Shield located underneath the engine bay. Remove the bolts and set it aside.
Locate the plastic Radiator Drain Valve at the bottom passenger side of the Radiator. Turn this plug and release only approximately a 3/4 gallon of coolant fluid (~3L). This is to allow the removal and relocation of coolant lines in the proceeding steps.
Remove the HVAC Heater Hoses (2x 1/4� diameter) and the Intake Manifold Engine Vac Line (5/8� diameter) from the Hose Connector Fitting. Tape and label the hoses if necessary.
Remove the Hose Connector Fitting. Set the Hose Connector Fitting aside for later use.
Locate the 1 5/8� diameter Radiator to Thermostat Coolant Hose.
Relocate the Coolant Hose to be in front of the Oil Cap and around the AC Line as illustrated. Cut approximately 5� to 6� off of the hose and re-secure it to the radiator.
Be sure the hose will not conflict with the belt. If not equipped with AC, secure the hose with restraining straps if necessary. Do not dispose of the 1 5/8� hose. The remaining hose will be needed in a later step.
Remove the Fuel Injection Vac Line located on the right side of the Intake Manifold. Tape and label it if necessary.
Pry off the Ignition Wire Mount located at the top of the Intake Manifold.
Unbolt the Ignition Wire Flange Mount.
With the Ignition Wire Flange Mount disconnected from the Intake Manifold, proceed to pry the Ignition Wire Flange Mount approximately 2 inches toward the driver side. This additional clearance will aid in the removal of the stock Intake Manifold as well as providing ample space for the future EGR Valve.
Unbolt the Vacuum Regulator (2 bolts) located towards the front drivers side of the Intake Manifold.
Remove the Fuel Vapor Return Line. This fitting is equipped with a simple push-style fitting. Simply push in the large curved shape and the fitting should pull off.
Remove the Throttle Cable and Cruise Control Cable Mount (2-bolts).
Loosen the Intake Manifold Bolts (12 � T30 Torx bolts). Note that these bolts do not remove completely. Once turned out of the Engine Block, the bolts remain connected to the Intake Manifold. Caution: You do not want to strip these bolts. It is advisable to inspect the Torx heads and use a vacuum to remove any dirt that may have accumulated inside the head. It may be necessary to use a machinist scribe or similar pointed object to loosen and vacuum out any dirt that may be residing inside the Torx heads before attempting to remove.
Lift out the Intake Manifold.
Caution: Do not drop anything into the Intake Ports. Before Proceeding, fill the Intake Ports with rags or paper towel. Clean and vacuum the area if necessary. Be sure to clean the Engine Block�s mating faces.
You are now ready to being modding your 4.0L J
Obtain the provided ModdBox stainless steel Supercharger Pulley Adaptor. Slip the supercharger Adapter onto your Eaton M90 Supercharger shaft until it binds (either an 89-93 oval or 94-95 rectangular style M90). The pulley is designed to have an interference fit which will cause the pulley to jam once it slips halfway onto the shaft. Use the stock Eaton M90 Supercharger lock nut to ratchet the pulley down the remaining length of the shaft until the Adapter hits the stop on the shaft. You may also want to use a press if you have one available. It is recommended that you use a low torque setting on an air or electric hammer-ratchet to suck the pulley down to the stop. If you do not have an automatic ratchet, you may carefully use a piece of soft lumber to stop the motion of the supercharger rotors. This will allow you to ratchet down the supercharger lock nut with a standard ratchet. Caution: Be sure that no debris falls into your Eaton M90 Supercharger. The tolerances on your supercharger are only a few thousandths of an inch and may be damaged if material falls or gets sucked into the supercharger housing. Even rotating the rotors by hand can often pull enough air to suck debris into the rotors. Use a vacuum to clear your rotors prior to installation.
<photo coming soon>
Obtain the provided ModdBox 6PK Custom Pulley and slip it onto the Supercharger Pulley Adaptor. Use the provided M5x16mm socket head cap screws.
<photo coming soon>
Locate the provided Black Liquid Gasket. Apply a thin bead of the gasket to the Eaton M90 Supercharger flange as illustrated.
Obtain the ModdBox Plenum Top Plate and bolt it to the base of the Eaton M90 Supercharger & Pulley Assembly. Use the provided M8x40mm socket head cap screws. Clean any excess gasket material.
Use the extra 1 5/8� diameter Radiator Hose that was remaining from a previous step. Measure out and cut a length of hose as is required for your supercharger:
For the 94�-95� Eaton M90 Supercharger (rectangular inlet): 1-7/8�
For the 89�-93� Eaton M90 Supercharger (oval inlet): 2-5/8�
Use one of the 2� stainless hose clamps to secure the hose to the Plenum Top Plate. Loosely place the other 2� diameter stainless hose clamp on the hose. Place the entire assembly aside for later use.
Obtain the ModdBox Plenum Base Plate. Apply a small bead of the provided Black Liquid Gasket around each Intake Port hole as shown.
Caution! The Plenum Base Plate is NOT reversible. Before placing the Plenum Base Plate on the Engine Block, be sure the wider ridge dimension (shown below) is placed at the back of the engine bay towards the firewall. If this is reversed, your supercharger pulley will not line up with your other engine pulleys.
Optional: If you have purchased a ModdBox Intercooler Kit, remove the 1/4�NPT plugs and replace them with the provided 1/4�NPT hose fittings. Refer to the ModdBox Intercooler Kit Installation Manual for further instructions.
Place the Plenum Base Plate onto the Engine Block in the correct orientation (shown in the previous step). Align the Inlet Ports with the Plenum Bottom Plate holes. Use the supplied M6x30mm socket head cap screws and loosely bolt down the Plenum Base Plate to the Engine Block (you will need to verify the alignment of the supercharger pulley before tightening the bolts).
Place and align the Eaton M90 Supercharger and Plenum Top Plate Assembly onto the Plenum Base Plate. Visually inspect the alignment of the supercharger pulley and the other engine pulleys. A miss-alignment of approximately 1/16� is acceptable due to the length of pulley to the adjacent pulleys and the lack of ribs on the idler pulley. If the alignment of your pulley is more than approximately 1/16�, you can fine tune the alignment of the Plenum Base Plate. Simply adjust the Plenum Bottom Plate as required (they are fitted with slotted holes) and torque it down to the Engine Block.
Locate the HVAC Heater Hoses (2x 1/4� diameter) that were removed from the Hose Connector Fitting and the Intake Manifold in a previous step. The hoses need to be reconnected to the Hose Connector Fitting in a new location approximately 3� above the rear-passenger side Inlet Port on the engine block (Inlet Port to combustion chamber). Review the illustration below for reference.
Cut the 1/4� diameter HVAC Heater Hose that originates from near the firewall. Be sure to leave at least a few extra inches to allow room for error. Reconnect the 1/4? diameter hose to the Hose Connector Fitting. Note: You can connect to either 1/4? barb on the fitting.
The Intake Manifold Engine Vac line (the 5/8� diameter hose that was connected to the Hose Connector Fitting and Intake Manifold) will need to be shortened and re-connected to the Hose Connector Fitting. This 5/8� Vac line consists of rubber hose AND plastic rigid tube that runs around behind the Intake Manifold. The plastic section of this line running along the firewall needs to be cut at approximately the centerline of the Intake Manifold. Reference the photo below and proceed to cut the 5/8� plastic tube. Use the provided piece of 5/8� hose (9� length) and connect one end to the 5/8� plastic line and the other to the Hose Connector Fitting. Secure both ends of the hose with a hose clamp.
(Note: the second 1/4? hose shown will be described in the next step)
Locate the remaining 1/4� diameter HVAC Heater Hose (it originates from in behind the alternator as illustrated). Remove and replace this hose with the provided 1/4� hose (24� long). Connect the other hose end to the Hose Connector Fitting. Secure both hoses with hose clamps.
Remove the rags or paper towels in your Engine Inlet Ports then proceed with the installation of the Supercharger Assembly. Apply a thin bead of Black Liquid Gasket along the Plenum Base Plate (already aligned and bolted to the Engine Block). Caution: Be sure to apply gasket material around all the bolt holes (as illustrated in the photo below). The gasket material must be extended to the inside edge of the mating face as shown on the bottom-left of the photo below. Failure to do so will result in a leak in your Intake Manifold Assembly.
(Note: Engine rags/paper towels removed from engine ports prior to installing Plenum Top Plate)
Obtain the Eaton M90 Supercharger Assembly (already assembled in a previous step). Place the assembly onto the Plenum Base Plate and bolt it down with the provided M6x30mm flange bolts. Caution: Do not drop anything into the 1 5/8� hose on the Plenum Top Plate. Debris may fall into your Engine Inlet Ports. Place a small rag or paper towel into the hose to make sure nothing falls in (make sure the rag does not fall in).
Optional Step. The provided 1/4�NPT and 1/8�NPT ports have been included for the installation of a Boost Sensor and Manifold Temperature Sensor. If you have a purchased monitoring equipment from ModdBox (or a third-party), it is advisable to install the necessary fittings now. Once the Intake Manifold is installed, these ports are less accessible and some disassembly may be required.
Obtain the ModdBox Intake Manifold (the hollow �C� shaped CNC part). Use the provided M5x16mm socket head cap screws and bolt the Supercharger Bypass Valve to the ModdBox Intake Manifold.
Connect the Supercharger Bypass Valve Vacuum Hose to the ModdBox Intake Manifold and the Valve Actuator.
(Note: Ignore the 1 5/8� hose, it should be connected to the Plenum Base Plate)
Install the ModdBox Cruise Control/Throttle Cable Mount to the Moddbox Intake Manifold. Use the provided M6x12mm socket head cap screws. Note: For models with newer throttle cables, the mount can be aligned with the base (factory offset). However, older models vehicles should be setback approximately 1/8� to 1/4� back to compensate for the creep (stretching) in the throttle cable.
Install the stock IAC Valve on to the ModdBox Intake Manifold using the M6x12mm socket head cap screws.
Optional Step. A 1/8�NPT port has been provided for a Water/Methanol Injection Nozzle. If you have purchased a ModdBox Water/Methanol Injection Kit (or a third party kit), it is advisable to install the necessary fittings now. Once the Intake Manifold is installed, these ports are less accessible and some disassembly may be required.
Proceed with the ModdBox Intake Manifold installation by adjusting the illustrated hoses as described below.
Clear the future Throttle Cable and Cruise Control Cable location of any loose hose, ignition cables, electrical wires, fittings, etc. Be sure to fasten these components securely and away from the action of the throttle body. Caution: Failure to keep this area clear could result in your throttle sticking open! Be sure this area is kept clear and that all components in the engine bay are kept secure.
Note the orientation of the Hose Connector fitting in relationship to the ModdBox Intake Manifold.
Take the ModdBox Intake Manifold Assembly and connect the Hose Connector (already connected to two 1/4? hoses and one 5/8� hose) using the M5x10mm socket head cap screws.
Locate the Stock Throttle Cable and Cruise Control Cable (if equipped). Connect the cables to the ModdBox Cable Mount as illustrated. Snap-in the Throttle Cable to the slot on the passenger side. The Cruise Control Cable must be snapped into the driver side slot.
(Note: Contrary to the photo, it�s easier to bolt on the Throttle Body after the assembly is bolted to the supercharger)
Locate your Throttle Position Sensor Plug and Idle Air Control Valve Plug.
Carefully expose the wires from the plastic guard and electrical tape.
Take the Idle Air Control Valve Plug Wire and cut it approximately 3� from the plug end. Splice in approximately 3� of wire to extend the wire to the new IAC location and plug it in. Use the provided tie-downs to secure the wire away from any moving parts. Caution: Make sure you do not reverse the polarity of the wires.
Apply the supplied Liquid Gasket to the ModdBox Intake Manifold as illustrated.
Line up the 1 5/8� Supercharger Bypass Hose and press the assembly down. Secure the 2� Hose Clamp to the Supercharger Bypass Valve. Caution: Do not drop anything into the Supercharger Bypass opening in the Plenum Top Plate. It may fall into an engine inlet port which could cause damage to your engine. Remove any rag or paper towel that you may have placed in the tube.
(Note: It may be easiest to have the tube connected to the Plenum Top Plate as suggested earlier)
Bolt down the ModdBox Intake Manifold Assembly to the back of the supercharger using the provided M8x25mm socket head caps screws.
Bolt the Stock Throttle Body onto the the Intake Manifold as shown using the provided M6x16mm socket head caps screws.
Locate the TPS plug wire and cut it approximately 3� from the plug end. Splice in approximately 3� of wire to extend the wire to the new IAC location and plug it in. Use the provided 1/4" loom and tie-downs to secure the wire away from any moving parts. Caution: Make sure you do not reverse the polarity of the wires.
Place a thin bead of Black Liquid Gasket on the ModdBox Intake Manifold�s mating face as illustrated.
Place and bolt up the ModdBox Intake Manifold Cover with the provided M6x12mm socket head cap screws.
Locate and connect the Brake Booster Hose to the provided 3/8� barb located on the back driver side of the ModdBox Intake Manifold.
Locate the Fuel Injection Vac Line and connect it to the 3/8� barb located beside the Supercharger Bypass Valve.
Locate the Fuel Vapor Return Line. Cut off the press fit connection and reconnect it to the remaining 3/8� barb on the ModdBox Intake Manifold. Secure the hoses with the provided hose clamps.
Locate the Stock EGR Valve. Connect the valve to the provided Stainless Steel EGR Extension.
Use the provided M8x25mm bolts and secure the EGR Valve to the ModdBox Intake Manifold as illustrated.
Reconnect the EGR Vac Line.
Use the provided 5/8� hose (16� long) and connect one end to the Crank Case Ventilation Tube. The Stock Crank Case Ventilation Tube can be removed by pressing the plastic spring release on the end of the fitting.
Connect the other end of the Crank Case Vent Hose to the Stock Intake Tube. Secure both ends with a hose clamp.
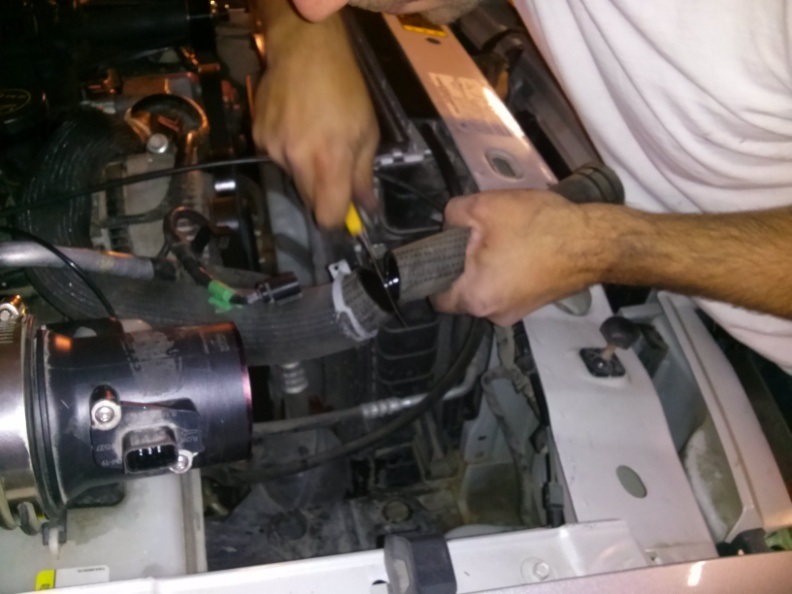
Remove your vehicle�s Stock Airbox Assembly (see stock diagrams for more details). Use a saw to cut the Stock MAF Tube approximately 1� in front of the MAF mount. Re-connect the MAF tube to the Stock Intake Tube. Plug the MAF back into the electrical socket. See illustration below.
(Note: Some models will be equipped with a flange between the airbox and the MAF)
Connect the downstream side of the Stock Intake Tube to the Throttle Body. Secure both hose clamps.
Optional. Your oil cap is easily accessible but it will rub against the stock Intake Tube when you perform maintenance. Although this is minor, you may want to extend the oil cap. Did you know your oil cap has already been extended upwards with a 2.5� extension? You may want to buy an additional extension to raise it up another 2.5� to clear the Intake Tube. See illustration below.
(Optional Ford Part #: ML5E-6765-AA)
Bolt the ModdBox Intake Heat Shield to the bolt located behind the passenger side headlight assembly. Secure the Intake Shield to the radiator coolant hose with the provided strap. Place your 70mm ModdBox Cold Air Intake Filter to the Stock MAF Tube and secure the hose clamp.
Replace the Stock Fuel Pump with the Moddbox 255lph Fuel Pump. See description here:
Install Instructions 4.0L V6 Cologne @ ModdBox
Re-install Radiator Rock Shield. Replace the 3/4 gallon (~3L) of coolant back to into the radiator cap.
Slack your Belt Tensioner using a 3/8� Box Wrench or Belt Removal Tool. Remove the Stock belt and replace it with the ModdBox 6PK Belt as illustrated below.
Optional. Obtain your stock throttle body cover. Cut the cover as shown in the below diagram. Remove one M6 bolt from your ModdBox Intake Manifold Cover and bolt down the throttle body cover.
CONNECTION CHECK LIST
EGR Vac Line
EGR Electrical Plug
EGR Stainless Line
Crank Case Vent Hose (may be 2 depending on your model)
IAC Electrical Plug
TPS Electrical Plug
Electrical wires (from side of Intake Manifold) should be secured away from the Throttle Cable and Cruise Control cables.
Fuel Vapor Return Line
Fuel Injection Vacuum Line
Brake Booster Line
more edits to come... for the most up-to-date information... click here:
Install Instructions 4.0L V6 Cologne @ ModdBox
Last edited by moddbox; 01-31-2014 at 01:46 PM.
#2
01-29-2014
#3
01-29-2014
@mikerider
Thanks for your interest and your positive comments!
I'll start by answering your question about testing. Since we have the privilege of residing next to the "highway through hell" featured on the Discovery Channel's TV show, we have a nice 32.0 km hill climb with about a 5000 ft elevation change (a good portion of the climb is around 8% too). So in general, we beat the crap out of a few rangers racing to the top and towing 6000lb payloads. We also have the kit installed on a few models where we have logged 25000 kms prior to our release in December of 2013.
As for your question about the 2003. The 2003 models are setup a bit different. Most of the differences do not change our kit because we have designed our base-plates for the various fuel line arrangements etc. However, the bolted connection to the 2003 air-box & lack of EGR makes some minor changes to what you would receive in the mail when compared to the one shown above. To account for the EGR, we swap out the M18 Stainless EGR Extension for our Stainless Block Plate. Also, you will have a bolted connection flange adapter included in your kit as well as an 85mm Air filter (unlike the one shown in the installation here which is a 2005).
As for the differences of our kit to other products on the market... we usually let it speak for itself. But since you mentioned it, we will make some distinctions:
-We back our product with add-on products and have pre-designed it to be bolt-on compatible. We offer an intercooler kit, methanol injection kit, higher boost pulleys, future gauge ports (intake temp/boost), etc.
-We will soon offer add-on packages... we are currently working on the 8psi kit which should reliably make over 300hp with stock internals (if anyone wants to go that far)
-Our product includes an upgraded fuel system which is NOT an option
-Our product is guaranteed 100% bolt-on compatible or your money back
-We offer superchargers in our packages with warranty
-Our kit is cheaper (often selling at $2000 usd WITH NO TUNE REQ and the following goodies...)
-255lph fuel pump with warranty is included
-Intake kit Included complete with heat shield & air filter is included
-Quality 35mm quick closing bypass valve included
-Two (2) 6PK pulleys specifically designed for your ranger pulley (won't slip).
All our parts are CNC cut and anodized for the highest quality finish.
Hope that helps :)
The following users liked this post:
Gatorbait1 (12-09-2021)
#4
01-29-2014

Join Date: Mar 2008
Location: Victoria, BC
Posts: 114
Likes: 0
Received 0 Likes
on
0 Posts


#6
01-29-2014
Join Date: Apr 2010
Location: Orange County, CA
Posts: 73
Likes: 0
Received 0 Likes
on
0 Posts
#7
01-29-2014
Thanks for your kind comments.
As for your question... we have not yet tested the kit on the 2001 model. Having said that, all the 4.0L SOHC engines are very similar in setup and we are sure that our kit can be put on that engine. However, we can't guarantee 100% compatibility.
In general, every engine we have worked on that looks like this has been compatible and we have prepared parts lists complete with wire/hose/hardware/brackets/fittings to make sure it is 100% bolt-on.
Other years/models may have that setup (other than the ones we have advertised) but we have not yet confirmed which ones they are. There are likely some additional models/years in the USA like this that are 100% bolt-on compatible to one of our kits but we are just unaware of it. In Canada, all 4.0L SOHC engines built after about March/2002 look like the above photo.
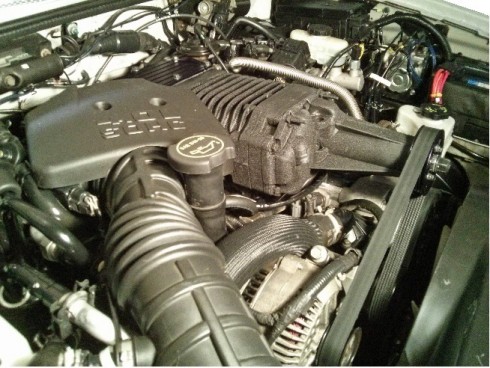
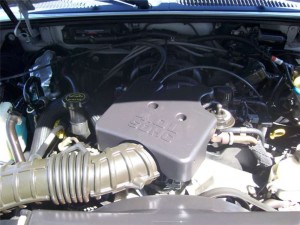
If your engine looks like the photo below, you will probably require some additional wiring or hose. But it should be pretty straight forward. We will probably compile the parts and offer this kit in future and guarantee 100% bolt-on compatibility soon.

There is one other setup on the explorers that we get a lot of questions about too... it is the 2002-2005 4-door setup. This product is COMING SOON and will be 100% Compatible We are currently running a prototype kit on a 2002 XLT 4-Door. This product will be released in February or March (as well as 2006-2010 4-door and Sport Trac successor).
(This is a photo of our actual R&D truck's engine bay prior to install)

Hope this helps :)
#9
01-29-2014

#10
01-29-2014
Thanks for the heads up. We will try to keep this one up to date and error-free but the manual on our website is maintained on a much more frequent basis.
Regarding the supercharger kit, we offer it with AND without the supercharger. Right now... we offer the kit on sale at the following prices:
$2000usd - for installation kit (without supercharger)
$2899usd - for supercharger kit (re-manufactured supercharger included with 3 year warranty)
Let us know if there are any other errors :)
The following users liked this post:
Gatorbait1 (12-09-2021)
#11
01-30-2014


As a guy that recently installed the RP Caster kit - the appearance of quality on this one blows it away. I spent more than half the time trying to 'clean-up' the install or researching how I could do it differently so it would look 'better'. Partly because I was upgrading/changing a fair amount from the standard setup, but some was trying to get it a little more 'sleek' looking.
For what it's worth - one item the other kit includes that this doesn't seem to address is the crossover fuel rail upgrade. This kit looks like it's still getting solid fuel pressure - so it must not be needed at this level. Just pointing it out.
#12
01-30-2014
Thanks for your "X2" comment :)
As for you being interested in "making your truck more sleek", our M18 Stainless EGR Extension and Pulleys are probably compatible to your setup (as long as you haven't cut your stock EGR). Our quick change pulley would also give you flexibility in future to go to higher boosts. Not to mention, our 5.5 psi pulley is actually a bit smaller than the stock thunderbird pulley which makes a bit more boost.
As for your comments about the fuel rail, a full loop is more desirable to produce equal pressure. However, when you have a 5/8" diameter fuel rail, the headloss (pressure differential) across the length of pipe is not even detectable (stock one's prob good till like 800hp). As a matter of fact, introducing fitting into the flow path will produce higher total friction than the stock piping. The stock fuel rail is geometrically setup in a manner that makes it difficult to manufacture the lower plenum plate without interference (the lower mounting bolts are between the engine intake inlets and are difficult to fabricate around). That is likely the reason for replacing the fuel rail in the other kit.
Last edited by moddbox; 02-01-2014 at 10:15 AM. Reason: spelling error
#13
01-30-2014
As for you being interested in "making your truck more sleek", our M18 Stainless EGR Extension and Pulleys are probably compatible to your setup (as long as you haven't cut your stock EGR). Our quick change pulley would also give you flexibility in future to go to higher boosts. Not to mention, our 5.5 psi pulley is actually a bit smaller than the stock thunderbird pulley which makes a bit more boost.
As far as the pulleys go - I'm actually already running a somewhat 'modified' setup so I run the 2.8" pulley along with an entire list of other 'upgrades' (Engine datalogging/management system, larger fuel pump, injectors, MAF, IAT relocation, throttle body, water/meth injection, complete dyno tuning, etc).
Keep up the good looking products though!
Last edited by logan03CO; 01-30-2014 at 11:38 AM.
#15
01-31-2014
Join Date: May 2011
Location: buffalo, ny
Posts: 273
Likes: 0
Received 0 Likes
on
0 Posts
#16
01-31-2014
Join Date: Apr 2010
Location: Orange County, CA
Posts: 73
Likes: 0
Received 0 Likes
on
0 Posts
Do you guys have any more info on the 8 PSI kit? Cost or overall differences over the 3.5 PSI kit you've got for sale currently?
And what about the intercooler kit you mentioned in an above post? That's one thing that the competition's kit doesn't have unless you'd like to get completely custom with it.
And what about the intercooler kit you mentioned in an above post? That's one thing that the competition's kit doesn't have unless you'd like to get completely custom with it.
#17
01-31-2014
Do you guys have any more info on the 8 PSI kit? Cost or overall differences over the 3.5 PSI kit you've got for sale currently?
And what about the intercooler kit you mentioned in an above post? That's one thing that the competition's kit doesn't have unless you'd like to get completely custom with it.
And what about the intercooler kit you mentioned in an above post? That's one thing that the competition's kit doesn't have unless you'd like to get completely custom with it.
Thanks for your inquires.
To start, the intercooler kit is just reaching the manufacturing stage and we do not yet know the exact price. This product is an "add-on" product to the basic kit shown in this thread. It will be 100% bolt-on compatible... note that the bottom plenum has two 3/8"npt plug fittings for the future in/out coolant lines.
As for the 8psi kit, in general it will just be a package of add-on products to the same basic kit (so you will still be required to start by purchasing the basic kit). The 8psi package will probably consist of just a few parts at a package deal (8.0 psi pulley, smaller belt, intercooler kit, etc). We may include the spark plugs, injectors, and SCT tuner but it may be more cost effective to let our customers purchase them separately from other suppliers (since the market here is very competitive). At minimum, we will supply a "start point" SCT tune file and specify which spark plugs and injectors to use.
Hope that helps.
ps. The injectors, fuel pump, etc will be sized such that you can go even further than 8psi (not recommended with stock internals). In our humble opinion, anything above the 8psi should have upgraded internals (some possible upgrades may include forged rods, head gasket, custom piston for lower compression ratio, engine pulley set to change supercharger pulley ratio, stiffer valve springs, aftermarket sensors, etc).
Last edited by moddbox; 01-31-2014 at 04:27 PM.
#18
01-31-2014
The more I read the more I'm tempted to take the dive.
Will you guys be testing an 8.0 psi setup?
Personally, if I go this route I will want to get every bit of power this can make, of course I would go through the engine internals.
I just want to know what the true potential could be since a lot of Ranger guys end up going the Expo 5.0 route when they want more power
#19
01-31-2014
@01RangerEdge
Well well... this is the fun part. We will probably go as far as we can to show the Ranger community what can be done using the smallest pulley on the M90 with a full engine pulley swap to make the ratio higher (cause the S/C pulley can only be so small without interfering with the snout). So the "true potential" is limited to the efficiency of the 1.5L/rev Eaton M90 blower. If we can make 14psi more we are confident we will be in the 475-500 hp range (which is where the fuel pump/injectors will top out in the 8psi kit). However, we do not intend to "package" anything above the 8psi due to the amount of changes that will be required to do it properly.... but parts will be available.
As for the testing of the 8psi setup... we have already began the build. It will take some time though as we need to give it some time on the track. However... you know what they say... "it's all in the tune".
Last edited by moddbox; 02-01-2014 at 01:25 PM.
#22
01-31-2014
Thanks.
I guess for now I can boast that my truck is faster than yours.. cause mine definitely DOES NOT look better.
Love the look of your truck. I gotta get me some tires and a flare side bed like that. Not to mention a paint job.
I guess for now I can boast that my truck is faster than yours.. cause mine definitely DOES NOT look better.
Love the look of your truck. I gotta get me some tires and a flare side bed like that. Not to mention a paint job.
#23
01-31-2014
But I'm not gonna lie, one of our R&D trucks has just a junkyard one we picked up for $150 CAD and it's working fine. But if you want it to be hassle-free (and if you have more money burn) we'd be happy to take your money

#24
01-31-2014
Join Date: Apr 2010
Location: Orange County, CA
Posts: 73
Likes: 0
Received 0 Likes
on
0 Posts
@doyouquaxu
Thanks for your inquires.
To start, the intercooler kit is just reaching the manufacturing stage and we do not yet know the exact price. This product is an "add-on" product to the basic kit shown in this thread. It will be 100% bolt-on compatible... note that the bottom plenum has two 3/8"npt plug fittings for the future in/out coolant lines.
As for the 8psi kit, in general it will just be a package of add-on products to the same basic kit (so you will still be required to start by purchasing the basic kit). The 8psi package will probably consist of just a few parts at a package deal (8.0 psi pulley, smaller belt, intercooler kit, etc). We may include the spark plugs, injectors, and SCT tuner but it may be more cost effective to let our customers purchase them separately from other suppliers (since the market here is very competitive). At minimum, we will supply a "start point" SCT tune file and specify which spark plugs and injectors to use.
Hope that helps.
ps. The injectors, fuel pump, etc will be sized such that you can go even further than 8psi (not recommended with stock internals). In our humble opinion, anything above the 8psi should have upgraded internals (some possible upgrades may include forged rods, head gasket, custom piston for lower compression ratio, engine pulley set to change supercharger pulley ratio, stiffer valve springs, aftermarket sensors, etc).
#25
01-31-2014
Sorry... dont know how we missed your comment. Guess there were a few comments at once and we didnt see.
Regarding the inclusion of custom pulleys... let me explain. The standard pulley (assuming you mean the stock 3.16"thunderbird pulley) is wider and will slip when driven hard when using a 6PK ranger belt. For this reason a custom 6PK pulley is required. In addition, we wanted to include pulleys that make lower boost that the ecu can compensate for. This way the initial cost of boosting/supercharging will be much more affordable for our customers. Since the stock ecu is able to compensate for the higher air flow up to about 4.5 psi (with our upgraded fuel system), we decided to include our 3.0 and 3.5 psi pulley (actually makes up to about 4psi max).
Even though only a 3.5psi pulley is on the truck it still makes impressive gains of +50 hp and +51 lbft (actually much bigger difference in the bottom end - those are max vs max numbers).
For those who want to go further... the smaller 5.5&8psi pulleys are available separately at a very affordable price (the 5.5 is actually slightly smaller than the stock thunderbird one).


