General Ford Ranger Discussion General discussion of the Ford Ranger that does not fit in any other sub-forum.
Sponsored by:
Sponsored by: DashLynx

water in LED tail light

Thread Tools
 
Search this Thread
 
  #1  
Old 01-18-2011
dracowing14's Avatar
Member
Thread Starter
Join Date: Sep 2009
Location: Richmond Hill, Ontario
Posts: 222
Likes: 0
Received 0 Likes on 0 Posts
water in LED tail light

I've had my new taillights for a couple of months now with no major problems but all of a sudden water has started to appear in the passenger side tail light. now being in Canada that water has frozen rock solid. I don't know how to go about fixing this issue.
Name:  newlights.jpg
Views: 535
Size:  96.8 KB

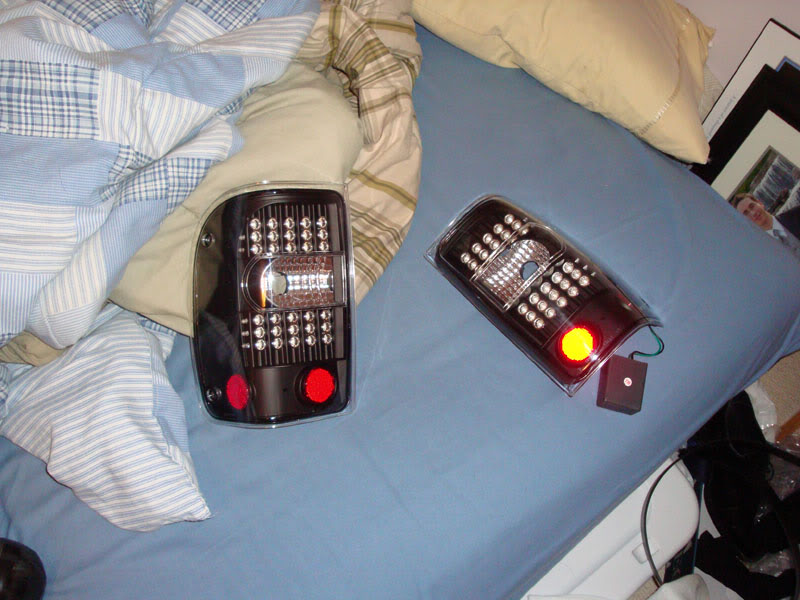
this is what they looked like before the water. being that these are LED and that i can't remove all the wiring or the lights form them I'm guessing i can't just open them u like a regular set of headlights or tail lights. so does anyone have any ideas.
 
  #2  
Old 01-18-2011
ME00Stepside's Avatar
Member
iTrader: (2)
Join Date: Nov 2010
Location: Maine
Posts: 1,237
Likes: 0
Received 27 Likes on 23 Posts
Wirelessly posted (Blackberry 8530)

I would start by siliconing around the edges with clear silicone. Then make sure the reverse bulb socket has a seal on it of some kind. If not, get one on it.
 
  #3  
Old 01-18-2011
dracowing14's Avatar
Member
Thread Starter
Join Date: Sep 2009
Location: Richmond Hill, Ontario
Posts: 222
Likes: 0
Received 0 Likes on 0 Posts
the ice finally melted inside the light and when i move it around the edges inside the light it doesn't drip out anywhere so I'm guessing its not the outer seal that's broken. the other problem i have right now is getting the water out, i would just let it evaporate but it would leave horrible water marks all over the inside of the lenses.
 
  #4  
Old 01-18-2011
KLC's Avatar
KLC
KLC is offline
RF Veteran
iTrader: (29)
Join Date: Nov 2007
Location: New Mexico
Posts: 13,115
Likes: 0
Received 5 Likes on 3 Posts
Short of taking it apart, the only thing I can think of is to try to run it out and maybe get a hair dryer to dry the rest. Sounds like it leaked around one of the socket holes in the back. I had two pairs similar and they are sealed very good. Never had a problem.
 
  #5  
Old 01-18-2011
dracowing14's Avatar
Member
Thread Starter
Join Date: Sep 2009
Location: Richmond Hill, Ontario
Posts: 222
Likes: 0
Received 0 Likes on 0 Posts
upon further inspection i found that the water is getting through the bulb socket were the regular tail light bulb would go the problem is that spot is no filled with the lights circuit board. so I'll need to figure out a way to cover that up while still letting the 2 wires come out of it. on the side note I'll probably have to open the light up to remove all the water. now the problem with this is there are still wires and circuits inside it that can't be removed until the assembly is split in to but I'm not sure if it is safe to bake it while this stuff is still in there.
 

Last edited by dracowing14; 01-18-2011 at 08:15 AM.
  #6  
Old 01-18-2011
KLC's Avatar
KLC
KLC is offline
RF Veteran
iTrader: (29)
Join Date: Nov 2007
Location: New Mexico
Posts: 13,115
Likes: 0
Received 5 Likes on 3 Posts
Yeah, I remember that hole. It serves as a vent to prevent condensation. I never had a problem with mine and I even pressure-washed them multiple times.
 
  #7  
Old 01-18-2011
dracowing14's Avatar
Member
Thread Starter
Join Date: Sep 2009
Location: Richmond Hill, Ontario
Posts: 222
Likes: 0
Received 0 Likes on 0 Posts
are you talking about the little pin hole between the reflectors or the hole with the circuit board. also i need to take these apart, is it safe to use the oven method with the LED's and the board and wiring still on them or should i try the heat gun method.
 
  #8  
Old 01-18-2011
winks's Avatar
Member
iTrader: (5)
Join Date: May 2005
Location: Jackson, New Jersey
Posts: 4,872
Likes: 0
Received 0 Likes on 0 Posts
Originally Posted by dracowing14
are you talking about the little pin hole between the reflectors or the hole with the circuit board. also i need to take these apart, is it safe to use the oven method with the LED's and the board and wiring still on them or should i try the heat gun method.
The member JP7 has attempted baking his after-market tail lights to disassemble them (not the same ones) and had bad results. Be very careful if you try doing that, because his were quite brittle.
 
  #9  
Old 01-18-2011
dracowing14's Avatar
Member
Thread Starter
Join Date: Sep 2009
Location: Richmond Hill, Ontario
Posts: 222
Likes: 0
Received 0 Likes on 0 Posts
I'm trying to take part a stock ford ranger tail light just as practice and I'm having a hell of a time, the plastic lip around the edge of the tail light melts long before the silicone is hot enough to split apart. i have tried the oven method once but the silicone wouldn't give up and then i tried the heat gun method and the plastic lip started melting. but luckily i caught it before any damage was done. what is the perfect temp for the oven method.
 
  #10  
Old 01-18-2011
Tys 4x4 FTW's Avatar
RF Veteran
iTrader: (8)
Join Date: Jul 2008
Location: Las Vegas, Nevada
Posts: 6,575
Likes: 0
Received 2 Likes on 2 Posts
if i recall the only way to get a ranger taillight apart is actually cutting the housing. they won't bake apart IIRC.

on a side note, i have the same tails you do, just with night shades on them, and i havent had any problems with condensation. but my old set that i had, (red lens instead) were getting condensation on the reverse lense.
 
  #11  
Old 01-18-2011
Jp7's Avatar
Jp7
Jp7 is offline
Member
iTrader: (9)
Join Date: Sep 2007
Location: N/A
Posts: 3,028
Likes: 0
Received 17 Likes on 14 Posts
Good luck getting those apart. I bought 3 sets just to get the parts I need to assemble 2 together.
 
  #12  
Old 01-18-2011
dracowing14's Avatar
Member
Thread Starter
Join Date: Sep 2009
Location: Richmond Hill, Ontario
Posts: 222
Likes: 0
Received 0 Likes on 0 Posts
its a combination of condensation and actual water I'm in Canada so we get a lot of water and it freezes up here.
 
  #13  
Old 01-18-2011
dracowing14's Avatar
Member
Thread Starter
Join Date: Sep 2009
Location: Richmond Hill, Ontario
Posts: 222
Likes: 0
Received 0 Likes on 0 Posts
well is there another way to get the water out then. that's my only option i have 2 of the passenger side one's but the one with the water is the drivers side.
 
  #14  
Old 01-18-2011
KLC's Avatar
KLC
KLC is offline
RF Veteran
iTrader: (29)
Join Date: Nov 2007
Location: New Mexico
Posts: 13,115
Likes: 0
Received 5 Likes on 3 Posts
Originally Posted by dracowing14
are you talking about the little pin hole between the reflectors or the hole with the circuit board. also i need to take these apart, is it safe to use the oven method with the LED's and the board and wiring still on them or should i try the heat gun method.
The one between the reflectors. The one with the circuit board should be sealed once you put on all the connections.

I honestly don't think you'll be able to get them apart in one piece. If anything you could try using a heat gun, but you'll probably end up ruining them. I say just try to get as much water as you can out and dry the rest and leave them be.
 
  #15  
Old 01-18-2011
winks's Avatar
Member
iTrader: (5)
Join Date: May 2005
Location: Jackson, New Jersey
Posts: 4,872
Likes: 0
Received 0 Likes on 0 Posts
Maybe you could try baking them at a low temperature with the lens facing down. the water had to get in somehow through those seals, it should be able to evaporate out the same way.
 
  #16  
Old 01-18-2011
Jp7's Avatar
Jp7
Jp7 is offline
Member
iTrader: (9)
Join Date: Sep 2007
Location: N/A
Posts: 3,028
Likes: 0
Received 17 Likes on 14 Posts
Originally Posted by winks
Maybe you could try baking them at a low temperature with the lens facing down. the water had to get in somehow through those seals, it should be able to evaporate out the same way.
If the flange is not perpendicular to the lens this will not work. It does not matter if you bake them inside out hanging from a tree.
 
  #17  
Old 01-18-2011
RLong31's Avatar
The Ban Hammer
iTrader: (5)
Join Date: Jul 2009
Location: Monrovia, IN
Posts: 2,594
Likes: 0
Received 2 Likes on 2 Posts
I know headlights are 200 degrees for 15 minutes to get em apart... never tried to do tail lights.
 
  #18  
Old 01-18-2011
KLC's Avatar
KLC
KLC is offline
RF Veteran
iTrader: (29)
Join Date: Nov 2007
Location: New Mexico
Posts: 13,115
Likes: 0
Received 5 Likes on 3 Posts
Originally Posted by Jp7
It does not matter if you bake them inside out hanging from a tree.
If they were inside out he could get the water out.
 
  #19  
Old 01-18-2011
Jp7's Avatar
Jp7
Jp7 is offline
Member
iTrader: (9)
Join Date: Sep 2007
Location: N/A
Posts: 3,028
Likes: 0
Received 17 Likes on 14 Posts
Originally Posted by KLC
If they were inside out he could get the water out.
No the water would be on the outside then!

Originally Posted by RLong31
I know headlights are 200 degrees for 15 minutes to get em apart... never tried to do tail lights.
I've bought so many sets of tail lights in the last few months to build the LED lights I'm working on now - don't you guys think I'd have some success with this?... I've probably taken apart between 7-10 lamps, breaking most of them. Learn from my expensive mistakes.

I'm not saying that it is impossible because the tail lights that I buy are from a different manufacturer. I don't like the Chinese LEDs that come in those premade LED lights as they don't have enough of them, and they cant handle any current.

Think about it though, if the flange is indeed not perpendicular how can you open them without breaking the plastic?
 

Last edited by Jp7; 01-18-2011 at 12:21 PM.
  #20  
Old 01-18-2011
dracowing14's Avatar
Member
Thread Starter
Join Date: Sep 2009
Location: Richmond Hill, Ontario
Posts: 222
Likes: 0
Received 0 Likes on 0 Posts
OK so if opening the lenses is out of the question what would be your idea on how to fix this. one of the guys at the local custom shop just said i should drill a hole through the back of the housing to drain the water out.
 
  #21  
Old 01-18-2011
KLC's Avatar
KLC
KLC is offline
RF Veteran
iTrader: (29)
Join Date: Nov 2007
Location: New Mexico
Posts: 13,115
Likes: 0
Received 5 Likes on 3 Posts
Originally Posted by Jp7
No the water would be on the outside then!
I know, that's what I meant. Just didn't say it as clearly.
 
  #22  
Old 01-18-2011
KLC's Avatar
KLC
KLC is offline
RF Veteran
iTrader: (29)
Join Date: Nov 2007
Location: New Mexico
Posts: 13,115
Likes: 0
Received 5 Likes on 3 Posts
Originally Posted by dracowing14
OK so if opening the lenses is out of the question what would be your idea on how to fix this. one of the guys at the local custom shop just said i should drill a hole through the back of the housing to drain the water out.
Always an option. Then just silicone the hole.
 
  #23  
Old 01-18-2011
dracowing14's Avatar
Member
Thread Starter
Join Date: Sep 2009
Location: Richmond Hill, Ontario
Posts: 222
Likes: 0
Received 0 Likes on 0 Posts
wouldn't it be better to leave the hole open for the condensation and future water to run out of.
 
  #24  
Old 01-18-2011
buggman's Avatar
Member
iTrader: (38)
Join Date: Apr 2007
Location: Dougal County
Posts: 1,661
Received 7 Likes on 5 Posts
Hairdryer on low/med heat to help dry out the water.
Silicone every opening you can find & around the bulb sockets just to make sure.
 
  #25  
Old 01-18-2011
KLC's Avatar
KLC
KLC is offline
RF Veteran
iTrader: (29)
Join Date: Nov 2007
Location: New Mexico
Posts: 13,115
Likes: 0
Received 5 Likes on 3 Posts
Originally Posted by dracowing14
wouldn't it be better to leave the hole open for the condensation and future water to run out of.
I guess if you think it will happen again. Like I said, I never had an issue.

Originally Posted by buggman
Hairdryer on low/med heat to help dry out the water.
I also suggested that. Could work.


Quick Reply: water in LED tail light


All times are GMT -6. The time now is 05:08 PM.