2006 Mazda B400 LED Exterior & Mini D2S 3.0 HID Projector retrofit
#1
 05-24-2014

2006 Mazda B400 LED Exterior & Mini D2S 3.0 HID Projector retrofit
I changed over my exterior to all LED and HID. Much better than stock.
Had to trim the shrouds a little (they were just a little bit too tall for the headlights)


All control circuit modules & ballasts mounted underneath the fiberglass header panel of the truck


Had to trim the sheetmetal with a metal saw and die grinder to get the projectors extra space in the back. Used POR to protect the metal from rusting.


Had to trim the fiberglass header opening a little...


Amber Triton V3 installed up front.


testing rotation of projectors (masking tape holding the lens on)


3X pair of triton V3 in the rear, used a piece of plexiglass to make a braket. Used a push-pin to secure bracket to existing hole in truck bed.


Headlights finished look (painted shrouds to match the body of the truck)


used 3" pvc pipe to seal the back of the projectors

All lights installed, and grille painted to match body of the truck (it was plain plastic) - I also painted the emblem black/clearcoat.


Bulbs are OEM phillips or osram (I can't remember!) 4300K
Had to trim the shrouds a little (they were just a little bit too tall for the headlights)
All control circuit modules & ballasts mounted underneath the fiberglass header panel of the truck
Had to trim the sheetmetal with a metal saw and die grinder to get the projectors extra space in the back. Used POR to protect the metal from rusting.
Had to trim the fiberglass header opening a little...
Amber Triton V3 installed up front.
testing rotation of projectors (masking tape holding the lens on)
3X pair of triton V3 in the rear, used a piece of plexiglass to make a braket. Used a push-pin to secure bracket to existing hole in truck bed.
Headlights finished look (painted shrouds to match the body of the truck)
used 3" pvc pipe to seal the back of the projectors
All lights installed, and grille painted to match body of the truck (it was plain plastic) - I also painted the emblem black/clearcoat.
Bulbs are OEM phillips or osram (I can't remember!) 4300K


#3
10-10-2014


Nice projector retrofit.
Does your mazda have day time running lights (DRLs)? If so, how did you disable them?
Did you use the stock headlights for the retrofit? If no, did you have to use an aftermarket headlight housing specifically for the retrofit job, or did you have another reason for buying the aftermarket headlights.
Did you cut the back of the headlights to fit the projector, or did you mount them through the 9007 socket?
Thanks.
Last edited by Njord; 10-10-2014 at 09:53 PM.
#4
10-11-2014
Nice projector retrofit.
Does your mazda have day time running lights (DRLs)? If so, how did you disable them?
Did you use the stock headlights for the retrofit? If no, did you have to use an aftermarket headlight housing specifically for the retrofit job, or did you have another reason for buying the aftermarket headlights.
Did you cut the back of the headlights to fit the projector, or did you mount them through the 9007 socket?
Thanks.
Does your mazda have day time running lights (DRLs)? If so, how did you disable them?
Did you use the stock headlights for the retrofit? If no, did you have to use an aftermarket headlight housing specifically for the retrofit job, or did you have another reason for buying the aftermarket headlights.
Did you cut the back of the headlights to fit the projector, or did you mount them through the 9007 socket?
Thanks.
2 - I used a set of aftermarket lamps to do the retrofit because I wanted a second pair to work on while I could still drive the truck with the OEM lamps. My aftermarket lamps were about 95$ each, and are OEM replicas. I forget the brand.
3 - I did mount them through the 9007 socket. The B-series headlights have WAY more depth than the ranger headlights and you can fit a bigger projector inside with no problems.
#6
11-15-2015
#8
01-24-2016
So I'm retrofitting a 1998-2000 style headlight which is very similar to the Mazda B-Series bucket. I got the mini D2S projector in it now.
I went out and got some 3 inch pipe and the fernco pvc caps to seal the back just like you did.
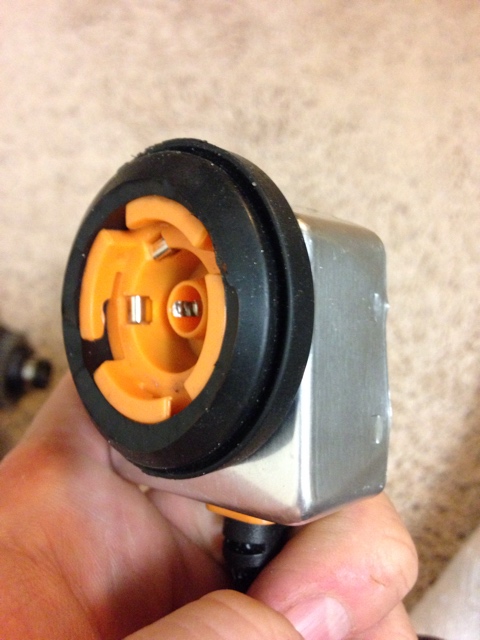
Do you have any pictures of the pipe on the back without the rubber cap on? I wanna see how the protruding shaft of the projector and the igniter fit in that pipe.
Here is what I've got sticking out and how my igniter looks. Is yours this close to the pipe? Can you remove the igniter with the pipe on? Does your grommet on the igniter right up against the igniter? Wiring at a hard bend?


I went out and got some 3 inch pipe and the fernco pvc caps to seal the back just like you did.
Do you have any pictures of the pipe on the back without the rubber cap on? I wanna see how the protruding shaft of the projector and the igniter fit in that pipe.
Here is what I've got sticking out and how my igniter looks. Is yours this close to the pipe? Can you remove the igniter with the pipe on? Does your grommet on the igniter right up against the igniter? Wiring at a hard bend?
#9
01-25-2016
So I'm retrofitting a 1998-2000 style headlight which is very similar to the Mazda B-Series bucket. I got the mini D2S projector in it now.
I went out and got some 3 inch pipe and the fernco pvc caps to seal the back just like you did.
Do you have any pictures of the pipe on the back without the rubber cap on? I wanna see how the protruding shaft of the projector and the igniter fit in that pipe.
Here is what I've got sticking out and how my igniter looks. Is yours this close to the pipe? Can you remove the igniter with the pipe on? Does your grommet on the igniter right up against the igniter? Wiring at a hard bend?
My wires come square out of the middle instead of at a 90 degree angle like that. I know I got everything at TRS, I would call them.
#10
01-25-2016

#12
01-25-2016
Well dang that sucks.
Well I guess I got a few options.
1. Do like yours and bend the wire so the grommet is in the center (makes a really long extension).
2. Cut a slot in the bottom for the wire and just put the rubber cap on (may have clearance issues since the wire goes down instead of straight back).
3. Make the pipe short and have the D2S igniter connect through a hole in the rubber cap, making it snug enough to seal out moisture from the bulb to igniter connection.
I saw your post on hidplanet about the seal inside the D2S connector well these don't have them. But the metal part you see is just a "skin" around a plastic box that is potted. So the head it self should be waterproof just not the actual connection.
Its the little things that get you hung up.
*****EDIT******
Well I may just do this. Found an old wiring grommet and cut the center out to fit the D2S connector. Put it on the connector and connected it. Seems to make a pretty good seal up against the bulb lock ring. Had to cut the wing nut tabs off the lock ring to fit.
I think with the silcone ring inside and with the grommet it should be pretty water tight. Also keeps me from having to modify the header panel and radiator support.
Last edited by sheltonfilms; 01-25-2016 at 07:56 PM.

Thread
Thread Starter
Forum
Replies
Last Post
Jp7
General Technical & Electrical
1
03-28-2021 03:58 PM
mikerider
OLD - Interior, Exterior, Electrical, & Misc.
22
07-30-2014 10:09 PM
Checking Interest: Custom HID RETROFIT Projector Headlights - MA
yuke175
OLD - Interior, Exterior, Electrical, & Misc.
44
03-13-2014 05:01 PM
Jp7
OLD - Interior, Exterior, Electrical, & Misc.
9
05-15-2009 04:52 PM


