How-to: Auto Dimming Mirror and Auto Headlights
#1
 05-27-2005


How-to: Auto Dimming Mirror and Auto Headlights
Written By: Mike Kourtenhaus (mjktg99) Member of Ranger-Forums
Technical Support: John Griggs (N3ELZ) Member of Ranger-Forums
Edited By: Bob Jusnes (SoundPer4mance) Member of Ranger-Forums
Revised by: John Griggs (N3ELZ) just another guy...
In this how-to I will cover the wiring for the Auto Mirror and for the Auto Head Lamps. The Auto Head Lamp portion of this mod requires the Auto Mirror that often comes with an OHC. Without it you will not have the proper hardware to install the Auto Lamp feature. This will NOT affect the normal operation of your headlight switch.
Please refer to the schematic later in the article for the auto lamp portion of this mod. It will give you a good diagram of what you will be doing. Below is a step-by-step process, use this in conjunction with the diagram to fully understand what you are doing.
I have also included information on hooking up the auto mirror WITHOUT having an OHC. The OHC is NOT necessary to do this mod, but it makes it just a bit easier.
As with any mod that involves the electrical system of your truck, you should disconnect the negative cable from your battery to avoid any damage to the electrical components during the procedure.
Materials Required:
# (2) 30AMP SPST Automotive Relays
# Approx. 10 pieces of 18 Gauge wire, length depends on where you mount the relays and 3 additional pieces about 12 feet long (maybe a little excessive but better to have too much then too little). Try to use multicolor wire if possible, if not then have something to mark them with.
# Wire Taps (if installing mirror for first time)
# Butt splice connectors.
# Crimp on Quick Disconnects that will fit securely on a relay terminal.
# Double Sided tape or something else to mount the relays with.
# Any relevant Wiring tools (I.E. Crimper)
Preparation:
# Disconnect the battery. I recommend doing this because of the way in which we will be cutting into the wiring.
# You need to pull down the OHC (if installed) and locate the wire harness for the mirror.
# Remove the A-pillar
# Remove the Knee Panel under the dash, then the steel plate behind it
# You now have to take off the plastic piece that is attached to the underside of the top of your dash board (3 screws). This is also the piece that your headlight and dimmer switch are attached to.
# Now disconnect the Head light switch and put that plastic piece aside, out of the way.
# If you are comfortable working in small places then you can skip the above 3 steps. You can alternately remove just the fuse box to reach the wires from the head light switch. The factory harness is just long enough to work with, but there's no real excess to play with, so proceed carefully.

# I would recommend deciding where you plan to mount the relays with enough space to mount them back to back or at least right next to each other, but DO NOT mount them. This way you get an idea of what length the rest of your wires need to be. Always make sure to leave some extra to compensate for errors. If Any.
Wiring Mirror Wires:
# White/Pink – This wire comes from the Mirror and triggers the relays. It can be found in the harness you located earlier. You need to lengthen this wire with the 12 foot piece and a butt splice connector. Run the wire all the way down the a-pillar and behind the dash. If you have the OHC already installed then you can follow the same path as the wires you ran behind the radio, except this wire does NOT go behind the radio. [Note by N3ELZ: Sometimes looks like white/violet or white/purple]
# Black/Pink – Reverse Sensing wire. This wire momentarily disables the auto dimming feature while you are in reverse. I do not have this hooked up, although if you chose to you will have to tap into the reverse wire that goes into your brake lights. It can be found underneath the dash board.
# Green/Yellow – 12 Volt Constant. Hot all the time. You can use the 2nd of 3 long pieces of wire to tap into the Green/Orange Dome light wire. This can be found underneath your dome light. If you already have the OHC installed use that wire that should already be tapped into the dome light.
#
# Red/White – 12 Volt Switched. Hot in run. You will need the 3rd piece of long wire and will have to run this down to behind the radio. You can then tap into the Yellow/Black wire on the radio wire harness. If you already have your OHC installed then you can tap into its Gray/Yellow wire. [Note by N3ELZ: Sometimes looks like red/yellow]
# Black – Ground. With the OHC installed simply use its ground, which should be the mounting screws. Without the OHC you can put a small screw in your roof and ground there or run another longer piece of wire and find an already established ground. You will need to add a ring terminal to the end of this wire.
Headlamp Switch Wires:
Example of "Y" connection that you will be making.

There are more than one of the same color wires in the bundle. You want the thicker of the ones of the same color. There are also 2 brown wires that are the same size, the proper one is the only one that is connected to the headlight switch.
# Blue/Orange – This is the lead wire going to the headlamps. Cut this wire and splice it back together with a 3rd piece inserted in 1 end of the butt splice. This piece will be going to the Head Lamp Relay. You will be forming a connection that resembles a Y.
# Red/Yellow – This is the power wire for the Head Lamps. Repeat the same wiring steps as before again making a Y connection with the 3rd piece going out to the Head Lamp Relay.
[*]Brown – This is the lead wire for the Parking Lamps. You will be making the same Y connection as above and the 3rd piece will go out to the Parking Lamp Relay
[*]Tan/White – This is the power wire for the Parking Lamps. Again, cut this wire and reconnect it with a butt splice and a 3rd piece making the Y.
Now that you have spliced into the Headlight Switch Wiring Harness, make sure all 4 of the new wires that created the Y’s are clearly marked so you do not get them confused. If you have determined where you will mount your relays you can cut these wires to the proper length and crimp on quick connects to the ends of each wire except the Tan/White wire. We will do this at a later step. Place these wires to the side.
NOTE: You CANNOT use wire taps when splicing into the head light switch Harness. You must use the splicing method described above. This is to prevent problems which tap connectors can create in higher current circuits. Tap connectors are better suited for lower current and signal wiring
Directions:
1. If you haven’t done so already, mount the mirror. To remove your old mirror, you will need a small flat head screw driver and you will have to go in from the underside of the mirror in between the mount on the windshield and the mirror. There is a spring clip that needs to be depressed to pull off the mirror. The mirror will pull up and off.
Auto Headlamps Wiring Diagram

Auto Headlamps Relay Assembly Pre-Fab
If you want, you can pre-fab the relays like the picture below, and wire into the headlight switch LAST rather than first. Here is a pre-fabbed assembly N3ELZ made.

It's up to you how you do it. But the instructions below involve building the relay assembly.
2. Take the White/Pink wire that you extended down behind the dash, adjust the length according to where you will mount the relays and crimp on a butt splice to the end of it. In the open end of that butt splice you will be inserting 2 wires creating the Y connection again. Theses wires do not need to be long, probably only around 3 inches or so. Crimp on quick disconnects to the end of each wire and attach them to terminal 85 of each relay
3. Take 2 pieces of wire and crimp them together in 1 quick disconnect. This will go onto terminal 86 of the Head Lamp Relay. On the opposite end of one of those the wires crimp on another quick disconnect and attach it to terminal 86 of the Parking Lamp Relay.
4. Take the second wire (from the previous step), along with the Tan/White Y splice and crimp them together into a quick disconnect. Attach this to terminal 30 of the Parking Lamp Relay.
5. You can now attach the Brown Y splice to terminal 87 of the Parking Lamp Relay.
6. Attach the Blue/Orange Y splice to terminal 87 of the Headlamp Relay
7. Finally, attach the Red/Yellow Y splice to terminal 30 of the Headlamp Relay

Completion:
1. We now need to test the system. Reconnect the battery.
2. Turn on your head lights using the switch to ensure that you have made good connections and it still functions properly
3. Now we want to test the Auto Lamps. Ideally it would be just hitting night fall as you finished but I doubt anyone will be ripping into their dash in the dark so we will have to find other ways to trigger the system. I tested mine at 1pm and it was a bright sunny day (Carl wasn’t there) and was able to set them off. What I did was cover all the sensors. I have an older mirror so there is a sensor on the back of the mirror and there is also one that sits just about flush with the windshield. I was able to stick a piece of cardboard in between it and the windshield and I hung my hat over the one on the mirror. You have to either turn your truck on or to ACC for the Auto Lamps to work. After a few seconds of darkness, they should turn on. They do not turn on immediately unless you start your truck in the dark. This is so they do not come on too soon when driving through tunnels or heavily shaded areas.
4. Now that you have tested your system and everything is functioning properly, you need to mount the relays. You should have already determined where to put them so it is just a matter of using the double sided tape or whatever your chose to mount them. Make sure they are secure

5. Finish up by putting your dash or fuse box back together and you are done.
Special Notes:
All of the Auto Mirrors come with a slider. This determines how long your headlights will stay on after you turn off your truck. On the older mirrors, there is not only the slider but an On/Off button that will disable the Auto Lamps from working automatically. On the new mirrors, there is no such button. So to disable the Auto Lamps the slider needs to be slid all the way over to the left
DISCLAIMER. This has only been tested on my 2002 Truck. I can not guarantee that it will work or the wiring will be the same on yours regardless of what your truck is. I will not in any way be held responsible for subsequent damages from attempting this mod. If you think they are different then STOP and do not proceed until you are able to confirm the proper wires to use.
Further note by N3ELZ: This works on 98+ trucks in general for sure. 2004+ is the possible exception but I don't know for sure.
Technical Support: John Griggs (N3ELZ) Member of Ranger-Forums
Edited By: Bob Jusnes (SoundPer4mance) Member of Ranger-Forums
Revised by: John Griggs (N3ELZ) just another guy...
In this how-to I will cover the wiring for the Auto Mirror and for the Auto Head Lamps. The Auto Head Lamp portion of this mod requires the Auto Mirror that often comes with an OHC. Without it you will not have the proper hardware to install the Auto Lamp feature. This will NOT affect the normal operation of your headlight switch.
Please refer to the schematic later in the article for the auto lamp portion of this mod. It will give you a good diagram of what you will be doing. Below is a step-by-step process, use this in conjunction with the diagram to fully understand what you are doing.
I have also included information on hooking up the auto mirror WITHOUT having an OHC. The OHC is NOT necessary to do this mod, but it makes it just a bit easier.
As with any mod that involves the electrical system of your truck, you should disconnect the negative cable from your battery to avoid any damage to the electrical components during the procedure.
Materials Required:
# (2) 30AMP SPST Automotive Relays
# Approx. 10 pieces of 18 Gauge wire, length depends on where you mount the relays and 3 additional pieces about 12 feet long (maybe a little excessive but better to have too much then too little). Try to use multicolor wire if possible, if not then have something to mark them with.
# Wire Taps (if installing mirror for first time)
# Butt splice connectors.
# Crimp on Quick Disconnects that will fit securely on a relay terminal.
# Double Sided tape or something else to mount the relays with.
# Any relevant Wiring tools (I.E. Crimper)
Preparation:
# Disconnect the battery. I recommend doing this because of the way in which we will be cutting into the wiring.
# You need to pull down the OHC (if installed) and locate the wire harness for the mirror.
# Remove the A-pillar
# Remove the Knee Panel under the dash, then the steel plate behind it
# You now have to take off the plastic piece that is attached to the underside of the top of your dash board (3 screws). This is also the piece that your headlight and dimmer switch are attached to.
# Now disconnect the Head light switch and put that plastic piece aside, out of the way.
# If you are comfortable working in small places then you can skip the above 3 steps. You can alternately remove just the fuse box to reach the wires from the head light switch. The factory harness is just long enough to work with, but there's no real excess to play with, so proceed carefully.
# I would recommend deciding where you plan to mount the relays with enough space to mount them back to back or at least right next to each other, but DO NOT mount them. This way you get an idea of what length the rest of your wires need to be. Always make sure to leave some extra to compensate for errors. If Any.
Wiring Mirror Wires:
# White/Pink – This wire comes from the Mirror and triggers the relays. It can be found in the harness you located earlier. You need to lengthen this wire with the 12 foot piece and a butt splice connector. Run the wire all the way down the a-pillar and behind the dash. If you have the OHC already installed then you can follow the same path as the wires you ran behind the radio, except this wire does NOT go behind the radio. [Note by N3ELZ: Sometimes looks like white/violet or white/purple]
# Black/Pink – Reverse Sensing wire. This wire momentarily disables the auto dimming feature while you are in reverse. I do not have this hooked up, although if you chose to you will have to tap into the reverse wire that goes into your brake lights. It can be found underneath the dash board.
# Green/Yellow – 12 Volt Constant. Hot all the time. You can use the 2nd of 3 long pieces of wire to tap into the Green/Orange Dome light wire. This can be found underneath your dome light. If you already have the OHC installed use that wire that should already be tapped into the dome light.
#
# Red/White – 12 Volt Switched. Hot in run. You will need the 3rd piece of long wire and will have to run this down to behind the radio. You can then tap into the Yellow/Black wire on the radio wire harness. If you already have your OHC installed then you can tap into its Gray/Yellow wire. [Note by N3ELZ: Sometimes looks like red/yellow]
# Black – Ground. With the OHC installed simply use its ground, which should be the mounting screws. Without the OHC you can put a small screw in your roof and ground there or run another longer piece of wire and find an already established ground. You will need to add a ring terminal to the end of this wire.
Headlamp Switch Wires:
Example of "Y" connection that you will be making.
There are more than one of the same color wires in the bundle. You want the thicker of the ones of the same color. There are also 2 brown wires that are the same size, the proper one is the only one that is connected to the headlight switch.
# Blue/Orange – This is the lead wire going to the headlamps. Cut this wire and splice it back together with a 3rd piece inserted in 1 end of the butt splice. This piece will be going to the Head Lamp Relay. You will be forming a connection that resembles a Y.
# Red/Yellow – This is the power wire for the Head Lamps. Repeat the same wiring steps as before again making a Y connection with the 3rd piece going out to the Head Lamp Relay.
[*]Brown – This is the lead wire for the Parking Lamps. You will be making the same Y connection as above and the 3rd piece will go out to the Parking Lamp Relay
[*]Tan/White – This is the power wire for the Parking Lamps. Again, cut this wire and reconnect it with a butt splice and a 3rd piece making the Y.
Now that you have spliced into the Headlight Switch Wiring Harness, make sure all 4 of the new wires that created the Y’s are clearly marked so you do not get them confused. If you have determined where you will mount your relays you can cut these wires to the proper length and crimp on quick connects to the ends of each wire except the Tan/White wire. We will do this at a later step. Place these wires to the side.
NOTE: You CANNOT use wire taps when splicing into the head light switch Harness. You must use the splicing method described above. This is to prevent problems which tap connectors can create in higher current circuits. Tap connectors are better suited for lower current and signal wiring
Directions:
1. If you haven’t done so already, mount the mirror. To remove your old mirror, you will need a small flat head screw driver and you will have to go in from the underside of the mirror in between the mount on the windshield and the mirror. There is a spring clip that needs to be depressed to pull off the mirror. The mirror will pull up and off.
Auto Headlamps Wiring Diagram
Auto Headlamps Relay Assembly Pre-Fab
If you want, you can pre-fab the relays like the picture below, and wire into the headlight switch LAST rather than first. Here is a pre-fabbed assembly N3ELZ made.
It's up to you how you do it. But the instructions below involve building the relay assembly.
2. Take the White/Pink wire that you extended down behind the dash, adjust the length according to where you will mount the relays and crimp on a butt splice to the end of it. In the open end of that butt splice you will be inserting 2 wires creating the Y connection again. Theses wires do not need to be long, probably only around 3 inches or so. Crimp on quick disconnects to the end of each wire and attach them to terminal 85 of each relay
3. Take 2 pieces of wire and crimp them together in 1 quick disconnect. This will go onto terminal 86 of the Head Lamp Relay. On the opposite end of one of those the wires crimp on another quick disconnect and attach it to terminal 86 of the Parking Lamp Relay.
4. Take the second wire (from the previous step), along with the Tan/White Y splice and crimp them together into a quick disconnect. Attach this to terminal 30 of the Parking Lamp Relay.
5. You can now attach the Brown Y splice to terminal 87 of the Parking Lamp Relay.
6. Attach the Blue/Orange Y splice to terminal 87 of the Headlamp Relay
7. Finally, attach the Red/Yellow Y splice to terminal 30 of the Headlamp Relay
Completion:
1. We now need to test the system. Reconnect the battery.
2. Turn on your head lights using the switch to ensure that you have made good connections and it still functions properly
3. Now we want to test the Auto Lamps. Ideally it would be just hitting night fall as you finished but I doubt anyone will be ripping into their dash in the dark so we will have to find other ways to trigger the system. I tested mine at 1pm and it was a bright sunny day (Carl wasn’t there) and was able to set them off. What I did was cover all the sensors. I have an older mirror so there is a sensor on the back of the mirror and there is also one that sits just about flush with the windshield. I was able to stick a piece of cardboard in between it and the windshield and I hung my hat over the one on the mirror. You have to either turn your truck on or to ACC for the Auto Lamps to work. After a few seconds of darkness, they should turn on. They do not turn on immediately unless you start your truck in the dark. This is so they do not come on too soon when driving through tunnels or heavily shaded areas.
4. Now that you have tested your system and everything is functioning properly, you need to mount the relays. You should have already determined where to put them so it is just a matter of using the double sided tape or whatever your chose to mount them. Make sure they are secure
5. Finish up by putting your dash or fuse box back together and you are done.
Special Notes:
All of the Auto Mirrors come with a slider. This determines how long your headlights will stay on after you turn off your truck. On the older mirrors, there is not only the slider but an On/Off button that will disable the Auto Lamps from working automatically. On the new mirrors, there is no such button. So to disable the Auto Lamps the slider needs to be slid all the way over to the left
DISCLAIMER. This has only been tested on my 2002 Truck. I can not guarantee that it will work or the wiring will be the same on yours regardless of what your truck is. I will not in any way be held responsible for subsequent damages from attempting this mod. If you think they are different then STOP and do not proceed until you are able to confirm the proper wires to use.
Further note by N3ELZ: This works on 98+ trucks in general for sure. 2004+ is the possible exception but I don't know for sure.
Last edited by Taylor; 11-21-2011 at 05:11 PM.
#2
05-28-2005
Originally Posted by n3elz
# Red/White � 12 Volt Switched. Hot in run. You will need the 3rd piece of long wire and will have to run this down to behind the radio. You can then tap into the Yellow/Black wire on the radio wire harness. If you already have your OHC installed then you can tap into its Yellow/Gray wire.
#3
06-18-2005

Join Date: May 2005
Location: New Orleans, LA
Posts: 120
Likes: 0
Received 0 Likes
on
0 Posts
#4
02-26-2006
#5
02-26-2006
Join Date: Jan 2006
Location: Santa Monica, CA
Posts: 420
Likes: 0
Received 0 Likes
on
0 Posts
Well casue it was telling me that it should work for 98+, but I did end up getting it set up properly. One things I found different is that INSTEAD of a brown wire, I believe it was a violet/red wire, I THINK. I was getting really frustrated with it but than realized that there was a pattern to it. The hot and lead for the parking lamps are both on one side of the connector, and the hot and lead for the headlamps are on the other side, one on top of each other. I couldn't figure it out so I put that theory together and shabam, it worked out great. Another thing was the 12V switch. The way it is writen and done for my 2000 is that it ends up having 2 Constant 12V signals. I hooked the one up to the dome light like it said, but the other one that said to tap into the yellow/black wire I changed to the red wire, which is the ACC and than my mirror worked properly. I ended up getting it done properly which made me extremely happy. I have HIDs in my ranger and I like getting out and having everything still illuminated while I walk to my front door :) Thanks for the write up and sweet stuff! I will be checking the exact colors for the headlamp switch and edit my post. Thanks Again.
#6
09-22-2006
Join Date: Apr 2006
Location: demarest, nj
Posts: 167
Likes: 0
Received 0 Likes
on
0 Posts
So with the headlamps I'm still uncertain how they work. When I start my truck at night will they turn on without me using the switch? And if it works like that will they stay on until light hits the rear view mirror?
How long is the short and longest settings for them staying on after you turn the truck off and lock it?
How long is the short and longest settings for them staying on after you turn the truck off and lock it?
#7
09-22-2006
The mirror has two sensors, one for the autolamps and one for the autodimming mirror.
Whenever the key is on, the headlamps turn on automatically at a factory calibrated level of darkness and turn off again when it becomes light outside. The adjustable delay can be set by the driver using a sliding bar for a duration of 0~3 minutes after key off.
The original Ranger headlight switch can still be used as before to turn on the headlamps manually if desired. Depending on which year mirror you use, the Autolamps feature can be disabled either by sliding the delay bar all the way to the left or by turning off a separate switch.
The mirror electrochromatically "dims" automatically when the rear facing sensor sees strong lighting from the rear such as a vehicle on high beams or with poorly adjusted headlights. If you wire up the reverse light wire to the mirror as in the original Ex installation, then the dimming feature is disabled when the transmission is in reverse.
#8
09-22-2006

#9
09-22-2006
Join Date: Apr 2006
Location: demarest, nj
Posts: 167
Likes: 0
Received 0 Likes
on
0 Posts

#11
09-22-2006
If you hook them up right. There are switched and unswitched power leads, so you need to get both hooked up correctly. The switched lead controls the timer and when it goes off (to zero volts) the timer uses unswitched power to run and keep the lights on for the time you set the slider to.
#12
02-27-2007
#13
02-27-2007
That type of relay often goes by "Bosch-pattern relay" or just the generic "automotive relay" name. Radio Shack sells them or you can get one at any auto parts store. Prices range from about $3~$10.
If you can't find one, go to a Ford dealer and ask for the Ranger blower fan relay (FOAZ-14N089-A).
If you can't find one, go to a Ford dealer and ask for the Ranger blower fan relay (FOAZ-14N089-A).
#14
02-28-2007
Here's a small tip: Bob may recall (he gave me valuable feedback when I installed my Auto Dim/Auto Lamp mirror using John's instructions - thanks again guys!) that I used a "dual relay socket" instead of doubling up on the single socket.

It's just something to make the wiring a little easier and neater. I think the dual socket was a little cheaper than 2 singles, as well.
It's just something to make the wiring a little easier and neater. I think the dual socket was a little cheaper than 2 singles, as well.
#15
02-28-2007
#16
02-28-2007
Originally Posted by HighRollerII
now this set up is for auto lights..that doesnt mean when you get out the truck with it off that the lights will stay on for a lil bit then shut off?
The optional autolamp system provides light sensitive automatic on-off control of the exterior lamps normally controlled by the headlamp switch. The autolamp system keeps the lamps on for a preselected period of time after the ignition switch is turned off. The pre-selected time lapse is adjustable up to approximately three minutes
#17
09-06-2007

Join Date: Jun 2007
Location: Moorefield, WV
Posts: 2
Likes: 0
Received 0 Likes
on
0 Posts
 I've got a problem....... The mirror I have is from a 99. The harness colors aren't the same as the ones listed here. From what I can tell the mirror does not have autolamp, just autodim, which is what I wanted anyway.But what to do with the wiring.
The colors on my harness are: White(which becomes pink), gray, light green, black and brown..
Any ideas?????
#18
09-07-2007
Originally Posted by madman4049
Ok here is a question I don't think has been asked before.
I have all the parts and the OHC is already installed. My question is this. I know that chevy's have an auto headlights override button to turn them off manually. How hard would this be to do and how would you do it? Reason being is I am military and the guards at the gate don't like you blinding them coming up to the gate. Oh and I work nights.
I have all the parts and the OHC is already installed. My question is this. I know that chevy's have an auto headlights override button to turn them off manually. How hard would this be to do and how would you do it? Reason being is I am military and the guards at the gate don't like you blinding them coming up to the gate. Oh and I work nights.
#20
09-07-2007
Originally Posted by chiefsrnger
I've got a problem....... The mirror I have is from a 99. The harness colors aren't the same as the ones listed here. From what I can tell the mirror does not have autolamp, just autodim, which is what I wanted anyway.But what to do with the wiring.The colors on my harness are: White(which becomes pink), gray, light green, black and brown..
Any ideas?????
On the other hand, I cannot find in the diagram the wire colors that you have posted...

#21
03-30-2008
Join Date: Jul 2004
Location: Lanoka Harbor, NJ
Posts: 201
Likes: 0
Received 0 Likes
on
0 Posts
The original how to that I wrote up was originally intended for the Auto Mirror with auto head lights. To incorporate an OHC, you also need to tap into your dimmer wire and an additional constant power source for the map lights. You will also need to run 2 wires through the firewall for the temp sensor.
#22
07-04-2008
Compared to the 95~2003 Rangers, your headlight switch is different with an integral dimmer. That's about it. Assuming that the mirror will fit on the windshield mount, I don't see any reason why the autolamp feature couldn't be adapted to your 94.
The autolamps mirror simply controls a pair of relays that switch the headlamp and running lamp circuits in parallel with the headlight switch.
The autolamps mirror simply controls a pair of relays that switch the headlamp and running lamp circuits in parallel with the headlight switch.
#23
07-06-2008
Also, be sure that the visors have a proper ground. Some visors provide ground directly through the mounting screws and others have a black ground wire that should ultimately go to chassis ground.
There is no gray wire in the console install. It is gray w/black stripe. You can find it at the PCM or at the speed control amplifier.
#24
07-06-2008
#25
09-20-2008
2004~2006 Rangers have different color codes from the ones in the how-to.
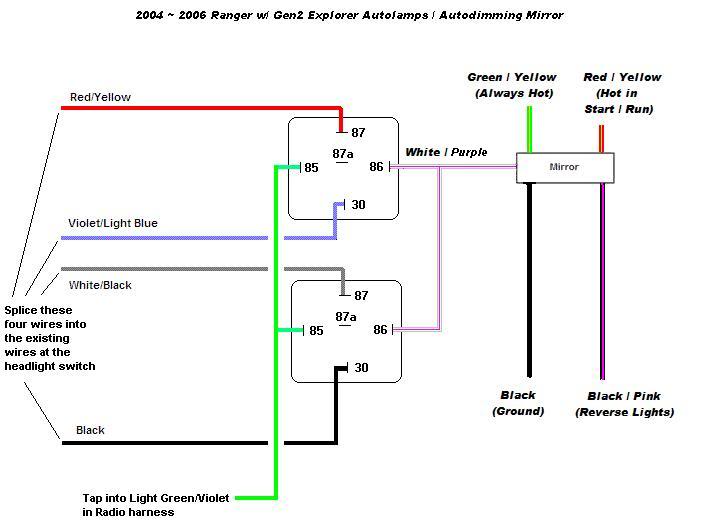
Another difference:
In the instructions for installing the autolamp mirror in the earlier trucks, the Red/White power wire for the mirror was tapped to the Yellow/Black of the radio harness. The corresponding color code in the 2004~2006 radio harness is Black/Pink.
Another difference:
In the instructions for installing the autolamp mirror in the earlier trucks, the Red/White power wire for the mirror was tapped to the Yellow/Black of the radio harness. The corresponding color code in the 2004~2006 radio harness is Black/Pink.
Last edited by Taylor; 11-21-2011 at 04:59 PM.


