How To: Train Horn Install
#1
 06-14-2008


How To: Train Horn Install
Well after seeing some other peoples installations of train horns on their truck I wasn't really too impressed with how they were in plain sight and drew a lot of attention. I looked around online and found these which I knew could easily be kept out of sight unlike the big triple chime chrome ones (no offense to anyone with those). With them installed the way this tutorial shows you can only see them if you get on your hands and knees and look under the truck. The install is very easy and does not take very much knowledge or mechanical skills to complete. Here is how I did it,
My first step was going to www.hornblasters.com and ordering one
of their 4 piece black horn kits. I didn't want a huge tank that took up a lot of room nor did I need the long honking times of one so I went with the cheaper 2 gallon combo. I spoke with the very friendly and knowledgeable owner named Matt on the phone and ordered up my kit. The shipping was second to none and it arrived early the next day.

Tools needed:
24"x24" 16 gauge steel
Something to hold the steel on the truck while you drill
A drill with assorted bits
A fresh razorblade to cut the hose
Thread sealant of your choice (i.e. Teflon tape)
Hardware to mount everything to the truck
A bedbox or a bed with a tonneau cover that you don't mind drilling into
Zipties
Misc. wire (size, color)
Misc. wire terminals and connectors
Two switches of your choice
An automotive relay
Here is everything that came with the kit

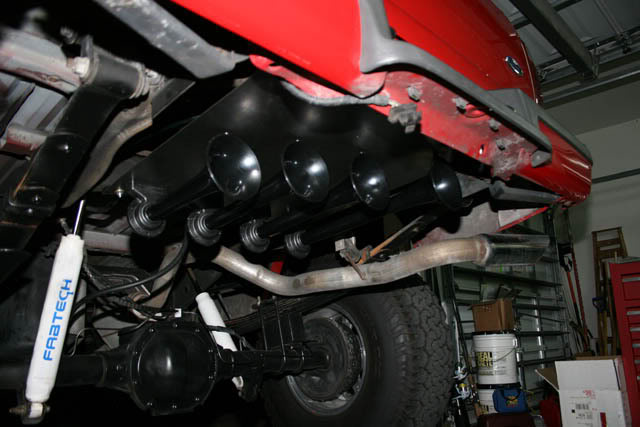
Now, lets get to installing it. I don't have a spare tire so where the old tire used to be is the perfect spot to mount it in my opinion. Heres where its gonna go
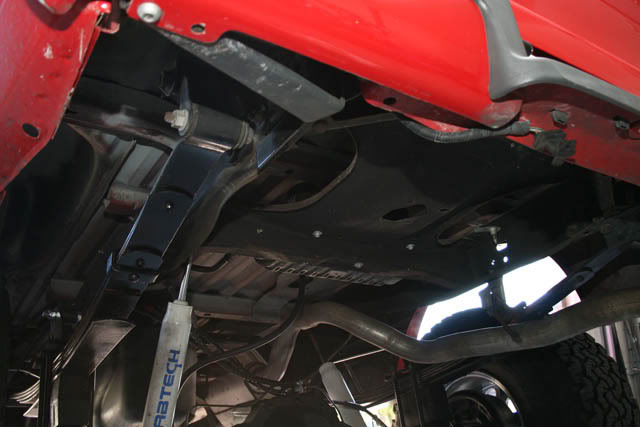
Obviously they aren't going to mount nicely to that since it's not flat. So I went out to Lowes and bought myself a sheet of 24"x24" 16ga steel.

Now that Ive got a place to attach the horns I need to attach the sheet of steel. I got it all centered (no cutting required) and then held the piece up with some locking pliers and then used a center punch to mark the spots where I am going to drill.
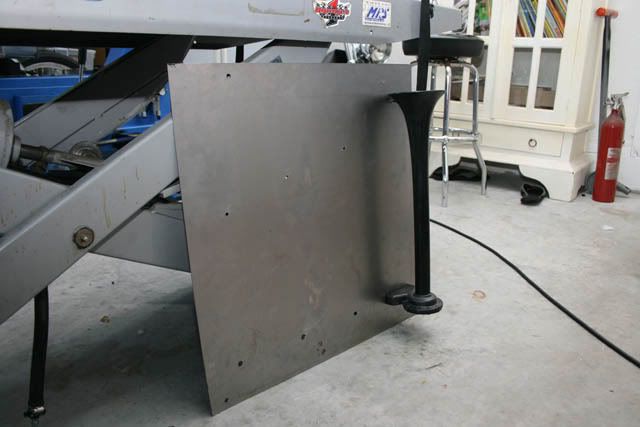
After I drilled those four holes I marked and drilled the holes to mount the horns themselves. Here is a picture of the holes all drilled and one horn being test fit. Make sure you measure and test fit the horns with supplied the 90* fittings on the end so that you will be able to bolt the sheet down without any clearance issues.
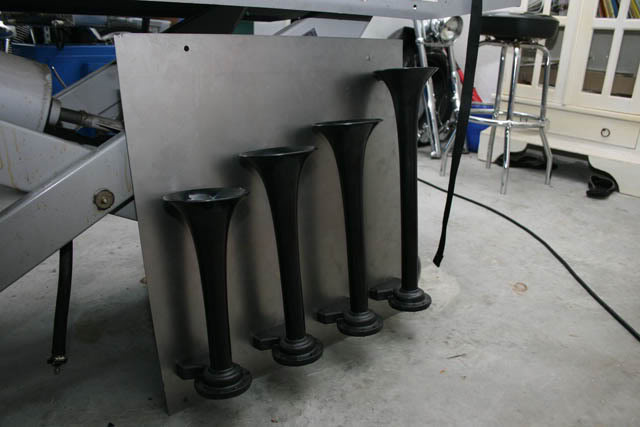
Now I mounted the horns to the sheet, there are bolts built into the horns so it is very easy. Make sure to cut the access of the bolts off of the small bolts that are at the front of the horns, otherwise they will hit the spare tire mount and you wont be able to bolt the sheet down fully. I mounted the horns facing backwards so that I don't risk water or other contaminates like mud getting in the horns and causing problems.
Now that the horns are bolted to the sheet you need to cut 4 pieces of the 5/16" tubing to equal lengths so that each horn gets air at the same time. Before you cut the tubing, decide where you are going to put with 4 way splitter. I put the 90* fittings on too but did not tighten them yet.
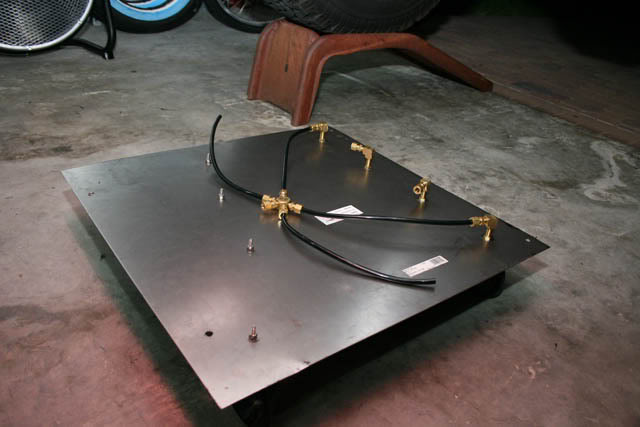
Now take off all the fittings and apply Teflon tape or your choice of thread sealant (I used white silicone). Connect all the airlines too, and remember not to over tighten anything because they are all brass. I drilled two small holes in the steel sheet so that I could mount my splitter with a zip-tie. Be sure not to kink any airlines or have any with extreme angle bends.
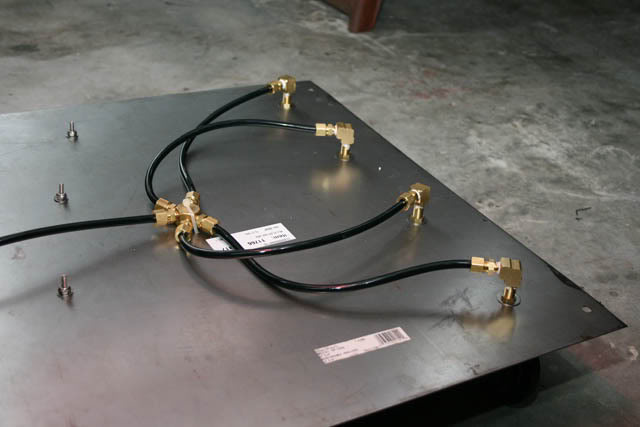
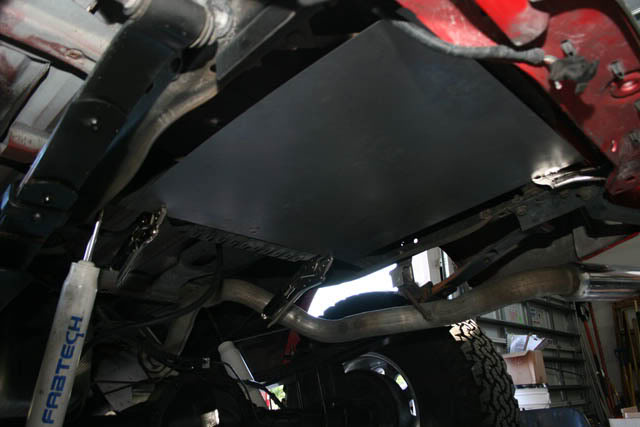
Now plan out where you want the airline to go and then route it away from the horns towards the front of the truck to get it out of the way for now. Now have someone hold the sheet with the horns bolted to it and use bolts with nylon lock nuts to hold the sheet up. Here is the sheet bolted to the truck. (note the leader line from the compressor to tank is not installed in the pictures)
Now with that out of the way you need to determine where you are going to mount your valve, tank, and compressor. I did not want to mount any of those under the truck so I opted to buy a cheap box for now until I can afford an aluminum one. I then marked and drilled my holes for the tank and valve. Now with the included hardware I bolted the tank to the box, I found a small pair of scews and lock nuts and mounted the valve too. To run the wires and line out of the box I drilled a 1" hole in the side of the box. You can see I connect the tank to the valve with the 1/4" line also.
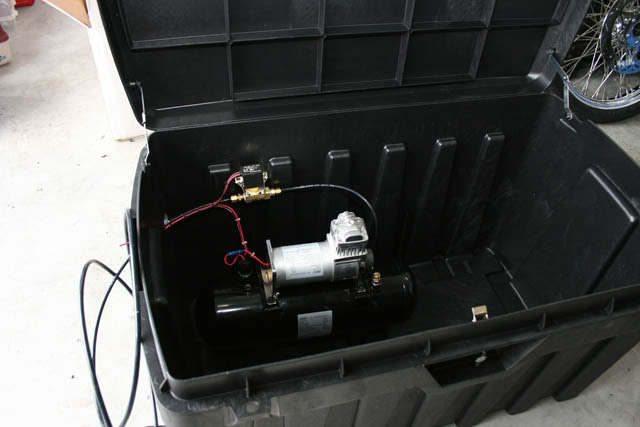
Now I placed the box in the bed where I wanted it. During the time of the picture it was being held in place with a tie down, but it is screwed to the bed now.
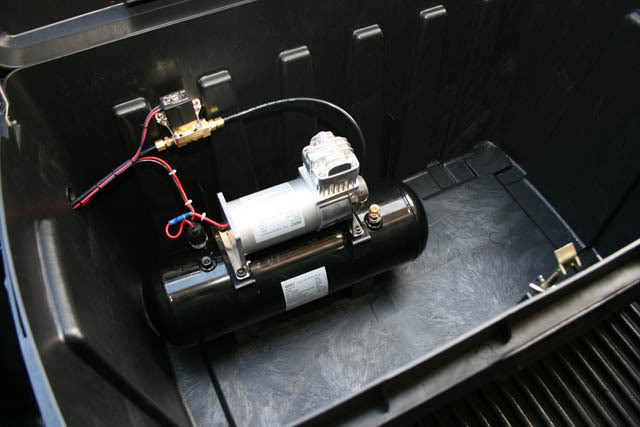
Here is the box in the bed during a quick sun shower break.
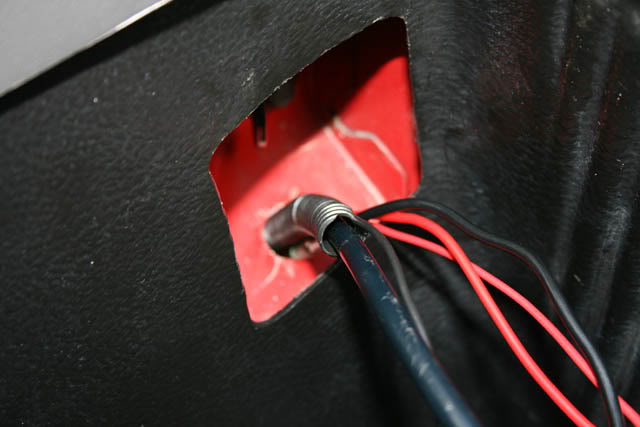
Now to connect the wires and airline to everything else I drilled a hole in the bed just under the factory left tie down hook and ran my air line and wires through it. Don't forgot to use a wire loom on the wires and line so you don't risk chaffing anything on it and causing a short or air leak. Now is a good time to route the airline to the valve and connect it too. Be sure to run all wires and airline inside the frame rail and use zip-ties to keep it all from moving. Cover everything from the box to the hole in the bed with 1" wire loom when you are done.
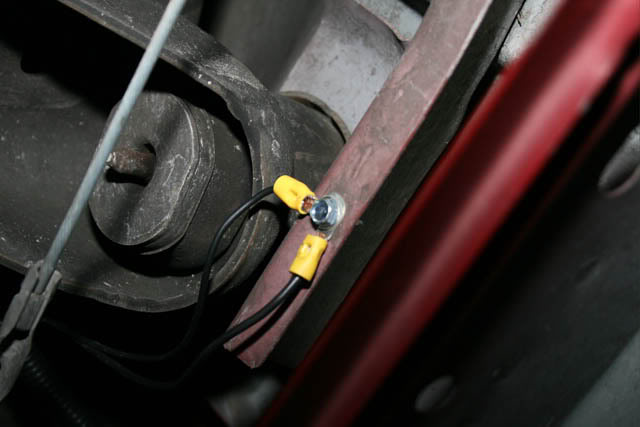
I used a self tapping screw to secure the ground wires to the underside of the cab.
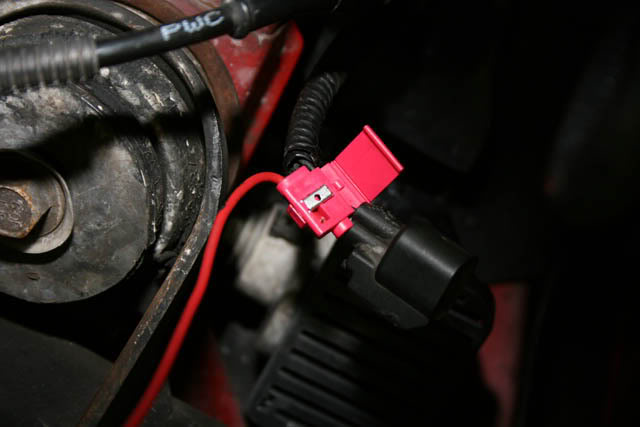
Here is where I got the main power for the compressor. The included wire has an inline fuse built in already but if you are using your own wire DON'T FORGET TO USE ONE AND MOUNT IT AS CLOSE TO THE POWER POINT AS POSSIBLE.
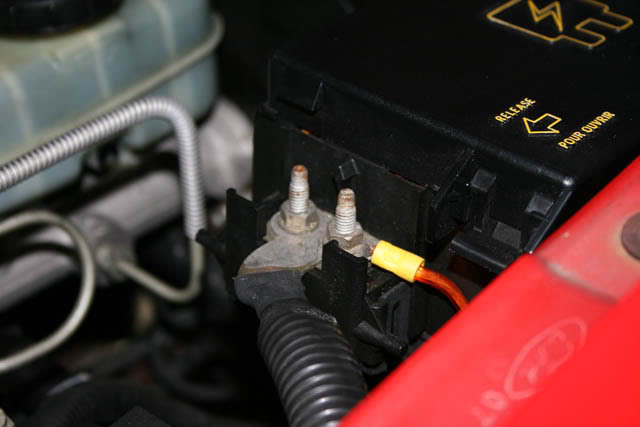
I could not locate the horn trigger wire under the dash so I used a wire tap on the positive wire at the horns. You can leave the stock horns connected or unplugged as I did, it is up to you. This wire needs to be routed inside the cab to the toggle switch.
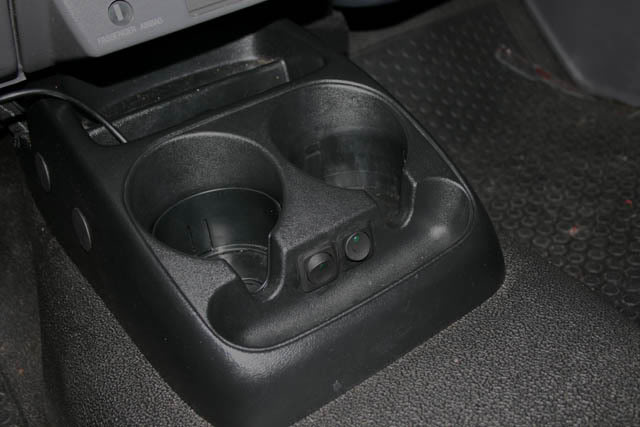
Here is where I placed the switches for the horn and compressor. I do not recommend putting them in the same spot as I did if you are using the same style switches because it requires a lot of work to get them to fit. The right switch toggles between stock horns+train horns and stock horns alone if you leave the stock horns connected. The left switch is the power to the compressor if the pressure switch kicks the compressor on.
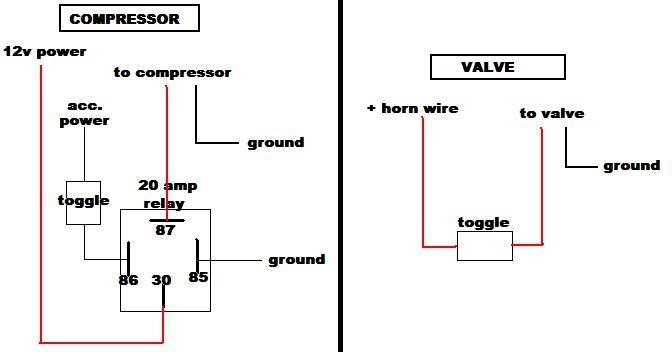
Here is how everything gets wired. Sorry, I am not the best with MS Paint but it gets the job done. The compressor will only kick on when the tank is below 110psi and the accessory line has power and with the toggle switch engaged. The horns will only work with the toggle switch engaged and when you press the factory horn button. Be sure to keep the switch in the off position when not using the horn, pressing the lock button twice or the panic button will make the train horns honk if the switch is engaged.
Now you are DONE, here is a video your end result
My first step was going to www.hornblasters.com and ordering one
of their 4 piece black horn kits. I didn't want a huge tank that took up a lot of room nor did I need the long honking times of one so I went with the cheaper 2 gallon combo. I spoke with the very friendly and knowledgeable owner named Matt on the phone and ordered up my kit. The shipping was second to none and it arrived early the next day.
Tools needed:
24"x24" 16 gauge steel
Something to hold the steel on the truck while you drill
A drill with assorted bits
A fresh razorblade to cut the hose
Thread sealant of your choice (i.e. Teflon tape)
Hardware to mount everything to the truck
A bedbox or a bed with a tonneau cover that you don't mind drilling into
Zipties
Misc. wire (size, color)
Misc. wire terminals and connectors
Two switches of your choice
An automotive relay
Here is everything that came with the kit
Now, lets get to installing it. I don't have a spare tire so where the old tire used to be is the perfect spot to mount it in my opinion. Heres where its gonna go
Obviously they aren't going to mount nicely to that since it's not flat. So I went out to Lowes and bought myself a sheet of 24"x24" 16ga steel.
Now that Ive got a place to attach the horns I need to attach the sheet of steel. I got it all centered (no cutting required) and then held the piece up with some locking pliers and then used a center punch to mark the spots where I am going to drill.
After I drilled those four holes I marked and drilled the holes to mount the horns themselves. Here is a picture of the holes all drilled and one horn being test fit. Make sure you measure and test fit the horns with supplied the 90* fittings on the end so that you will be able to bolt the sheet down without any clearance issues.
Now I mounted the horns to the sheet, there are bolts built into the horns so it is very easy. Make sure to cut the access of the bolts off of the small bolts that are at the front of the horns, otherwise they will hit the spare tire mount and you wont be able to bolt the sheet down fully. I mounted the horns facing backwards so that I don't risk water or other contaminates like mud getting in the horns and causing problems.
Now that the horns are bolted to the sheet you need to cut 4 pieces of the 5/16" tubing to equal lengths so that each horn gets air at the same time. Before you cut the tubing, decide where you are going to put with 4 way splitter. I put the 90* fittings on too but did not tighten them yet.
Now take off all the fittings and apply Teflon tape or your choice of thread sealant (I used white silicone). Connect all the airlines too, and remember not to over tighten anything because they are all brass. I drilled two small holes in the steel sheet so that I could mount my splitter with a zip-tie. Be sure not to kink any airlines or have any with extreme angle bends.
Now plan out where you want the airline to go and then route it away from the horns towards the front of the truck to get it out of the way for now. Now have someone hold the sheet with the horns bolted to it and use bolts with nylon lock nuts to hold the sheet up. Here is the sheet bolted to the truck. (note the leader line from the compressor to tank is not installed in the pictures)
Now with that out of the way you need to determine where you are going to mount your valve, tank, and compressor. I did not want to mount any of those under the truck so I opted to buy a cheap box for now until I can afford an aluminum one. I then marked and drilled my holes for the tank and valve. Now with the included hardware I bolted the tank to the box, I found a small pair of scews and lock nuts and mounted the valve too. To run the wires and line out of the box I drilled a 1" hole in the side of the box. You can see I connect the tank to the valve with the 1/4" line also.
Now I placed the box in the bed where I wanted it. During the time of the picture it was being held in place with a tie down, but it is screwed to the bed now.
Here is the box in the bed during a quick sun shower break.
Now to connect the wires and airline to everything else I drilled a hole in the bed just under the factory left tie down hook and ran my air line and wires through it. Don't forgot to use a wire loom on the wires and line so you don't risk chaffing anything on it and causing a short or air leak. Now is a good time to route the airline to the valve and connect it too. Be sure to run all wires and airline inside the frame rail and use zip-ties to keep it all from moving. Cover everything from the box to the hole in the bed with 1" wire loom when you are done.
I used a self tapping screw to secure the ground wires to the underside of the cab.
Here is where I got the main power for the compressor. The included wire has an inline fuse built in already but if you are using your own wire DON'T FORGET TO USE ONE AND MOUNT IT AS CLOSE TO THE POWER POINT AS POSSIBLE.
I could not locate the horn trigger wire under the dash so I used a wire tap on the positive wire at the horns. You can leave the stock horns connected or unplugged as I did, it is up to you. This wire needs to be routed inside the cab to the toggle switch.
Here is where I placed the switches for the horn and compressor. I do not recommend putting them in the same spot as I did if you are using the same style switches because it requires a lot of work to get them to fit. The right switch toggles between stock horns+train horns and stock horns alone if you leave the stock horns connected. The left switch is the power to the compressor if the pressure switch kicks the compressor on.
Here is how everything gets wired. Sorry, I am not the best with MS Paint but it gets the job done. The compressor will only kick on when the tank is below 110psi and the accessory line has power and with the toggle switch engaged. The horns will only work with the toggle switch engaged and when you press the factory horn button. Be sure to keep the switch in the off position when not using the horn, pressing the lock button twice or the panic button will make the train horns honk if the switch is engaged.
Now you are DONE, here is a video your end result
Last edited by korey89; 03-18-2009 at 08:48 PM. Reason: rehosted pics

#4
12-22-2010
Join Date: Dec 2008
Location: Plattsburgh, New York
Posts: 3,390
Likes: 0
Received 2 Likes
on
2 Posts

#6
02-28-2016
Member


#8
02-28-2016
#9
02-29-2016
Member
I ended up tapping the blue wire. From the harness it goes blue and black wire then plugs into the bottom horn, the bottom horn then has a black wire that connects the two horns together.
I tested with a test light and verified that the blue wire is the signal wire.
Put it on my relay and now I have two hella super tones behind the grill that also work with the two stock horns. 4 Horns total..lol
-Nigel
I tested with a test light and verified that the blue wire is the signal wire.
Put it on my relay and now I have two hella super tones behind the grill that also work with the two stock horns. 4 Horns total..lol
-Nigel
#10
02-29-2016


#12
03-03-2016


Thread
Thread Starter
Forum
Replies
Last Post


