How-To: Power Window Swap Using OEM Parts
#1
 01-20-2011


How-To: Power Window Swap Using OEM Parts
Ok in this article im going to show u how to swap your ranger from manual to power windows using OEM parts.
Note: this is for the pwr windows only my truck has shaved doors and mirrors so i didn't do the pwr locks or the pwr mirrors but its just as easy as the windows.
Note: with this method the auto down feature will not work i plan on installing one of the autoloc modules to do this later on.
STEP #1 The first thing your going to want to do is head to the junk yard find a ranger with the power options in the door u will want to get the following parts
1. the pwr window regulators with motors attached for both sides.
2. the switches and the wiring that goes from the switches to under the dash.
3. the plastic part of the door panel that the switches snap into
4. the plastic wire holders that go on the door
STEP #2 once u get the parts u need your going to want to start cutting wires out of the harness that u dont need if u want to do pwr locks and mirrors skip this step. U dont have to do this but it makes it look cleaner and life alot easier.
On the driver side switch u will want to keep the 6 wires coming out of it they are as follows.
1. Lb/blk stripe is pwr to window switch
2. wht/blk stripe is driver window up
IMPORTANT!!! there are two tan/Lb stripe wires one is small one is big.
3. tan/Lb stripe is driver window down (SMALL wire)
4. tan/Lb is the crossover wire between the switch on the driver side for the passenger window to the switch on the passenger side (big wire)
5. wht/ylw stripe is the other crossover wire
6. blk ground
IMPORTANT!!!!
u also have a wht/blk stripe coming from the window motor and a solid red wire. you will need to wire the wht/black stripe from the motor to the wht/blk stripe coming from the switch. Then take the solid red from the motor and wire it to the (SMALL)tan/Lb wire. After this is done u should have 4 wires coming out of the harness(if u strip all the other stuff out) they are the lb/blk stripe, the blk ground, and the two crossover wires
On the passenger side switch there is 5 wires as stated before. You can stripe all the wires out of the harness that u dont need. If u do this there should be 3 wires coming out of the end of the harness. the Lb/blk stripe, and the two crossover wires.
1. Lb/blk stripe is power to switch
2. red/ylw goes to window motor
3. ylw/red stripe goes to window motor
4. tan/Lb is the crossover wire as mentioned before
5. wht/ylw is the other crossover wire
once this is done set them to the two harnesses to the side and on to step 3
STEP #3 Remove both door panels and set them aside i didn't take pics of this cause most everyone knows how.
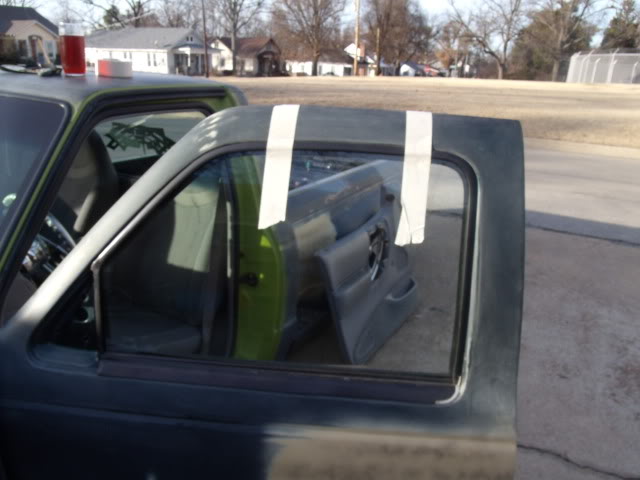
STEP #4 Use masking tape and tape both windows in the all the way up position just to make sure they dont fall.
STEP #5 When u look at the door u will see 3 rivets these will need to be drilled out i used a corded drill and a good 1/4in drill bit.
Once u have the rivets drill out pull the manual window regulator out of the door and set it aside.
STEP #6 Get the driver side window motor regulator assembly its hard to explain but it can only go in one way. untape the window and bring it down until u can get the plastic end of the regulator in the track. Now position the mounting holes to match the holes in the door (NOTE:they dont use the same holes as the manual ones but the holes are already in the door.
The picture shows which holes to mount the assembly in. Use short 1/4 in bolts with a nut and lock washer to bolt the assembly in place
There are 4 mounting holes but u can only get bolts in 3 of them.
STEP #7 go to passenger side drill the same 3 rivets out and follow the same instructions as step 6
Once u have both assemblies in place and mounted go to step 8
STEP #8 Take the rubber loom in between the door and cab out of the door and cab to where its just setting in between so u can have access to both sides.
Remove the black pieces that cover the end of the carpet and the kick panel on both sides.
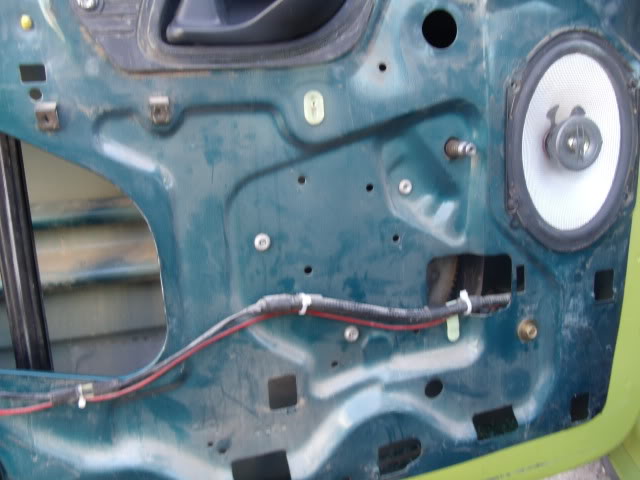
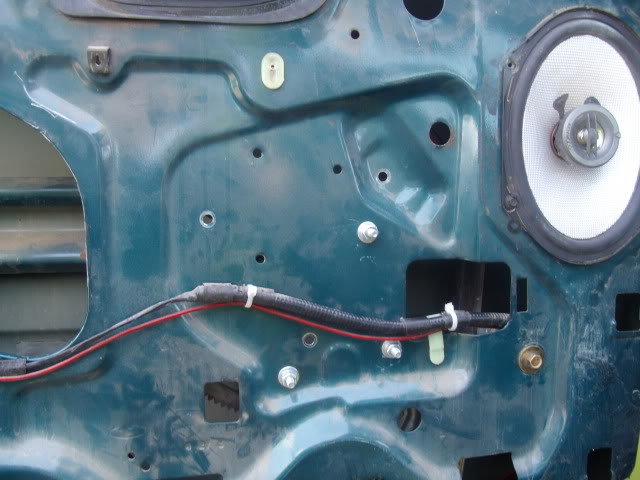
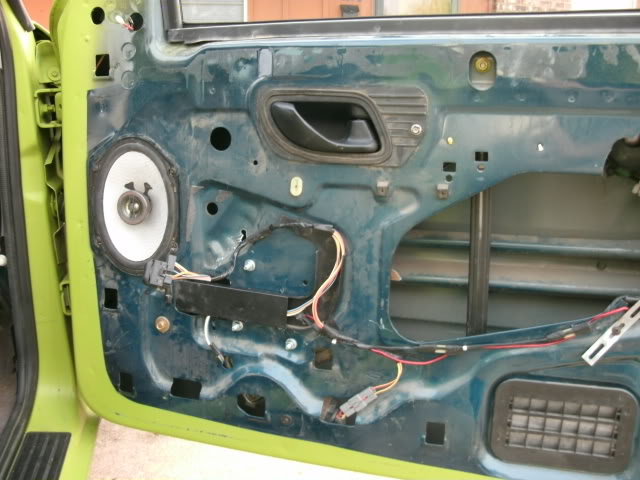
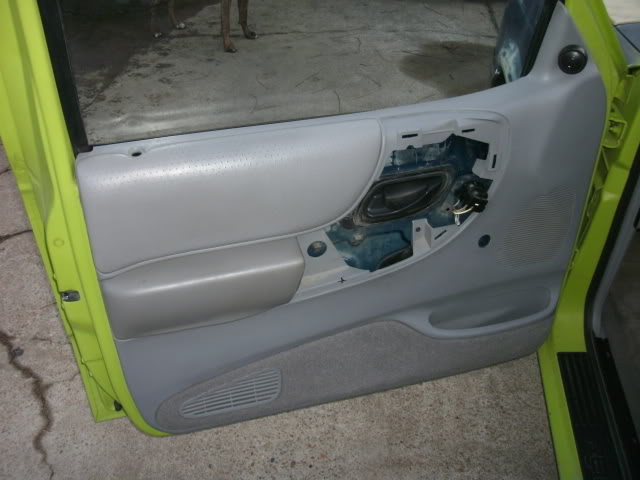
STEP #9 Start on driver side remove the speaker. Feed the wires through the door into the rubber boot and into the cab. u can reach up where the kick panel is and grab the wires to feed them through. There is a certain hole to put it through so u can use the factory plastic wire holders that go on the door (see picture) run wires exactly how shown
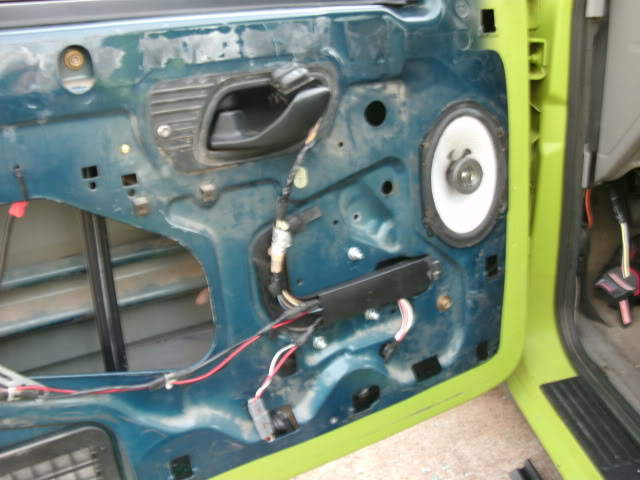
(This is how the door should look when done.)
once u get the wires in the cab u should see this
3 wires and a ground wire
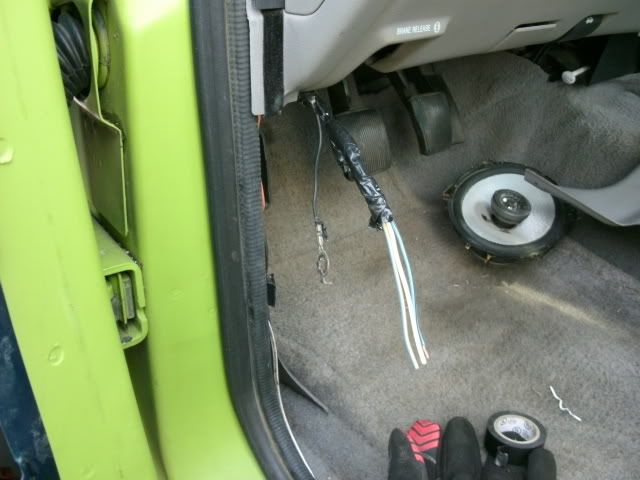
STEP #10 Ground the blk wire to the factory ground behind the kick panel
Leave the other 3 wires hanging the for now
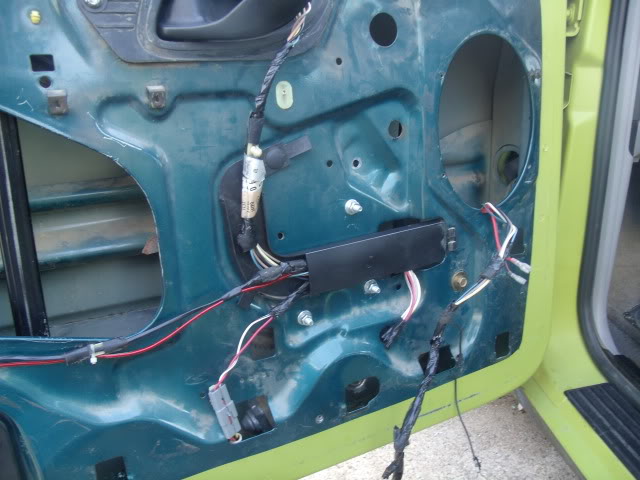
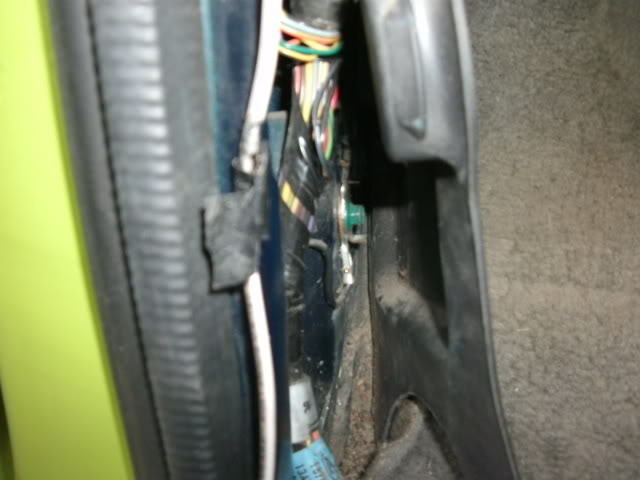
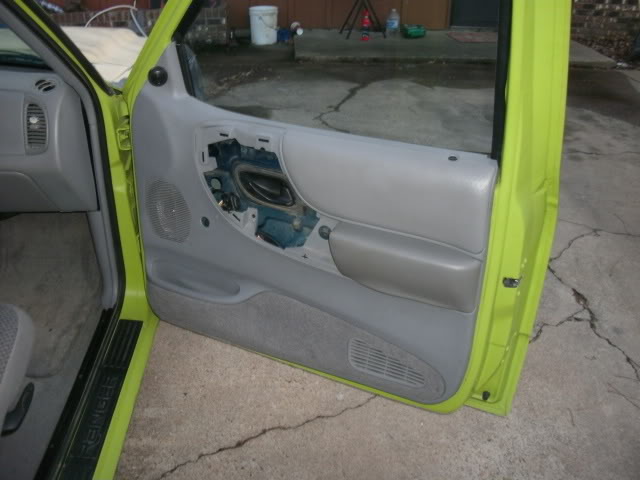
STEP #11 Go to the passenger side feed the wires in the door through the black loom and into the cab. Same as the driver side u should have 3 wires coming out on the passenger side, The Lb/blk stripe and the two crossover wires
The passenger door should look like this when done
At this point u should be done with the doors now its on to wiring.
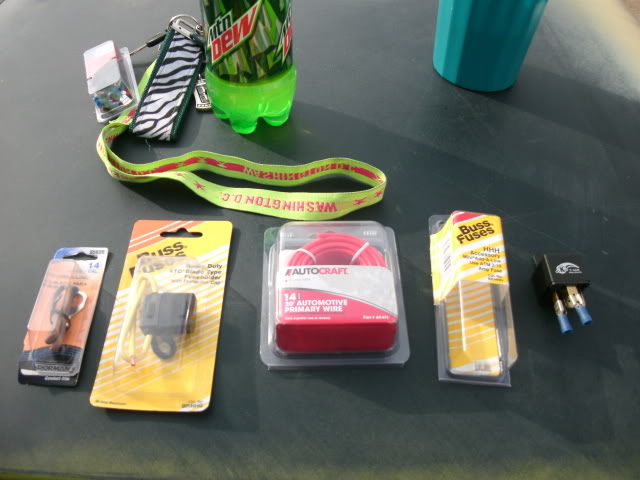
U will need a few things from the part store for the next few steps
1. mini fuse add a line
2. a fusible link lead wire
3. heavy duty fuse holder
4. a relay ( i had a left over keep it clean 40 amp relay i used)
5. a roll of 14ga. wire
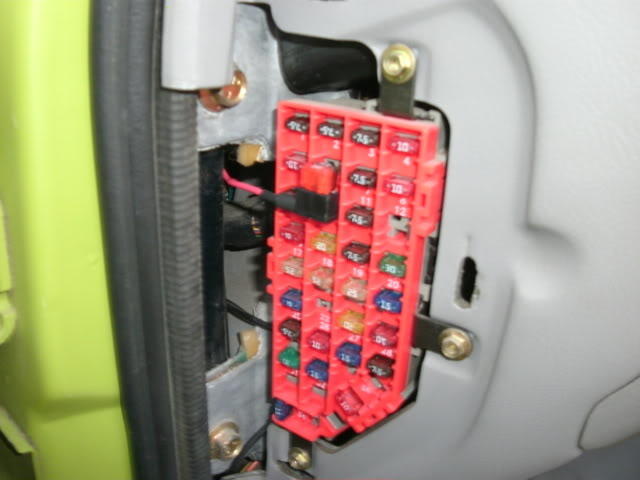
STEP #12 You will need to use the add a line to tap into your fuse box. You will want to find a fuse that is keyed that way the windows will only work with the key on. Run a piece of the 14ga. wire from the add a link down to where u have the 3 wires hanging.
I used fuse number 10 for 2 reasons. 1. theres not very many keyed functions in the fuse box and for 2. it was closer to the back of the fuse box so it would close right with the add a link installed. (u will see what im talking about)
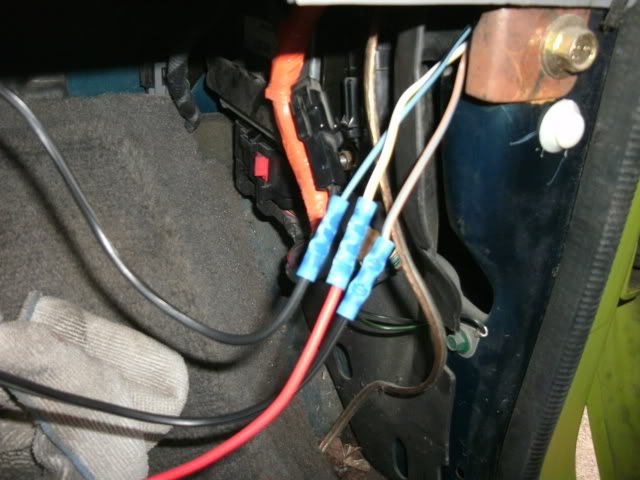
STEP #13 Now your going to want to run a constant hot from the battery. I used the distribution block that is on the side of the fuse box for this.
This is where u will use the fusible link lead and the fuse holder u bought
attach the two together.
Unbolt either side of the distribution block in the pic and bolt your fusible link to it as shown
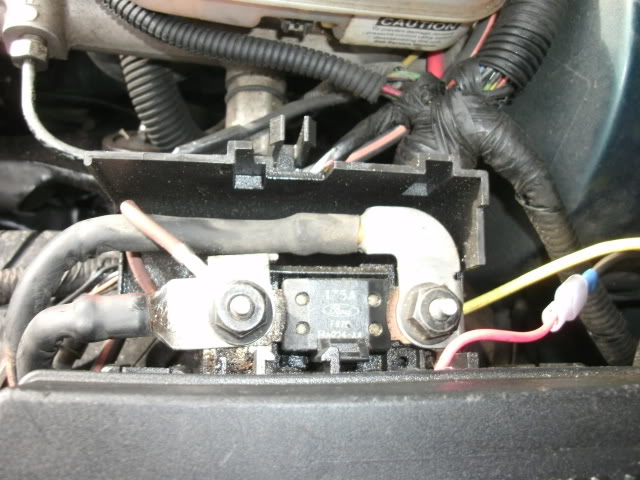
then crimp connect a piece of the 14ga. wire to the other end of the fuse holder and run it through the fire wall down to were the other wires are hanging on the driver side
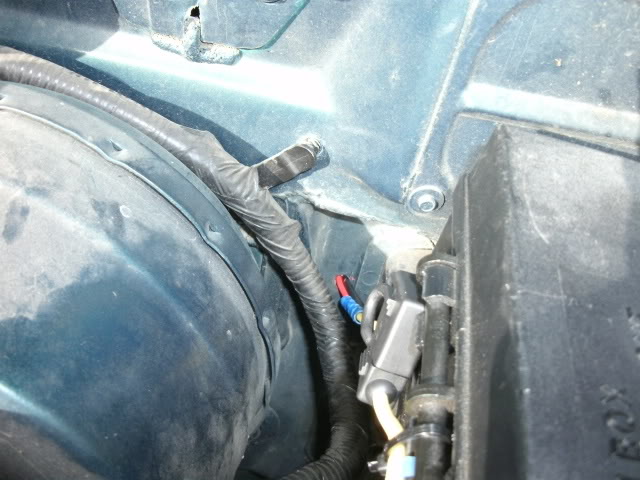
Now go back to the factory ground i showed u earlier and run another piece of the 14ga. wire to were the wires are hanging this will be the ground for the relay.
STEP #14 go to the passenger side and run a piece of the 14ga. wire from the Lb/blk wire over to same wire on the driver side splice these together into one wire put a female end connector on it so it can plug into the relay
Now take a piece of the 14ga. wire and connect it to the wht/ylw stripe wire run it to the driver side wire and connect it to the matching wire. Do the same for the tan/Lb.
STEP #15 Now on the driver side u should have 1 wire coming from the window switches (Lb/Blk) and 3 wires coming from the truck. Put female end connectors on all 4 wires. These for will be the 4 u plug into the relay.
Get the relay mine has 5 prongs.
Take the wire with the inline fuse holder from the distribution block and plug it into 87 on the relay.
Take the ground from the kick panel and plug it into 85 on the relay.
Take the wire coming from the add a line in the fuse box and plug it into 86 on the
relay.
Take the Lb/ blk wire coming from the switches and plug it into 30 on the relay.
87a is not used
Now find a good mounting spot for the relay i put mine behind the panel under the steering column (it has two bolts at the bottom of the dash that hold it on). Hide all wires.
STEP #16 Turn key on and test switches make sure both windows roll up and down make sure the tracks are clean and lubed.
STEP #17 Reinstall door panels.
STEP #18 reinstall the plastic pieces the switches go in.
DONE!!! Enjoy your new power windows. If i forgot anything please let me know this is my first write up so i may have forgot something. Feel free to ask me any questions u may have.
Note: this is for the pwr windows only my truck has shaved doors and mirrors so i didn't do the pwr locks or the pwr mirrors but its just as easy as the windows.
Note: with this method the auto down feature will not work i plan on installing one of the autoloc modules to do this later on.
STEP #1 The first thing your going to want to do is head to the junk yard find a ranger with the power options in the door u will want to get the following parts
1. the pwr window regulators with motors attached for both sides.
2. the switches and the wiring that goes from the switches to under the dash.
3. the plastic part of the door panel that the switches snap into
4. the plastic wire holders that go on the door
STEP #2 once u get the parts u need your going to want to start cutting wires out of the harness that u dont need if u want to do pwr locks and mirrors skip this step. U dont have to do this but it makes it look cleaner and life alot easier.
On the driver side switch u will want to keep the 6 wires coming out of it they are as follows.
1. Lb/blk stripe is pwr to window switch
2. wht/blk stripe is driver window up
IMPORTANT!!! there are two tan/Lb stripe wires one is small one is big.
3. tan/Lb stripe is driver window down (SMALL wire)
4. tan/Lb is the crossover wire between the switch on the driver side for the passenger window to the switch on the passenger side (big wire)
5. wht/ylw stripe is the other crossover wire
6. blk ground
IMPORTANT!!!!
u also have a wht/blk stripe coming from the window motor and a solid red wire. you will need to wire the wht/black stripe from the motor to the wht/blk stripe coming from the switch. Then take the solid red from the motor and wire it to the (SMALL)tan/Lb wire. After this is done u should have 4 wires coming out of the harness(if u strip all the other stuff out) they are the lb/blk stripe, the blk ground, and the two crossover wires
On the passenger side switch there is 5 wires as stated before. You can stripe all the wires out of the harness that u dont need. If u do this there should be 3 wires coming out of the end of the harness. the Lb/blk stripe, and the two crossover wires.
1. Lb/blk stripe is power to switch
2. red/ylw goes to window motor
3. ylw/red stripe goes to window motor
4. tan/Lb is the crossover wire as mentioned before
5. wht/ylw is the other crossover wire
once this is done set them to the two harnesses to the side and on to step 3
STEP #3 Remove both door panels and set them aside i didn't take pics of this cause most everyone knows how.
STEP #4 Use masking tape and tape both windows in the all the way up position just to make sure they dont fall.
STEP #5 When u look at the door u will see 3 rivets these will need to be drilled out i used a corded drill and a good 1/4in drill bit.
Once u have the rivets drill out pull the manual window regulator out of the door and set it aside.
STEP #6 Get the driver side window motor regulator assembly its hard to explain but it can only go in one way. untape the window and bring it down until u can get the plastic end of the regulator in the track. Now position the mounting holes to match the holes in the door (NOTE:they dont use the same holes as the manual ones but the holes are already in the door.
The picture shows which holes to mount the assembly in. Use short 1/4 in bolts with a nut and lock washer to bolt the assembly in place
There are 4 mounting holes but u can only get bolts in 3 of them.
STEP #7 go to passenger side drill the same 3 rivets out and follow the same instructions as step 6
Once u have both assemblies in place and mounted go to step 8
STEP #8 Take the rubber loom in between the door and cab out of the door and cab to where its just setting in between so u can have access to both sides.
Remove the black pieces that cover the end of the carpet and the kick panel on both sides.
STEP #9 Start on driver side remove the speaker. Feed the wires through the door into the rubber boot and into the cab. u can reach up where the kick panel is and grab the wires to feed them through. There is a certain hole to put it through so u can use the factory plastic wire holders that go on the door (see picture) run wires exactly how shown
(This is how the door should look when done.)
once u get the wires in the cab u should see this
3 wires and a ground wire
STEP #10 Ground the blk wire to the factory ground behind the kick panel
Leave the other 3 wires hanging the for now
STEP #11 Go to the passenger side feed the wires in the door through the black loom and into the cab. Same as the driver side u should have 3 wires coming out on the passenger side, The Lb/blk stripe and the two crossover wires
The passenger door should look like this when done
At this point u should be done with the doors now its on to wiring.
U will need a few things from the part store for the next few steps
1. mini fuse add a line
2. a fusible link lead wire
3. heavy duty fuse holder
4. a relay ( i had a left over keep it clean 40 amp relay i used)
5. a roll of 14ga. wire
STEP #12 You will need to use the add a line to tap into your fuse box. You will want to find a fuse that is keyed that way the windows will only work with the key on. Run a piece of the 14ga. wire from the add a link down to where u have the 3 wires hanging.
I used fuse number 10 for 2 reasons. 1. theres not very many keyed functions in the fuse box and for 2. it was closer to the back of the fuse box so it would close right with the add a link installed. (u will see what im talking about)
STEP #13 Now your going to want to run a constant hot from the battery. I used the distribution block that is on the side of the fuse box for this.
This is where u will use the fusible link lead and the fuse holder u bought
attach the two together.
Unbolt either side of the distribution block in the pic and bolt your fusible link to it as shown
then crimp connect a piece of the 14ga. wire to the other end of the fuse holder and run it through the fire wall down to were the other wires are hanging on the driver side
Now go back to the factory ground i showed u earlier and run another piece of the 14ga. wire to were the wires are hanging this will be the ground for the relay.
STEP #14 go to the passenger side and run a piece of the 14ga. wire from the Lb/blk wire over to same wire on the driver side splice these together into one wire put a female end connector on it so it can plug into the relay
Now take a piece of the 14ga. wire and connect it to the wht/ylw stripe wire run it to the driver side wire and connect it to the matching wire. Do the same for the tan/Lb.
STEP #15 Now on the driver side u should have 1 wire coming from the window switches (Lb/Blk) and 3 wires coming from the truck. Put female end connectors on all 4 wires. These for will be the 4 u plug into the relay.
Get the relay mine has 5 prongs.
Take the wire with the inline fuse holder from the distribution block and plug it into 87 on the relay.
Take the ground from the kick panel and plug it into 85 on the relay.
Take the wire coming from the add a line in the fuse box and plug it into 86 on the
relay.
Take the Lb/ blk wire coming from the switches and plug it into 30 on the relay.
87a is not used
Now find a good mounting spot for the relay i put mine behind the panel under the steering column (it has two bolts at the bottom of the dash that hold it on). Hide all wires.
STEP #16 Turn key on and test switches make sure both windows roll up and down make sure the tracks are clean and lubed.
STEP #17 Reinstall door panels.
STEP #18 reinstall the plastic pieces the switches go in.
DONE!!! Enjoy your new power windows. If i forgot anything please let me know this is my first write up so i may have forgot something. Feel free to ask me any questions u may have.
The following users liked this post:
JohnnySpeed (09-15-2020)
#2
03-04-2014

#4
07-27-2014
#5
07-27-2014

Join Date: Jan 2014
Location: Plainfield, CT
Posts: 144
Likes: 0
Received 0 Likes
on
0 Posts
I'm going to use Codys right up for windows and experiment with Locks. I think for now I'll install a Remote Starter with Keyless and just wait on the keyless portion. Make a How-To from ground up.
I need a life. I came here and found one.

#6
07-27-2014
I'm thinking its 98+ but I want to be safe and find some from 2000+. I have to play the waiting game on Craigslist. My local JY's suck something fierce. A quick question though. Where does the wire harness from the door to the dash end up roughly? If i find a pair of doors at a JY I want to be able to beeline it to the harness and disconnect.
I'm going to use Codys right up for windows and experiment with Locks. I think for now I'll install a Remote Starter with Keyless and just wait on the keyless portion. Make a How-To from ground up.
I need a life. I came here and found one.
I'm going to use Codys right up for windows and experiment with Locks. I think for now I'll install a Remote Starter with Keyless and just wait on the keyless portion. Make a How-To from ground up.
I need a life. I came here and found one.
It's a good life !
I think your approach is a good one, 2001 up was a slight styling change but could have been other things in there but I am not sure. As I said I lucked out.
I wish I had cut the harness longer, it goes in the cab from the door and then under the dash, take a little longer to disassemble the dash and get as much of it as you can, you don't need the part that attaches to the Cab harness if you follow Cody's How-To.
I took the door with as much harness as I could get without taking things apart.
I now have the doors to check out and all of the door parts, window motors, locks, door harness and switches. Easier to work things out if something isn't working.
Luck
#7
07-27-2014
Join Date: Jan 2014
Location: Plainfield, CT
Posts: 144
Likes: 0
Received 0 Likes
on
0 Posts
It's a good life !
I think your approach is a good one, 2001 up was a slight styling change but could have been other things in there but I am not sure. As I said I lucked out.
I wish I had cut the harness longer, it goes in the cab from the door and then under the dash, take a little longer to disassemble the dash and get as much of it as you can, you don't need the part that attaches to the Cab harness if you follow Cody's How-To.
I took the door with as much harness as I could get without taking things apart.
I now have the doors to check out and all of the door parts, window motors, locks, door harness and switches. Easier to work things out if something isn't working.
Luck
I've seen a couple XLT Non-Power option doors floating around and it looks like the grab handle where all the power option switches are mounted is the same dimensions. I had thought about snatching those and mounting after market product into it but I'd rather do OEM...that is Plan B though. I really dislike the XL door panel now that I've seen the XLT...
I'm looking up Remote starter information now, Really hope there is a harness I can use to make it easier. if not oh well. If i get this out of the way I can focus on adding keyless later. I WILL have switches for locks inside, i don't understand why all the aftermarket stuff doesn't. I think its stupid.
If you Luck out again and happen to stumble upon some power XLT's...let me know. I'm roughly a couple hours south of you, lol.
#8
07-28-2014
I think your right about the style change, but i believe all the mounting is the same. I will get creative if I have to as long as its all the same dimensions I'll make it work...or else! If I'm lucky enough at the JY to find it I'll try to get as much as possible without removing the Dash. several panels are easy enough to remove.
I've seen a couple XLT Non-Power option doors floating around and it looks like the grab handle where all the power option switches are mounted is the same dimensions. I had thought about snatching those and mounting after market product into it but I'd rather do OEM...that is Plan B though. I really dislike the XL door panel now that I've seen the XLT...
I'm looking up Remote starter information now, Really hope there is a harness I can use to make it easier. if not oh well. If i get this out of the way I can focus on adding keyless later. I WILL have switches for locks inside, i don't understand why all the aftermarket stuff doesn't. I think its stupid.
If you Luck out again and happen to stumble upon some power XLT's...let me know. I'm roughly a couple hours south of you, lol.
Stay away from the aftermarket universal power window and door lock kits, they are 100% junk. The easiest thing you can do is find an 04-06 ranger at the junkyard with power options and grab its door harnesses and complete dash harness, you will also have to grab it's gem, but it has to be compatible with your engine and trans. That will be the easiest to doing the swap.
I did it the other way and am paying for it now. I bought an aftermarket power window and door lock setup, the windows quit working 2 months after installing them, I replaced them with factory power window regulators and motors. Now after 3 years of using them, the harness that came with the cheapo power windows is starting to fail and it takes forever for the windows to go up. The door lock actuators would go out every 4-6 months and the control box went out once. They haven't worked for almost 2 years now. I have a set of factory door locks and factory harnesses sitting in the closet for a year now, just haven't felt like installing them.
#9
07-28-2014
Join Date: Jan 2014
Location: Plainfield, CT
Posts: 144
Likes: 0
Received 0 Likes
on
0 Posts
98-2006 will be a direct bolt in. Anything newer and its going to be way to much work. I picked up a set of 08 door panel switches back in January, the thread you commented on earlier and the wiring for the 08+ switches is just more work than it is worth.
Stay away from the aftermarket universal power window and door lock kits, they are 100% junk. The easiest thing you can do is find an 04-06 ranger at the junkyard with power options and grab its door harnesses and complete dash harness, you will also have to grab it's gem, but it has to be compatible with your engine and trans. That will be the easiest to doing the swap.
I did it the other way and am paying for it now. I bought an aftermarket power window and door lock setup, the windows quit working 2 months after installing them, I replaced them with factory power window regulators and motors. Now after 3 years of using them, the harness that came with the cheapo power windows is starting to fail and it takes forever for the windows to go up. The door lock actuators would go out every 4-6 months and the control box went out once. They haven't worked for almost 2 years now. I have a set of factory door locks and factory harnesses sitting in the closet for a year now, just haven't felt like installing them.
Would I be able to grab a 98-06 XLT panel, switches, regulator and motor and just wire it up like Cody did? That I would believe is more feasible in my situation. I'll definitely learn more about electrical. I was reading I wouldn't get the auto down function or something, I'm fine with that. As long as i can hook it up to my remote starter (That I'm close to purchasing, yay another How-To!).
I looked at your thread, I love the 08+ but really don't want to mess with that sort of mess so I'll stick with 98-06.
I'm going to start making a Word Doc with all this stuff in here for future posts...
Go install your power options!! before I relieve you of them

#10
07-28-2014
Good info.
Is there a remote locking kit that uses OEM Lock Actuators ?
Just the control module and wiring ?
Would be good to find that out, also would be easier to install.
I am afraid you are not south of me anymore, moved to SoCal and loving it !
Check out Ken's Auto Salvage, NH, mention the site and you knowing Sandy, with the Red Ranger, and Pedro.
Ken is easy to work with and if he has door you should be able to get them cheap.
Is there a remote locking kit that uses OEM Lock Actuators ?
Just the control module and wiring ?
Would be good to find that out, also would be easier to install.
Check out Ken's Auto Salvage, NH, mention the site and you knowing Sandy, with the Red Ranger, and Pedro.
Ken is easy to work with and if he has door you should be able to get them cheap.
Last edited by Scrambler82; 07-28-2014 at 09:26 AM.
#11
07-28-2014
Join Date: Jan 2014
Location: Plainfield, CT
Posts: 144
Likes: 0
Received 0 Likes
on
0 Posts
Good info.
Is there a remote locking kit that uses OEM Lock Actuators ?
Just the control module and wiring ?
Would be good to find that out, also would be easier to install.
I am afraid you are not south of me anymore, moved to SoCal and loving it !
Check out Ken's Auto Salvage, NH, mention the site and you knowing Sandy, with the Red Ranger, and Pedro.
Ken is easy to work with and if he has door you should be able to get them cheap.
Is there a remote locking kit that uses OEM Lock Actuators ?
Just the control module and wiring ?
Would be good to find that out, also would be easier to install.
I am afraid you are not south of me anymore, moved to SoCal and loving it !
Check out Ken's Auto Salvage, NH, mention the site and you knowing Sandy, with the Red Ranger, and Pedro.
Ken is easy to work with and if he has door you should be able to get them cheap.
As for the Key-less, alarm and other functions you splice I believe three wires into the circuit for the door locks. Exactly how I don't know yet, still trying to figure it out but it connects into the starter module. So the module takes over as to when to unlock/lock the doors. Doesn't have anything to do with the truck. You won't have auto-down features or something because that has something to do with the truck.
So it seems very possible to rig up your own wiring for the windows/locks and hook it up to a Remote/Key less system without actually doing anything different. I still want OEM parts and will be hunting the JY tomorrow again, I found 4 vehicles I want to scavenge if they are the correct years. Anyone know if a B series door panels will fit on a Ranger? I'm thinking 98-06 will fit my 04 Ranger. The panel looks exactly like a Ranger XLT...It had power too! They won't sell me the whole door I'll have to pick it but what ever. That is if this is the right year. Found two Explorers with MINT OHC/Visors, hope those are the right years.
While in my head it seems like a great idea to swap over all door inners, Dash harness, and GEM I think its way to much work when Cody has clearly wired it to work...and it should work with Keyless Entry without issues.
Here is the manual for the RS4-G4 Starter: http://www.commandocaralarms.com/man...-1-3-4_ins.pdf
Manual for IDataLink ADS-TB: http://cdncontent2.idatalink.com/cor...N_20140710.pdf
Maybe someone can make some sense of this to help us out.
A little over 2 hour drive to Ken's from me, not to bad. My father in law goes to Boston a few times a week, he could pick something up for me if i asked. I should call and see...lol. Thanks for the tip!
#12
08-05-2014
Join Date: Jan 2014
Location: Plainfield, CT
Posts: 144
Likes: 0
Received 0 Likes
on
0 Posts
This may in fact be a stupid question but here it goes. I'm doing my prep for this mod and I'm wondering why we have to take the solid Red wire from the motor plug and splice it into the small Tan/Lb wire? is it to provide a constant ground and complete circuit to the relay so no matter what direction (up or down/Positive or negative) it will be complete?
#13
08-05-2014
All I can say is to watch where the wires are going.
Color codes tend to go out the window when you are wiring/rewiring from scratch into an OEM harness.
I have read the OP postings and all appears to be a good go.
Watch the wires, watch where they are going and understand what you are wiring based on what each wire does.
Good luck and post your findings.
#14
08-05-2014
Join Date: Jan 2014
Location: Plainfield, CT
Posts: 144
Likes: 0
Received 0 Likes
on
0 Posts
I THINK I'm good to go. Because I grabbed the whole harness and haven't pulled it apart its still in tact. All his color codes are the same on this one. Because he pulled his apart to make it neater the way he words things made me stumble but made sense once I thought about it. These operate as a positive and negative current to turn the motor in different directions right? If so then what I said before makes sense. Basically it is taking out one wire (that'd normally go to the dash harness and thus computer) and keeping it our own self-contained loop Cody came up with. I'll understand it more once i look into each prong on the window switches to understand which one goes where. I'll keep you guys up to date once I get my OEM regulator/motors in.
#15
08-08-2014
Join Date: Jan 2014
Location: Plainfield, CT
Posts: 144
Likes: 0
Received 0 Likes
on
0 Posts
Well guys on 8/8 at 5pm I started the swap. I sorted the wires a few days before and just had to extend/splice wires tonight to test the electrical. I didn't put the power regulators in but I did test them while they where unmounted. from 5pm-12am with a 90 min break in there I got it working! Very straight forward with what Cody wrote. Even I could do it. I bet anyone with minor electrical experience will complete it much quicker than I since I had to learn a lot about electrical. It works flawlessly and I just have to mount the regulators and pop the new panels in.
I used 40Ft of 14Ga automotive wire, lol.
I used 40Ft of 14Ga automotive wire, lol.
#16
08-10-2014
Join Date: Jan 2014
Location: Plainfield, CT
Posts: 144
Likes: 0
Received 0 Likes
on
0 Posts
Solved my problem that I had. I crossed a wire to the passenger side instead of using the driver side wire. The wording confused me when I did the sorting out but realized my error once I thought about it logically. VERY easy Mod to do for any Ranger with manual windows. Thank you Cody for a solid write-up!
Last edited by SteveDie; 08-10-2014 at 03:27 PM.
#17
04-09-2017


#18
06-24-2017

Join Date: Dec 2016
Location: pittsburgh pa
Posts: 418
Likes: 0
Received 0 Likes
on
0 Posts
Dude, thanks for a great writeup!!! I'm doing the change on my 98, I'm not hitting a salvage yard, I'm getting stuff off ebay in parts. then I needed the wiring idea since I figured its more than just power and ground. I loved ur piece and will try to follow it as best I can...thanks, great job
#19
06-25-2017
Join Date: Dec 2016
Location: pittsburgh pa
Posts: 418
Likes: 0
Received 0 Likes
on
0 Posts
#20
06-26-2017
i highly recommend going to a you pull it junk yard and getting the parts and the wiring so you know that have everything and you can get a visual on where it all goes and take a few pics of the donor truck. it is a real easy swap. i used this thread to do mine. follow it to the t and you will have no problems with the conversion
The following users liked this post:
Casadan (07-05-2023)
#21
07-08-2017
Join Date: Dec 2016
Location: pittsburgh pa
Posts: 418
Likes: 0
Received 0 Likes
on
0 Posts
Hi, I followed ur thread as best I could, my difference is I got my reg/motor, switches, black panels on ebay...got rest at parts store, I started it today, no luck. I know the motor works. I put power and ground to it once it was attached and switch didn't work. since I don't have under dash wiring I have to trace each wire but I did so. if I didn't know better id say I got a bad relay? its getting power but when I check power out nothing. I'm also not seeing power from add a line. I don't have a fuse at #10 so I looked elsewhere. I am wondering if I have to hook up other side to complete the circuit?

Thread
Thread Starter
Forum
Replies
Last Post
mountain ranger
General Technical & Electrical
5
01-08-2009 04:02 PM
robert99ranger
General Technical & Electrical
1
05-24-2008 07:32 PM
03DualSport
General Ford Ranger Discussion
1
12-11-2006 04:36 PM


