How-To: 2 10" Subs in a Reg Cab
#1
 04-12-2010


How-To: 2 10" Subs in a Reg Cab
Tools/Material needed:
10 sq. ft. of 3/4" MDF (im assuming 10, i had a 8 sq. ft. sheet, plus some extra laying around)
Circular Saw
Jig Saw
Drill
Drill Bits
Screwdriver(s)
Drywall Screws (good for mdf since they have a fine thread)
Speaker Wire
2 Speaker Quick Connects
PL Premium 100 Adhesive
Common Sense (Not readily available at all stores)
I predrilled all my holes, and put a drywall screw about every 6-8 inches, no need to go overboard since the glue does most of the holding. I added a big enough bead of PL premium glue, so that when i fastened all my screws, the glue seeped out just a bit. Applying the glue to the closest edge of the inside of the box, will allow the glue to create a seal between the wood and keep the outside of the box clean.
First of all, i measured the area between the speaker pods behind the seats. From previous speaker boxes built i had cut out the speaker pod behind the driver seat (no picture) i also know, that building a box without an "indent" for your armrest, you lose the ability to flip up your armrest without moving up the seat a bit. SO, i cut out an indent, like so:
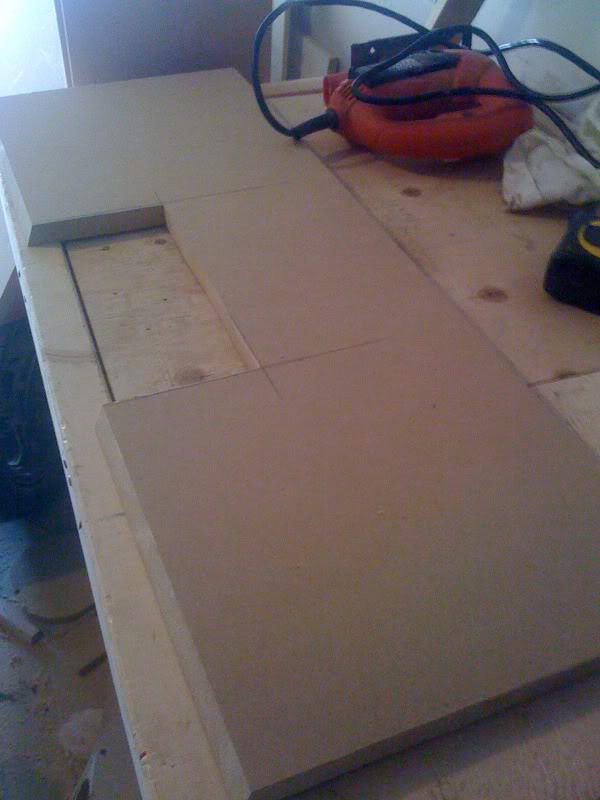
This is the base. total length is 31". The armest is 9" (this is on my 08XL) So my "indent" is 9.5". Leaving 10 3/4" on either side for the sub. The "depth" of the base is 7" with the front of the base being cut at about 60-65 degree angle (cant remember exactly) so that the subs follow the shape of the seat.
Next i cut the face of the box. The two pods that will hold the subwoofers:
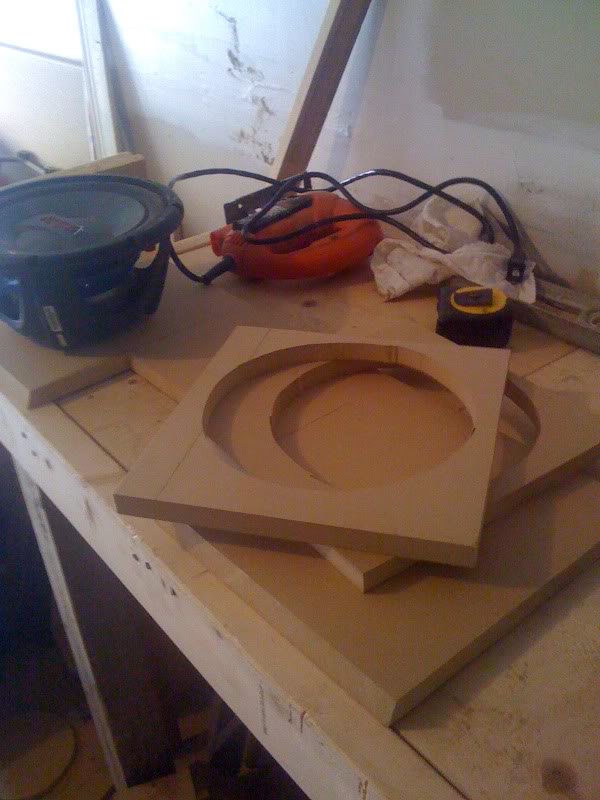
They're cut at 11 1/4" inch tall by 10 3/4" wide. I could of made them a bit taller, but i didnt. Make sure when you cut out your hole for your sub, you make sure to leave enough space so that when you go to fasten the bottom of your pod, to the 60 degree angle cut, your sub doesnt hit the base of your box. I mounted the two pods to the base of the box and this is the result:
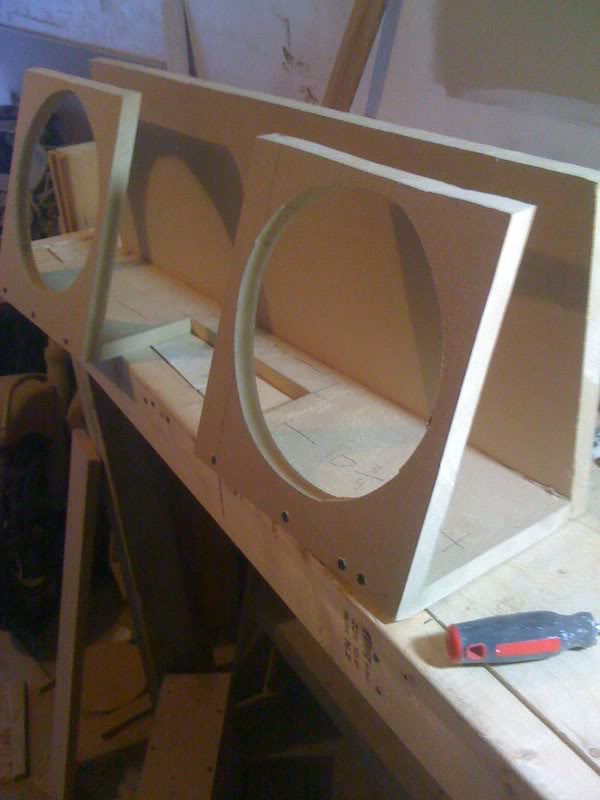
In the picture, the back of the box is already mounted. Fairly simple, one piece cut at 31" by 12", and mounted to the base.
Next i cut out "triangles" to start enclosing the box:
Kind of hard to see in this picture, but its there. I took a very "common sense" approach to this...i stuck a piece of wood up to the triangular hole, and traced a piece to cut. (Im bad with explaining things, i work in the construction industry, a lot of the stuff comes from experience) But its not hard. When fastening everything, i fastened everything on the "inside" of the box. Driving screws through the "face" of the box, top and bottom. I repeated this step for every side, and my box was mostly closed in.
The top of the box is pretty simple as well, although i dont have any pictures. I cut a piece of wood with the same 60 degree angle as the base, the space between the speaker pod and the back wall i believe is 2 1/2". With the 3/4" mdf for the front and back of the box, that brings the total top depth to 4"
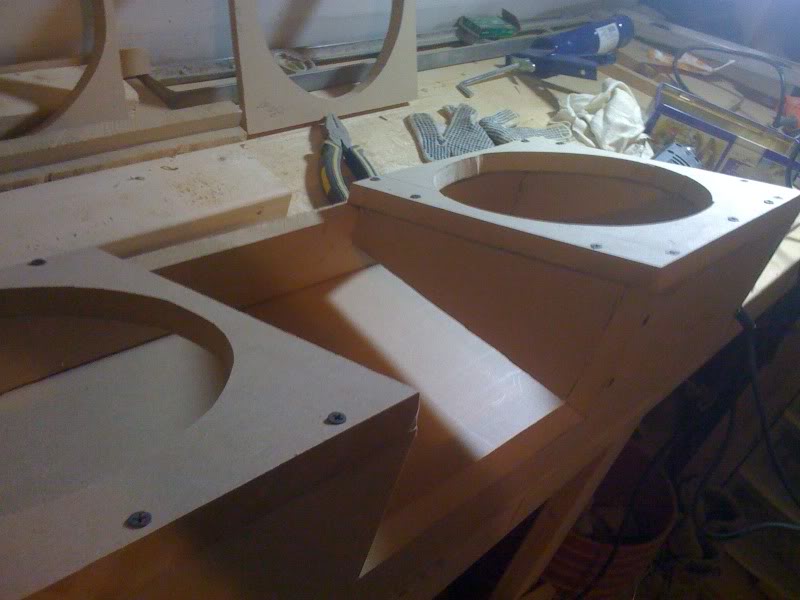
Now all that was left to do was the "face" of the "indent" area. I dont have any pictures of this process, but its pretty idiot-proof. Just fill in the gap, and seal it. One thing i left out is, in the back of box, i drilled 2, 2" holes for the speaker quick connects. I glued and screwed them to the box, so that installing and removing the box wont be a pain.
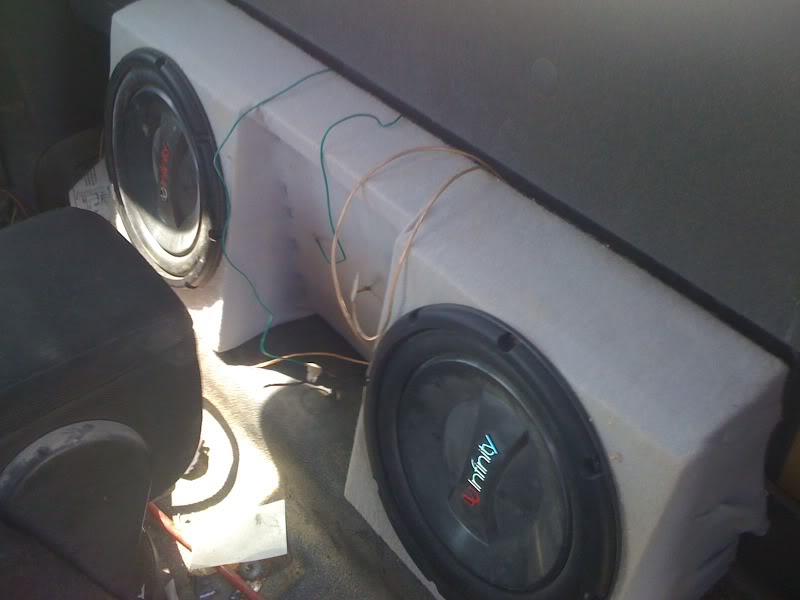
I purchased 1 yd of fabric, and stapled the **** out of it to the box. I kept all the stapling to the back of the box (out of sight, out of mind) but i did have to staple the fabric to the little "indent" of the box, since its not one consistent shape. I let everything glue/seal, and cure over night, put in the subs the next day, and threw it in the truck. Sounds bad ***. Didnt lose ANY room what so ever. It is built a bit smaller then recommended for the subs, but thats fine with me.
Final Product.
10 sq. ft. of 3/4" MDF (im assuming 10, i had a 8 sq. ft. sheet, plus some extra laying around)
Circular Saw
Jig Saw
Drill
Drill Bits
Screwdriver(s)
Drywall Screws (good for mdf since they have a fine thread)
Speaker Wire
2 Speaker Quick Connects
PL Premium 100 Adhesive
Common Sense (Not readily available at all stores)
I predrilled all my holes, and put a drywall screw about every 6-8 inches, no need to go overboard since the glue does most of the holding. I added a big enough bead of PL premium glue, so that when i fastened all my screws, the glue seeped out just a bit. Applying the glue to the closest edge of the inside of the box, will allow the glue to create a seal between the wood and keep the outside of the box clean.
First of all, i measured the area between the speaker pods behind the seats. From previous speaker boxes built i had cut out the speaker pod behind the driver seat (no picture) i also know, that building a box without an "indent" for your armrest, you lose the ability to flip up your armrest without moving up the seat a bit. SO, i cut out an indent, like so:
This is the base. total length is 31". The armest is 9" (this is on my 08XL) So my "indent" is 9.5". Leaving 10 3/4" on either side for the sub. The "depth" of the base is 7" with the front of the base being cut at about 60-65 degree angle (cant remember exactly) so that the subs follow the shape of the seat.
Next i cut the face of the box. The two pods that will hold the subwoofers:
They're cut at 11 1/4" inch tall by 10 3/4" wide. I could of made them a bit taller, but i didnt. Make sure when you cut out your hole for your sub, you make sure to leave enough space so that when you go to fasten the bottom of your pod, to the 60 degree angle cut, your sub doesnt hit the base of your box. I mounted the two pods to the base of the box and this is the result:
In the picture, the back of the box is already mounted. Fairly simple, one piece cut at 31" by 12", and mounted to the base.
Next i cut out "triangles" to start enclosing the box:
Kind of hard to see in this picture, but its there. I took a very "common sense" approach to this...i stuck a piece of wood up to the triangular hole, and traced a piece to cut. (Im bad with explaining things, i work in the construction industry, a lot of the stuff comes from experience) But its not hard. When fastening everything, i fastened everything on the "inside" of the box. Driving screws through the "face" of the box, top and bottom. I repeated this step for every side, and my box was mostly closed in.
The top of the box is pretty simple as well, although i dont have any pictures. I cut a piece of wood with the same 60 degree angle as the base, the space between the speaker pod and the back wall i believe is 2 1/2". With the 3/4" mdf for the front and back of the box, that brings the total top depth to 4"
Now all that was left to do was the "face" of the "indent" area. I dont have any pictures of this process, but its pretty idiot-proof. Just fill in the gap, and seal it. One thing i left out is, in the back of box, i drilled 2, 2" holes for the speaker quick connects. I glued and screwed them to the box, so that installing and removing the box wont be a pain.
I purchased 1 yd of fabric, and stapled the **** out of it to the box. I kept all the stapling to the back of the box (out of sight, out of mind) but i did have to staple the fabric to the little "indent" of the box, since its not one consistent shape. I let everything glue/seal, and cure over night, put in the subs the next day, and threw it in the truck. Sounds bad ***. Didnt lose ANY room what so ever. It is built a bit smaller then recommended for the subs, but thats fine with me.
Final Product.
Last edited by bonez; 04-12-2010 at 07:57 PM.

#4
07-29-2013

Looks good !
It isn't the easiest thing to get two subs in a std cab, good go !
Did you determine the volume, sq inches of interior space each speaker requires when you built this package ?
Just asking, mainly to determine if it is a problem in general or not. Most speaker manufacturer's state the area needed and I was wondering if it really mattered.

Thread
Thread Starter
Forum
Replies
Last Post
NewfieRanger
Audio & Video Tech
5
09-03-2007 01:28 PM


