New mods! (Pic Heavy)
#1
 04-25-2012


Join Date: Jan 2012
Location: Yucaipa, CA
Posts: 15
Likes: 0
Received 0 Likes
on
0 Posts
New mods! (Pic Heavy)
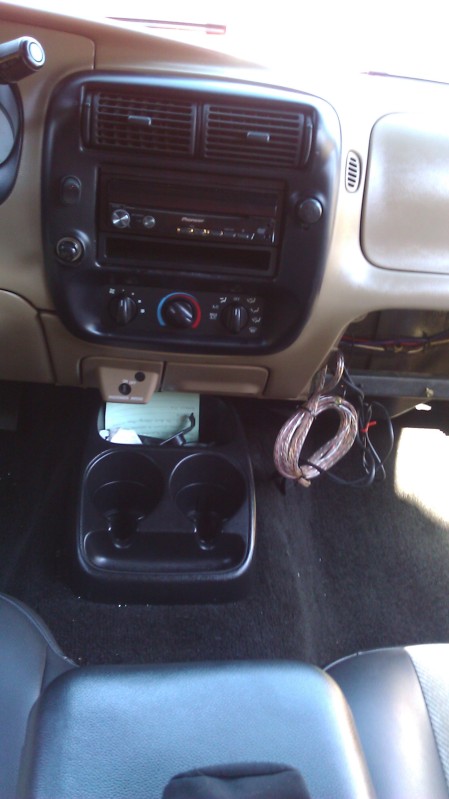
I went to the local junkyard and picked up an explorer center console, explorer EATC (blue) with all the sensors, and a glove box light from an explorer as well, since I didnt have one. Got everything for $60. Hope you guys like it
Here are some before pics


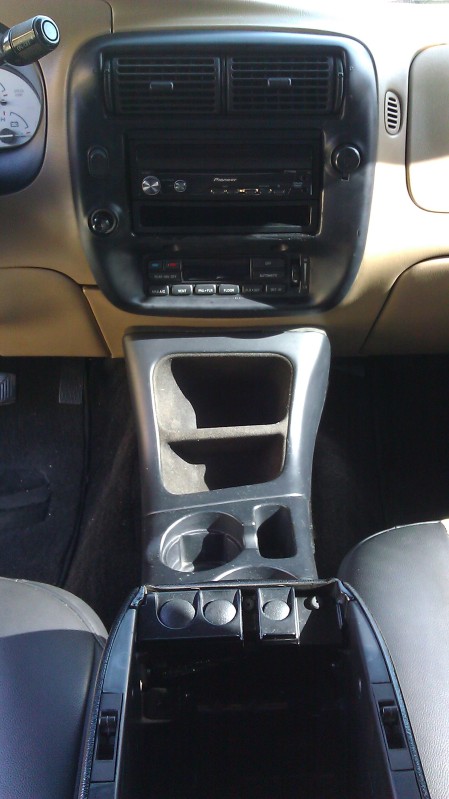
I did the EATC first

After that, I sprayed with black krylon fusion. Hacked the driver seat using the 60/40 to 40/40 mod and installed the console.

I did the "buggman" (over on ---) mod and relocated the passenger airbag on/off switch

Had the lid recovered to match the seats :) as well as having the driver seat reupholstered the right way
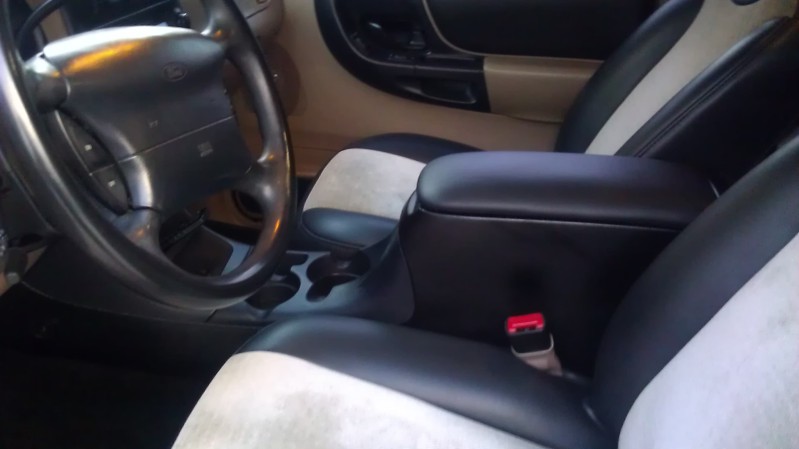

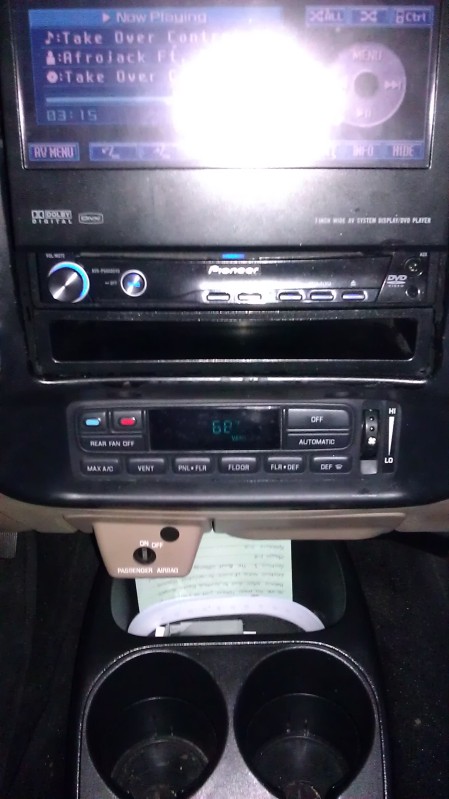
Glove box light finally!

Also, ordered white led bulbs a week ago and installed those too so I have white needles to go with my indiglo gauges I got for Christmas

Big thanks to N3ELZ's Cardomain how-to page along with rwenzing for the EATC. I also kept the functionality of the rear fan for the console for the fan. I also cut a small rectangle in the duct work, so the console duct work lines up. Meaning I am able to turn on the floor air up front, directing the air to the back through the console, as well as having air to the floor like normal. (Hope that made sense, hard to explain over web). Let me know what you guys think!
Here are some before pics
I did the EATC first
After that, I sprayed with black krylon fusion. Hacked the driver seat using the 60/40 to 40/40 mod and installed the console.
I did the "buggman" (over on ---) mod and relocated the passenger airbag on/off switch
Had the lid recovered to match the seats :) as well as having the driver seat reupholstered the right way
Glove box light finally!
Also, ordered white led bulbs a week ago and installed those too so I have white needles to go with my indiglo gauges I got for Christmas
Big thanks to N3ELZ's Cardomain how-to page along with rwenzing for the EATC. I also kept the functionality of the rear fan for the console for the fan. I also cut a small rectangle in the duct work, so the console duct work lines up. Meaning I am able to turn on the floor air up front, directing the air to the back through the console, as well as having air to the floor like normal. (Hope that made sense, hard to explain over web). Let me know what you guys think!


#4
04-26-2012
You did a great job with those mods! Center console is my next project, I have the console I just need to spray it black. what paint did you use? also, how did you wire it up and where did you cut the hole in the duct work? You should make a how-to for this mod :) and did you glue the air bag switch on?
#5
04-26-2012
#6
04-26-2012
prob harder to do in my truck which is lame since the SJB got introduced in 2004. wiring is different from the how-to on car domain.
http://www.cardomain.com/ride/296394...ar-cab/page-14
Last edited by 99offroadrngr; 04-26-2012 at 07:18 AM.

#8
04-26-2012
Join Date: Jan 2012
Location: Yucaipa, CA
Posts: 15
Likes: 0
Received 0 Likes
on
0 Posts
Thank you. Means a lot coming from a truck like yours. Can't wait to swap to the 04+ front end. I love the big grille. Your truck looks so mean!
You did a great job with those mods! Center console is my next project, I have the console I just need to spray it black. what paint did you use? also, how did you wire it up and where did you cut the hole in the duct work? You should make a how-to for this mod :) and did you glue the air bag switch on?
x3! looks good man.
prob harder to do in my truck which is lame since the SJB got introduced in 2004. wiring is different from the how-to on car domain.
http://www.cardomain.com/ride/296394...ar-cab/page-14
prob harder to do in my truck which is lame since the SJB got introduced in 2004. wiring is different from the how-to on car domain.
http://www.cardomain.com/ride/296394...ar-cab/page-14
Thanks. You guys are awesome! None of this would even be possible if it weren't for people like you guys helping everyone out
#9
04-27-2012
To be honest, it wasn't all that hard. Just time consuming. It was worth it, especially when only a handful of rangers have them (from what I've seen). Def makes your truck unique. Just have to follow the how-to step by step and if you do that. You are GOLDEN! You should def do it!
Thank you. Means a lot coming from a truck like yours. Can't wait to swap to the 04+ front end. I love the big grille. Your truck looks so mean!
I just used krylon fusion. I was a little iffy about it at first but it came out great. Now I am just going to see how well it holds up. When you pulled the console, there should be duct work that runs underneath the console and a bunch of wires. What I did was get rid of all the wires except the power and ground. They run the full length of the console and split off to one other wire in the back for the fan. It is just to power the fan control. If you pull out your old cupholders, ashtray and airbag switch, you will see your duct work that puts air to the floor. What I did was line up the console like you normally would and marked where the center console duct work touched the trucks floor duct work. Then cut a small rectangle in the truck duct work so now when I turn on the air to the floor, it goes to the floor and runs through the console duct work to the back. I left all the rear fan controls on the console so I could open/close the vents in the rear. I should have taken more pics....sorry :( Ya i just drilled two small holes and used this really sticky tape I bought at home depot. It has like a cushion in it. Really cool stuff. Im scared to write a how-to haha...im still new. I hope that made sense lol. If not, dont be afraid to tell me haha.
Thank you. I bet rwenzing would be able to help you out with the difference in wiring. Guy is a genius lol. Be the only one (I think) to put it in an 04+ That would be sick!
Thanks. You guys are awesome! None of this would even be possible if it weren't for people like you guys helping everyone out
Yea, this helps a lot thanks for the information. I am soon to be tackling this project but I have to make a few more trips to the JY first and do the seat conversion or buy some seats. last question, did you buy a new console lid or were you able to find one in decent shape?
#10
05-01-2012
Join Date: Jan 2012
Location: Yucaipa, CA
Posts: 15
Likes: 0
Received 0 Likes
on
0 Posts
Yea, this helps a lot thanks for the information. I am soon to be tackling this project but I have to make a few more trips to the JY first and do the seat conversion or buy some seats. last question, did you buy a new console lid or were you able to find one in decent shape?
#11
05-01-2012
EATC is straight forward as long as you follow the how to.
Took maybe 12 hours if you do all the testing, I spent more time making factory looking under-hood harnesses.
If you pull the EATC controller apart make sure you put the vacuum solenoid connector back on correctly. I ended up max ac when I wanted floor heat. Didn't notice until I decided to do a 8 hour road trip on a sub zero day.
#12
05-01-2012
#13
05-02-2012
EATC is straight forward as long as you follow the how to.
Took maybe 12 hours if you do all the testing, I spent more time making factory looking under-hood harnesses.
If you pull the EATC controller apart make sure you put the vacuum solenoid connector back on correctly. I ended up max ac when I wanted floor heat. Didn't notice until I decided to do a 8 hour road trip on a sub zero day.
Took maybe 12 hours if you do all the testing, I spent more time making factory looking under-hood harnesses.
If you pull the EATC controller apart make sure you put the vacuum solenoid connector back on correctly. I ended up max ac when I wanted floor heat. Didn't notice until I decided to do a 8 hour road trip on a sub zero day.
AND
Found the how to, now to think on another project, a good one at that.
#14
05-03-2012
Join Date: Jan 2012
Location: Yucaipa, CA
Posts: 15
Likes: 0
Received 0 Likes
on
0 Posts
EATC is straight forward as long as you follow the how to.
Took maybe 12 hours if you do all the testing, I spent more time making factory looking under-hood harnesses.
If you pull the EATC controller apart make sure you put the vacuum solenoid connector back on correctly. I ended up max ac when I wanted floor heat. Didn't notice until I decided to do a 8 hour road trip on a sub zero day.
Took maybe 12 hours if you do all the testing, I spent more time making factory looking under-hood harnesses.
If you pull the EATC controller apart make sure you put the vacuum solenoid connector back on correctly. I ended up max ac when I wanted floor heat. Didn't notice until I decided to do a 8 hour road trip on a sub zero day.
They come in Explorer Eddie Bauer edition and limited. I believe the years 95-01, but make sure you check youre wiring to the right one on the how to. Different wires and diagrams for different year EATC's
#15
05-03-2012
#16
05-09-2012
#17
05-09-2012
Join Date: Jan 2012
Location: Yucaipa, CA
Posts: 15
Likes: 0
Received 0 Likes
on
0 Posts
I am going tmrw to the junkyard if you want me to pick up the cubby inserts for you? PM me if you are interested.
Thank you. I love the full length console much better. Ya I got the switch relocate idea off of a member on --- named buggman. Are you talking about the Ranger console with the sub built in?
Thank you. I love the full length console much better. Ya I got the switch relocate idea off of a member on --- named buggman. Are you talking about the Ranger console with the sub built in?
#18
05-10-2012
Join Date: May 2011
Location: buffalo, ny
Posts: 273
Likes: 0
Received 0 Likes
on
0 Posts
#19
05-11-2012
Explorers are most interchangeable, as you will need the UV sensor, OAT, inside temp sensor + duct, and the controller. Plus other models use different fan control methods.
Their are basically 2 explorer versions 95-97 (blue green) and 98-01 (green), the wiring plugs change between the years along with the blend door harness. So stay in the year ranges for parts.
The hardest part is swapping the blend door controller, I suggest starting with a regular ratchet until the screw head is over the top of the controller then switching to a flat ratcheting box end. Also have a flexible magnet on hand as that far screw like to fall back on the the heater box. Start with the hard screw first then work to the easier ones.
After that you just need to keep all 20 or so wires at the head unit in check.
Read this twice
http://www.cardomain.com/ride/296394...ar-cab/page-14
For the blower motor you just cut off the connector for the resistor block and add the wiring pigtail off the controller. Only need to add 2 wires under the hood to behind the driver head light for the outside temp sensor. I already have a home brew harness in place there for my efan and water temp gauge. It looks semi stock just inst wrapped or pinned.

Thread
Thread Starter
Forum
Replies
Last Post
matt224
Member Introductions
11
05-09-2011 09:07 PM


