Another LED Thread
#1
 03-16-2011


Another LED Thread
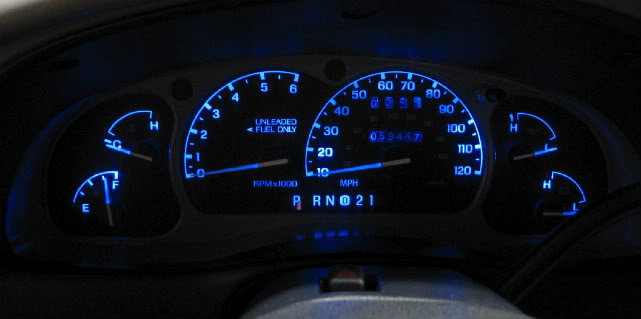
I finished up the led changeover, only thing left is the cruise pods. Here are the pics, the camera doesnt take good pics of the speedo, I think it is too bright for the lens. It does not have the hot spots like it seems. Enjoy!
DSC00474.jpg?t=1300334431
DSC00473.jpg?t=1300334431
DSC00472.jpg?t=1300334431
Y29udGVudDovL21lZGlhL2V4dGVybmFsL2ltYWdlcy9tZWRpYS8zMDA.jpg?t=1300334431
Y29udGVudDovL21lZGlhL2V4dGVybmFsL2ltYWdlcy9tZWRpYS8yOTk.jpg?t=1300334431
Thanks to buggman for the 4x4, fog, and headlight switch conversion. I also have a blue filter that I need to install with some white LEDs behind the HVAC so it doesnt look purple.
#3
03-16-2011
there is a how to on here on how to do it, I basically followed that but instead of using the white gauges like EVERYONE else. lol, I decided to use my stock gauges, and instead of painting the back of the overlays I used blue LED plug in bulbs. I used bulbs from Superbrightleds.com. They are the SMD bulbs. I dont know how to solder and didnt have the time and money to do that so i did plug ins. I am very satisfied with the result. The total cost was prolly 60 bucks cause I used my cluster not a different one, the bulbs were 50 for the 6 in the cluster and the 2 in the HVAC. Then other money on sand paper and crap. I did have some issues with the needles on the speedo. I didnt do the test ahead of time so I had to take pictures of where they sat when warm and then replaced them from there. The speed needle I had to drive next to a friend to make sure it was set right. Hope this helps
Here is the link to the how to https://www.ranger-forums.com/interior-exterior-electrical-123/how-paint-your-overlays-convert-leds-104562/
Here is the link to the how to https://www.ranger-forums.com/interior-exterior-electrical-123/how-paint-your-overlays-convert-leds-104562/
#4
03-16-2011

#7
03-27-2011
Join Date: Jul 2008
Location: MINERAL POINT
Posts: 48
Likes: 0
Received 0 Likes
on
0 Posts
#8
03-27-2011
#11
04-08-2011


#12
04-08-2011
Join Date: Mar 2011
Location: Quebec, Canada
Posts: 10
Likes: 0
Received 0 Likes
on
0 Posts
Check out my thread HERE
I don't really understand this part. When I disassembled my cluster, I could move the needles freely until they hit the edge. For example the RPM needle stopped at "0" and I couldn't wedge them down further. I assumed the socket just 'stopped' at some point and all I would have to do is replace the needles at the "0" marker.
Last edited by steelfrog; 04-08-2011 at 11:25 AM.
#13
04-08-2011
to get the needles off you have to twist them off. You make the mark so when you put them back on you will be able to line up that stopping point at the 0 marker aka your mark.
edit. didnt explain it to well.
To get the needles off you have to turn the needle clockwise till you hit the stopping point. Then you continue turning past that stopping point. IF then you decide to turn it back your needle will be off the amount that you turned it past the stopping point. This is why you need to make a baseline mark so when you put the needles back on you can line them up instead of eyeballing them.
#14
04-08-2011
Join Date: Mar 2011
Location: Quebec, Canada
Posts: 10
Likes: 0
Received 0 Likes
on
0 Posts
to get the needles off you have to twist them off. You make the mark so when you put them back on you will be able to line up that stopping point at the 0 marker aka your mark.
edit. didnt explain it to well.
To get the needles off you have to turn the needle clockwise till you hit the stopping point. Then you continue turning past that stopping point. IF then you decide to turn it back your needle will be off the amount that you turned it past the stopping point. This is why you need to make a baseline mark so when you put the needles back on you can line them up instead of eyeballing them.
edit. didnt explain it to well.
To get the needles off you have to turn the needle clockwise till you hit the stopping point. Then you continue turning past that stopping point. IF then you decide to turn it back your needle will be off the amount that you turned it past the stopping point. This is why you need to make a baseline mark so when you put the needles back on you can line them up instead of eyeballing them.
#16
04-08-2011
Join Date: Mar 2011
Location: Quebec, Canada
Posts: 10
Likes: 0
Received 0 Likes
on
0 Posts
Well damn. Now I'm going to have to try this weekend. If I tinted the back of the gauge cluster blue without switching to LEDs (for now), would the light still shine through, or would it be too weak?
#18
04-08-2011
The normal dash illumination bulbs will be the t10 base bulbs/leds.
I'm working on modding some t5 leds with different color led's as all I have now are white. The white led's work perfectly well but using the same color led as the color filtering adds a little depth to the color (at least I think it does).
#19
04-09-2011
I pulled my needles off with a fork. I ran the truck to warm first so I could see where everything was set, and then i just drove next to a buddy to put the speedo back on, here is the link to the bulbs I bought,
http://www.superbrightleds.com/cgi-b...HP5.htm#photos
Sanding the green off was not a big deal. You have to be careful you dont sand any other colors off, I hit the door ajar a little bit so when that light comes on you can see some clear but its not that big of deal to me. I only replaced the main 194 bulbs on the back, I didnt do any of the dummy lights. I hope this helps.

Thread
Thread Starter
Forum
Replies
Last Post
Jp7
OLD - Interior, Exterior, Electrical, & Misc.
3
06-18-2012 03:04 PM
Tys 4x4 FTW
General Ford Ranger Discussion
21
02-08-2010 08:09 AM
Jp7
General Technical & Electrical
6
08-30-2008 01:43 PM


