Cut my head liner.
#1
 07-05-2009


Cut my head liner.
Sooo I'm waiting on a temp sensor for my OHC to come in the mail so I decided I would mount the OHC and then do all the wiring once the sensor arrives. So I measured twice then cut into my head liner. No worries I didn't f anything up but I was too scared to pull out the drill, cause my dad would probably come outside then panick and rip my head off for cutting up my head liner 
I'm hoping to get these holes drilled tomorrow that way he just sees the finished project and doesn't get all pissy. How do yall usually go about drilling the larger holes that the clips snap into? Just drill two holes and cut them together?
I'm hoping to get these holes drilled tomorrow that way he just sees the finished project and doesn't get all pissy. How do yall usually go about drilling the larger holes that the clips snap into? Just drill two holes and cut them together?
#3
07-05-2009
Join Date: Oct 2006
Location: Virginia Beach, VA
Posts: 193
Likes: 0
Received 0 Likes
on
0 Posts
#4
07-05-2009
The temp sensor will be mailed tomorrow. I would suggest using 18 gauge speaker wire to wire up your temp sensor. It will make easy work of fishing the wire through the vehicle.
For the holes I just used my bracket as a template and used a sharpie to mark where the holes needed to be. Then for the slot I used a big bit and drilled 3 holes and then used a flat screw driver to fold the extra metal back. Worked pretty well.
For the holes I just used my bracket as a template and used a sharpie to mark where the holes needed to be. Then for the slot I used a big bit and drilled 3 holes and then used a flat screw driver to fold the extra metal back. Worked pretty well.
#5
07-06-2009
The temp sensor will be mailed tomorrow. I would suggest using 18 gauge speaker wire to wire up your temp sensor. It will make easy work of fishing the wire through the vehicle.
For the holes I just used my bracket as a template and used a sharpie to mark where the holes needed to be. Then for the slot I used a big bit and drilled 3 holes and then used a flat screw driver to fold the extra metal back. Worked pretty well.
For the holes I just used my bracket as a template and used a sharpie to mark where the holes needed to be. Then for the slot I used a big bit and drilled 3 holes and then used a flat screw driver to fold the extra metal back. Worked pretty well.

This is a pretty cool mod for under $20. Hopefully I can get it all up and running with no problems. I have no clue what color the display lights up though. But I'm thinking about putting my ipod in the garage door opener compartment.

#7
07-06-2009
#8
07-06-2009
ugh I'm a bit fustrated right now. Took me about 2 hours to get the holes drilled and the ohc snapped into the bracket. The right pin didnt want to snap in so it was a pain in the ***. Now from the drivers seat the OHC looks pretty good, but when you look closer you will understand my fustration.
So here it is from the drivers side at a distance.
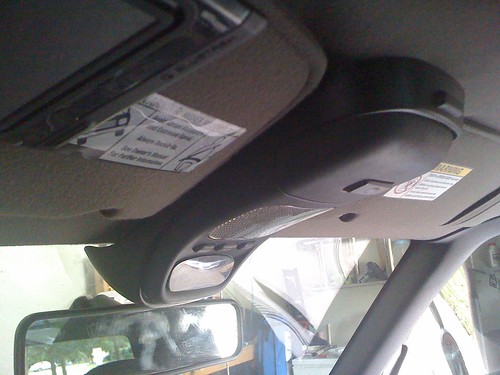
If you get closer you will notice that I mounted my bracket too close and the end of it doesnt sit flush with the windshield, rather it sticks out a bit.
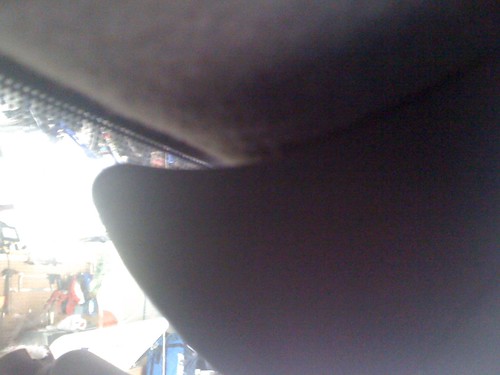
And finally the part that is beyond repair. I cut too large on the passenger side of the OHC. Theres a small part showing where you can tell I cut the headliner.

So yea I feel like a royal **** up right now.
So here it is from the drivers side at a distance.
If you get closer you will notice that I mounted my bracket too close and the end of it doesnt sit flush with the windshield, rather it sticks out a bit.
And finally the part that is beyond repair. I cut too large on the passenger side of the OHC. Theres a small part showing where you can tell I cut the headliner.
So yea I feel like a royal **** up right now.
#9
07-06-2009
Join Date: Oct 2006
Location: Virginia Beach, VA
Posts: 193
Likes: 0
Received 0 Likes
on
0 Posts
#10
07-06-2009
Join Date: Mar 2008
Location: locust grove georgia
Posts: 1,441
Likes: 0
Received 0 Likes
on
0 Posts
#11
07-06-2009


#12
07-06-2009
#14
07-07-2009
Join Date: Jun 2009
Location: USA
Posts: 596
Likes: 0
Received 0 Likes
on
0 Posts
#15
07-07-2009
I decided to wire (most) of it up today. I only had like 4 inches of wire coming off the harness cause the way I cut it so the longest part was crimping on longer wire. The only part I gave up on was getting my dome light off so Ill probably hold off on that till the sensor arrives, then I'll complete the wiring. But so far so good, I like the color it lights up.
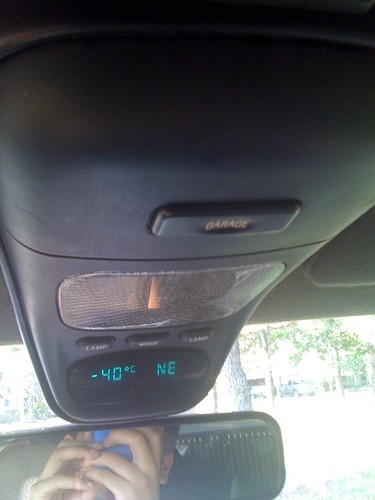
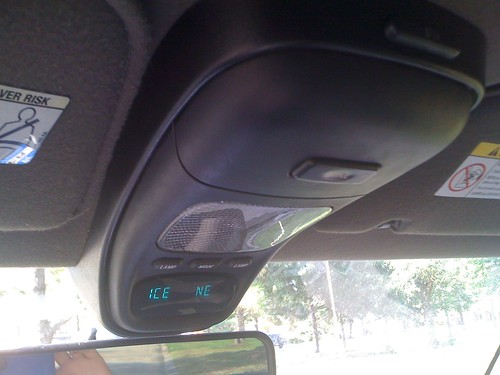
If any one knows an easy way to get this type of dome light off, let me know!
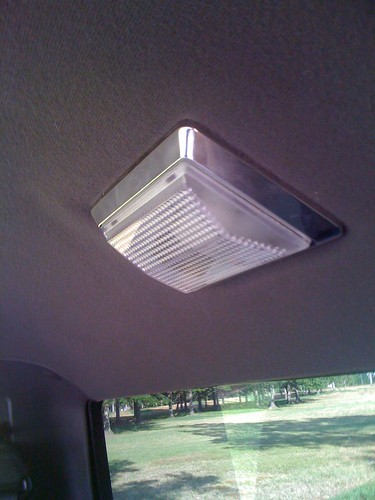
If any one knows an easy way to get this type of dome light off, let me know!
#16
07-07-2009

#18
07-07-2009
#20
07-08-2009
Thanks. I got it off, I was gonna go ahead and run the wire(s) but I need to pull my headliner down a bit. Its too dark/humid for that right now. Since I just have a single dome light I know I run the black and blue wire into the dome light but what about the map light wire?
The other one may be tucked away up in there.
While your at it you should upgrade to a mustang domelight. Simple plug and play dome light

Thread
Thread Starter
Forum
Replies
Last Post
DaveWMFD
OLD - Interior, Exterior, Electrical, & Misc.
19
03-08-2010 07:09 PM


