dropped 91 4.0 auto..
#51
 02-05-2012


Join Date: Mar 2010
Location: New Richland MN
Posts: 33
Likes: 0
Received 0 Likes
on
0 Posts
So heres as much of an update as i can give.. I have decided that the 4.0 just isent my style .. So i'm puting a 5.0 in it :) I will be continuing the body mods I have in mind just not going to paint it till the motor and drive train is in .I already have a complete 92 mercury grand marquis .. car runs like a top but the tranny is shot so thats the first thing i need to figure out .,.. convert to a 5 speed or stay with the auto and keep it simple ... .
well off to search the web for some tips and tricks to getting this all done..
well off to search the web for some tips and tricks to getting this all done..
#53
03-31-2012
Join Date: Mar 2010
Location: New Richland MN
Posts: 33
Likes: 0
Received 0 Likes
on
0 Posts
#54
04-03-2012
Join Date: Mar 2010
Location: New Richland MN
Posts: 33
Likes: 0
Received 0 Likes
on
0 Posts


#56
04-04-2012
Join Date: Mar 2010
Location: New Richland MN
Posts: 33
Likes: 0
Received 0 Likes
on
0 Posts

#57
04-14-2012
Join Date: Mar 2010
Location: New Richland MN
Posts: 33
Likes: 0
Received 0 Likes
on
0 Posts


#58
04-14-2012
Join Date: Mar 2010
Location: New Richland MN
Posts: 33
Likes: 0
Received 0 Likes
on
0 Posts


#59
04-21-2012
Join Date: Mar 2010
Location: New Richland MN
Posts: 33
Likes: 0
Received 0 Likes
on
0 Posts
Ok I'm going to write this all out so anyone looking for this info will find it ..
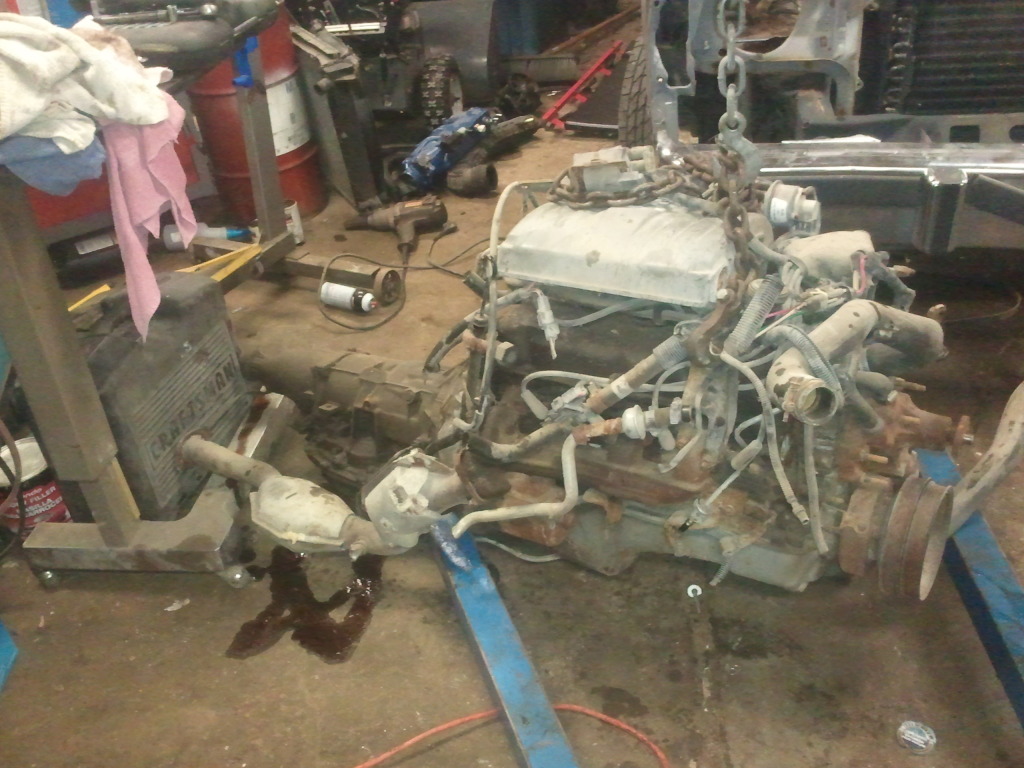
My truck is a 2wd 1991 ford ranger ext short box standard cab.. It came factory with a 4.0 ltr , automatic transmission , and it had air conditioning ..
the motor and transmission I am swapping into the truck is a 1989 ford 5.0 out of a Lincoln town car, and the automatic transmission that was in the same car.
to install the motor I bought motor mounts for a 1990 ford mustang gt convertible . Part number 2725 for the drivers side mount and 2726 for the passengers side mount.
I found in my situation that with the passenger side in the back hole of the two on the frame cross member and the drivers side in the front hole everything seems to line up and sit straight ..
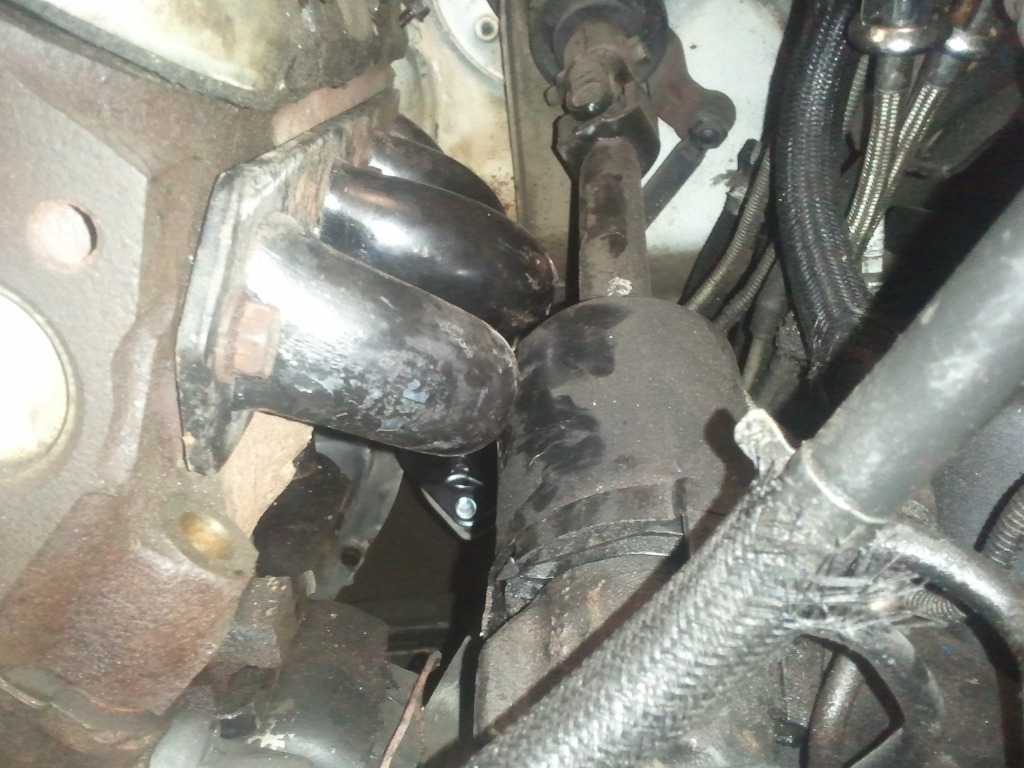
I put the head on the passenger side with the valve cover to test the heater box clearance and found there to be plenty of room..
Once I install the transmission I will continue with more pictures and info.. for now hears all the pics I have of my progress ..
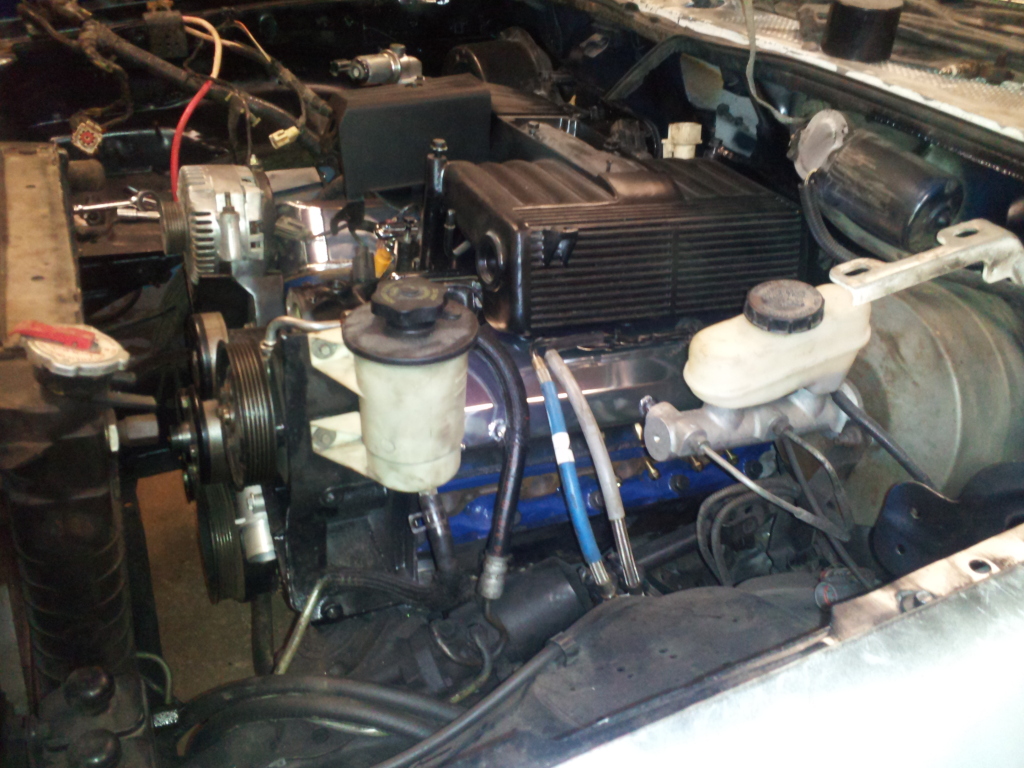
The motor sitting in the engine bay


passenger side motor mount.. its still siting away from the frame because I need to make a hole for the locator dowel ..

The drivers side looks a little crooked but its just the weird angle I had to take the picture
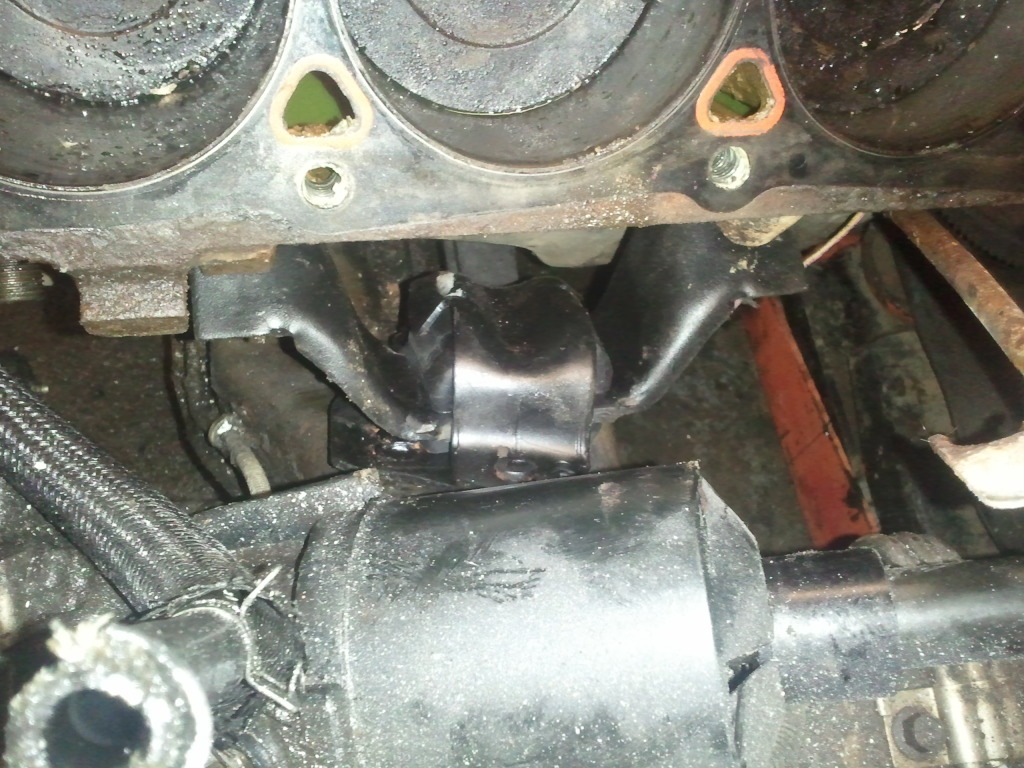
Heater box clearance without the head and valve cover ..

Hears the same pic with the head and valve cover on ..


hears a pic of the clearance from the oil filter outlet to the steering box.


any questions or more pics wanted let me know ...
My truck is a 2wd 1991 ford ranger ext short box standard cab.. It came factory with a 4.0 ltr , automatic transmission , and it had air conditioning ..
the motor and transmission I am swapping into the truck is a 1989 ford 5.0 out of a Lincoln town car, and the automatic transmission that was in the same car.
to install the motor I bought motor mounts for a 1990 ford mustang gt convertible . Part number 2725 for the drivers side mount and 2726 for the passengers side mount.
I found in my situation that with the passenger side in the back hole of the two on the frame cross member and the drivers side in the front hole everything seems to line up and sit straight ..
I put the head on the passenger side with the valve cover to test the heater box clearance and found there to be plenty of room..
Once I install the transmission I will continue with more pictures and info.. for now hears all the pics I have of my progress ..
The motor sitting in the engine bay
passenger side motor mount.. its still siting away from the frame because I need to make a hole for the locator dowel ..
The drivers side looks a little crooked but its just the weird angle I had to take the picture
Heater box clearance without the head and valve cover ..
Hears the same pic with the head and valve cover on ..
hears a pic of the clearance from the oil filter outlet to the steering box.
any questions or more pics wanted let me know ...
#60
05-25-2012
Join Date: Mar 2010
Location: New Richland MN
Posts: 33
Likes: 0
Received 0 Likes
on
0 Posts
so I have been working on the truck a little bit every night . decided that I dident like the way everything was with the gt convertible mounts so i got some steal and pulled out the plasma and made my own ..
Heres the drivers side mount.. I used stock 4.0 mounts.. I started with a ruff cut shape and then after checking fitment i gave them some shape..


Passenger side after some shaping ..

After I was saticfied with them I gave them a few coats of hi temp primer and some crinkle black ..


I did set the motor back a bit and had a few places that i had to do some clearance work but nothing a few smacks from a dead blow couldent fix.
Heres the drivers side mount.. I used stock 4.0 mounts.. I started with a ruff cut shape and then after checking fitment i gave them some shape..
Passenger side after some shaping ..
After I was saticfied with them I gave them a few coats of hi temp primer and some crinkle black ..
I did set the motor back a bit and had a few places that i had to do some clearance work but nothing a few smacks from a dead blow couldent fix.
#61
10-15-2012
Join Date: Mar 2010
Location: New Richland MN
Posts: 33
Likes: 0
Received 0 Likes
on
0 Posts


#62
11-18-2012
Join Date: Mar 2010
Location: New Richland MN
Posts: 33
Likes: 0
Received 0 Likes
on
0 Posts
few updates ... for a top end gasket kit from felpro and head bolts as well ... my heads are back from the machine shop.. complete and clean.. had a 3 angle valve job, new valve gides , new springs and retainers they machined everything smooth and put a coat of royal ford blue on them ...


started cleaning and sandblasting everything and coating it all with some duplicolor engine enamel.. the valve covers will be replaced latter on as I have to clear the roller rockers that i ordered ..
I found a 97 merc mountaineer 5.0 in the you pull yard and grabbed everything off the front of the motor power steering pump and bracket . alternator and bracket .. also got the upper and lower intake and the heads .. Brought it all home cleaned it and painted it all ...
#63
01-13-2013
Join Date: Mar 2010
Location: New Richland MN
Posts: 33
Likes: 0
Received 0 Likes
on
0 Posts
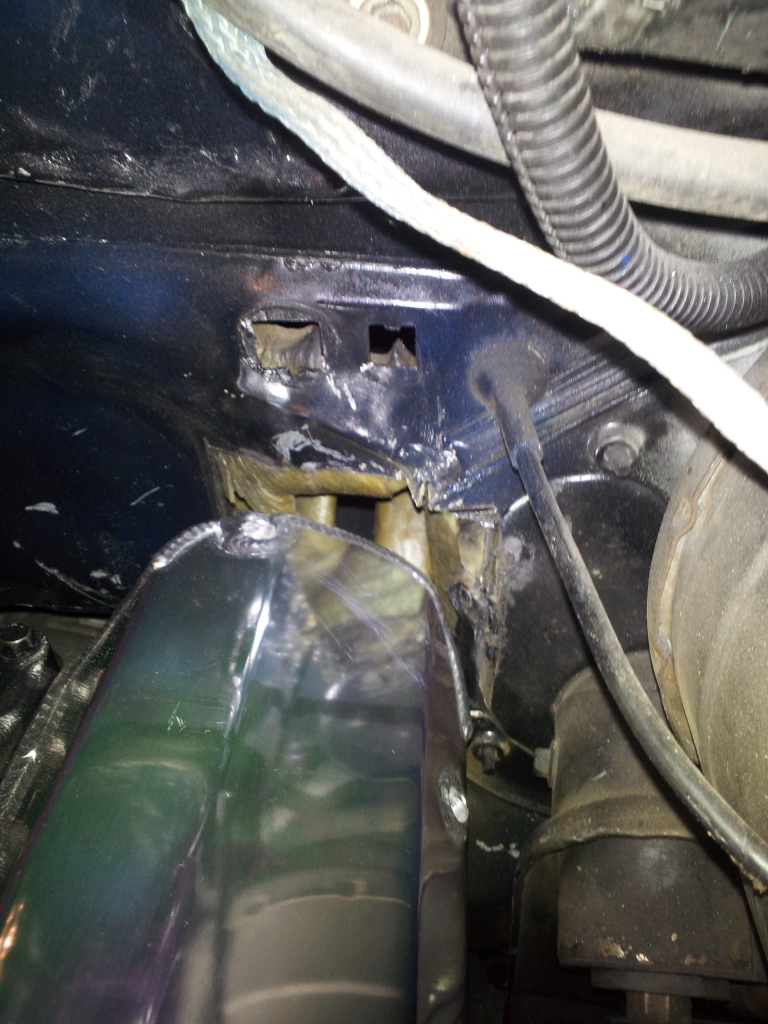
the motor is finally in for the last time .. I put the new valve covers on and slid the motor in and there was a few places were I had to do some mods . When I made my motor mounts i made it so the motor was as far down and back as possible .. the new valve covers are bigger so they contacted the fire wall .. few cuts latter some welding and a small amount of bondo to make it look alittle better and it fits like a glove.
here you can see where I cut to gain some clearance


I made some patch panels and welded them in..


A little bondo to smooth things out a bit..


and some paint to finish things up..

Now the motor is in and everything clears... time to start wiring things up..


here you can see where I cut to gain some clearance
I made some patch panels and welded them in..
A little bondo to smooth things out a bit..
and some paint to finish things up..
Now the motor is in and everything clears... time to start wiring things up..
#64
01-13-2013
Join Date: Mar 2010
Location: New Richland MN
Posts: 33
Likes: 0
Received 0 Likes
on
0 Posts
the motor is finally in for the last time .. I put the new valve covers on and slid the motor in and there was a few places were I had to do some mods . When I made my motor mounts i made it so the motor was as far down and back as possible .. the new valve covers are bigger so they contacted the fire wall .. few cuts latter some welding and a small amount of bondo to make it look alittle better and it fits like a glove.
here you can see where I cut to gain some clearance

I made some patch panels and welded them in..


A little bondo to smooth things out a bit..


and some paint to finish things up..


Now the motor is in and everything clears... time to start wiring things up..


here you can see where I cut to gain some clearance
I made some patch panels and welded them in..
A little bondo to smooth things out a bit..
and some paint to finish things up..
Now the motor is in and everything clears... time to start wiring things up..
#65
07-24-2013
Join Date: Mar 2010
Location: New Richland MN
Posts: 33
Likes: 0
Received 0 Likes
on
0 Posts
after a short break I finally am getting back to working on the ranger ..
still weighting on a few parts for the engine so I started working on the body again .. pulled the box off tonight and got the hole for the old tail handle closed and now im trying to figure out what to do with the gap between the pan and the tail gate..
hears what I started with ..

And hears where im at now.


#66
07-31-2013
Join Date: Mar 2010
Location: New Richland MN
Posts: 33
Likes: 0
Received 0 Likes
on
0 Posts


#68
08-17-2013
Join Date: Mar 2010
Location: New Richland MN
Posts: 33
Likes: 0
Received 0 Likes
on
0 Posts


#70
08-17-2013
Join Date: Mar 2010
Location: New Richland MN
Posts: 33
Likes: 0
Received 0 Likes
on
0 Posts


#71
09-15-2013
Join Date: Mar 2010
Location: New Richland MN
Posts: 33
Likes: 0
Received 0 Likes
on
0 Posts

#72
09-20-2013
Join Date: Mar 2010
Location: New Richland MN
Posts: 33
Likes: 0
Received 0 Likes
on
0 Posts


#73
10-30-2013
Join Date: Mar 2010
Location: New Richland MN
Posts: 33
Likes: 0
Received 0 Likes
on
0 Posts
got some time to work on the truck today .. threw the front end together to see what i have to work with and this is what i got...


I dont like the grill so thats gona go.. havent figured out whats gona replace it but ill figure something outt. and I plan on making a filler panel for the space between the bumper and grill sash..


I dont like the grill so thats gona go.. havent figured out whats gona replace it but ill figure something outt. and I plan on making a filler panel for the space between the bumper and grill sash..

Thread
Thread Starter
Forum
Replies
Last Post


