When you click on links to various merchants on this site and make a purchase, this can result in this site earning a commission. Affiliate programs and affiliations include, but are not limited to, the eBay Partner Network.
I thought on doing the LED Projector install myself,Profile Bi-LED; I have asked around about who might do the retrofit for me, and got no replies, which is ok, but either I need to do it or have it done by the Projector Supplier.
I have read and listened to a lot of U-Tube Videos, and my opinion is as follows:
a) If the Projectors can be mounted with the Threaded Stub at the rear of the Projectors then try it.
b) If you need to cut the rear of the housing, like the Ranger Housings because they are very shallow, then have the pros do it, there are too many things that could go wrong.
So I am in negotiations with a shop to have my new housing, sitting at the USPS Office, retrofitted with the LED Projectors above including Black Shrouds modified to fit the Headlights, and a New Wiring Harness to fit the 2003 Ranger.
I am thinking on two options, thinking, thinking:
1) Air Vents, in housings - not sure about them but it is easier to do it now than later, not too expensive no additional labor if done with the Projectors !
2) AND LED Rings around the Projector Lens. These have Cree LEDs mounted in the rings, again not too expensive and no additional labor if done with the Projectors. The thing I like is they are BI-Colored, white until you turn on the directionals and then amber or ice-versa !
The overall price is a killer, one shop has a 15% off, if you sign up for their Newsletter, so I want to get all of the options that make sense up front.
Back to the Install by Supplier:
From what I have read on the Web, and videos seem on U-Tube, there are a few things that need to be checked before buttoning up the Faces of the Housing, which need a good sealer to get back to IP68 Waterproof standard. These little things need to be addressed to get the most light and in the right place.
The cutting of the housing is interesting, from what I have seen, it is something I think I can do, but finding the mounting points for the three or four bolts, that's another thing, getting it positioned to keep the cut off straight with the housing and truck, that's something I am not sure I want to tackle.
My outcome with all the information on the web, all the info from the supplier, and all of my projects that are still waiting to get done... I have decided to have a shop do the work; that way they will be done, will be a plug and play, and I get to finish the mezzanine in the Barn.
The shops being considered: 1) Lightwerkz, 2) The Retrofit Store (? - Name)
These are the new Housings.
Here is the Projectors: 5500K - 6000K, Lumens ?
Last edited by Scrambler82; 03-27-2018 at 06:06 PM.
Things have taken a turn... good or bad, not sure, but I have decided to go with the Morimoto, D2S 4.0 Bi-Xenon Projectors, with 35W drivers, and Switchback Halos.
The reason for this turn around is that the pattern of the D2S Units not only have a broader low beam, but the High beams are where the D2S shines and I need the high more than good low beams.
These are the Morimoto D2S Bi_Xenon Projectors:
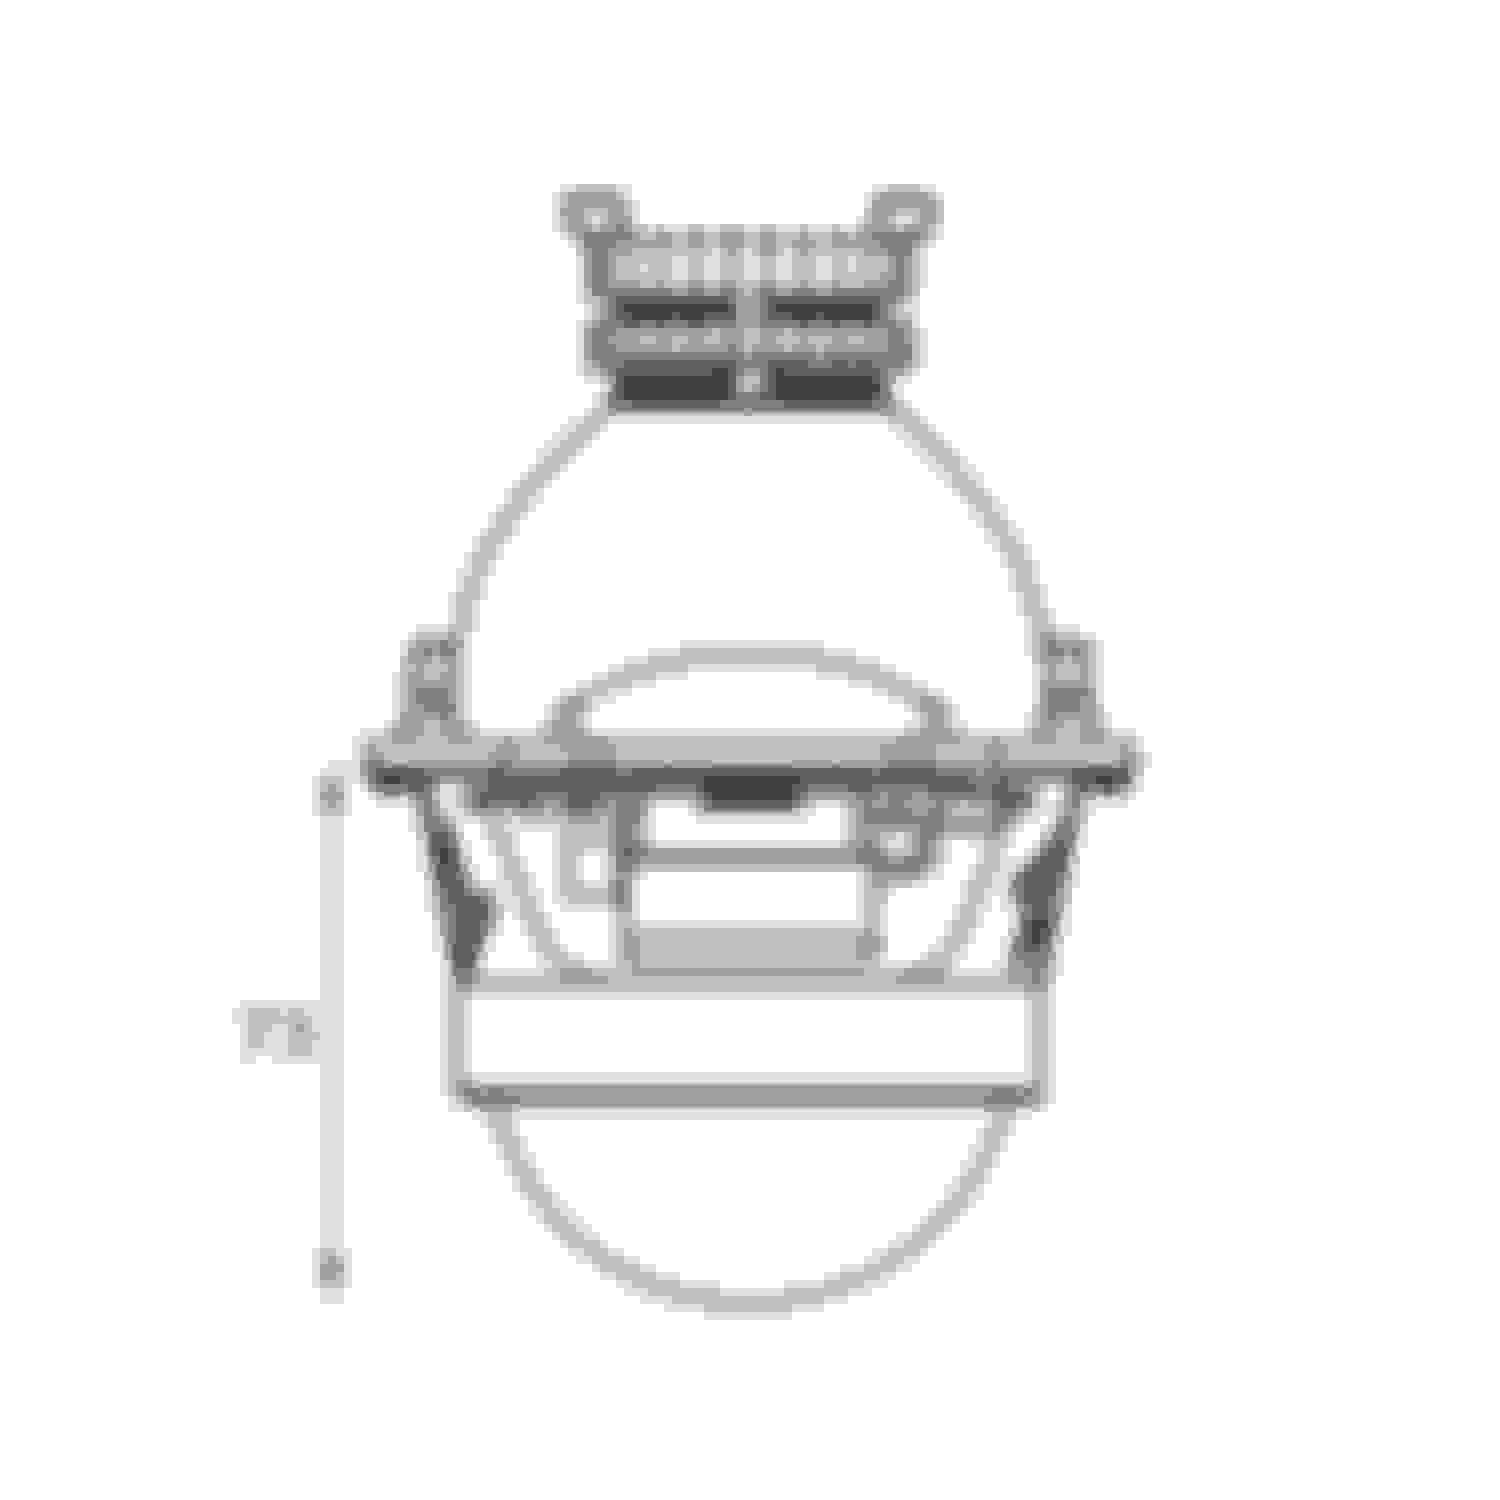
Not sure if anyone is interested but here are some measurements:
73mm = 2.87", the new Housings are 3.5", but I need to cut off the back end of the Housings, so some sort of spacer will be needed.
48 mm = 1.88"just need to check how much room I have between the housing and the radiator support.
I also found a Jig On-Line for the bolt pattern of the D2S Mounting Plate, the same as the Hella D5 Projectors, and ordered it but... there is a holiday where it is coming from and things are on hold. The holiday os called "Tomb Sweeping" and it lasts for five days, I am wondering what that's about but haven't looked it up !
This Jig has a positioning Pin based on the type of OEM Bulbs you use, it aligns the jig to the same position as the OEM Bulb, and has Drill Sleeves to position the holes, sounds good BUT only time will tell. (I think I need to made a back up as soon as it arrives).
I have LED Fog Lights, cheap ones, but hoping they work out too, just need to fill the area in front of the truck, similar to the OEM Fogs !
After that I am hoping the Mezzanine will be completed in the Barn (walls are started), and I can get the Truck inside again and then the doors come apart for powered windows, maybe locks and mirrors too. All of the electrics will be based on the How-To's on this Site.
Will update once things arrive and the projects get started.
Thanks for reading !
Last edited by Scrambler82; 04-05-2018 at 05:43 PM.
The Radio Bezel, Door Handle / Switch Bezels and the Cup Holder are still at the Hydro-Graphics Shop, problem with finding the Brushed Metal Graphic, but he says he has it coming in but it has been four weeks.. !
Not really happy about the timeframe but I was told this guys "Is the Guy in Hydrographics" !
Hoping for delivery next week.
The look isn't bad, was hoping for something a little lighter in color for the Radio Bezel and Door Bezels but they look good.
The Radio Bezel, no holes !
The Door Bezels for Electric Windows and Locks Mod.
This one can go in but I am waiting for the total package to be completed.
The Cup Holder.
So far so good ! I need to get a few more lights installed in the Barn and then the straightening out of the mess. Should get enough room to start at least one project on the Truck.
Back to the Projector Headlight Project.
I don't like doing something without measurements... I've been told this retrofit isn't an exact science until you get to the leveling of the Projectors but my OCD kicks in and I need "Exactitude" or my mine goes bonkers !
AND the eBay Jig won't fit the 9007 Bulb Opening, why not I ask... I was told it is an older style bulb and there isn't much call for them.
So I am at square one with the Projector Retrofit !
I am looking for a FRIEND, a new friend, in the Temecula, CA area, that has an Oven in the garage to heat up the housings, one at a time. I tried to use the kitchen oven but got a "Not with my Stove you aren't"... funny when the wife want dinner cooker for her it is my stove now its here stove, wondering where the break point here !
My PLAN... once the Lenses are separated from eh housing, I want to so some quick measuring for fitment but from all of the reading these 3" D2S, 4.0, will not fit the '01 up Ranger Housings without cutting.
I will attempt to make an aluminum plug to fit the 9007 Bulb Mounting and use it as a centering point for not only the alignment of the Projector but the positioning of the Four Mounting Holes on the Projector.
Once that is done I will determine if the Plastic Housing is secure enough to hold the Housing without cracking, if not then I am thinking of a Mounting Plate for the rear of the housing to mount the Projector Flange to. this may seem likeextga work but I am hoping it will give Ranger Owners a Jig to make the initial cut and holes in the Housing.
Once the Center Cut is done and the four hole are in place then I will attempt to secure the Projectors in the Housings. How you ask, I do not know, except from watching the videos on U-Tube. JB Weld will bemused and probably more than is needed but hoping for a lifetime, remaining lifetime, of use.
I have not idea at this point how to start the process except to fins a level point and determine how the lights would be mounted on the vehicle. From there I can get an idea of the projector level point and once the holes are in place I can try to line up the Projector based on the level point. I have not idea how I am going to start, the housings are aftermarket and they may not fit exactly the same.
Just waiting for a friend to pop their head up and say they have an oven I can use for the Lens removal and I can get started.
Based on my past, "Procrastinator Extraordinaire" this is going to take some time to get finished... I have most of what I need:
New aftermarket Headlight Housings
D2S, 4.0, Projectors
Install kit with a lot of parts
A truck wanting new headlight more than I do... LoL !
I think I have everything to get the job don't, just need the Oven and the ability !
Headlights are being built by a guy on another Ranger Forum, Jordan.
Audio System, parts are here. I will be measuring tomorrow to see if the Amp will fit either under the Passenger seat or between the seats and put a console over it.
I ended up getting an Alpine iLX-207 Mech-Less Head Unit. I wanted a good unit to use Apple Car Play, a friend who runs an Audio Shop said this is a good one.
I will also get a chance to install the Radio Bezel with Water Graphic.
After that I am gathering parts for a Washer/Overflow Tank Replacement, while everything is apart, I need to replace the Heater Resistor AGAIN and this time I'm doing the Pigtail and I need to address the Vacuum Ball connections... defrost only !
Got my work cut out for me.
AND the wife added to the Honey Do List, counter in the pantry and shelves in the office.
Projector headlight conversion was on hold, decided I wasn't going to get it done so I shipped all the parts to a Pro to do it .
Almost ready, waiting impatiently.
New Audio System, parts are here, also having a pro do this project BUT can't decide on who.
I will be taking all of the parts and talking to three shops tomorrow, if one impresses me, they will have the job.
Also started my new Audio System upgrade.
Head Unit: Alpine iLX-207, no mechanicals.
Front 6.75" Round Speakers with Tweeters, Rear 6 x 8" coaxial ovals, 800 wait Amp, and an 8" Woofer.
Not sure of all the extra things I'm going toned but I am sure the Shop will let me know.
Moded my Sub Enclosure to fit behind the seats.
Still needs the finishing touches.
Then added the Tweeters.
Remove the Radio Bezel and dropped the electrics out the bottom of the dash area, to be mounted in a new panel to be mounted under the HVAC area, closing off the Cubby area, cubby will go too.
Who knows what will be next.
Power Windows, '06 Mirrors, maybe a V-8, now that would be nice !
Heres the new Head Unit, Alpine, iLX-206, iPlay... works GREAT with eh iPhone.
Hydro-coated Radio Bezel, the Head Unit needs to be moved out more, wish I had noticed it before I left the shop, now I can fix to or take to back. The same shop will be doing the Power Windows and Mirror hook up and maybe Locks, time will tell but they can fix the Head Unit position then.
'06 Power Mirrors, pulled the Glass, cleaned the insides some, add wiring for the directionals in the glass, and Heaters that came on the mirrors. Thinking on Puddle Lights in the mirrors, not too sure I want them there. Thinking also, on a small directional on the bottom of the mirror, again, not sure but will need a little room on the bottom for a bolt on mirror to see down the side of the truck, and watch the rear wheel when off-roading.
My latest acquisition, 1911A1, 9mm, S/S.
Mods thinking on: New Black Aluminum (maybe Ebony) Grips, new sights after I have some time at the range.
Still Working On the Raptor Grille Lights
Still throwing this one around some, thinking of reworking the mount some, thinning out the areas between the mounting hardware.
I will be getting the grille and light bar powder-coated the same color, the Grille Surround and the Hood will be some shade of BLACK but I'm still thinking on it.
Other than that I'm in the house, not obeying an order to stay home but staying home because it is the right thing to do !
I even turned down a "Quarantine Party Invite"... IF I get p!sses off about others going out without masks, partying, I can't do it myself.
God Bless All, stay safe, stay at home if you can !
Added a Light Bar to my Custom 4x4 Fabrication Bumper, Mike is making them !
Also, added but haven't hooked up an LED Light Bar, not sure when it will be finished but something for a rainy day.
No winch yet, I'm still thinking on it, the Master Procrastinator that I am, I need to modify the Grille and Surround.
I'm thinking adding a bar across the grille at the correct height for the winch clearance, then some down supports at the edges of the winch mount opening, from there all it will take is some cutting.
Biggest problem, what to use for the bar that is compatible with the fiberglass, maybe someone makes a fiberglass bar the length I need. Once it is all black you won't see all of the differences in material anyway.
Last edited by Scrambler82; 04-22-2020 at 09:49 AM.
looking good man! I haven't been on in ages, so I'm just snooping around.
On the 1911, if you wan some crazy cool/unique grips check out https://www.highfiguregrips.com/ John the guy who makes them is super cool. Worked with him in commercial carpentry for a while and those are his pastime.
INT3RC3PTOR,
Good to hear from you, hope you and the family are safe out of the way.
I am hanging in there for the Site, more lately than usual.
The 1911 Grip, nice stuff but two things, first I am thinking Ebony Wood, and two the cost of those Whoa !
The Grips I'm looking at are the Houge Ebony $60, or their Aluminum Grips, at $40 !
I think the Black Grips and the S/S Housing will look good.
 03-27-2018