N3ELZ's 5R44E Transmission Rebuild Log
#26
 03-28-2008
Unregistered User
Posts: n/a
The can of stuff below is the shiz-nagle-floogle-mojo-workin'est stuff I have ever used. It's nasty though. I sprayed it on one side of the plate when I got home and didn't try to get the gasket off until about 2 hours later and once started, it just PEELED off leaving just a few scattered islands of paper. I've got the other side soaking now.
If you need to remove these or any other gaskets, this is the stuff. Definitely an outdoor or use in a well-ventilated area product. The chem mix in these could get to you, lol.
If you need to remove these or any other gaskets, this is the stuff. Definitely an outdoor or use in a well-ventilated area product. The chem mix in these could get to you, lol.
I used it when I did my last intake. I was sick for 3 weeks afterwards. I know I have a condition for such, but exposures for anyone is not good! It might not effect anyone else as bad, but wear some gloves and such please!

#27
03-29-2008


Thanks for the concern, D. -- I sprayed and soaked it OUTSIDE, and let it sit for awhile. When you do that, the volatiles go away after a bit, and it kind of "gels" with the stuff it's begun to dissolve and the VOC's seem virtually gone by the time you use it. I recommend letting it sit for an hour or more -- it really gets rid of the VOC's and makes the gasket that much softer to remove.
Well, here's the results after cleaning the gasket off. It was not so bad to remove with the Permatex stuff -- better living through chemistry as Dupont used to say.
Well, here's the results after cleaning the gasket off. It was not so bad to remove with the Permatex stuff -- better living through chemistry as Dupont used to say.
#28
03-29-2008
Some sneer at the special tools you can get for this, and you can make some of them for sure. But little things like these locator pins make the job much more sure and easy.
If you look at the pics below, you can see some pins at the corners of the valve body being used to positively locate the gasket position prior to mounting the separator plate. Without something like this, you run the risk of having the gasket move a bit when you bolt the plate on.
When you put the plate on, that's not the worst place you worry about. So the pins also thread into the transmisson housing to positively locate both the gasket and align the valve body as you put it on. This way, you're not sliding it around trying to line up the holes and displacing the gasket.
These pins and others (like the bell housing alignment pins) came with that Ford Rotunda toolset I bought on eBay.
#29
03-29-2008
I mentioned earlier that you may have mods from Ford that eliminate the need for the Transgo kit and how you can know when you look at your VB. Here's the indication.
When you look at the end of the valve body where the "spool" that engages the shifting lever is, you'll see this perforated plug. It's not on the unmodified design. You will also be missing a relief valve and triangular shaped filter inside the VB passageways -- both are integrated into this piece you're looking at.
Now the Superior kit is said to actually still do some useful stuff -- it works differently than the Transgo. There's a lot of info on all that here and it's a good read BEFORE you do this. I only went to it AFTER I got confused by the missing parts in the passageways when I took apart the VB.
http://www.explorerforum.com/forums/...d.php?t=140987
The second pic is just the VB after I'd completely reassembled it.
#30
03-29-2008
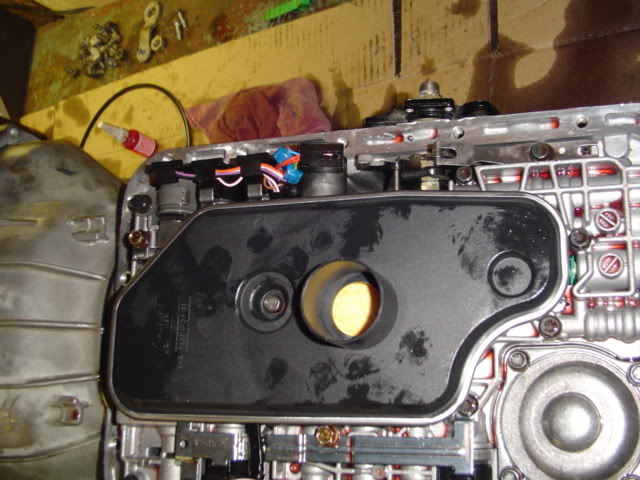
Okay, some final pics for now of the VB reattached. After this it was just some detail work of buttoning up the cover, putting the extension housing back on, and mounting the DTR sensor (digital transmission range sensor).
I forgot to get a transfer case to extension housing gasket so I need to go out and get that later. Probably the metric bolts to bolt up the transfer case to the housing also. Tranny goes in the truck later today.
I forgot to get a transfer case to extension housing gasket so I need to go out and get that later. Probably the metric bolts to bolt up the transfer case to the housing also. Tranny goes in the truck later today.
#31
03-29-2008
#32
03-29-2008
Member
#35
03-30-2008
Well, below you can see the t-case and tranny before I bolted them back into the truck.
Hey, the alignment pins I got with that tool set are neat for getting the torque converter to line up. You put the 2 pins on studs adjacent to one another on the torque converter, and turn the flexplate to where the drivers side will project through the hole for the starter.
Then you can get the tapered ends in and as you push everything lines up properly. You can't get it all the way in on a 3.0 -- not sure about others. But it goes in far enough that you remove the one pin sticking through, and rotate the flywheel to where the other pin can be removed through the access plate. Then fine tune the tranny height and push -- voila! It's in. Very nice.
The other pic shows a problem I still have. I feel pretty stupid for not measuring this previously since I know there's two sizes of rear driveshaft flanges. The driveshaft I have for the rear uses the larger flange (like my axle does), but the t-case I have uses the smaller one. I'm going to post on this separately to see if anyone has a flange I can buy to replace the one on my t-case.
Oh, the wad of grey stuff on the t-case is not gum, lol. It's epoxy putty I used to fill a large hole for an unused sensor on the t-case. I'm just reusing the output shaft sensor in the transmission since I don't have a 4x4 PCM or anything and if I were to hook up one from the output shaft of the t-case it would confuse the PCM. I just have to divide by 2.5 to know how fast I'm going in 4 low, lol.


#37
03-30-2008
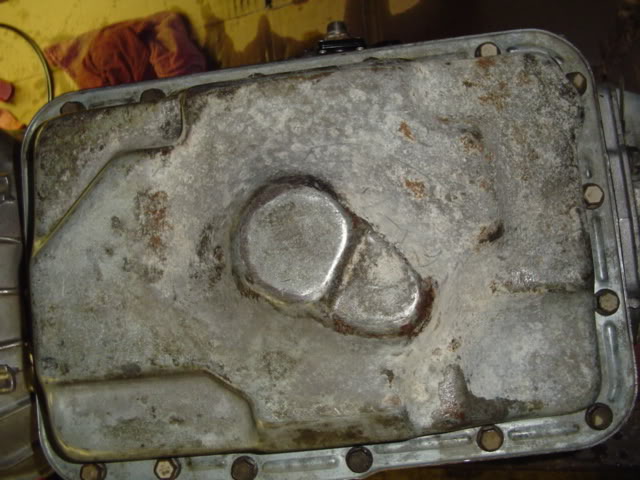
To use it would have been more work than I wanted to do, lol. If you look, you can see the screw is busted off in the hole, and sometimes getting those steel-to-aluminum screws out with an extractor doesn't work and you have to drill them out and re-tap for a larger screw. It came to me that way so I don't know what happened to it.
I decided to do an end-run around that and take the redneck approach, lol...
I decided to do an end-run around that and take the redneck approach, lol...

#39
03-30-2008


#41
03-30-2008
#42
04-01-2008
Well, just an update: the front pipe won't ship until late this week, the O2 sensors are on the way, and I haven't heard from the CAT vendor about shipping yet.
This weekend I'll go to the junkyard and get the flange or the smaller driveshaft end -- one or the other depending on what's easier to get out, lol...
This weekend I'll go to the junkyard and get the flange or the smaller driveshaft end -- one or the other depending on what's easier to get out, lol...
#43
04-02-2008

Join Date: Oct 2005
Location: Kennett Square, PA
Posts: 129
Likes: 0
Received 0 Likes
on
0 Posts
#44
04-02-2008
If I average them out it's about right, lol. It's 29" from flange to flange on my truck and the Cherokee shafts are too long, the Bronco too short.
I'll get a Cherokee shaft and cut it down. Guys with D30 front ends have used the Cherokee shaft but the slightly smaller axle works to their advantage.
We'll find a shaft this Saturday when we go to the JY I hope. It's easy to cut them down, but a more work to lengthen them.
I'll get a Cherokee shaft and cut it down. Guys with D30 front ends have used the Cherokee shaft but the slightly smaller axle works to their advantage.
We'll find a shaft this Saturday when we go to the JY I hope. It's easy to cut them down, but a more work to lengthen them.
#45
04-05-2008
Okay, James and I went to the junkyard today and scored two necessary things for my job. I got the end piece of an older driveshaft to adapt to the 2.5" hole spacing on the transfer case, so I don't need to change that flange. Got it for $4 including a temp sensor for James' Cherokee.
I also got a Cherokee driveshaft with a good double cardan joint on it for $25. Interestingly enough, we didn't have to dismount it!
We were looking for a jack to remove one from under a donor vehicle, and the jacks in Cherokees are under the back seat. The donor was missing the jack, so James and I went to find one in different Cherokees.
The first one he went to, he lifted the back seat and no jack -- but there was a good front driveshaft under it, lol. Somebody is going to be unhappy when they come back for it since it looks like they were hiding it to come back for.
James came to where I was and said, "hold this for me will you?" -- I looked at him strangely because I didn't think he needed a shaft, then as he just stared back I was like, "you mean this is one?" He told me yes and how he found it.
Well that saved some time and effort!
The donor Ranger driveshaft for the end piece was also already out of the truck so we just had to knock out the u-joint to get it.
An easy day at the JY!
#46
04-05-2008
If anyone is unclear about the different ends on the driveshafts, here they are next to each other. On the left is the one with 3" bolt spacing, on the right the one with 2.5" bolt spacing (which I needed). I looked at lots of them, and they all looked like they do here so you can tell them apart at a glance without measuring.
All appear to use the same size u-joint. The one shown here is NAPA's heavy duty type.
Second pic is something I highly recommend: a small (12 ton in this case) hydraulic press. It makes all this kind of stuff like u-joint replacement super easy.
All appear to use the same size u-joint. The one shown here is NAPA's heavy duty type.
Second pic is something I highly recommend: a small (12 ton in this case) hydraulic press. It makes all this kind of stuff like u-joint replacement super easy.
#48
04-06-2008
#49
04-06-2008
#50
04-06-2008


