Update (Mustang and Shelby GTG)
#1
 07-12-2011


Update (Mustang and Shelby GTG)
Had our little get together this weekend. Had some good food, meet some awesome people (Thanks to Tracy (Maximum Velocity) for bringing the Boss 302 out ) and got to go to SAR for the first time. What a really nice track. I was really blown away by how well run it was. Really jealous of you local guys. I'd be there every weekend.
Anyway thought I'd share some pics:
Start Point in Buda, TX


In San Antonio @ a awesome italian place. Right down the street from Maximum Velocity

SVO's 85 LX

Warren's GT350

Mikes Mystic:

Justin's V6:

My coupe:

Slick's coupe:

Ed's Blown Shelby:

Dewayne's Shelby:

Heritage Ford GT:

Purdy KR

12 Gt-500

Tracy (Maximum Velocity) Boss 302 very purdy car :P


So this is what a REAL track look's like:

Nice camaro:


This was in the parking lot...unfortunately that's where it stayed...would have like to see what it ran :) Oh well...

Anyway thought I'd share some pics:
Start Point in Buda, TX
In San Antonio @ a awesome italian place. Right down the street from Maximum Velocity
SVO's 85 LX
Warren's GT350
Mikes Mystic:
Justin's V6:
My coupe:
Slick's coupe:
Ed's Blown Shelby:
Dewayne's Shelby:
Heritage Ford GT:
Purdy KR
12 Gt-500
Tracy (Maximum Velocity) Boss 302 very purdy car :P
So this is what a REAL track look's like:
Nice camaro:
This was in the parking lot...unfortunately that's where it stayed...would have like to see what it ran :) Oh well...
#2
07-12-2011
COUPE UPDATE:
Well this mod if finally done. Didn't take too many pictures. I read thread after thread about this mod. Some people said do it this way, other's said this way. This is how I did mine. Pretty straight foreward if you ask me.
Dirty Engine Bay

In Order to install a 3g alternator in a fox, the alternator bracket require's a little massaging.Not all cars have to do this but I had to on mine. Took a die grinder and dremel to grind mine down a bit. I borrow the pictures from another thread so you can see what you need to do:
BEFORE

AFTER

The top bolt hole on the fox is threaded (3/8) if I remember correctly. With the 3g alternator, you can either put in a helicoil, or you can do what most people do and go get a 2in 3/8 bolt,lock washer and nut to bolt up the top of the alternator. The bottom mount retains the factory bolt

New 4gauge power wire going from the alternator to the start solenoid. Some threads were different than other's here. Some said put a waffle fuse, or a fusible link on your new hot wire going to the solenoid. Some said close to the alternator, some said close to the start solenoid. I chose to put it close to the alternator. Well after some looking around (2hrs) No-one around here had a fusible link. So I ended up putting a 140 Amp Circuit breaker in. 4gauge in, 4 gauge out. This way if something goes wrong and I blow a fuse I'm not paying $5 a fuse.
New 4 gauge wire:

Circuit Breaker:

Spliced Stator wire:

Belt Clearence:

That's pretty much it. Only other problem that I ran into was the pulley that was on my stock Fox 75 amp alternator was not the same size that was on my 3g alternator.My belt that I had wasn't big enough. So I ended up just changing out the belt.
I know on my 99 Ranger that the alternator wasn't all that great. I don't know how useful this would be to you guys for a retrofit, but it might be valuable to guys who have the bigger stereo systems/offroad lighting???
This mod is leading up to this electric fan install. Stock Mustang alternator's are 75 amps (output) Not anywhere near enough in order to fire up a Ford Taurus fan. The Taurus fan draws 138 amp for 4 miliseconds on start up. Which would absolutely annihilate the poor anemic stock alt. Going to 130 3g alternator is pretty much a must:
Taurus Fan

Well this mod if finally done. Didn't take too many pictures. I read thread after thread about this mod. Some people said do it this way, other's said this way. This is how I did mine. Pretty straight foreward if you ask me.
Dirty Engine Bay
In Order to install a 3g alternator in a fox, the alternator bracket require's a little massaging.Not all cars have to do this but I had to on mine. Took a die grinder and dremel to grind mine down a bit. I borrow the pictures from another thread so you can see what you need to do:
BEFORE
AFTER
The top bolt hole on the fox is threaded (3/8) if I remember correctly. With the 3g alternator, you can either put in a helicoil, or you can do what most people do and go get a 2in 3/8 bolt,lock washer and nut to bolt up the top of the alternator. The bottom mount retains the factory bolt
New 4gauge power wire going from the alternator to the start solenoid. Some threads were different than other's here. Some said put a waffle fuse, or a fusible link on your new hot wire going to the solenoid. Some said close to the alternator, some said close to the start solenoid. I chose to put it close to the alternator. Well after some looking around (2hrs) No-one around here had a fusible link. So I ended up putting a 140 Amp Circuit breaker in. 4gauge in, 4 gauge out. This way if something goes wrong and I blow a fuse I'm not paying $5 a fuse.
New 4 gauge wire:
Circuit Breaker:
Spliced Stator wire:
Belt Clearence:
That's pretty much it. Only other problem that I ran into was the pulley that was on my stock Fox 75 amp alternator was not the same size that was on my 3g alternator.My belt that I had wasn't big enough. So I ended up just changing out the belt.
I know on my 99 Ranger that the alternator wasn't all that great. I don't know how useful this would be to you guys for a retrofit, but it might be valuable to guys who have the bigger stereo systems/offroad lighting???
This mod is leading up to this electric fan install. Stock Mustang alternator's are 75 amps (output) Not anywhere near enough in order to fire up a Ford Taurus fan. The Taurus fan draws 138 amp for 4 miliseconds on start up. Which would absolutely annihilate the poor anemic stock alt. Going to 130 3g alternator is pretty much a must:
Taurus Fan
#3
07-12-2011
Finally finished my Installation of a Early 90's model 2 speed Taurus electric fan on my 90 Notchback.
Parts:
Taurus Fan:

Hayden Fan Controller:

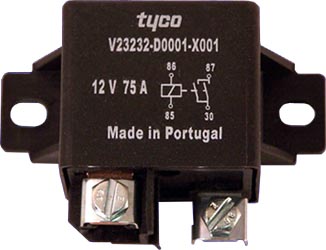
75 Amp Relay :
40 Amp female fuse:
Radiator zip ties:

10ft of 8 gauge wire
10ft of 12 gauge wire
Butt splices
Ring Terminals
Zip Ties
Electrical tape
Ok so I picked up my taurus fan for 28 bucks at our local wrench a part. The weekend before I picked up my 3g alternator for 28 bucks also.
Anyway, Here is my horrible wiring diagram, with my chicken scratch writing. Before I did anything, I wrote this down.

Had a few spots where I just couldn't figure out. The write ups that are on the net vary so much, that you don't know who is right/wrong blah blah blah. So after a call and
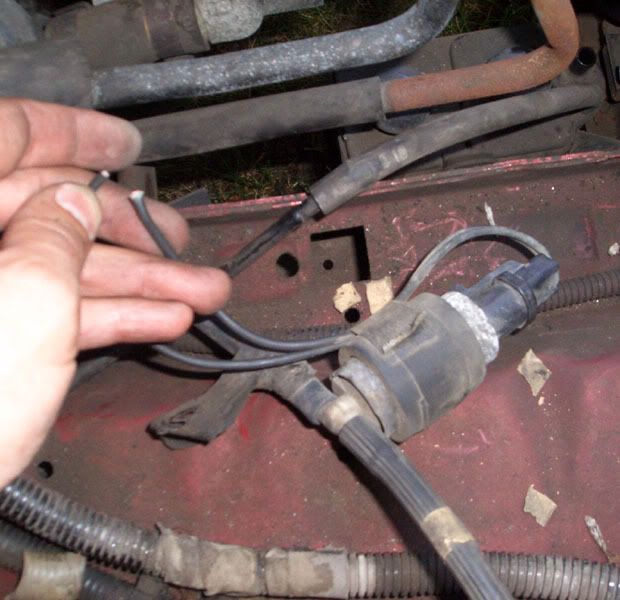
long chat with a professional who doesn't do this for a living, finally got things ironed out. So first I did the wiring for the fan itself.

Installed my 40 amp fuse:


Installed my 75 amp Relay:

Grounded the relay:


Now that that's all installed, time to rip out the old stuff. Pulled out the mechanical fan/clutch/shroud and overflow bottle. Reinstalled the 4 water pump bolts back
into the pulley.
Like every other write up, most talked about using weather stripping. I went the same route. 3/8 x 1/2 roll of weather stripping. I'm going to redo
mine. I think that I can do something better. But this will get me by for right now. The bottom of the fan fit's nicely into the bottom (factory) shroud
clips. But leaves you scratching your head for securing the top. Some write up's had you flip the fan upside down, and trim this piece off and
grind here. I didn't want to do that. So I mounted it the way it was stock. Went to the parts store and got some radiator pull through zip ties for the top
install. Talk about a pain in the ***.
So I installed the fan:


The picture above also show's where I mounted my controller. Figured I'd keep it there, that way I could adjust it if need be. Didn't really
have any other place to put it. All in all it worked out pretty good.
Fan installed:

For the overflow bottle, I still need to work on that. But for the time being I have two of the radiator pull through ties holding it on to the radiator. Hopefully
I'll make something out of sheet metal that will support it on the bottom.
The controller install was pretty self explanatory, I chose to only use the high speed side on the taurus fan. Flow's just fine and keep's my car @ 190 degree's with the
a/c on max and it's 105 outside. Pay attention to color wire's and look really hard at the factory wiring and where you going to tap into. I ended up wiring the fan the wrong
way and it was blowing air into the radiator instead of pulling. I missed the iddy biddy red strip on the wire. I tried to shrink wrap all my connections, some of them I just didn't
have the right size, so I made due with what I had. One note, as far as how to wire up the controller's 12v constant hot, and 12v "KEY ON" I didn't want my fan to run after I have
shut the car off. Things happen and mechanical/electrical parts can crap out. So I wired my controller's 12v constant hot and 12v "KEY ON" hot together to a 12v "KEY ON" source.
Which ended up being the PURGE SOLENOID connector. Both wire's are black so your going to have to figure out which wire is hot and which is ground.
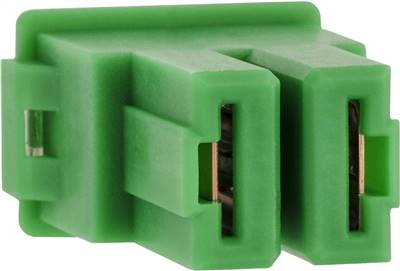
Picture of purge solenoid (borrowed from another forum) which is located on the passenger side below the airbox, and inboard of the frame rail. you can't miss it.
The rest is a piece of cake.
Parts:
Taurus Fan:
Hayden Fan Controller:
75 Amp Relay :
40 Amp female fuse:
Radiator zip ties:
10ft of 8 gauge wire
10ft of 12 gauge wire
Butt splices
Ring Terminals
Zip Ties
Electrical tape
Ok so I picked up my taurus fan for 28 bucks at our local wrench a part. The weekend before I picked up my 3g alternator for 28 bucks also.
Anyway, Here is my horrible wiring diagram, with my chicken scratch writing. Before I did anything, I wrote this down.
Had a few spots where I just couldn't figure out. The write ups that are on the net vary so much, that you don't know who is right/wrong blah blah blah. So after a call and
long chat with a professional who doesn't do this for a living, finally got things ironed out. So first I did the wiring for the fan itself.
Installed my 40 amp fuse:
Installed my 75 amp Relay:
Grounded the relay:
Now that that's all installed, time to rip out the old stuff. Pulled out the mechanical fan/clutch/shroud and overflow bottle. Reinstalled the 4 water pump bolts back
into the pulley.
Like every other write up, most talked about using weather stripping. I went the same route. 3/8 x 1/2 roll of weather stripping. I'm going to redo
mine. I think that I can do something better. But this will get me by for right now. The bottom of the fan fit's nicely into the bottom (factory) shroud
clips. But leaves you scratching your head for securing the top. Some write up's had you flip the fan upside down, and trim this piece off and
grind here. I didn't want to do that. So I mounted it the way it was stock. Went to the parts store and got some radiator pull through zip ties for the top
install. Talk about a pain in the ***.
So I installed the fan:
The picture above also show's where I mounted my controller. Figured I'd keep it there, that way I could adjust it if need be. Didn't really
have any other place to put it. All in all it worked out pretty good.
Fan installed:
For the overflow bottle, I still need to work on that. But for the time being I have two of the radiator pull through ties holding it on to the radiator. Hopefully
I'll make something out of sheet metal that will support it on the bottom.
The controller install was pretty self explanatory, I chose to only use the high speed side on the taurus fan. Flow's just fine and keep's my car @ 190 degree's with the
a/c on max and it's 105 outside. Pay attention to color wire's and look really hard at the factory wiring and where you going to tap into. I ended up wiring the fan the wrong
way and it was blowing air into the radiator instead of pulling. I missed the iddy biddy red strip on the wire. I tried to shrink wrap all my connections, some of them I just didn't
have the right size, so I made due with what I had. One note, as far as how to wire up the controller's 12v constant hot, and 12v "KEY ON" I didn't want my fan to run after I have
shut the car off. Things happen and mechanical/electrical parts can crap out. So I wired my controller's 12v constant hot and 12v "KEY ON" hot together to a 12v "KEY ON" source.
Which ended up being the PURGE SOLENOID connector. Both wire's are black so your going to have to figure out which wire is hot and which is ground.
Picture of purge solenoid (borrowed from another forum) which is located on the passenger side below the airbox, and inboard of the frame rail. you can't miss it.
The rest is a piece of cake.
#4
07-12-2011


#5
07-12-2011

Thread
Thread Starter
Forum
Replies
Last Post
Clinton
OLD - Interior, Exterior, Electrical, & Misc.
18
05-22-2012 09:27 PM
lumpy4000
Meets, Greets, & Events
39
12-24-2009 04:14 PM


