Lessons learned: '96 RWD Explorer 5.0/4R70W conversion for an '02 coil spring Ranger
#1
 01-08-2015


Join Date: Jan 2014
Location: Tampa, Florida
Posts: 94
Likes: 0
Received 0 Likes
on
0 Posts
Lessons learned: '96 RWD Explorer 5.0/4R70W conversion for an '02 coil spring Ranger
Lessons learned: '96 RWD Explorer 5.0/4R70W conversion into an '02 coil spring Ranger
Preparation:
1st things 1st, a couple GREAT guides and info on the swap is essential:
1996 - 1999 Ford Vehicles Service Manual - Ford Explorer and Ranger Forums "Serious Explorations"�
Swapping An Explorer 5.0L In To A 1998-Up Ranger
2001 Ranger 5.0l Swap Wiring Guide!!!!
2nd, having the Ford EVTM for both the Ranger and Explorer of choice is essential
3rd, buy a wrecked, complete, running Explorer. I needed a ton of brackets, cables, wires etc that go along with the conversion.
Up top, nearly everything fits tight be well, bolts in, looks like it belongs. It's underneath that in some places, space goes away and things can get complicated.
Under the hood:
I thought the round '96 Expo air filter box looked out of place so I swapped in a later '98 square filter box and intake tube. Pulled the original '96 MAF out of the round box, was a perfect fit on the later pieces. Did have to plug a breather hold in the top of the tube. Might be personal taste but I do think it looks better (and uses the same '02 Ranger air filter).
Always thought the rats nest of crisscrossed ignition wires at the coil packs was unattractive. Rebuilt the bracket to turn the coil packs 90� so the electrical connections face to the rear. Since the towers are triggered in pairs, this allowed for all the front towers to run one bank, and the rear towers to run the other. To help eliminate confusion, I did number the bracket with appropriate cylinder numbers. It's personal taste but I do think it adds �neatness�.
Best fit for the fan shroud was to re-use the Ranger 3.0 shroud with 7/8� trimmed off the leading edge of the shroud to account for the thicker radiator core. Also needed to trim 1/2� off the bottom of the right side shroud mounting tab. As modified, the shroud fits the radiator well and has the fan centered in the opening. The fan opening in the 3.0 shroud is quite a bit higher than the 5.0 one and the way I've got the engine in the bay, fits well.
Wiring the non-PATS PCM to the Ranger harness was a snap � built a 16� long adapter using a matched pair of 42 pin connectors from a breakers yard. Made the handful of changes needed within that adapter. Having a copy of both the Explorer and Ranger Ford EVTM's was essential to sort out the wiring.
The '96 Expo engine temp sensor did not match the '02 Ranger gauge. Swapped in the original 2 wire Ranger sensor, but was able to leave it with just the Expo single wire. Works perfectly.
A/C System:
Hands down, the trickiest wiring was for the a/c compressor clutch. The Expo and Ranger use opposite logic for the WOT relay and clutch control. I removed the original Ranger compressor clutch fuse, grabbed the ground path for the Ranger a/c harness from under the fuse/relay box, tee'd off the wire going to the PCM from the a/c switch in the cabin and swapped the pins on the output of the clutch relay.
Both high and low pressure switches are still in use, the PCM correctly controls the clutch for WOT, Just like they should..
The Expo primary a/c hose assembly was a perfect fit to the Ranger condenser and accumulator but, to do it again, I'd use an Expo evaporator and condenser to evap hose. The different inlet angle would add much needed clearance, particularly with the Torque Monster headers.
Power Steering:
High pressure power steering line: Used a 3/8� hydraulic union to marry most of the 5.0 hose to the rack and pinion end of the Ranger's original hose. Quick, easy and inexpensive.
Fuel System:
The fuel pressures and fuel pressure regulator systems are quite different between the early Explorer V8's and the later Rangers.
The Explorers (through '98) use a nominal 2.5 � 3 bar system with the FPR at the fuel rail and a return all the way back to the tank.
The later Rangers use a nominal 4 bar system with the FPR in the fuel tank and a pressure bleed off circuit leaving the fuel filter going back to the FPR.
Running the 3 bar system at 4 bars of pressure is asking more than the PCM can accommodate, perhaps replacing the 19 lbs/hr injectors with smaller ones, say 14 lbs might (at a cost) and using a later non-return fuel rail could keep things happy.
Another option would be to find a suitable FPR for the in-tank system. Dropping the pressure there would allow an early Expo V8 to run with the later non-return fuel rail correctly.
But, since I did not want to experiment with smaller injectors and did not have access to the Fuel Pressure Regulators �R� Us catalog, I decided retain the Explorer's fuel rail/FPR and adapt the Rangers system to accommodate.
Dropped the tank and removed the original FPR. Did swap in a new fuel pump while there.
Used a length of 3/8" generic fuel line repair to get a proper line connector and silver soldered it to the end of the front half of the Expo fuel return line. I've read of guys using compression unions and sawing off the 3/8" nipple off the back of the Ranger fuel filter.
Since the Ranger's fuel lines are different sizes at the inlet to the Explorer's fuel filter, I used push on fuel line unions to swap the 5/16" and 3/8" ends on the pair of 5/16" lines.
Once done, the Ranger's fuel supply plugs into the Explorer fuel filter inlet, the Expo fuel return line plugs into the Ranger's pressure bleed line and the Expo fuel filter pops into the Ranger's bracket like it was made for it.
Lastly, I found that both the original and a new FPR ran at the bottom of the pressure window for the system, added an adjustable FPR set to the upper end of the pressure window. Fuel trims run about -7% or so at high way cruising, nothing the PCM can't deal with and should improve fuel atomization.
Transmission:
While the 4R70W transmission is out, take the time to change the filter and inspect the 1st/2nd accumulator springs. They're notorious for breaking causing harsh up-shifts into 2nd. I've no idea what the broken spring color is, and did not find any info on the yellow upper spring. I swapped in a matched pair of white/pink springs.
Added a drain plug in the trans pan while there:
Under the Ranger:
To keep costs down, I opted to re-use the OEM Explorer cats � this saved me a ton of cash on a custom exhaust with cats but complicated the install in a number of places.
1st problem with the cats was clearance at the transmission cross member. Had to lift the back of the trans 3/4�, trim one of the welded on cat supports and a bit of re-shaping the of the front corner of the cross member. Another issue was clearance for the left down pipe at the oil pan � mandated the use the Expo rear sump oil pan. (or massive re-shaping of a different sump).
With the back of the transmission raised that high, I had the oil pan carrying the weight of the engine at the rack and pinion unit.
Using the Strada Shop mounting plates, I had to lift the mounts 3/8� and use an steel Explorer oil pan to get the clearance I needed. End result is an engine that sits level in the engine bay. Did have to notch one plate to clear a plug on the side of the block and trim the plates quite a bit for aesthetics and clearance for the Torque Monster headers.
At least in my case, the drop in the right side Strada Shop engine plate could have been eliminated and a similar lift added in to the left side. Would make home made flat plates a very workable solution using shims for the left side lift.
On the transmission bell housing, I trimmed off a pair of tabs to add clearance and to clear the Expo cat, trimmed a bit off the right side lower control arm mount bracket. All non-structural stuff.
The Expo oil pan was STUPID tight during the install with the transmission mounted to the engine. I decided to move the leading edge of the sump to the drain plug, used a Ford Racing Parts rear sump oil pickup but could have modified the Expo to fit. Made the fit and install a snap but I did have real problems getting the pan liquid tight. The steel was so stressed from the stamping that it was cracking inches away from where I was brazing the cuts and splices. Once I had it tight, I decided not to do any cleanup of the brazes. Super thin steel that was very very heat sensitive kept the brazes a bit on the ugly side. I'm sure a skilled TIG welder would not have had the heat issue I did, but a skilled TIG welder I'm not!
A different catalytic converter/exhaust solution would have make the generic Ford Racing Parts rear sump oil pan a very viable option and not having to raise the back of the transmission would have only helped at the rack and pinion.
The drive shaft was the unexpected catch in the works. With 78.5� between the back of the transmission and input flange, my local driveshaft shop balked at building a one piece shaft.
They gave me two options: A one piece 6� aluminum shaft or a two piece 2 1/2� steel one. Either was going to be expensive and since space was tight I opted for the steel. $550 out the door using the original Expo shaft for the front and rear flanges with a new center bearing/flange assembly and tubing. OUCH. Going with a used and shortened aluminum shaft might have been less expensive but I'm unsure on that.
The front support for the fuel tank made a great place for the center bearing. Looks whacky mounted at an angle but works perfectly.
One issue that I've not corrected yet: The left bank front catalytic hangs down further than I'd prefer. Might have to have an exhaust shop move the cat a couple inches
Diff/rear axle. Used the Expo 8.8 LSD/Disk brake axle. Cut off the Expo sway bar and torque rod brackets. Used 3� tube spring perches opposite the original Expo perches as well as a 2nd pair for the Bronco II 1� sway bar brackets. Added in a pair of 3� tube shock mounts for the Ranger shocks.
Only problem so far is the Ranger e-brake cable bracket is not a great solution for the Expo cables. Gotta work on that.
Rough expense summary:
$650 for a running but totaled 5.0 Explorer delivered
$550 for the drive shaft
$70 for the Strada Shop mounting plates
$300 for misc bits and pieces at Summit to include a muffler, tune up bits etc
Makes it just about $1600 in the red.
But, on the upside:
Sold the Underdog underdrive pulley off the Ranger 3.0 for $100
Sold the Ranger 3.0 engine and trans for $375
Sold the interior out of the Expo for $220
Got over $400 for the scrapped Expo
Makes it about $1100 in the black
So, total �gross� costs: $500 � Not a bad way to refresh a gutless and tired 175K mile 3.0 Ranger with a bad set of cats to a bare bones Explorer 5.0 V8.

#4
01-10-2015

Join Date: Aug 2014
Location: Portland, OR
Posts: 93
Likes: 0
Received 0 Likes
on
0 Posts
Awesome man. This helps out quite a bit, and I'll stop asking some of these questions in my thread under yours haha. Sucks to hear about the driveshaft. I've had a custom one, but it was only around $200... We'll see what I can have done when I get to that point. Since I have a lot more room, I'm HOPING to not have so much trouble as you did with clearance and such. We shall see about that as well. Since my Explorer came with hacked up exhaust, I bought the 99+ exhaust manifolds, and 2 Magnaflow low profile cats. They are really small, so hopefully an exhaust shop won't have any trouble getting things to clear. Thanks for the great writeup!

#6
07-30-2015
Join Date: Jan 2014
Location: Tampa, Florida
Posts: 94
Likes: 0
Received 0 Likes
on
0 Posts
With the expo oil pan, the stock expo cats fit well -- it was when stuffing the engine and transmission as a unit that the leading edge of the sump on the pan causes issues at the cross member,
Best I understand, if you lower the engine straight down into the engine bay, even the cast aluminum pan fits, its the angle from having 3 - 4 feet of transmission that complicates things.
Maybe I"m a wuss, but I thought trying to marry the transmission to the engine once the engine was already in the truck would have proven quite a challenge.
Had I used a generic rear sump oil pan, the left exhaust would have been a real challenge, and since the generic is deeper at the oil pump, would have needed even a further lift to get clearance between the pan and rack/pinion unit.
#7
07-30-2015
#8
07-31-2015
Join Date: Jan 2014
Location: Tampa, Florida
Posts: 94
Likes: 0
Received 0 Likes
on
0 Posts
All the '96 - '01 5.0 Expo's came with a 90 degree adapter -- earlier ones included a built in/on cooler, later ones omited it.
Either fits the '98 and up coil spring Rangers.
The water pump to oil cooler hose for the early adapters is no longer available, makes the non-cooler adapters an easier install.
Either fits the '98 and up coil spring Rangers.
The water pump to oil cooler hose for the early adapters is no longer available, makes the non-cooler adapters an easier install.
#10
08-04-2015

#11
08-04-2015
#12
08-05-2015
#13
08-07-2015
#14
11-03-2017

Join Date: Nov 2017
Location: Covington, Kentucky
Posts: 10
Likes: 0
Received 0 Likes
on
0 Posts
Lessons learned: '96 RWD Explorer 5.0/4R70W conversion into an '02 coil spring Ranger
Preparation:
1st things 1st, a couple GREAT guides and info on the swap is essential:
1996 - 1999 Ford Vehicles Service Manual - Ford Explorer and Ranger Forums "Serious Explorations"�
Swapping An Explorer 5.0L In To A 1998-Up Ranger
2001 Ranger 5.0l Swap Wiring Guide!!!!
2nd, having the Ford EVTM for both the Ranger and Explorer of choice is essential
3rd, buy a wrecked, complete, running Explorer. I needed a ton of brackets, cables, wires etc that go along with the conversion.
Up top, nearly everything fits tight be well, bolts in, looks like it belongs. It's underneath that in some places, space goes away and things can get complicated.
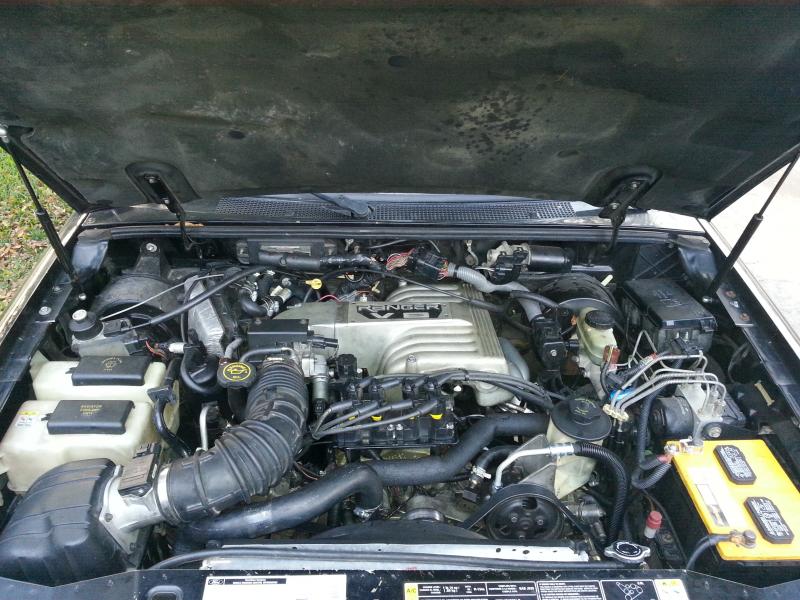
Under the hood:
I thought the round '96 Expo air filter box looked out of place so I swapped in a later '98 square filter box and intake tube. Pulled the original '96 MAF out of the round box, was a perfect fit on the later pieces. Did have to plug a breather hold in the top of the tube. Might be personal taste but I do think it looks better (and uses the same '02 Ranger air filter).
Always thought the rats nest of crisscrossed ignition wires at the coil packs was unattractive. Rebuilt the bracket to turn the coil packs 90� so the electrical connections face to the rear. Since the towers are triggered in pairs, this allowed for all the front towers to run one bank, and the rear towers to run the other. To help eliminate confusion, I did number the bracket with appropriate cylinder numbers. It's personal taste but I do think it adds �neatness�.
Attachment 76882
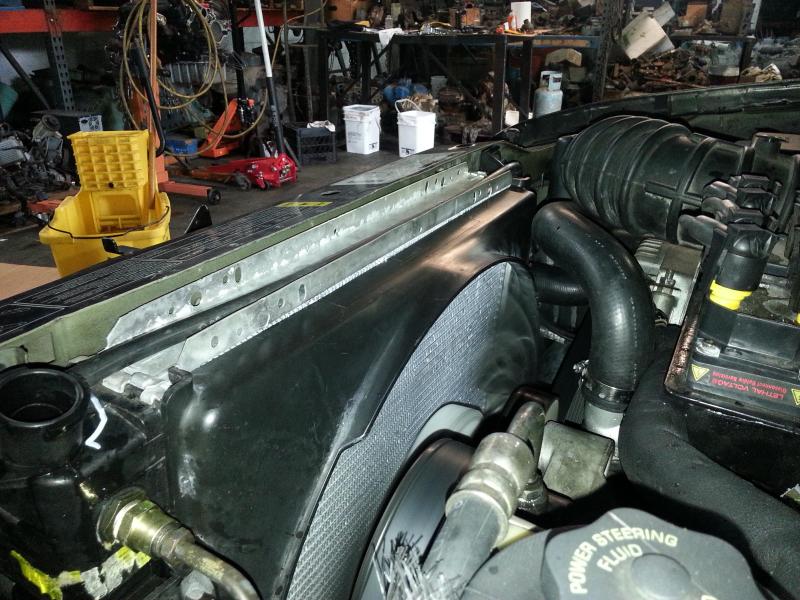
Best fit for the fan shroud was to re-use the Ranger 3.0 shroud with 7/8� trimmed off the leading edge of the shroud to account for the thicker radiator core. Also needed to trim 1/2� off the bottom of the right side shroud mounting tab. As modified, the shroud fits the radiator well and has the fan centered in the opening. The fan opening in the 3.0 shroud is quite a bit higher than the 5.0 one and the way I've got the engine in the bay, fits well.
Attachment 76883
Wiring the non-PATS PCM to the Ranger harness was a snap � built a 16� long adapter using a matched pair of 42 pin connectors from a breakers yard. Made the handful of changes needed within that adapter. Having a copy of both the Explorer and Ranger Ford EVTM's was essential to sort out the wiring.
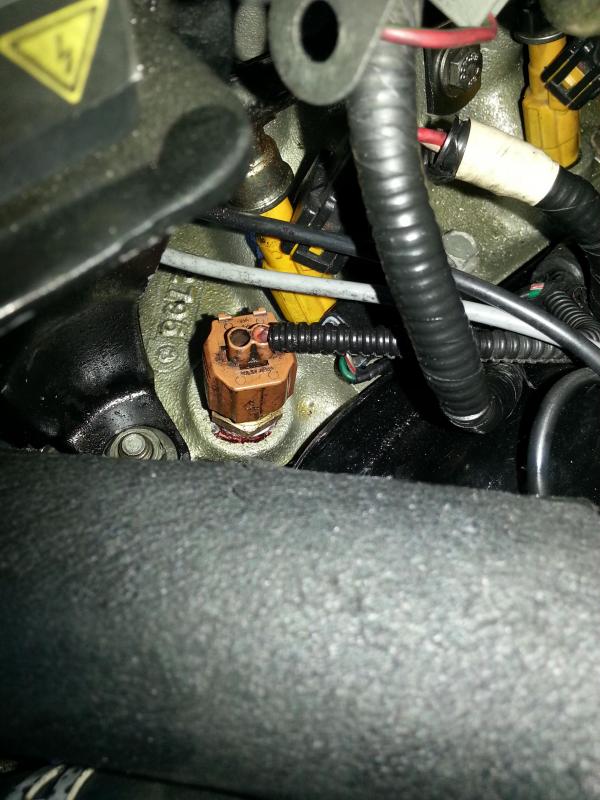
The '96 Expo engine temp sensor did not match the '02 Ranger gauge. Swapped in the original 2 wire Ranger sensor, but was able to leave it with just the Expo single wire. Works perfectly.
Attachment 76884
A/C System:
Hands down, the trickiest wiring was for the a/c compressor clutch. The Expo and Ranger use opposite logic for the WOT relay and clutch control. I removed the original Ranger compressor clutch fuse, grabbed the ground path for the Ranger a/c harness from under the fuse/relay box, tee'd off the wire going to the PCM from the a/c switch in the cabin and swapped the pins on the output of the clutch relay.
Both high and low pressure switches are still in use, the PCM correctly controls the clutch for WOT, Just like they should..
The Expo primary a/c hose assembly was a perfect fit to the Ranger condenser and accumulator but, to do it again, I'd use an Expo evaporator and condenser to evap hose. The different inlet angle would add much needed clearance, particularly with the Torque Monster headers.
Attachment 76885
Power Steering:
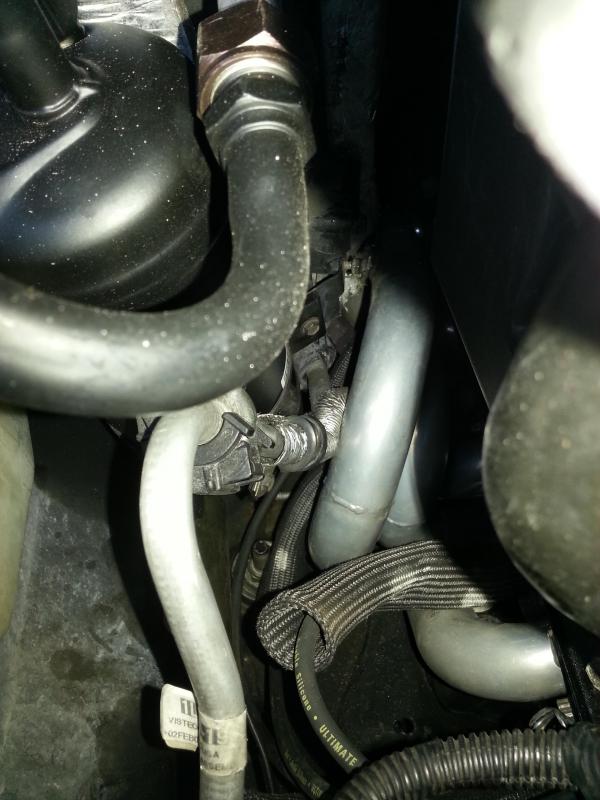
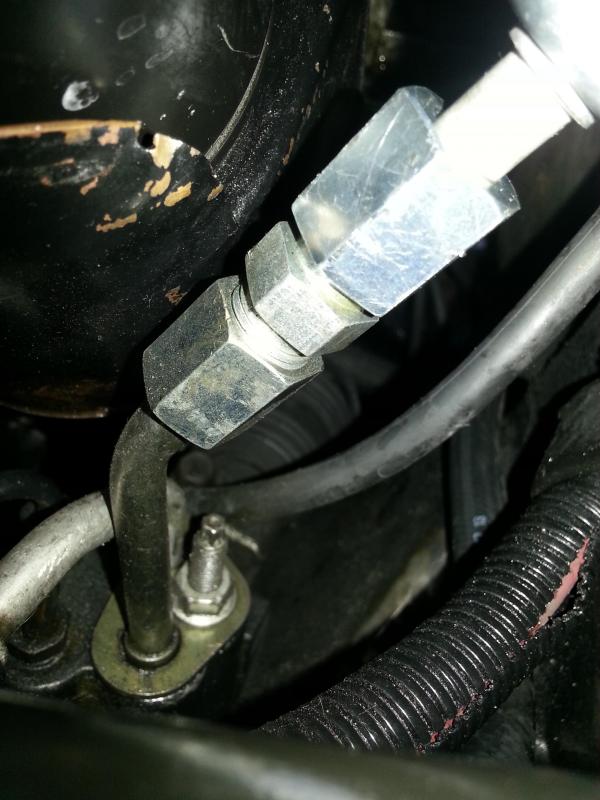
High pressure power steering line: Used a 3/8� hydraulic union to marry most of the 5.0 hose to the rack and pinion end of the Ranger's original hose. Quick, easy and inexpensive.
Attachment 76886
Fuel System:
The fuel pressures and fuel pressure regulator systems are quite different between the early Explorer V8's and the later Rangers.
The Explorers (through '98) use a nominal 2.5 � 3 bar system with the FPR at the fuel rail and a return all the way back to the tank.
The later Rangers use a nominal 4 bar system with the FPR in the fuel tank and a pressure bleed off circuit leaving the fuel filter going back to the FPR.
Running the 3 bar system at 4 bars of pressure is asking more than the PCM can accommodate, perhaps replacing the 19 lbs/hr injectors with smaller ones, say 14 lbs might (at a cost) and using a later non-return fuel rail could keep things happy.
Another option would be to find a suitable FPR for the in-tank system. Dropping the pressure there would allow an early Expo V8 to run with the later non-return fuel rail correctly.
But, since I did not want to experiment with smaller injectors and did not have access to the Fuel Pressure Regulators �R� Us catalog, I decided retain the Explorer's fuel rail/FPR and adapt the Rangers system to accommodate.
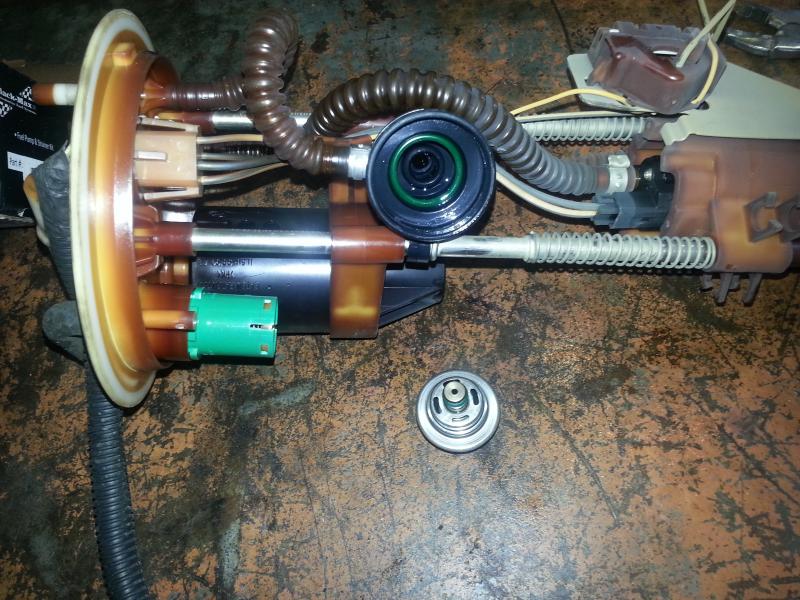
Dropped the tank and removed the original FPR. Did swap in a new fuel pump while there.
Attachment 76887
Used a length of 3/8" generic fuel line repair to get a proper line connector and silver soldered it to the end of the front half of the Expo fuel return line. I've read of guys using compression unions and sawing off the 3/8" nipple off the back of the Ranger fuel filter.
Since the Ranger's fuel lines are different sizes at the inlet to the Explorer's fuel filter, I used push on fuel line unions to swap the 5/16" and 3/8" ends on the pair of 5/16" lines.
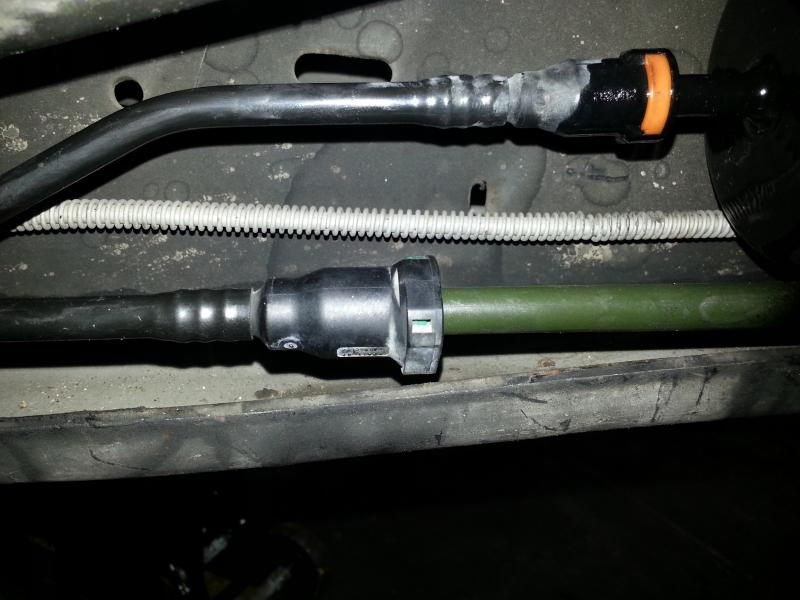
Once done, the Ranger's fuel supply plugs into the Explorer fuel filter inlet, the Expo fuel return line plugs into the Ranger's pressure bleed line and the Expo fuel filter pops into the Ranger's bracket like it was made for it.
Attachment 76888
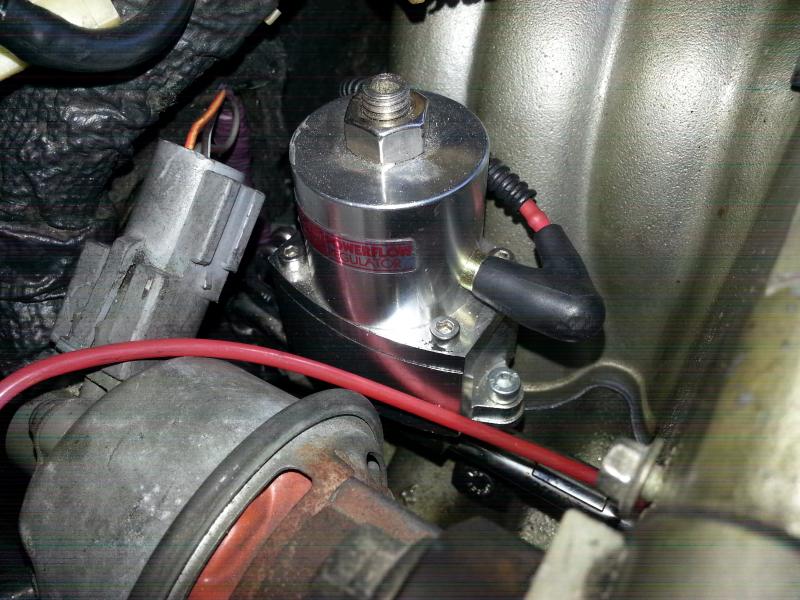
Lastly, I found that both the original and a new FPR ran at the bottom of the pressure window for the system, added an adjustable FPR set to the upper end of the pressure window. Fuel trims run about -7% or so at high way cruising, nothing the PCM can't deal with and should improve fuel atomization.
Attachment 76889
Transmission:
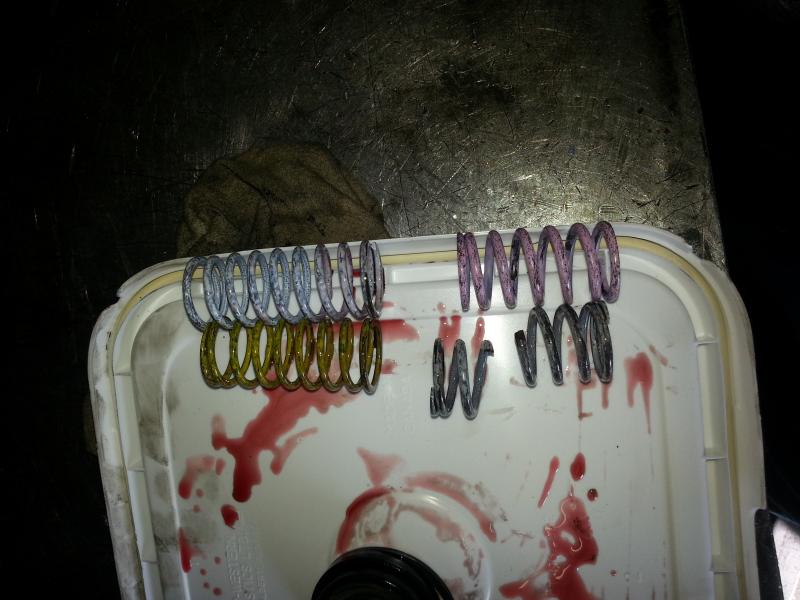
While the 4R70W transmission is out, take the time to change the filter and inspect the 1st/2nd accumulator springs. They're notorious for breaking causing harsh up-shifts into 2nd. I've no idea what the broken spring color is, and did not find any info on the yellow upper spring. I swapped in a matched pair of white/pink springs.
Attachment 76890
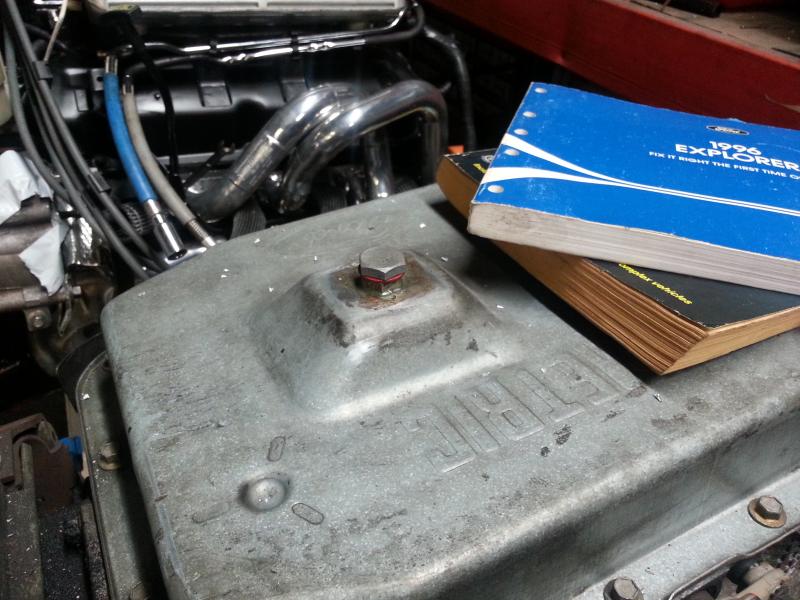
Added a drain plug in the trans pan while there:
Attachment 76891
Under the Ranger:
To keep costs down, I opted to re-use the OEM Explorer cats � this saved me a ton of cash on a custom exhaust with cats but complicated the install in a number of places.
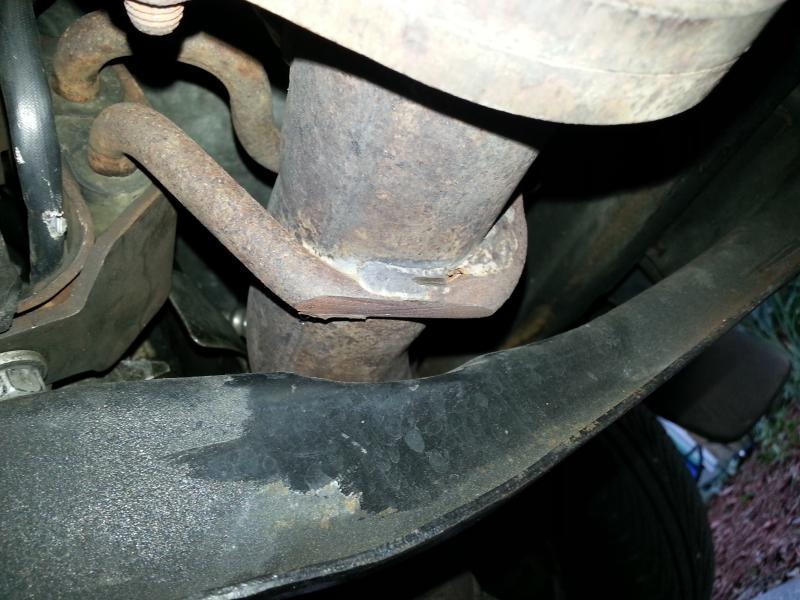
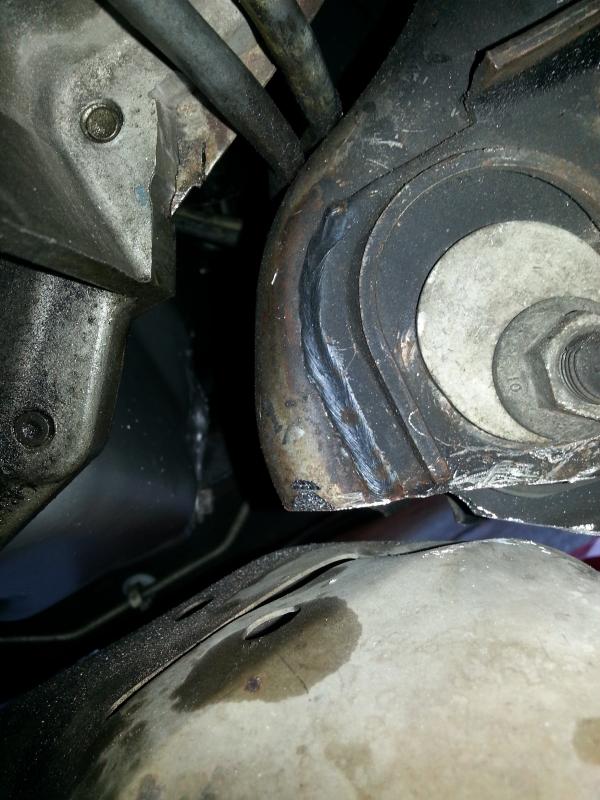
1st problem with the cats was clearance at the transmission cross member. Had to lift the back of the trans 3/4�, trim one of the welded on cat supports and a bit of re-shaping the of the front corner of the cross member. Another issue was clearance for the left down pipe at the oil pan � mandated the use the Expo rear sump oil pan. (or massive re-shaping of a different sump).
Attachment 76892
Attachment 76893
Attachment 76894
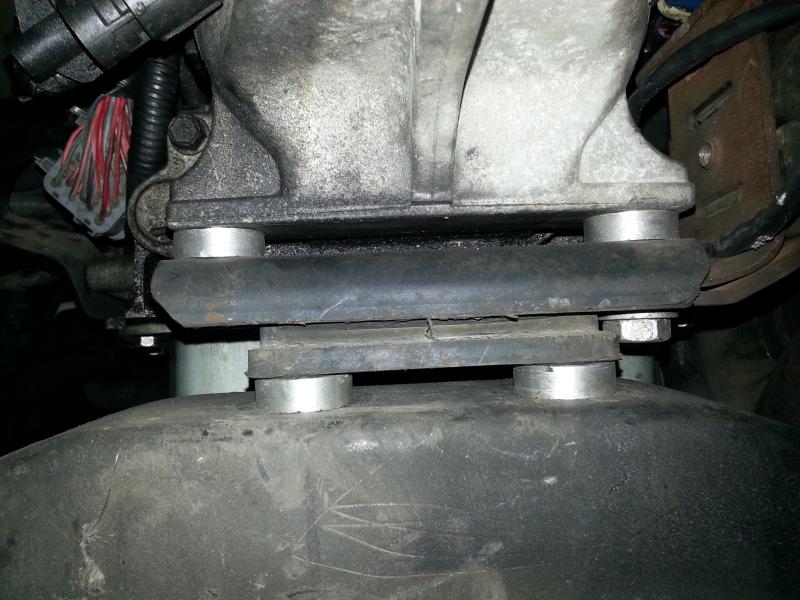
With the back of the transmission raised that high, I had the oil pan carrying the weight of the engine at the rack and pinion unit.
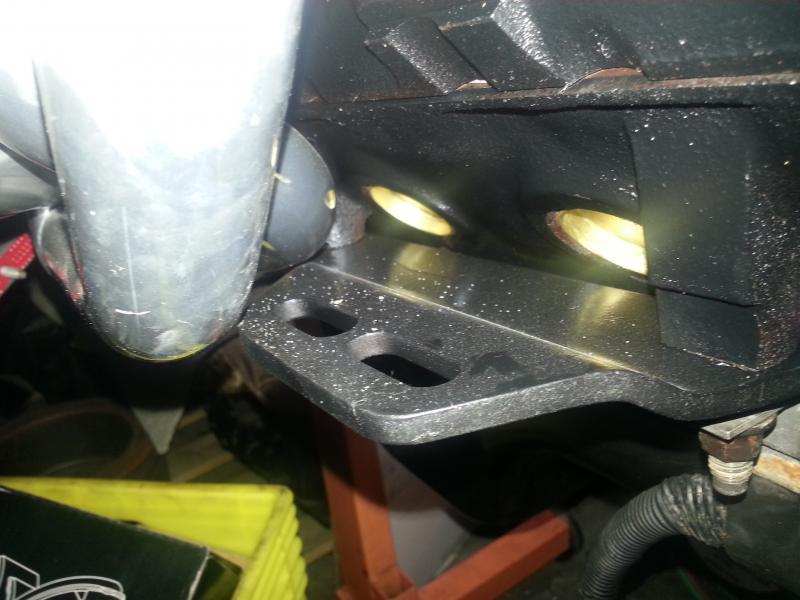
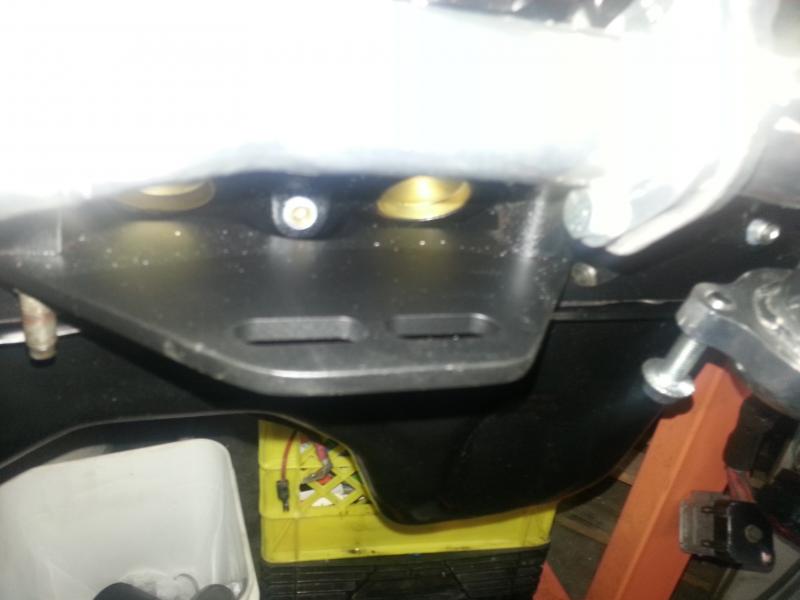
Using the Strada Shop mounting plates, I had to lift the mounts 3/8� and use an steel Explorer oil pan to get the clearance I needed. End result is an engine that sits level in the engine bay. Did have to notch one plate to clear a plug on the side of the block and trim the plates quite a bit for aesthetics and clearance for the Torque Monster headers.
At least in my case, the drop in the right side Strada Shop engine plate could have been eliminated and a similar lift added in to the left side. Would make home made flat plates a very workable solution using shims for the left side lift.
Attachment 76895
Attachment 76896
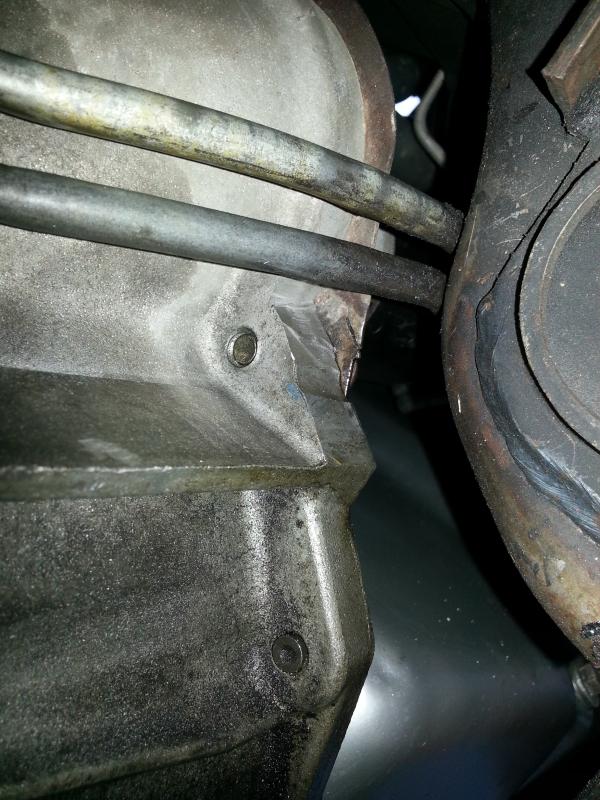
On the transmission bell housing, I trimmed off a pair of tabs to add clearance and to clear the Expo cat, trimmed a bit off the right side lower control arm mount bracket. All non-structural stuff.
Attachment 76897
Attachment 76898
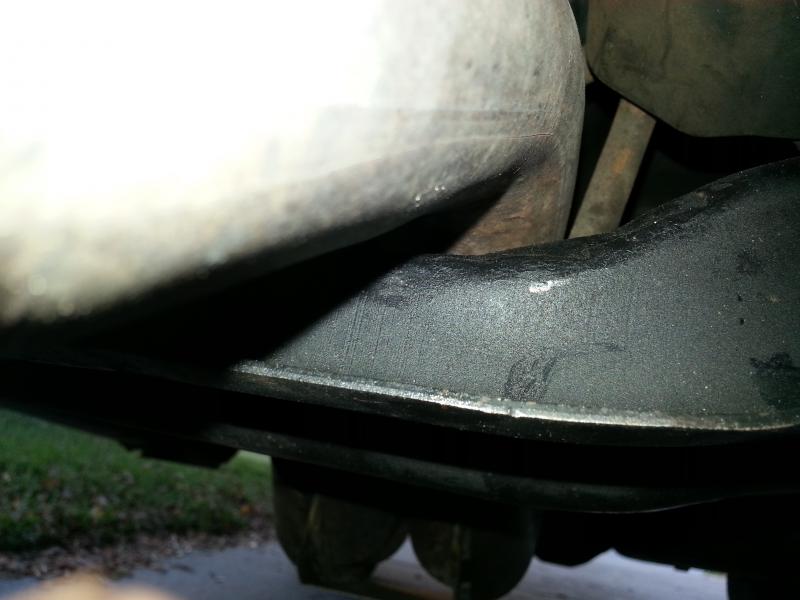
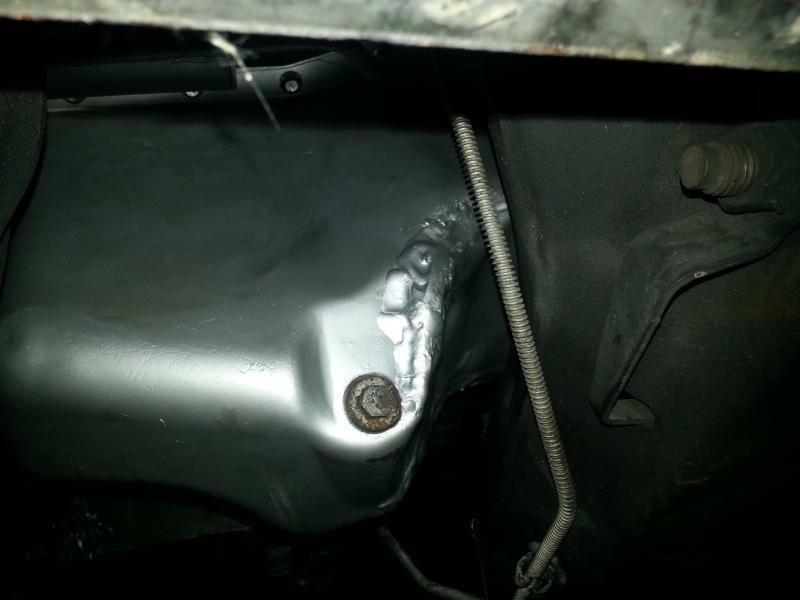
The Expo oil pan was STUPID tight during the install with the transmission mounted to the engine. I decided to move the leading edge of the sump to the drain plug, used a Ford Racing Parts rear sump oil pickup but could have modified the Expo to fit. Made the fit and install a snap but I did have real problems getting the pan liquid tight. The steel was so stressed from the stamping that it was cracking inches away from where I was brazing the cuts and splices. Once I had it tight, I decided not to do any cleanup of the brazes. Super thin steel that was very very heat sensitive kept the brazes a bit on the ugly side. I'm sure a skilled TIG welder would not have had the heat issue I did, but a skilled TIG welder I'm not!
Attachment 76899
A different catalytic converter/exhaust solution would have make the generic Ford Racing Parts rear sump oil pan a very viable option and not having to raise the back of the transmission would have only helped at the rack and pinion.
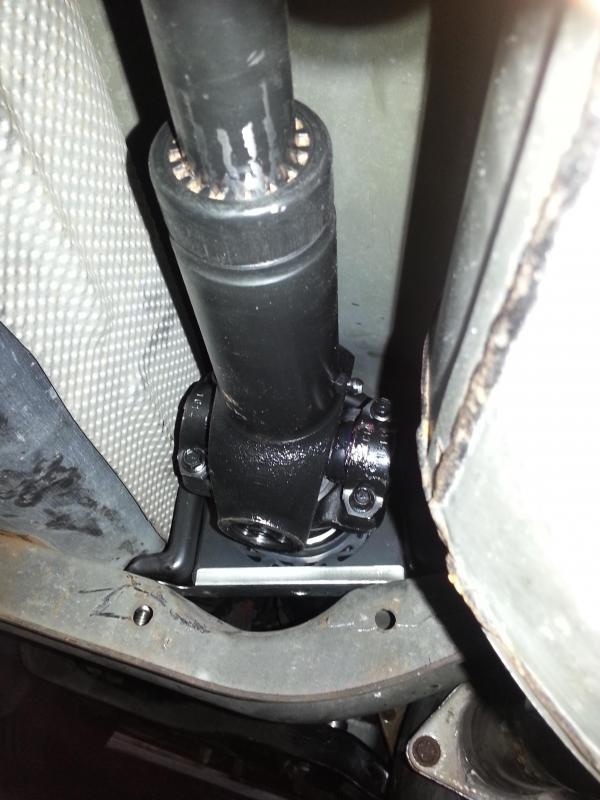
The drive shaft was the unexpected catch in the works. With 78.5� between the back of the transmission and input flange, my local driveshaft shop balked at building a one piece shaft.
They gave me two options: A one piece 6� aluminum shaft or a two piece 2 1/2� steel one. Either was going to be expensive and since space was tight I opted for the steel. $550 out the door using the original Expo shaft for the front and rear flanges with a new center bearing/flange assembly and tubing. OUCH. Going with a used and shortened aluminum shaft might have been less expensive but I'm unsure on that.
Attachment 76900
The front support for the fuel tank made a great place for the center bearing. Looks whacky mounted at an angle but works perfectly.
Attachment 76901
One issue that I've not corrected yet: The left bank front catalytic hangs down further than I'd prefer. Might have to have an exhaust shop move the cat a couple inches
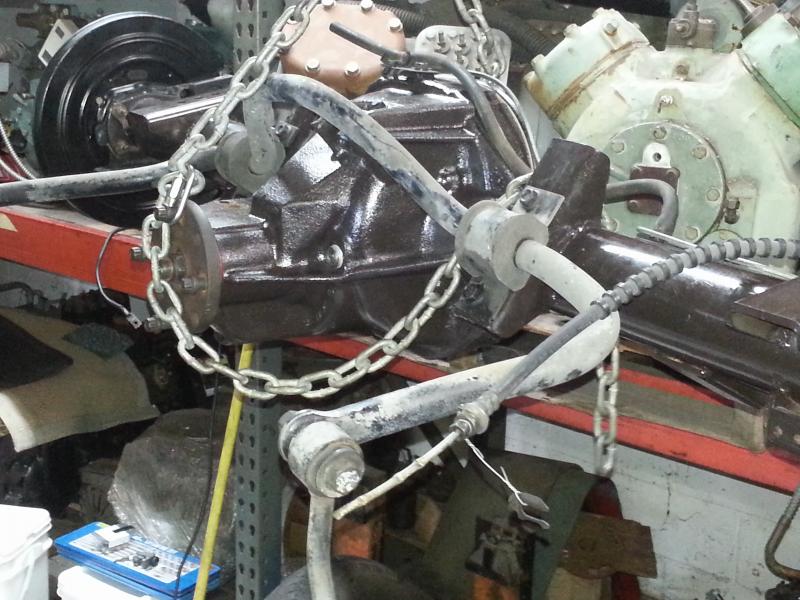
Diff/rear axle. Used the Expo 8.8 LSD/Disk brake axle. Cut off the Expo sway bar and torque rod brackets. Used 3� tube spring perches opposite the original Expo perches as well as a 2nd pair for the Bronco II 1� sway bar brackets. Added in a pair of 3� tube shock mounts for the Ranger shocks.
Only problem so far is the Ranger e-brake cable bracket is not a great solution for the Expo cables. Gotta work on that.
Attachment 76902
Rough expense summary:
$650 for a running but totaled 5.0 Explorer delivered
$550 for the drive shaft
$70 for the Strada Shop mounting plates
$300 for misc bits and pieces at Summit to include a muffler, tune up bits etc
Makes it just about $1600 in the red.
But, on the upside:
Sold the Underdog underdrive pulley off the Ranger 3.0 for $100
Sold the Ranger 3.0 engine and trans for $375
Sold the interior out of the Expo for $220
Got over $400 for the scrapped Expo
Makes it about $1100 in the black
So, total �gross� costs: $500 � Not a bad way to refresh a gutless and tired 175K mile 3.0 Ranger with a bad set of cats to a bare bones Explorer 5.0 V8.
Preparation:
1st things 1st, a couple GREAT guides and info on the swap is essential:
1996 - 1999 Ford Vehicles Service Manual - Ford Explorer and Ranger Forums "Serious Explorations"�
Swapping An Explorer 5.0L In To A 1998-Up Ranger
2001 Ranger 5.0l Swap Wiring Guide!!!!
2nd, having the Ford EVTM for both the Ranger and Explorer of choice is essential
3rd, buy a wrecked, complete, running Explorer. I needed a ton of brackets, cables, wires etc that go along with the conversion.
Up top, nearly everything fits tight be well, bolts in, looks like it belongs. It's underneath that in some places, space goes away and things can get complicated.
Under the hood:
I thought the round '96 Expo air filter box looked out of place so I swapped in a later '98 square filter box and intake tube. Pulled the original '96 MAF out of the round box, was a perfect fit on the later pieces. Did have to plug a breather hold in the top of the tube. Might be personal taste but I do think it looks better (and uses the same '02 Ranger air filter).
Always thought the rats nest of crisscrossed ignition wires at the coil packs was unattractive. Rebuilt the bracket to turn the coil packs 90� so the electrical connections face to the rear. Since the towers are triggered in pairs, this allowed for all the front towers to run one bank, and the rear towers to run the other. To help eliminate confusion, I did number the bracket with appropriate cylinder numbers. It's personal taste but I do think it adds �neatness�.
Attachment 76882
Best fit for the fan shroud was to re-use the Ranger 3.0 shroud with 7/8� trimmed off the leading edge of the shroud to account for the thicker radiator core. Also needed to trim 1/2� off the bottom of the right side shroud mounting tab. As modified, the shroud fits the radiator well and has the fan centered in the opening. The fan opening in the 3.0 shroud is quite a bit higher than the 5.0 one and the way I've got the engine in the bay, fits well.
Attachment 76883
Wiring the non-PATS PCM to the Ranger harness was a snap � built a 16� long adapter using a matched pair of 42 pin connectors from a breakers yard. Made the handful of changes needed within that adapter. Having a copy of both the Explorer and Ranger Ford EVTM's was essential to sort out the wiring.
The '96 Expo engine temp sensor did not match the '02 Ranger gauge. Swapped in the original 2 wire Ranger sensor, but was able to leave it with just the Expo single wire. Works perfectly.
Attachment 76884
A/C System:
Hands down, the trickiest wiring was for the a/c compressor clutch. The Expo and Ranger use opposite logic for the WOT relay and clutch control. I removed the original Ranger compressor clutch fuse, grabbed the ground path for the Ranger a/c harness from under the fuse/relay box, tee'd off the wire going to the PCM from the a/c switch in the cabin and swapped the pins on the output of the clutch relay.
Both high and low pressure switches are still in use, the PCM correctly controls the clutch for WOT, Just like they should..
The Expo primary a/c hose assembly was a perfect fit to the Ranger condenser and accumulator but, to do it again, I'd use an Expo evaporator and condenser to evap hose. The different inlet angle would add much needed clearance, particularly with the Torque Monster headers.
Attachment 76885
Power Steering:
High pressure power steering line: Used a 3/8� hydraulic union to marry most of the 5.0 hose to the rack and pinion end of the Ranger's original hose. Quick, easy and inexpensive.
Attachment 76886
Fuel System:
The fuel pressures and fuel pressure regulator systems are quite different between the early Explorer V8's and the later Rangers.
The Explorers (through '98) use a nominal 2.5 � 3 bar system with the FPR at the fuel rail and a return all the way back to the tank.
The later Rangers use a nominal 4 bar system with the FPR in the fuel tank and a pressure bleed off circuit leaving the fuel filter going back to the FPR.
Running the 3 bar system at 4 bars of pressure is asking more than the PCM can accommodate, perhaps replacing the 19 lbs/hr injectors with smaller ones, say 14 lbs might (at a cost) and using a later non-return fuel rail could keep things happy.
Another option would be to find a suitable FPR for the in-tank system. Dropping the pressure there would allow an early Expo V8 to run with the later non-return fuel rail correctly.
But, since I did not want to experiment with smaller injectors and did not have access to the Fuel Pressure Regulators �R� Us catalog, I decided retain the Explorer's fuel rail/FPR and adapt the Rangers system to accommodate.
Dropped the tank and removed the original FPR. Did swap in a new fuel pump while there.
Attachment 76887
Used a length of 3/8" generic fuel line repair to get a proper line connector and silver soldered it to the end of the front half of the Expo fuel return line. I've read of guys using compression unions and sawing off the 3/8" nipple off the back of the Ranger fuel filter.
Since the Ranger's fuel lines are different sizes at the inlet to the Explorer's fuel filter, I used push on fuel line unions to swap the 5/16" and 3/8" ends on the pair of 5/16" lines.
Once done, the Ranger's fuel supply plugs into the Explorer fuel filter inlet, the Expo fuel return line plugs into the Ranger's pressure bleed line and the Expo fuel filter pops into the Ranger's bracket like it was made for it.
Attachment 76888
Lastly, I found that both the original and a new FPR ran at the bottom of the pressure window for the system, added an adjustable FPR set to the upper end of the pressure window. Fuel trims run about -7% or so at high way cruising, nothing the PCM can't deal with and should improve fuel atomization.
Attachment 76889
Transmission:
While the 4R70W transmission is out, take the time to change the filter and inspect the 1st/2nd accumulator springs. They're notorious for breaking causing harsh up-shifts into 2nd. I've no idea what the broken spring color is, and did not find any info on the yellow upper spring. I swapped in a matched pair of white/pink springs.
Attachment 76890
Added a drain plug in the trans pan while there:
Attachment 76891
Under the Ranger:
To keep costs down, I opted to re-use the OEM Explorer cats � this saved me a ton of cash on a custom exhaust with cats but complicated the install in a number of places.
1st problem with the cats was clearance at the transmission cross member. Had to lift the back of the trans 3/4�, trim one of the welded on cat supports and a bit of re-shaping the of the front corner of the cross member. Another issue was clearance for the left down pipe at the oil pan � mandated the use the Expo rear sump oil pan. (or massive re-shaping of a different sump).
Attachment 76892
Attachment 76893
Attachment 76894
With the back of the transmission raised that high, I had the oil pan carrying the weight of the engine at the rack and pinion unit.
Using the Strada Shop mounting plates, I had to lift the mounts 3/8� and use an steel Explorer oil pan to get the clearance I needed. End result is an engine that sits level in the engine bay. Did have to notch one plate to clear a plug on the side of the block and trim the plates quite a bit for aesthetics and clearance for the Torque Monster headers.
At least in my case, the drop in the right side Strada Shop engine plate could have been eliminated and a similar lift added in to the left side. Would make home made flat plates a very workable solution using shims for the left side lift.
Attachment 76895
Attachment 76896
On the transmission bell housing, I trimmed off a pair of tabs to add clearance and to clear the Expo cat, trimmed a bit off the right side lower control arm mount bracket. All non-structural stuff.
Attachment 76897
Attachment 76898
The Expo oil pan was STUPID tight during the install with the transmission mounted to the engine. I decided to move the leading edge of the sump to the drain plug, used a Ford Racing Parts rear sump oil pickup but could have modified the Expo to fit. Made the fit and install a snap but I did have real problems getting the pan liquid tight. The steel was so stressed from the stamping that it was cracking inches away from where I was brazing the cuts and splices. Once I had it tight, I decided not to do any cleanup of the brazes. Super thin steel that was very very heat sensitive kept the brazes a bit on the ugly side. I'm sure a skilled TIG welder would not have had the heat issue I did, but a skilled TIG welder I'm not!
Attachment 76899
A different catalytic converter/exhaust solution would have make the generic Ford Racing Parts rear sump oil pan a very viable option and not having to raise the back of the transmission would have only helped at the rack and pinion.
The drive shaft was the unexpected catch in the works. With 78.5� between the back of the transmission and input flange, my local driveshaft shop balked at building a one piece shaft.
They gave me two options: A one piece 6� aluminum shaft or a two piece 2 1/2� steel one. Either was going to be expensive and since space was tight I opted for the steel. $550 out the door using the original Expo shaft for the front and rear flanges with a new center bearing/flange assembly and tubing. OUCH. Going with a used and shortened aluminum shaft might have been less expensive but I'm unsure on that.
Attachment 76900
The front support for the fuel tank made a great place for the center bearing. Looks whacky mounted at an angle but works perfectly.
Attachment 76901
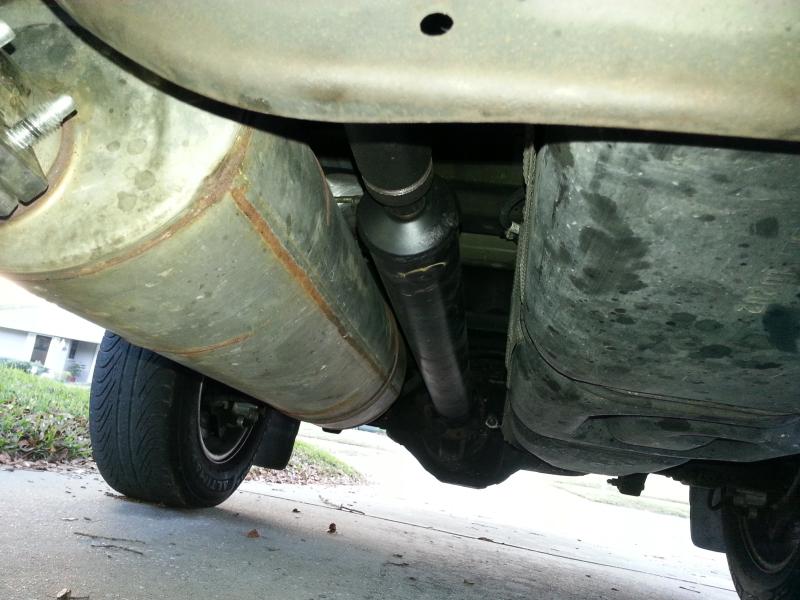
One issue that I've not corrected yet: The left bank front catalytic hangs down further than I'd prefer. Might have to have an exhaust shop move the cat a couple inches
Diff/rear axle. Used the Expo 8.8 LSD/Disk brake axle. Cut off the Expo sway bar and torque rod brackets. Used 3� tube spring perches opposite the original Expo perches as well as a 2nd pair for the Bronco II 1� sway bar brackets. Added in a pair of 3� tube shock mounts for the Ranger shocks.
Only problem so far is the Ranger e-brake cable bracket is not a great solution for the Expo cables. Gotta work on that.
Attachment 76902
Rough expense summary:
$650 for a running but totaled 5.0 Explorer delivered
$550 for the drive shaft
$70 for the Strada Shop mounting plates
$300 for misc bits and pieces at Summit to include a muffler, tune up bits etc
Makes it just about $1600 in the red.
But, on the upside:
Sold the Underdog underdrive pulley off the Ranger 3.0 for $100
Sold the Ranger 3.0 engine and trans for $375
Sold the interior out of the Expo for $220
Got over $400 for the scrapped Expo
Makes it about $1100 in the black
So, total �gross� costs: $500 � Not a bad way to refresh a gutless and tired 175K mile 3.0 Ranger with a bad set of cats to a bare bones Explorer 5.0 V8.

Thread
Thread Starter
Forum
Replies
Last Post
Foxtrot Moon
General Technical & Electrical
0
09-25-2014 02:56 PM
Want to Buy: Coil spring lift, coil spacers - AL
ubwfuf
OLD - Suspension, Tires, & Wheels
9
03-10-2011 11:27 AM


