Torsion Bar Adjustment
#1
 02-08-2008


Torsion Bar Adjustment Guide
haha, NO! I'm not going to ask where or how to do it.. I'm actually going to be snapping a bunch of photo's here in a minute because I FINALLY have some dang free time to balance the front of my truck up to match that 2" stock rear block from the factory in the rear. So just a heads up for any adventurers into the underside of the truck and wanting info on the proper way to do things with it.
If your interested, stay tuned.. as right now I am heading out to start working on it.
If you plan on following along, gather up a couple tools.. and pop them out in your work area.. nothing like prepping for a job :-)
*************************
Tools Needed:
1/2" Socket + Breaker Bar
Bright colored paint for marking torsion bolt stock location and turn point. Or a Dremel (Like I did)
1x Quicklift/Hydraulic Jack to lift the truck
2x Jack's to drop the front end on (ALWAYS Safer using a proper set of jacks)
1x Measuring Tape, for measuring the rear end.. (Will provide pictures on proper measurement areas.)
First step, you'll need to pull out your measuring tape and measure the front and rear height to get a mark as to how much you wish to lift the front of the truck. Write them both down on paper so you don't forget them, and keep the paper handy for frequent measurement checks. This is the proper way to get your measure, from the ground, to the lower portion of the top most point of the wheel well:

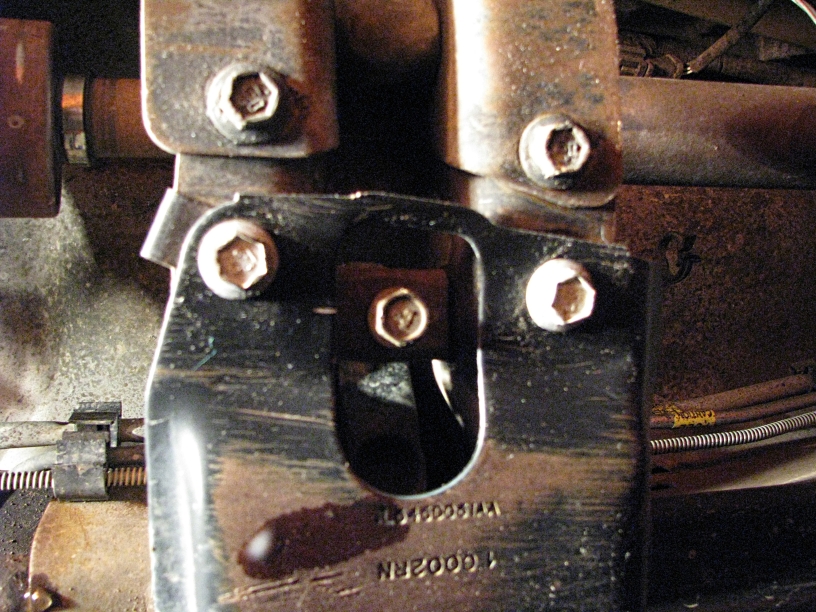
This is where the torsion bars are located.. 2 of them, one for each side of the front suspension. Which means there are 2 bolts to adjust, each bolt is a 1/2" socket, with plenty of room to get both hands around to give you some leverage if you need it. They are located a couple feet behind each wheel, and are very visible just by peeking under the edge of the truck.

The proper placement and raising of the truck is the most important part of this operation.. this is a very simple task, and provides you with the maximum amount of protection, BE SAFE! Never stick any tools, arms, legs, or anything breakable/hurtable under a tire or any spot you may risk getting hurt if, for some reason, the vehicle decides it doesnt like to stay lifted. I don't want to ever hear about anyone breaking a limb or back from squatting wierd under the truck.. dont do it, just do it like everyone else, lay on yoru back, wear a good pair of Carharts//Overalls to keep yourself warm, dry, and give some protection value. The following 2 pictures are how you lift the front end, and place the jacks.


The next step is to mark the stock location of the bolt. You should clean off the surrounding area of the bolt and scuff it a slight bit if you decide to apply a paint to it to mark the location. For myself, I prefer to use a Dremel with a cutting bit attached to mark the location, the following is how I marked it.. this is to show you exactly how many rotations of the TB you are doing, and provides a good place to tweak each side to the exact amount every time. The picture is slightly fuzzy.. as holding a camera eight inches away doesnt allow it to focus just right, I sharpened it up a bit and tweaked it so you can see the marks on both the nut, and on the outer housing of the TB.
Fasten a 1/2" socket to the bolt, stick your breaker bar on the end of the socket wrench.. and begin to tighten it (Righty tighty, lefty loosey) (Or Clockwise for Tightening, Counter for Loosening). A good sized breaker bar will give you PLENTY of leverage, I was able to do this with 1 arm on the breaker, and my other hand holding the socket in place and found it very easy to tighten the bolt. Adjust both sides EXACTLY the same, and a small amount at a time.. I went roughly 1/2 a turn on each side, then got up and measured the gap in the tire to the wheel well every time, I pre-determined I wanted to give myself 1 1/2" lift to give me a good balance with the front and rear, but not a prerunner look. You NEED to measure BOTH sides at the same time, as it is very critical to make sure both are measuring the same when the truck is lowered. Keep tightening the bolt until you feel you have what you need.. then lower the truck, and take it out for a spin on some un-even terrain to settle the suspension back into place.
This is a before/after picture of my work, this is a VERY easy task to do.. and makes a big improvement. This allowed my 265/75/16 Toyo's to stop rubbing when I cranked the wheel.. and makes it look an awful lot better as well.

If your interested, stay tuned.. as right now I am heading out to start working on it.
If you plan on following along, gather up a couple tools.. and pop them out in your work area.. nothing like prepping for a job :-)
*************************
Tools Needed:
1/2" Socket + Breaker Bar
Bright colored paint for marking torsion bolt stock location and turn point. Or a Dremel (Like I did)
1x Quicklift/Hydraulic Jack to lift the truck
2x Jack's to drop the front end on (ALWAYS Safer using a proper set of jacks)
1x Measuring Tape, for measuring the rear end.. (Will provide pictures on proper measurement areas.)
First step, you'll need to pull out your measuring tape and measure the front and rear height to get a mark as to how much you wish to lift the front of the truck. Write them both down on paper so you don't forget them, and keep the paper handy for frequent measurement checks. This is the proper way to get your measure, from the ground, to the lower portion of the top most point of the wheel well:
This is where the torsion bars are located.. 2 of them, one for each side of the front suspension. Which means there are 2 bolts to adjust, each bolt is a 1/2" socket, with plenty of room to get both hands around to give you some leverage if you need it. They are located a couple feet behind each wheel, and are very visible just by peeking under the edge of the truck.
The proper placement and raising of the truck is the most important part of this operation.. this is a very simple task, and provides you with the maximum amount of protection, BE SAFE! Never stick any tools, arms, legs, or anything breakable/hurtable under a tire or any spot you may risk getting hurt if, for some reason, the vehicle decides it doesnt like to stay lifted. I don't want to ever hear about anyone breaking a limb or back from squatting wierd under the truck.. dont do it, just do it like everyone else, lay on yoru back, wear a good pair of Carharts//Overalls to keep yourself warm, dry, and give some protection value. The following 2 pictures are how you lift the front end, and place the jacks.
The next step is to mark the stock location of the bolt. You should clean off the surrounding area of the bolt and scuff it a slight bit if you decide to apply a paint to it to mark the location. For myself, I prefer to use a Dremel with a cutting bit attached to mark the location, the following is how I marked it.. this is to show you exactly how many rotations of the TB you are doing, and provides a good place to tweak each side to the exact amount every time. The picture is slightly fuzzy.. as holding a camera eight inches away doesnt allow it to focus just right, I sharpened it up a bit and tweaked it so you can see the marks on both the nut, and on the outer housing of the TB.
Fasten a 1/2" socket to the bolt, stick your breaker bar on the end of the socket wrench.. and begin to tighten it (Righty tighty, lefty loosey) (Or Clockwise for Tightening, Counter for Loosening). A good sized breaker bar will give you PLENTY of leverage, I was able to do this with 1 arm on the breaker, and my other hand holding the socket in place and found it very easy to tighten the bolt. Adjust both sides EXACTLY the same, and a small amount at a time.. I went roughly 1/2 a turn on each side, then got up and measured the gap in the tire to the wheel well every time, I pre-determined I wanted to give myself 1 1/2" lift to give me a good balance with the front and rear, but not a prerunner look. You NEED to measure BOTH sides at the same time, as it is very critical to make sure both are measuring the same when the truck is lowered. Keep tightening the bolt until you feel you have what you need.. then lower the truck, and take it out for a spin on some un-even terrain to settle the suspension back into place.
This is a before/after picture of my work, this is a VERY easy task to do.. and makes a big improvement. This allowed my 265/75/16 Toyo's to stop rubbing when I cranked the wheel.. and makes it look an awful lot better as well.
Last edited by WowMike2001; 11-16-2008 at 05:10 AM.
#3
02-08-2008
Just finished up.. going to snap a last picture of a side-view.. I decided oto give myself a 1 1/2inch TB lift for the front... as I dont really liek the Pre-Runner look, and that extra inch and a half gives me the clearance needed so my 265/75/16's dont rub anymore. Plan on getting a 4"SL sometime this summer I think.. could have bought the kit today if I wanted, but I ended up buying myself an air impact set, and a 60 LED rechargeable 12volt//ac power work light.. perfect for putting in my pickup.
So give me a few whiel I edit a couple pictures and get them ready for ya all =)
So give me a few whiel I edit a couple pictures and get them ready for ya all =)
Last edited by WowMike2001; 02-08-2008 at 11:25 PM.


#5
02-08-2008

#6
02-08-2008

Join Date: Apr 2007
Location: East Texas
Posts: 2,830
Likes: 0
Received 0 Likes
on
0 Posts
#7
02-08-2008
#8
02-08-2008
The following users liked this post:
Belacgrebmar (05-19-2021)
#10
02-10-2008
Hmm, if a MOD happens to see this, woudl you mine tossing it up as a stick yon here? Would help out an awful lot of those folks needing to know what the torsion bar is and such. I think it more belongs in the Suspension section rather than the how-to as more peopel look in here then in there for the help on it. Thanks a bunch!
#11
02-10-2008


#13
02-11-2008
5" RCD lift with Deaver leafs, 3" body lift
If I'm correct (I think I've got my lifts down) The RCD lift changes the front suspension to coil's and removes the Torsion Bar suspension.
#16
02-11-2008
And as a random note.. that quicklift is the infamous one that rolled form the front of my bed in my '88 ranger, to the rear while I was accelrating uphill.. and knocked my tailgate completely off its hinges.. those quiclifts ar ebuilt tough! The sucker ended up falling out of the bed of my truck at 35mph and didnt even dent or scratch it.
And boohoo on that GM part -laughs- To be honest, I never even noticed until you mentioned that.. never payed attention to the sticker, rofl. DOH! I'll spray paint over em and paint FORD in some whiteblue letters just to cure it
And boohoo on that GM part -laughs- To be honest, I never even noticed until you mentioned that.. never payed attention to the sticker, rofl. DOH! I'll spray paint over em and paint FORD in some whiteblue letters just to cure it
The following users liked this post:
Belacgrebmar (05-19-2021)
#17
02-11-2008
Unregistered User
Posts: n/a
this has been covered over and over and over and over and over and over and over and over and over and over and over and over over and over and over and over and over and over and over and over and over and over and over and over over and over and over and over and over and over and over and over and over and over and over and over over and over and over and over and over and over and over and over and over and over and over and over!
there are many ways to do this , all have been debated to death.
i just use a 12 point 1/2" chrome socket on a 1/2" impact gun and send the bolts home!
there are many ways to do this , all have been debated to death.
i just use a 12 point 1/2" chrome socket on a 1/2" impact gun and send the bolts home!
#18
02-13-2008
Join Date: Nov 2007
Location: Sticks, CT
Posts: 181
Likes: 0
Received 0 Likes
on
0 Posts


#24
03-12-2008
Join Date: Apr 2007
Location: East Texas
Posts: 2,830
Likes: 0
Received 0 Likes
on
0 Posts
#25
11-15-2008

Join Date: Apr 2008
Location: tampa, fl
Posts: 6
Likes: 0
Received 0 Likes
on
0 Posts
so i just tried to do this to my truck and the bolt on the drivers side is about an 1/8 th of an inch further in than the one on the passanger side, but the measurments are the same on both sides exactly the same..should i try and even them out or what. o and i had it at about an inch and then after i drove it around for a bit it sank to just over 1/2 id that normal for it to "settle" that much?


