
Help, need access to cab
#1
 01-23-2015


Join Date: Oct 2014
Location: Northeast, Ga.
Posts: 24
Likes: 0
Received 0 Likes
on
0 Posts

#3
01-23-2015

#4
01-23-2015
Join Date: Oct 2014
Location: Northeast, Ga.
Posts: 24
Likes: 0
Received 0 Likes
on
0 Posts
Thanks for the info but..............
..........I've looked underneath the vehicle and I am not seeing what you are indicating. Could it be the 2009 and new Rangers are a different design and so maybe those mentioned areas/plugs are not there?
Or it could be I'm blind..............so will look again but I am pretty sure I did not see that/those.
thanks
Or it could be I'm blind..............so will look again but I am pretty sure I did not see that/those.
thanks
#6
01-23-2015
Pull your flooring back.. they should be there. I highly doubt Ford changed anything. You can't see the front ones from underneath the truck, they are under the silver head shield stuff. The middle one, and MAYBE the rear one you can see from under there. It's just a rubber grommet. I'll try not to be lazy later and crawl under there for a picture.
#7
01-23-2015


#11
01-24-2015
Join Date: Oct 2014
Location: Northeast, Ga.
Posts: 24
Likes: 0
Received 0 Likes
on
0 Posts
Thanks for the pictures.............
I appreciate the pictures, they do give an idea of where they might be on my vehicle....but.... I crawled under and I did find "A"(meaning 1) grommet. It was located right above the frame member; I would have a devil of a time getting my hand into there. Part of my problem is there is a frame and auxiliary support stuff(I guess that's what it is?). Plus there seems to be 'shields' of some sort also which block the view; this is on the drivers side. Admittedly I guess I did not do a good thorough look on the passenger side?
My other problem is that my vehicle has carpeting along with underlayment. The plastic molding is extremely snug and I am not sure how I am to pry it away? But I am not so sure that will allow me to still pull the carpet away with it installed under/up the backside of the cab.
Admittedly I had what seemed like more easily access to the cabs in my older F150's, but they did not have carpeting either.
Again, thanks for the pictures. Since you appear to have gutted the interior how did you get the moldings off without damaging them?
#12
01-24-2015
The ones on the floor you just pull up.. they are sturdy, you won't break them. You may need remove the piece on the kick-panel.. it's just held on by one plastic pin.. I recommend a trim removal tool.. kinda looks like a 2 pronged fork.. but you can probly get it with a flathead or something. Seats are held on by 4 bolts.. plus a big star bolt that holds the seat-belts onto the floor. Then you peel back the carpet. Let me go crawl under the truck and try to get a picture of where the grommet is.
#13
01-24-2015
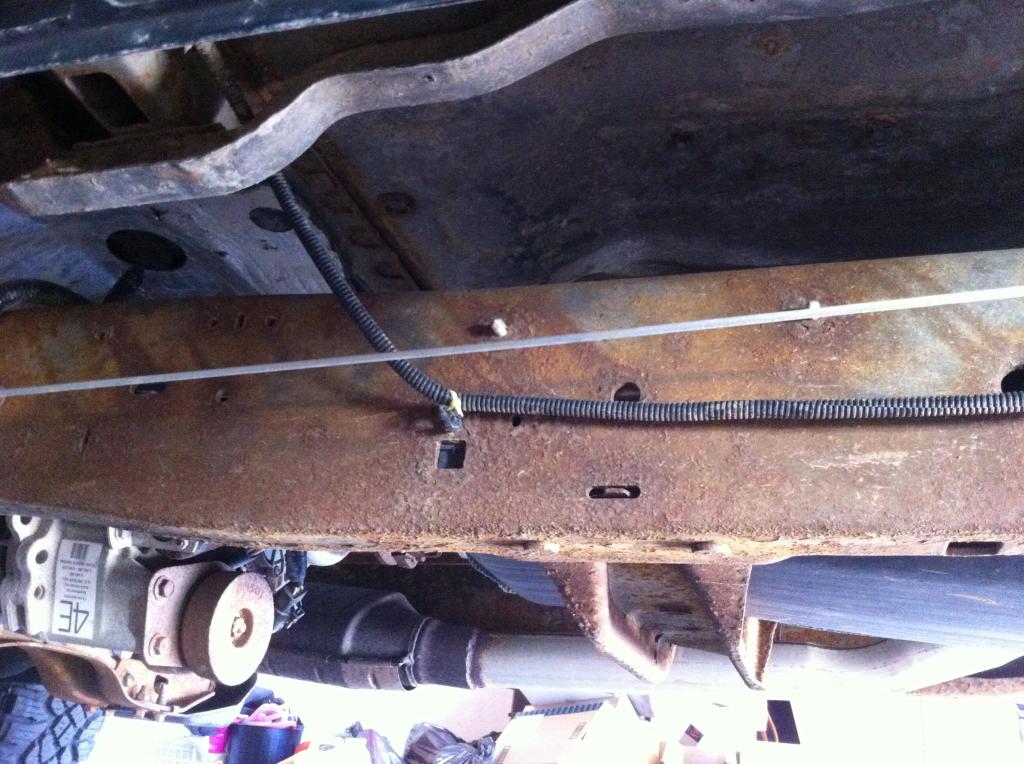
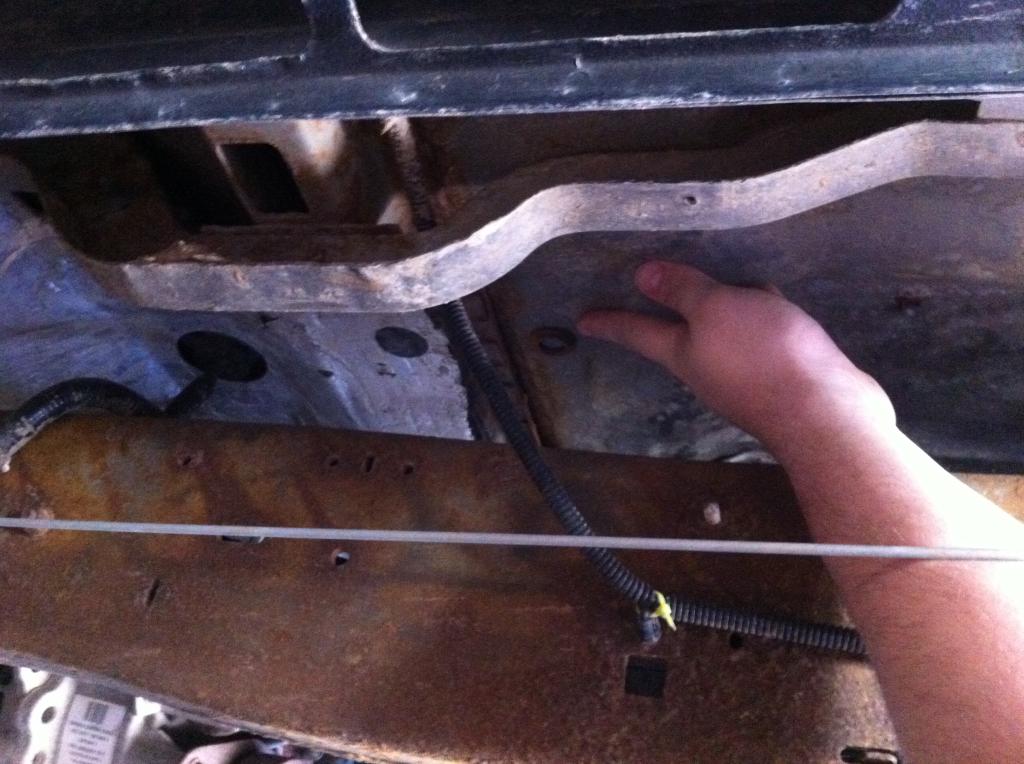
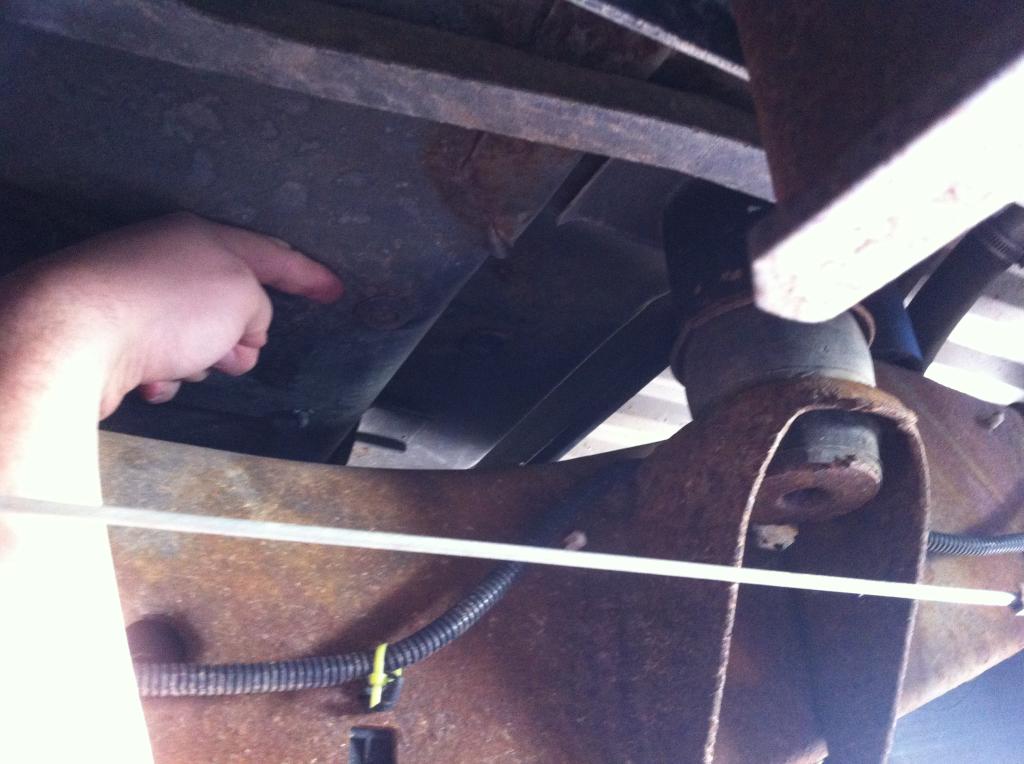
Here ya go.. they are above the frame.. I forgot mine is body lifted so it's easier to get to than it will be for you.. might be easier to push it through from the top instead of trying to feed it up from underneath.
The one above the crossmember is under the seat.. the other one is near the rear of the cab by that hump for the rear seats.
Picture of the crossmember behind the transfer case for 4x4's.. You can see the grommet above the frame.
One under the driver's seat:
One near the rear of the cab:
The one above the crossmember is under the seat.. the other one is near the rear of the cab by that hump for the rear seats.
Picture of the crossmember behind the transfer case for 4x4's.. You can see the grommet above the frame.

One under the driver's seat:

One near the rear of the cab:

#14
01-26-2015
Join Date: Oct 2014
Location: Northeast, Ga.
Posts: 24
Likes: 0
Received 0 Likes
on
0 Posts
thanks again for the pictures
I did find two of the grommets on the driver side; looking from underneath. They would be very difficult for me to access and try to push/pull an 'av' cord thru. So, I went to the passenger side and found two like on the drivers side. But I may be able to access the 'rear' one? It is not as 'blocked' as the driver side one. It is above the frame but slightly more accessible. I think if I can find/use a stiff wire or maybe even a skinny screwdriver or pick I can poke a hole up thru the carpet above? Then maybe I can then cut a hole under the passenger seat carpet and run the cable from there to where I poked a hole and down thru to the underside??? As you can tell I am not very experienced on this type of stuff but I am feeling more confident I will be able to get my 'av' cable from the back to the front now. Just so one knows: I am installing a backup camera. Doing electrical, mechanical I am kinda decent but dealing with 'routing' and interiors I am kinda ....not.
thanks again for the pictures. they really helped
thanks again for the pictures. they really helped
#15
01-26-2015


Join Date: Apr 2007
Location: Placentia, CA
Posts: 927
Likes: 0
Received 0 Likes
on
0 Posts
#16
01-26-2015
I did find two of the grommets on the driver side; looking from underneath. They would be very difficult for me to access and try to push/pull an 'av' cord thru. So, I went to the passenger side and found two like on the drivers side. But I may be able to access the 'rear' one? It is not as 'blocked' as the driver side one. It is above the frame but slightly more accessible. I think if I can find/use a stiff wire or maybe even a skinny screwdriver or pick I can poke a hole up thru the carpet above? Then maybe I can then cut a hole under the passenger seat carpet and run the cable from there to where I poked a hole and down thru to the underside??? As you can tell I am not very experienced on this type of stuff but I am feeling more confident I will be able to get my 'av' cable from the back to the front now. Just so one knows: I am installing a backup camera. Doing electrical, mechanical I am kinda decent but dealing with 'routing' and interiors I am kinda ....not.
thanks again for the pictures. they really helped
thanks again for the pictures. they really helped
Look on youtube for videos on how to take it apart or something. It may seem like a lot of work to remove the seat, trim and pull the carpet, but I promise you it's easy.
#17
02-05-2015
Join Date: Oct 2014
Location: Northeast, Ga.
Posts: 24
Likes: 0
Received 0 Likes
on
0 Posts
Thanks for the pictures and advice
Thanks again for the help and directions.
I was able to utilize the access on the drivers side under the seat.
I now have my backup camera and monitor installed.
$50+ verses paying someone $350 for the monitor including install.
a few bruised finger tips are the only negatives.
thanks again.
I was able to utilize the access on the drivers side under the seat.
I now have my backup camera and monitor installed.
$50+ verses paying someone $350 for the monitor including install.
a few bruised finger tips are the only negatives.
thanks again.
#18
02-05-2015
Join Date: Apr 2007
Location: Placentia, CA
Posts: 927
Likes: 0
Received 0 Likes
on
0 Posts

#19
02-05-2015
Join Date: Oct 2014
Location: Northeast, Ga.
Posts: 24
Likes: 0
Received 0 Likes
on
0 Posts
Worthless??
Worthless?? Guess I don't understand. What I was doing, but maybe incorrectly, was thanking those who sent the pictures and access information. What I was doing is installing a backup camera and needed to know where to 'come into' the cab with the cable.
"If" you are saying 'worthless' because I have not detailed how to install and connect and run everything I guess I get it? I did not take pictures and I only followed the instructions that came with the equipment; even tho they were vague.
So, sorry this was worthless.
"If" you are saying 'worthless' because I have not detailed how to install and connect and run everything I guess I get it? I did not take pictures and I only followed the instructions that came with the equipment; even tho they were vague.
So, sorry this was worthless.
#20
02-05-2015
Worthless?? Guess I don't understand. What I was doing, but maybe incorrectly, was thanking those who sent the pictures and access information. What I was doing is installing a backup camera and needed to know where to 'come into' the cab with the cable.
"If" you are saying 'worthless' because I have not detailed how to install and connect and run everything I guess I get it? I did not take pictures and I only followed the instructions that came with the equipment; even tho they were vague.
So, sorry this was worthless.
"If" you are saying 'worthless' because I have not detailed how to install and connect and run everything I guess I get it? I did not take pictures and I only followed the instructions that came with the equipment; even tho they were vague.
So, sorry this was worthless.
I would be interested to see it as well. It's on my list of things to do since I got my DVD player like 4 years ago, haha.
Glad you got it taken care of :)
#21
02-05-2015
Join Date: Oct 2014
Location: Northeast, Ga.
Posts: 24
Likes: 0
Received 0 Likes
on
0 Posts
Backup Camera install
I do not know how to 'install' or 'link' pictures so the best I Can Do is give a link to where I got my backup camera and 5" monitor. They both were found at the Amazon site:
camera:
monitor:
I connected the power wire of the camera to my back up light positive wire. That way it only comes on when in reverse. The included instructions are kind of vague but I'm sure those of you reading this can figure it out. By the way the camera is a license plate frame so looks better, to me, than 'add on' looking type ones.
The monitor, I took the easy way for the moment. I got a accessory plug that goes into the cigar/accessory socket on the dash and connected it to the power cord of the monitor. Since the Ranger/B4000 has not a lot of available space on the dash I have not done a permanent install of the monitor yet. At the moment it is utilizing the suction cup mount like you can do with a Garmin GPS; it's 'sticking' onto one of those weighted pads. Eventually I'll figure where I can permanently 'stick' the thing.
The cable run is on the driver side of the vehicle and attached to the frame at strategic points. The cable is entering the cab via the access hole that can be found under the seat (see the above pictures that were sent). I initiated running the cable from the inside of the cab first, then cut a small hole in the grommet, replaced the grommet and then ran the cable to the rear.
Why a camera? I just bought this truck a few months ago and it came with a bed topper.....a big one. I thought at first I would just take it off and sell it. But now I see that in bad weather it does come in handy when putting stuff in the bed. But the topper does cause some 'sight' problems. With camera, side mirrors and 'neck straining' I can see better. At pushing 70 it gets harder to see sometimes and neck turning is tuffer too.
Sorry, no pics. But I am going to assume that most of you who subscribe to this forum have some mechanical skills and with my abbreviated description can figure out what I have done and can do it too and probably better.
#22
02-05-2015
Join Date: Apr 2007
Location: Placentia, CA
Posts: 927
Likes: 0
Received 0 Likes
on
0 Posts
Worthless?? Guess I don't understand. What I was doing, but maybe incorrectly, was thanking those who sent the pictures and access information. What I was doing is installing a backup camera and needed to know where to 'come into' the cab with the cable.
"If" you are saying 'worthless' because I have not detailed how to install and connect and run everything I guess I get it? I did not take pictures and I only followed the instructions that came with the equipment; even tho they were vague.
So, sorry this was worthless.
"If" you are saying 'worthless' because I have not detailed how to install and connect and run everything I guess I get it? I did not take pictures and I only followed the instructions that came with the equipment; even tho they were vague.
So, sorry this was worthless.
99% of the time when someone posts that it just means we like to see pictures of the finished product. Even though something has been done before its always nice to show off the finished product.
Anyways, I am glad you got it all installed and working. Enjoy the backup camera!
#23
02-05-2015
In order to upload pictures, you can create a free account at a photo hosting website like Photobucket. Then you can copy and paste the [IMG] code into your thread and the picture will be linked here.
That's cool though, I can picture how it's mounted. Does it stay on while you are driving? The one I was thinking of doing would be on in reverse, but that would kind of cool to have a live video of what's going on behind me while cruising.
That's cool though, I can picture how it's mounted. Does it stay on while you are driving? The one I was thinking of doing would be on in reverse, but that would kind of cool to have a live video of what's going on behind me while cruising.
#24
02-05-2015
Join Date: Oct 2014
Location: Northeast, Ga.
Posts: 24
Likes: 0
Received 0 Likes
on
0 Posts
In order to upload pictures, you can create a free account at a photo hosting website like Photobucket. Then you can copy and paste the [IMG] code into your thread and the picture will be linked here.
That's cool though, I can picture how it's mounted. Does it stay on while you are driving? The one I was thinking of doing would be on in reverse, but that would kind of cool to have a live video of what's going on behind me while cruising.
That's cool though, I can picture how it's mounted. Does it stay on while you are driving? The one I was thinking of doing would be on in reverse, but that would kind of cool to have a live video of what's going on behind me while cruising.
2. Yes, you can wire it into a constant 'hot' wire and have it on all the time if you choose. With the rather fine wire they include for connecting the power I was not sure having it on all the time would be good for such 'fine' wire.

Thread
Thread Starter
Forum
Replies
Last Post
winks
General Technical & Electrical
20
08-07-2008 07:48 PM
V8 Level II
General Ford Ranger Discussion
16
09-15-2007 10:12 AM


