How-To: Install Cab Lights / Clearance Lights
#1
 12-23-2010


How-To: Install Cab Lights / Clearance Lights
seeing as how there have been a few people putting the super duty recon lights on their trucks, I figured i would extend some info to some of you who might be interested in attempting the task.
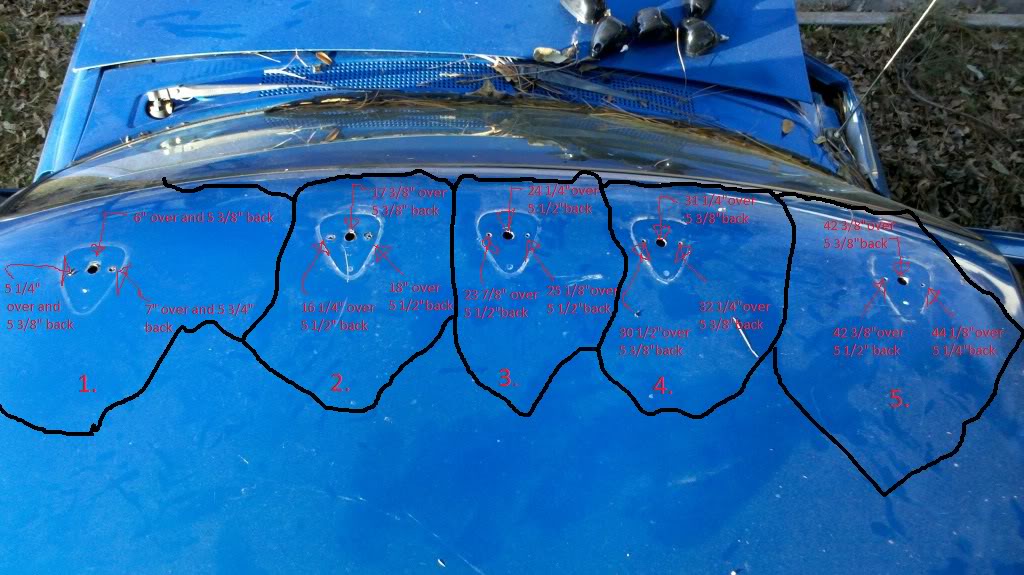
there will be three wholes total per light.
ATTEMPT AT YOUR OWN RISK. i take no responsibility for anything that may go wrong
first remove both plastic pieces above the driver door and a-pillar pieces, sun visors, and oh-**** handles inorder to access the area between the headliner and the roof to access the wiring later and inorder to save your headliner from any drill bits that go through the roof.
i took all my measurements from the driver side door seal "OVER", and the top of the windshield seal "BACK" and worked my way over towards the passenger side door seal.
before you put your self taping screws in be sure to put some silicone on them to prevent any moisture from getting in the cab
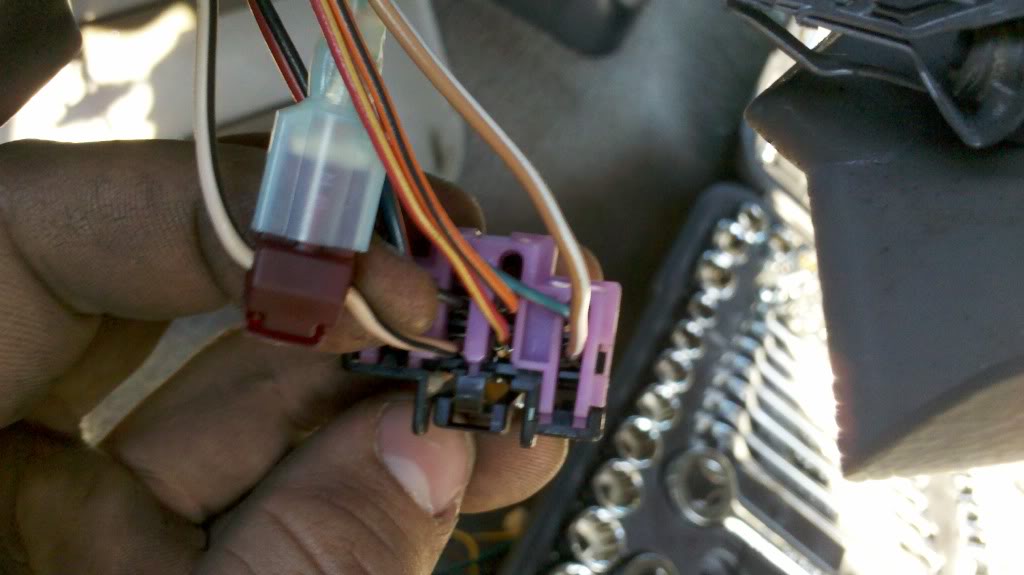
after you have your holes drilled and your connectors run through the roof run all your wires above the headliner and down the a-pillar into the headlight indicator panel.
i didnt take any pictures of this step because its pretty much self explanitory.
remove the fuse panel cover.
and pop out the gauge surround just enough to access the headlight indicator, this will require you to remove the radio bezel.
this is where your multimeter/ power source locator comes into play.
hook your battery back up and turn the headlight switch towards your running lights indicator. once you do that figure out what wire has power at that moment and that will be the wire you splice into for your power. then find somewhere to mount your ground wire.
this is the wire that it ended up being on my '98 it may be different on newer models
once your connections are good and your all powered up put all your plastic pieces back togeather and your good to go.
there will be three wholes total per light.
ATTEMPT AT YOUR OWN RISK. i take no responsibility for anything that may go wrong
over all difficulty: 5/10 just because of the drilling into the roof and mild electrical skills needed
tools needed:
tape measure
drill with assorted bits including: 1/8" for a tap bit, 1/4" for the self taping mount screws,
5/16" for the wiring with the male connector to go through- i believe i had to go up to a 27/64" for the plug
silicone grease for the self taping screws to prevent moisture from getting in to the cab
wire strippers with wire connectors
and a multimeter/ anything you can use to test power
and of course your favorite beverage
first remove both plastic pieces above the driver door and a-pillar pieces, sun visors, and oh-**** handles inorder to access the area between the headliner and the roof to access the wiring later and inorder to save your headliner from any drill bits that go through the roof.
i took all my measurements from the driver side door seal "OVER", and the top of the windshield seal "BACK" and worked my way over towards the passenger side door seal.
before you put your self taping screws in be sure to put some silicone on them to prevent any moisture from getting in the cab
after you have your holes drilled and your connectors run through the roof run all your wires above the headliner and down the a-pillar into the headlight indicator panel.
i didnt take any pictures of this step because its pretty much self explanitory.
remove the fuse panel cover.
and pop out the gauge surround just enough to access the headlight indicator, this will require you to remove the radio bezel.
this is where your multimeter/ power source locator comes into play.
hook your battery back up and turn the headlight switch towards your running lights indicator. once you do that figure out what wire has power at that moment and that will be the wire you splice into for your power. then find somewhere to mount your ground wire.
this is the wire that it ended up being on my '98 it may be different on newer models
once your connections are good and your all powered up put all your plastic pieces back togeather and your good to go.

Thread
Thread Starter
Forum
Replies
Last Post
TheBearJeweler
OLD - Interior, Exterior, Electrical, & Misc.
15
03-15-2011 01:53 PM
For Sale: Cab Clearance Lights - NC - $25 shipped
therangerofdanger
OLD - Interior, Exterior, Electrical, & Misc.
1
09-01-2010 09:34 PM
therangerofdanger
General Technical & Electrical
10
12-23-2007 09:49 AM


