Question About Cruise Control Switch
#26
 02-25-2010

#27
02-25-2010

That's the reason for the snaking wires on my modded pair and the additional LED. Totally uniform light and it looks briliant.
#28
02-25-2010
I was thinking about that Shane. I had considered ordering the new style of LED from them in the same twist lock housing. The style I ordered is 1 lumen and the new style are 6 lumens. I may change my order..
EDIT: I emailed them and told them to invoice me for two more of the 6 lumen LEDs after adding them to my existing order.. What the hell, I've spent money in worse ways..
GB :)
EDIT: I emailed them and told them to invoice me for two more of the 6 lumen LEDs after adding them to my existing order.. What the hell, I've spent money in worse ways..
GB :)
Last edited by Bird76Mojo; 02-25-2010 at 10:08 PM.
#29
02-26-2010

Honestly, having done the single LED like in N3elz's cardomain (John Griggs), the light output sucks and is not uniform. You along with whomever does a single LED in there(solder or twist in) will find themselves very disappointed.
That's the reason for the snaking wires on my modded pair and the additional LED. Totally uniform light and it looks briliant.
That's the reason for the snaking wires on my modded pair and the additional LED. Totally uniform light and it looks briliant.
#30
02-26-2010
Same place as the Headight/4x4 switch, foglight switch, and dash how-to's, N3elz/John Griggs' cardomain. Packed full of how-to's. Just gotta do a click fest of 30 pages to find what you want since the glossary is messed up.
So here's a link: http://www.cardomain.com/ride/296394
I used John's cardomain to jumpstart my little LED obsession on the interior of my truck. All my led mods were inspired by his, but done a little differently(see: my 2 LED's per pod where the link shows 1, my sanding technique, etc)
**EDIT: bored....
95+ Ford Ranger Headlight and 4x4 Switch LED Mod
Adding LED's to Ranger Cruise Control Pods
Gauge Color Change Using Factory Overlays (by N3ELZ and $tone02 -- published formerly on Generation-Edge)
Don't forget the AWESOME LED tutorial and other how-to's he's got. He hasn't been on R-F in quite some time now...probably going on 2 years now.
#31
02-27-2010
#32
03-06-2010
Well I've had the battery unhooked for about 30 minutes now and I'm getting ready to take the airbag out and try those LEDs. The company ended up shipping me the high intensity LEDs along with the regular style so I'm just gonna use the high intensity and not even try the regular ones. I'll probably sell the regular twist lock LEDs on here if this "bolt in" mod ends up working. Unless someone knows another location in the truck where I can use these twist lock style of LEDs???? Anyone?
From what I can tell by pictures of the twist lock factory bulb and the twist lock LEDs I ordered, they're exactly the same..
I'll update this thread with my results and maybe even some pictures..
GB :)
From what I can tell by pictures of the twist lock factory bulb and the twist lock LEDs I ordered, they're exactly the same..
I'll update this thread with my results and maybe even some pictures..
GB :)
#33
03-06-2010
Well I got one of them installed today but it didn't go without it's problems.
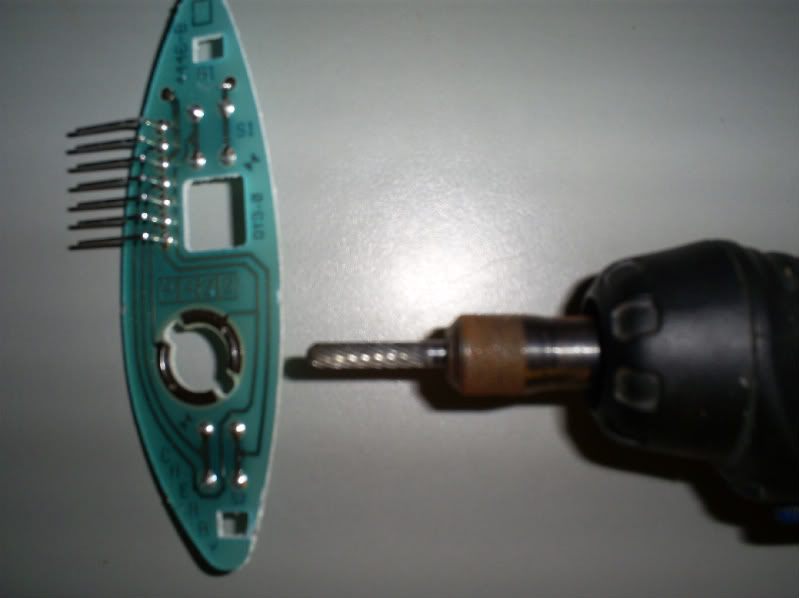
One thing worth noting is that you have to dremel out the hole for the bulb, in the circuit board, just a tiny bit bigger for the twist lock LEDs. No major problem there. It was easily done with my dremel and a small rotary file/milling bit. Then after you get the LED to fit into the hole, just remove it and bend the tabs/electrical connections down a little at a time until the LED twists/locks into place snugly. You only bend down on on corner with small needle nose pliers because the tabs are pre-bent as you'll see if you order any of them.
Then you'll notice, after getting the LED to fit the hole, that the circuit board is so thin that the twist lock LED doesn't want to stay in. This was easily fixed by bending down the little tabs that actually make the electrical connection to the circuit board. You have to be VERY CAREFUL doing this or you'll end up like me, breaking one of the tabs off of your new LEDs. I broke one off of the high intensity LEDs so I used the conventional style twist lock LED. It ended up being way brighter than the OEM bulb that I left in the right side for now. I'm glad I didn't go with the high intensity in the end because these conventional style twist lock LEDs are plenty bright enough!!
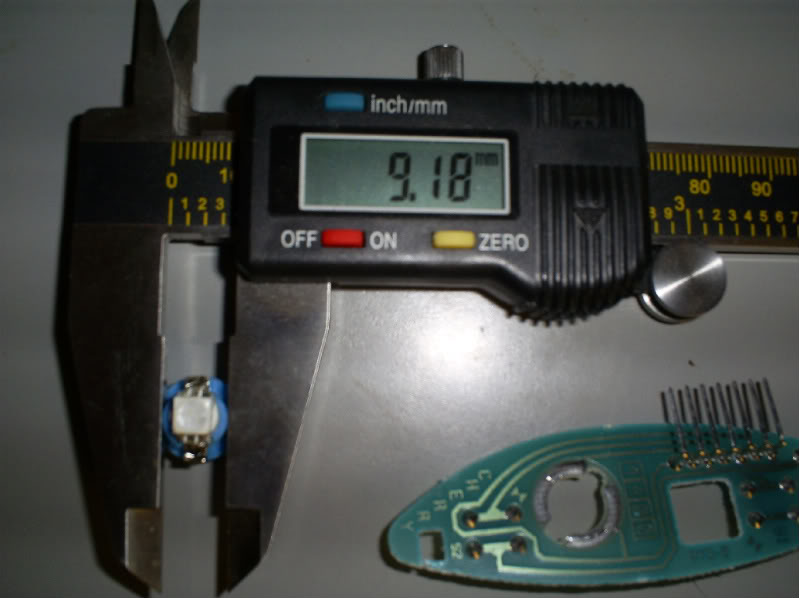
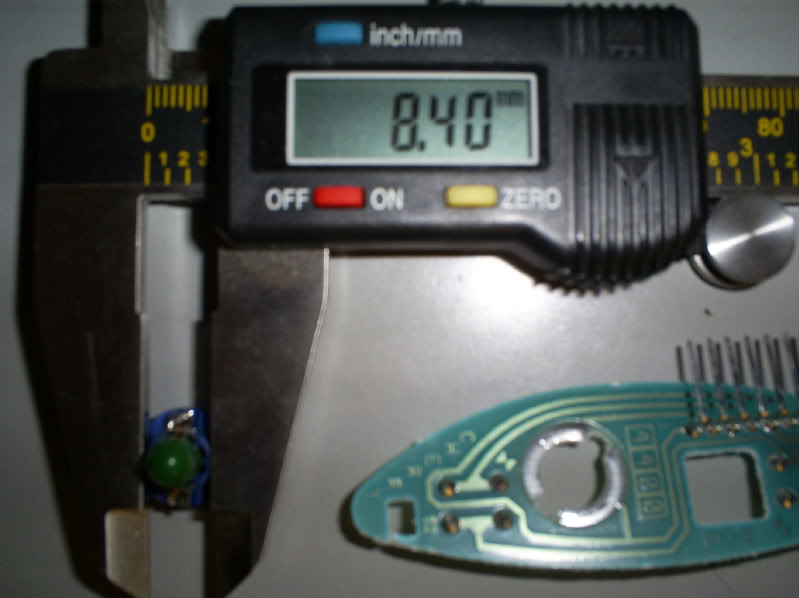
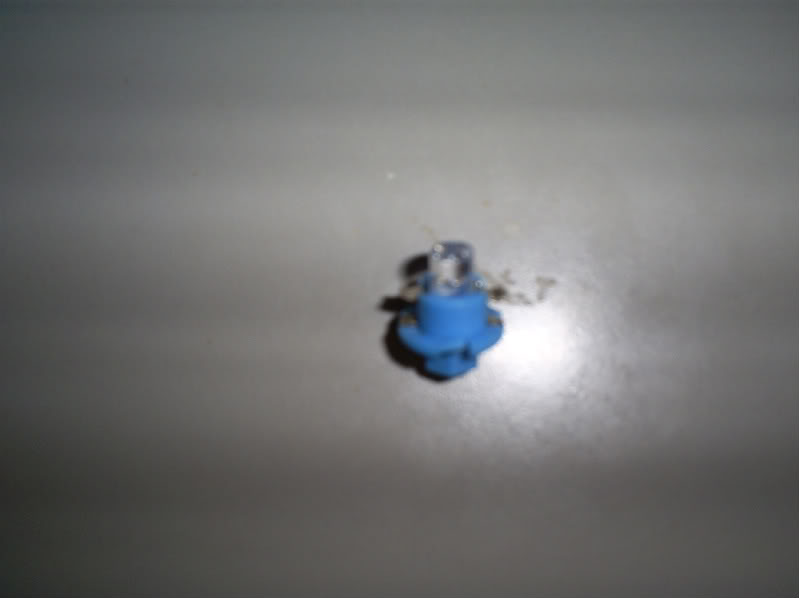
Here you can see the difference in diameter between the original OEM twist lock bulb and the twist lock high intensity LED..
Here's the dremel bit I used with great results.. Note: You also have to enlarge the two "slots" on opposite sides of the main bulb hole on the circuit board. Just a tiny bit to let the new LED contacts (tabs) fit through.
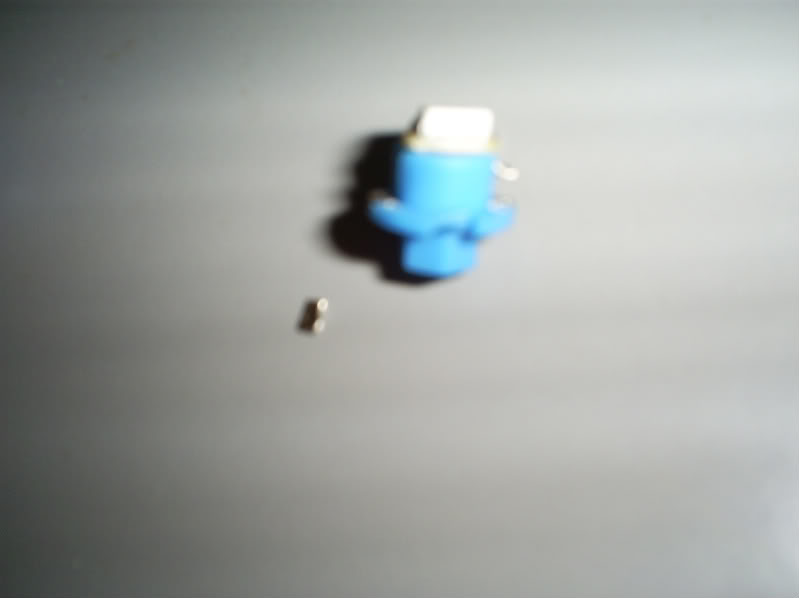
Here's the high intensity LED that I broke the tab/electrical connection off of.. I can't stress enough how easy these break. You have to be very careful with bending them. It might be a good idea to order a couple extra when you buy them, especially when they're so cheap!
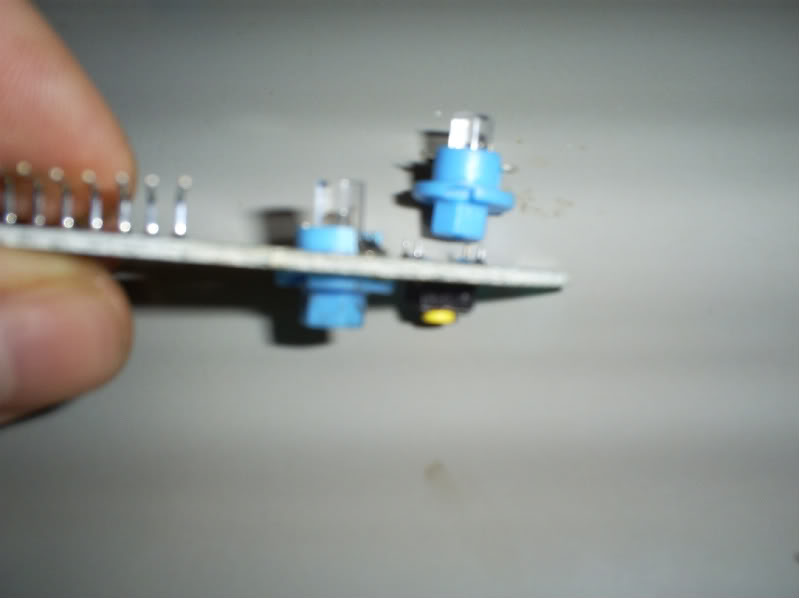
Here's the conventional twist lock LED that I ended up using instead of the high intensity type..
Here I'm attempting to show the thickness of the circuit board compared to the conventional LED and its locking tabs. You can see why you have to bend them down to lock into the board tightly..
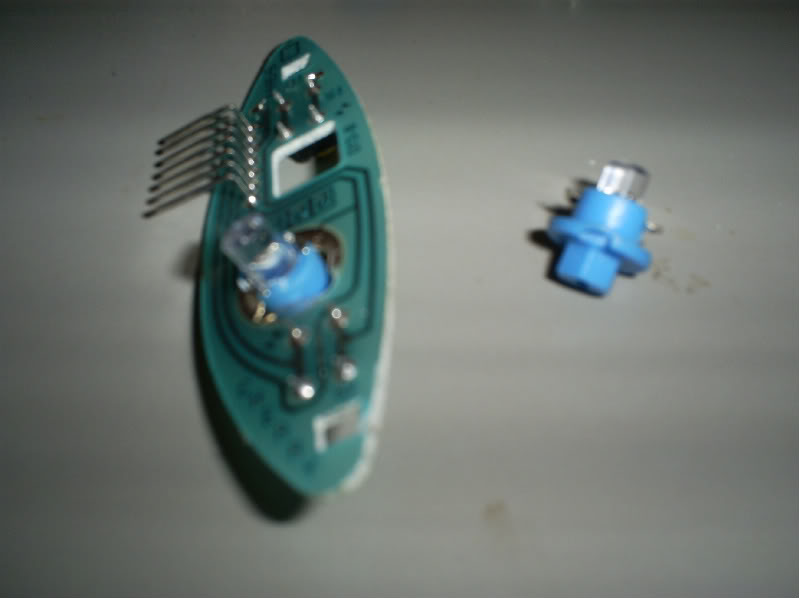
Here's one conventional twist lock LED installed into the board after bending the tabs. If you're worried about the height of the LED, don't be, as it's actually a little shorter than the OEM bulb..
Here you can see just how bright these blue CONVENTIONAL LEDs are. Some people didn't think they'd be bright enough but I couldn't disagree more! I couldn't get the OEM bulb to show up on camera at all. They're just that dim. The CONVENTIONAL LED shows up nice and bright blue.. I'm happy!! Now to do the other side and I'm done!

Here's the page showing the LEDs you'll need to order. They're the "B8.4D Twist Lock lamp" shown on the bottom right of the page. Available in any color, in conventional LED and high intensity. The conventional variety are plenty bright enough..
http://www.superbrightleds.com/cgi-b...specs%2FB8.htm
GB
One thing worth noting is that you have to dremel out the hole for the bulb, in the circuit board, just a tiny bit bigger for the twist lock LEDs. No major problem there. It was easily done with my dremel and a small rotary file/milling bit. Then after you get the LED to fit into the hole, just remove it and bend the tabs/electrical connections down a little at a time until the LED twists/locks into place snugly. You only bend down on on corner with small needle nose pliers because the tabs are pre-bent as you'll see if you order any of them.
Then you'll notice, after getting the LED to fit the hole, that the circuit board is so thin that the twist lock LED doesn't want to stay in. This was easily fixed by bending down the little tabs that actually make the electrical connection to the circuit board. You have to be VERY CAREFUL doing this or you'll end up like me, breaking one of the tabs off of your new LEDs. I broke one off of the high intensity LEDs so I used the conventional style twist lock LED. It ended up being way brighter than the OEM bulb that I left in the right side for now. I'm glad I didn't go with the high intensity in the end because these conventional style twist lock LEDs are plenty bright enough!!
Here you can see the difference in diameter between the original OEM twist lock bulb and the twist lock high intensity LED..
Here's the dremel bit I used with great results.. Note: You also have to enlarge the two "slots" on opposite sides of the main bulb hole on the circuit board. Just a tiny bit to let the new LED contacts (tabs) fit through.
Here's the high intensity LED that I broke the tab/electrical connection off of.. I can't stress enough how easy these break. You have to be very careful with bending them. It might be a good idea to order a couple extra when you buy them, especially when they're so cheap!
Here's the conventional twist lock LED that I ended up using instead of the high intensity type..
Here I'm attempting to show the thickness of the circuit board compared to the conventional LED and its locking tabs. You can see why you have to bend them down to lock into the board tightly..
Here's one conventional twist lock LED installed into the board after bending the tabs. If you're worried about the height of the LED, don't be, as it's actually a little shorter than the OEM bulb..
Here you can see just how bright these blue CONVENTIONAL LEDs are. Some people didn't think they'd be bright enough but I couldn't disagree more! I couldn't get the OEM bulb to show up on camera at all. They're just that dim. The CONVENTIONAL LED shows up nice and bright blue.. I'm happy!! Now to do the other side and I'm done!
Here's the page showing the LEDs you'll need to order. They're the "B8.4D Twist Lock lamp" shown on the bottom right of the page. Available in any color, in conventional LED and high intensity. The conventional variety are plenty bright enough..
http://www.superbrightleds.com/cgi-b...specs%2FB8.htm
GB
Last edited by Bird76Mojo; 03-06-2010 at 08:17 PM.
#34
03-06-2010
I took that last picture showing the blue left side LED in the daytime with my jacket over my head.. I'm heading out now to hopefully catch the difference between the right OEM bulb and the left standard twist lock (blue) LED, since it's after dark..
I still think the high intensity type would be way too bright.
Here's the best night time shots I could get, for you all to compare/evaluate..
Let me know what you guys think. This mod is WAY easier than soldering and works quite well I think. PLUS IT'S CHEAP!

I think I must have nicked the coating in there as you can see two little blue lines in this shot. I'll have to touch it up a little. It looks way worse in pictures than in person. Hardly noticable then...


GB :)
I still think the high intensity type would be way too bright.
Here's the best night time shots I could get, for you all to compare/evaluate..
Let me know what you guys think. This mod is WAY easier than soldering and works quite well I think. PLUS IT'S CHEAP!
I think I must have nicked the coating in there as you can see two little blue lines in this shot. I'll have to touch it up a little. It looks way worse in pictures than in person. Hardly noticable then...
GB :)
Last edited by Bird76Mojo; 03-06-2010 at 08:48 PM.
#35
03-07-2010
#36
03-07-2010
Just one, as the pictures show. It's way brighter than people said it would be. I think the high intensity would be OVERKILL in a big way. At night it's the perfect brightness if you ask me. Not too bright, not too dim.. I can't vouch for other colors though.. They might be brighter or more dim, who knows??
Read carefully because mods are necessary but it's still easier than all of the soldering in the previous mods..
GB :)
Read carefully because mods are necessary but it's still easier than all of the soldering in the previous mods..
GB :)
#37
03-08-2010

Join Date: Feb 2010
Location: Manchester, NJ
Posts: 84
Likes: 0
Received 0 Likes
on
0 Posts
#38
03-08-2010
Read here: Super Bright LEDs - Instrument Cluster and Gauge Backlights
"Built-in Current Limiting Resistors or Constant Current Drivers"
I was the test pilot and it works. It just takes a little extra care to get it right. It's still much easier than drilling a bunch of holes, soldering a bunch of resistors in, then the LEDs.
I plan on doing a little research on other bulbs in my truck and using their site to order them all. The 4x4 switch, the foglight switch, the gauge cluster, the headlight switch, whatever is possible..
GB :)
#39
03-15-2010
I just took one of the LEDs out of the twist lock housing and it has two resistors underneath it. I just finished the install on the right side of the wheel and the first time it didn't come on. I took it apart and twisted the LED a tiny bit and it works fine now. The left side, which I did first, has worked flawlessly ever since and is perfect at night. Time will tell but this seems like a pretty simple, cost effective, and quick mod..
Anyone else done this mod the same way I have?? If so, post your results, pictures, gripes, etc...
GB
Anyone else done this mod the same way I have?? If so, post your results, pictures, gripes, etc...
GB
#40
03-15-2010
I just took one of the LEDs out of the twist lock housing and it has two resistors underneath it. I just finished the install on the right side of the wheel and the first time it didn't come on. I took it apart and twisted the LED a tiny bit and it works fine now. The left side, which I did first, has worked flawlessly ever since and is perfect at night. Time will tell but this seems like a pretty simple, cost effective, and quick mod..
Anyone else done this mod the same way I have?? If so, post your results, pictures, gripes, etc...
GB
Anyone else done this mod the same way I have?? If so, post your results, pictures, gripes, etc...
GB
#41
03-15-2010
It's in one of my previous posts in this thread. B8.4D Twist Lock lamp in blue. The standard intensity LED. I broke the electrical connecting tabs on one of the high intensity models which turned out to be ok because the standard intensity LED ended up being the perfect brightness level I was looking for. Anything brighter would be annoying/overkill.
GB :)
GB :)
#42
03-15-2010
It's in one of my previous posts in this thread. B8.4D Twist Lock lamp in blue. The standard intensity LED. I broke the electrical connecting tabs on one of the high intensity models which turned out to be ok because the standard intensity LED ended up being the perfect brightness level I was looking for. Anything brighter would be annoying/overkill.
GB :)
GB :)
#43
03-15-2010
It was well worth the trouble if you ask me. No soldering involved. There was some work needed though. Read back through this thread in my posts and you'll see what's required. Some dremel work and VERY CAREFUL bending of the electrical tab/connectors on the LEDs. The circuit board is too thin for the LED base to grab so you have to bend the tabs down with needle nose pliers REALLY CAREFULLY. I broke one, so you might order one or two extra.
Mine are lit up really evenly. I just went outside and they look killer at night. Evenly lit, but not so bright they look like some neon ricer crap.
I'm ordering every bulb on the truck (exterior) as we speak. Except the headlight and foglights of course. It's getting pricey real quick! lol
GB :)
Mine are lit up really evenly. I just went outside and they look killer at night. Evenly lit, but not so bright they look like some neon ricer crap.
I'm ordering every bulb on the truck (exterior) as we speak. Except the headlight and foglights of course. It's getting pricey real quick! lol
GB :)
#44
03-15-2010
It was well worth the trouble if you ask me. No soldering involved. There was some work needed though. Read back through this thread in my posts and you'll see what's required. Some dremel work and VERY CAREFUL bending of the electrical tab/connectors on the LEDs. The circuit board is too thin for the LED base to grab so you have to bend the tabs down with needle nose pliers REALLY CAREFULLY. I broke one, so you might order one or two extra.
Mine are lit up really evenly. I just went outside and they look killer at night. Evenly lit, but not so bright they look like some neon ricer crap.
I'm ordering every bulb on the truck (exterior) as we speak. Except the headlight and foglights of course. It's getting pricey real quick! lol
GB :)
Mine are lit up really evenly. I just went outside and they look killer at night. Evenly lit, but not so bright they look like some neon ricer crap.
I'm ordering every bulb on the truck (exterior) as we speak. Except the headlight and foglights of course. It's getting pricey real quick! lol
GB :)
#45
03-15-2010
Nope. The twist lock bulbs I specified take no modification except bending down the electrical tabs to lock onto the circuit board tightly. The hole in the board has to be dremeled out ever so slightly, and the notches in the hole have to be enlarged a c#*t hair.. lol
If everything works out for you guys, howsabout some feedback??
GB :)
If everything works out for you guys, howsabout some feedback??
GB :)
#46
03-15-2010
Nope. The twist lock bulbs I specified take no modification except bending down the electrical tabs to lock onto the circuit board tightly. The hole in the board has to be dremeled out ever so slightly, and the notches in the hole have to be enlarged a c#*t hair.. lol
If everything works out for you guys, howsabout some feedback??
GB :)
If everything works out for you guys, howsabout some feedback??
GB :)
#47
03-15-2010
#48
03-15-2010
#49
03-15-2010
#50
03-15-2010


