

Raptor Grille Lights


Raptor Grille Lights

I started the finishing steps "The Raptor Styled LED Grille Lights" !
Here is the pictures so far, not completed yet but some is better than none !
In another thread, I showed the three center lights.
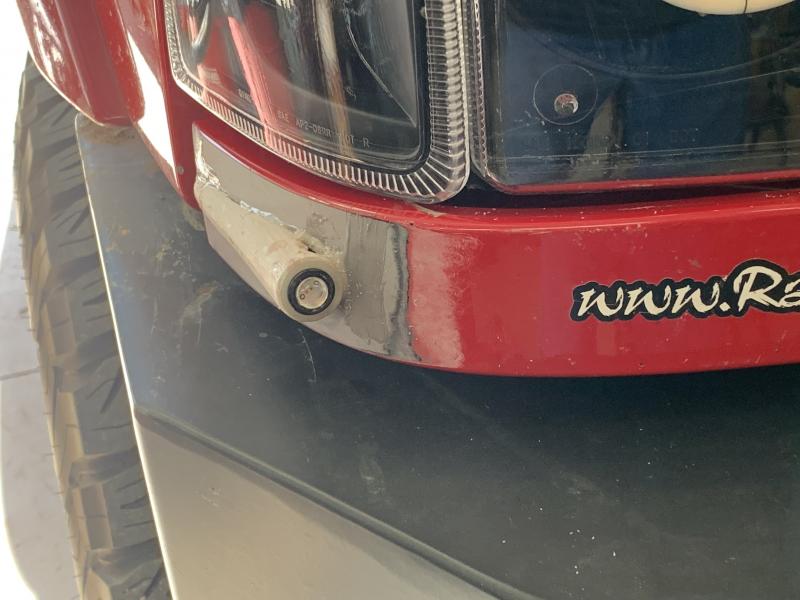
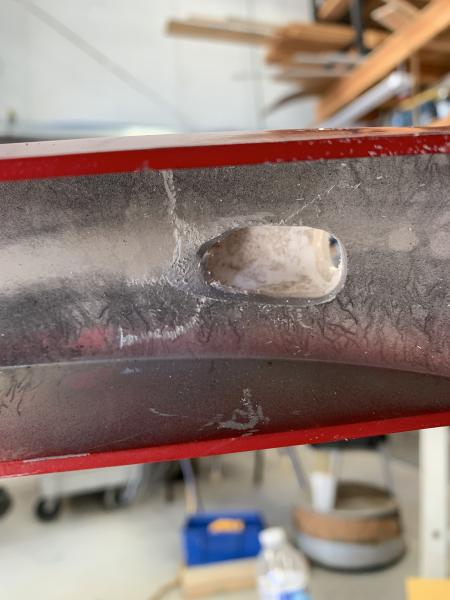
Here is where we stand, Homemade Pod, JB Welded to Grille Shell, pending Fiberglass, wiring, and paint.
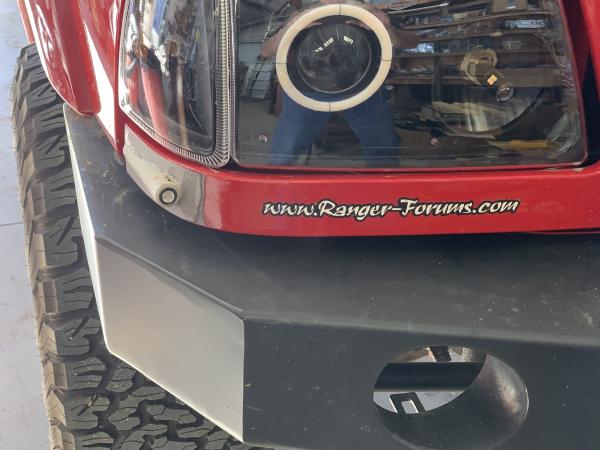
A little closer look.
Using a Drill I started the opening, my main concern here was getting the hole inside of the pod area.
Then went to a Grinder Bit, attached to my Hand Drill.
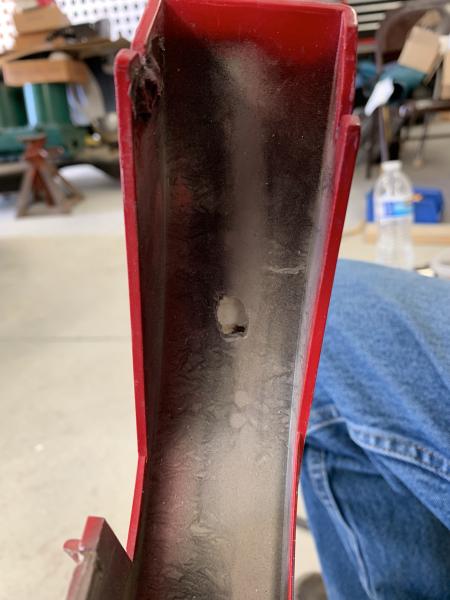
Opened it up some, fit the LED, still too tight; need more room for the wire to move freely.
Ended up cleaning out the area behind the LED, gives me room for the wire not to rub.
Ended with about twice the opening I started with; allows me to tighten the nut a little easier.
The next two pics are just the JB Weld attachment.
You can see in the second pic, the hole on the inside is already in place.
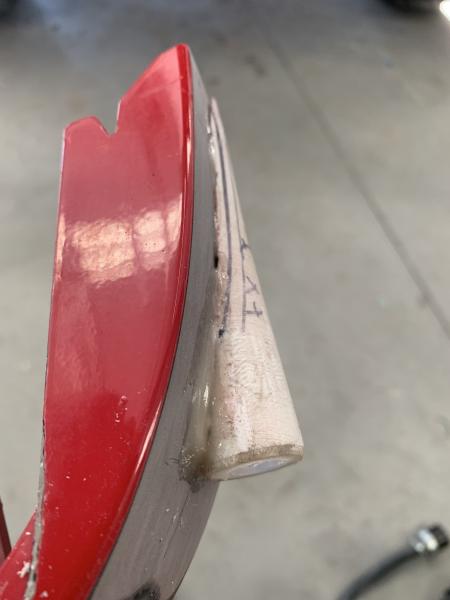
A little different angle of the front view.
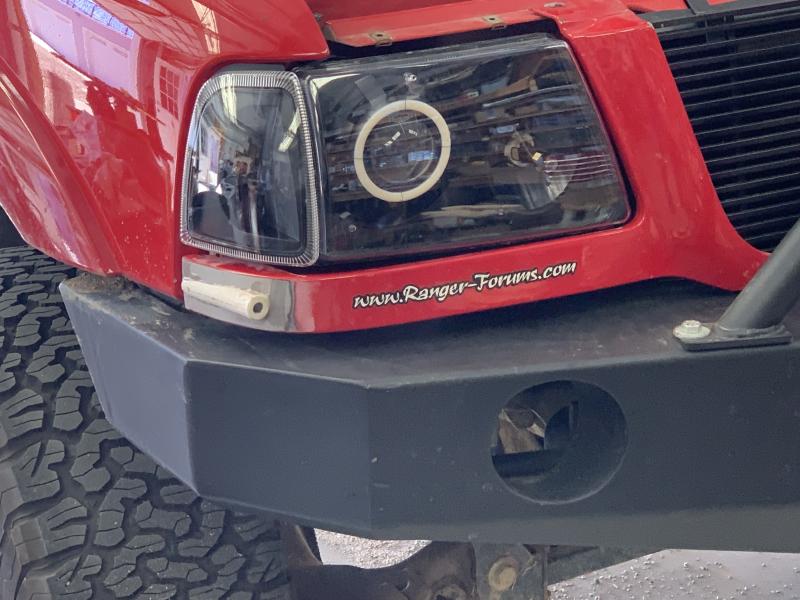
First have to mention the STICKER on the Grille Shell, been there for long time, est. 12 years.
Sanding the paint on the grille shell was more of a task than expected. The paint was thicker than hand sanding could remove in short order. I ended up using a small area vibrator type sander, paint came off quickly.
The Pods are Homemade PVC Pipe with a thick Fiber Washer attached to the end with... you guessed it, JB Weld.
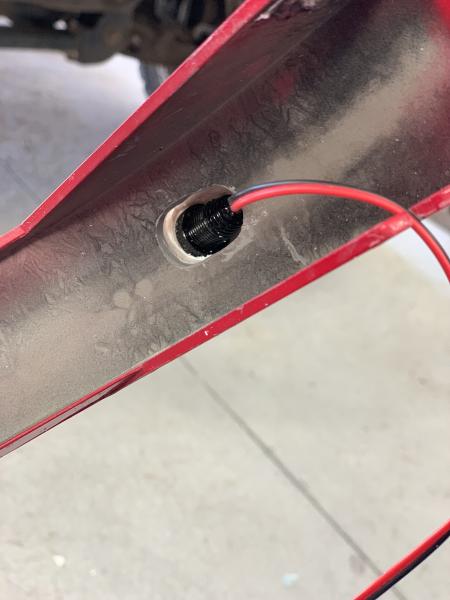
I drilled the Washer to fit the LED Lamp after being attached to the Pipe, didn't have to waste my time and fingers, drilling a washer that was going to grab and spin while drilling. I fit the LED in the washer, verified fitment and proceeded to cut the curve in the Pod to fit the Grille Shell; not too hard since the adhesive and the fiber glass will cover the imperfections.
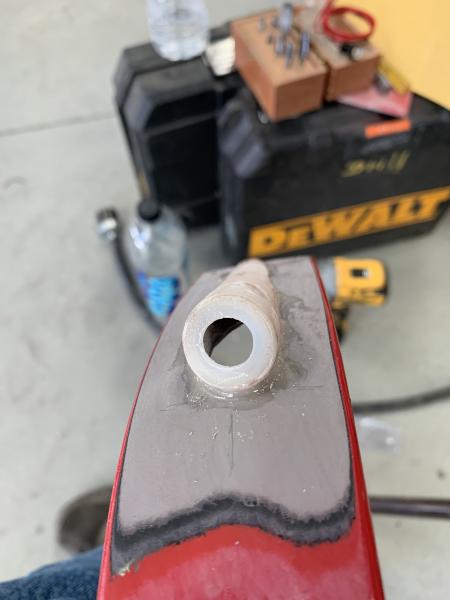
Then I took a 7/16 Drill Bit and drill through the back side of the Shell, allowing me room to get the grinder bit in, and started grinding the PLASTIC Grille Shell away from the inside of the Pod, watching the edges so I didn't grind through.
I started with a smaller grinder bit at a faster speed, found the plastic that the Grille Shell is made of did more melting that chipping away. Went to a larger bit and a slower speed, that worked the best.
Where I stand now... I have the Pod attached, the opening in the backside of the Grille Shell is done, LED fitment is complete, now on to fiberglassing and wiring.
The wiring will be attaching the LEDs together, adding a connector and then to the existing Grille Lights under the Hood edge; shouldn't be a problem.
Adding a connector is a must... IF you intend to ever remove your grille without cutting wires.
The fiberglassing, haven't done it in a while, never was good at it but it should work out.
There you have the next and final step in the Raptor Style - Grille Light Project.
My next decision on the Grille Project is do I paint the Grille Shell "Black" or leave it "Red" ?
I will set up a Poll, that will get some thinking on it. I'll get a picture of the front with the read shell.
I'm was thinking black would look different but looking at the red shell back in place, the division of the red and black doesn't look too bad, up in the air again... decisions, decisions, decisions !
Last edited by Scrambler82; Jan 24, 2022 at 11:17 AM.
I got some sanding and fiberglassing done yesterday.
After letting the fiberglass resin dry, I cleaned up the edges some, smoothed out the edges and a couple of high spots, then added more resin.
Let them set over night but haven't got back to the project this AM yet.
Sanding next, priming and getting some matching paint for the grille shell, E4 Red, may need a Color Code.
I will try to get some pictures when I get back in the barn.
NOTE: right now I am using the Grille Lights and the Headlight Halos as DRLs, I am thinking the Halos are a little too much but I will have to check them out again !

Member
Joined: May 2021
Posts: 889
Likes: 203
From: Midwest
I looked at the package for mine and they are from Oznium.com, "https://www.oznium.com/led-bolts-prewired-leds/led-bolt", with lens.
Very similar product and I'm sure you will get a decent product with Super Bright LEDs.
Member
Joined: May 2021
Posts: 889
Likes: 203
From: Midwest
The reason I ask is I have some of the SBLs for the exact same purpose: DRL. I got chrome so they'd blend right in with the chrome grill I have. If you ordered the 75 lumen ones, I'm interested to know how you think they work out as the SBLs are 85 lumens, so the light output will be very similar.
Also, did you order yours with our without lenses?
Also, did you order yours with our without lenses?
First - "SBL" ?
Im thinking Small Blinking Lights ! LoL !
The LEDs (oznium.com/led-bolts-prewired-leds/led-bolt); I used the 11mm Amber 25 Lumens output.
These seems bright to me, in fact when putting the truck in the barn at dusk I can see an amber glow, enoguh to see things in the barn but not super bright.
75 Lumens is three times the amount of light, so I'm thinking they are going to be brighter and maybe too bright for grille lights; but that is your choice !
The ones I used I picked from the Oznium Site based on the pictures and the reports from people that have used them, Amazon sells them too and you can usually get some info from the reviews.
I still might change the Halos from DRL to Directionals, thinking to keep the amount of light down some.
Hope that helps.
Ltr
Member
Joined: May 2021
Posts: 889
Likes: 203
From: Midwest
SBL = SuperBrightLEDs.
75 lumens isn't going to 'look' 3 times brighter than 25. Lumens are a measure of total light production by a source. That's different from a lux, which is how much light strikes a given area. So the design of the LED, as well as any lens/reflector combo, will effect the lux.
75 lumens isn't going to 'look' 3 times brighter than 25. Lumens are a measure of total light production by a source. That's different from a lux, which is how much light strikes a given area. So the design of the LED, as well as any lens/reflector combo, will effect the lux.
Thanks for the intro to LEDs, I was wrong to assume the 3x output.
I just went back in the order link on the Oznium Site and got the actual size I ordered, 11 mm. Then went to the Light Listing and compared the specs.
I didn't do any calculations to determine the true output.
It was just as easy for me to say three "times brighter" vs "will be brighter" without any designation of the amount of light, based on 1 watt/40ma/8.5 lumens for the 11mm Bolt Lights, and 3w/25 lumens/70 ma for the 16mm Bolt Lights.
Please do the calculations for us so we know what the output of the 8.5 vs 25 lumens are and you will have your answer as to the brightness of your lights; 11 mm/8.5 lumens is bright enoguh for me. Let us know what you find out ?
Ltr Dude
Member
Joined: May 2021
Posts: 889
Likes: 203
From: Midwest
Well, 25 lumens is roughly 3 times the lumens of 8.5. But that's strictly how much light the LED chip produces. But that is not to say it will 'appear' three times brighter. There's a lot of factors that come into play when it gets down to 'how bright it is'.
First, the design and size of the chip itself. Beyond that, there's any reflectors and/or lenses/diffusers that are part of the final assembly.
It's kinda like this: A given engine may have a specific horsepower output, but that alone will not determine �mi time, or mileage, or 0-60 time.
First, the design and size of the chip itself. Beyond that, there's any reflectors and/or lenses/diffusers that are part of the final assembly.
It's kinda like this: A given engine may have a specific horsepower output, but that alone will not determine �mi time, or mileage, or 0-60 time.
Thanks, learning as I go !
The Units I am using are 1 watt and the larger one is 3 watts, so we have the out put and the amperage used based on 12 volts input, actual is probably around 5 volt used but.
My end thought is... your LEDs are brighter than mine and in turn show up brighter, and IMHO... based on my 1 watt lights at 8.5 lumens, your lights would be too bright for night time use but might work out for daytime use.
That all I can say based on the info I have and my knowledge of LEDs.
If you do this mod, please post up daytime and nighttime pictures; I would like to compare the LEDs and the specs to see just how much difference there is.
Thanks for the lesson, always good to learn something new.
I too want the visibility during the day,
I used to turn on the Parking lights but that old quick.
Really like the idea of not turning on/off the light, should have done it before.
Brighter lights during the daytime should be good.
Pictures.
I used to turn on the Parking lights but that old quick.
Really like the idea of not turning on/off the light, should have done it before.
Brighter lights during the daytime should be good.
Pictures.
Low Temp, too bad, when you get to it.
Only hit 70 degrees here today, inside the barn a little warmer.
I started sanding the fiberglass on the grille shell lights.
No lights in yet !
Only hit 70 degrees here today, inside the barn a little warmer.
I started sanding the fiberglass on the grille shell lights.
No lights in yet !
Member
Joined: May 2021
Posts: 889
Likes: 203
From: Midwest
As a sidebar, I'm using the same LEDs for puddle lights. I'm able to use the keyless entry fob to turn them on. And it's NOT just tying them to the dome light! If it warms up tomorrow enough I'll pick that project back up. I'm probably about �th of the way through it.
Another member, suggested... Puddle Lights need to on before you get to the vehicle, I had to agree.
I could only make the lights come on once the door was opened not that it wouldn't help.
I gave up the idea, maybe if I go for the electric locks, LoL, another project.
I was thinking at least using similar RED LED Bolt Lights, on the edge of the door, for warning lights.
Always another project.
Ltr
Member
Joined: May 2021
Posts: 889
Likes: 203
From: Midwest
Funny, I have some a little a larger in OD to use for the same reason.<br />Another member, suggested... Puddle Lights need to on before you get to the vehicle, I had to agree.<br />I could only make the lights come on once the door was opened not that it wouldn't help.<br />I gave up the idea, maybe if I go for the electric locks, LoL, another project.<br /><br />I was thinking at least using similar RED LED Bolt Lights, on the edge of the door, for warning lights.<br /><br />Always another project.<br /><br />Ltr
One guy used V-LEDs Puddle Lights in the mirrors, they put out a lot of light but room is a problem inside the mirrors.
I think, IMHO... the Bolt Lights will not put out enough light for Puddle Lights, this other member I mentioned that used the VLEDs, something think on WHEN/IF I get Keyless entry.

Member
Joined: May 2021
Posts: 889
Likes: 203
From: Midwest
I wasn't thrilled with VLED's use of sticky tape. I'd much rather have a mechanical fastener.
The LEDs I have are 85 lumens. Hooking them up to a 12v power source in a dark room in the house, it looks like they'll be more than capable of doing the job. Yeah, 85 lumens is about 1/5 of 400 for the VLEDs, If 85 lumens isn't enough, there's plenty of real estate on my mirrors to add another one.
Visually, 400 lumens will most likely appear as twice as bright as 85.
Did you notice in the top of the VLED Lights, there are two 4mm tapped holes, all you need is a strip of metal, bent into a home made mounting bracket.
So using the 3M strip and the 4mm hole with a home made bracket you end up with a very secure mount.
I like them and IF I was going to add Electric Locks, I would use these, 2" OD size, 1.5" mounting hole, amount of light 400 lm, I don't like the 5500 Kelvin temp. color but they aren't used enough to worry about the color.
Not trying to talk you into these, just talk'n; although they are something I might try when the time is right.
Ltr
2, 4mm, tapped holes !
Neither here or there, you are using your LEDs and they should work ok.
I won't be using them until I get powered locks.
Pictures are always good as you progress on the Mod Trail.
Later

Member
Joined: Dec 2021
Posts: 261
Likes: 25
From: ANDERSON
Your light project is coming a long and looks like it came that way. One thing I do like about fiberglass is how workable it can be. Not a big fan of sanding fiberglass but it is a thing that has to be done as some how I can get it all over me no matter how careful I am. LEDs are nice and handy to have.
Your light project is coming a long and looks like it came that way. One thing I do like about fiberglass is how workable it can be. Not a big fan of sanding fiberglass but it is a thing that has to be done as some how I can get it all over me no matter how careful I am. LEDs are nice and handy to have.
Also, I use a thick poly glove when working fiberglass, can be a pain but I don't like the fiber too much.
We will find out but not too soon ! I am sure a tap can pulled from the activation circuit that would activate a light circuit, at least I am hoping.

Thread
Thread Starter
Forum
Replies
Last Post
winks
Interior, Exterior, & Electrical
6
Apr 26, 2012 08:33 AM


