

Second attempt at painting Ford emblem

Second attempt at painting Ford emblem
My first attempt at disassembling & painting a Ford emblem didn't go as planned.
I first heated the front of the emblem until it was quite hot. I took a utility knife blade and pried up one edge, then used a small screwdriver to continue to pry the face off. Unfortunately, it must have been too hot as the plastic warped something awful. After another heat cycle, I tried to bend the plastic back into shape & this is the result....


Kinda sucks.
There's no way of saving the insert, but the chrome backing is in good shape & I'm going to try & print out a few Ford logos with some high quality gloss photo paper in an inkjet printer. I'll cover the paper with some plain plexi to keep it safe. It won't make it outside, so this one will be delegated to the side of my tool box in the garage.
However....
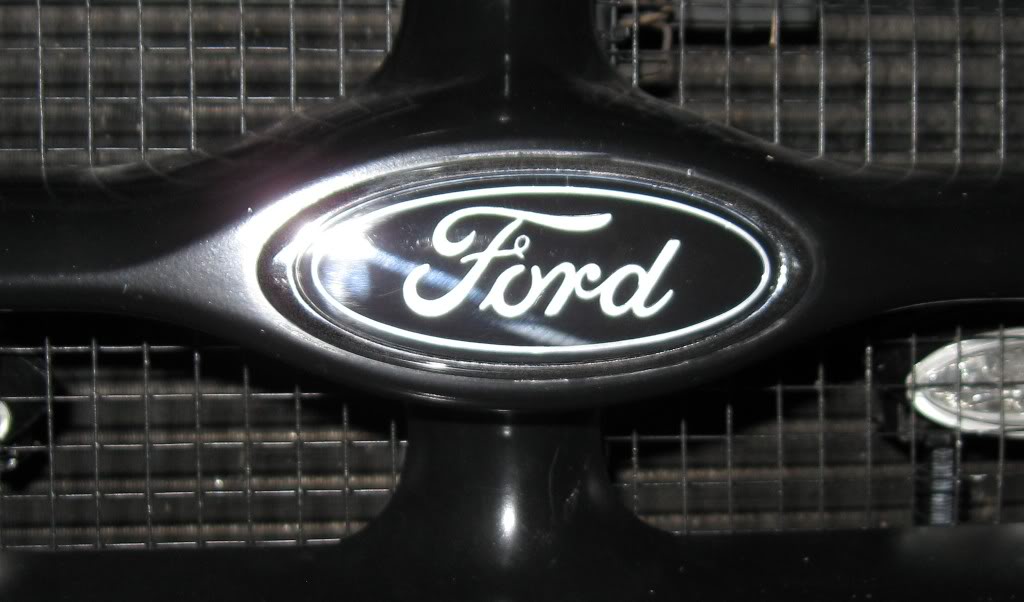
After spending a LOT more time on my second one, I came up with this...


It's my first "successful" black emblem.
The hardest part came when removing the insert.
Unlike before, I heated the BACK of the emblem only this time. One of the tabs on the back is a little bent now from all the heat.
This emblem was already starting to come apart on one end, so I was able to insert the corner of a blade to help pry the face off once the back was hot. This worked ok, enough to get a small screwdriver in there for more control. Rather than break another front, I decided (while it was still warm) to pour in some Goo Gone between the front & chrome back to loosen the adhesive. This worked a little as I was able to see the adhesive & with the screwdriver holding the front up, I could use the blade to begin cutting the adhesive from the back.
Some of the chrome inside the Ford script still stuck to the adhesive & pulled off, leaving areas where there was some chrome and some that were just clear.
The only way I could remedy this was to scrape all the remaining chrome from the Ford script using an xacto knife & a magnifying glass. Skip forward about 8 hours & I had all the chrome removed & rinsed the emblem many times with paint thinner to help loosen any remaining blue paint that had worked into the chrome areas.
If anybody has access to a sandblaster, I bet you could carefully remove all the chrome from the Ford script & the outer oval to make eliminate the scratches. If you have a sandblaster & have the time I'd be interested in trying this sometime.
For now, I'm leaving the chrome outer ring as is... luckily none of the chrome peeled off here.
The first coat of paint (the Ford script) is Krylon silver metallic paint that looks almost chrome. Unfortunately, there are millions of tiny little scratches in the Ford script from scraping the chrome out. You can't see them unless you look closely, but I know they're there.
A few coats of silver to fill in any areas that looked light or thin.
After the silver dried, I wet sanded the entire back with 400 - 1000 grit paper and washed a few times with soap & water, then 70% rubbing alcohol to remove any fingerprints I may have left.
Second coat of paint (old blue backing) is Krylon Fusion gloss black. I wanted something that would adhere to the backing as well as possible.
A few coats later & it was ready to have the front worked on.
During the chrome scraping; paint thinner, whatever other chemicals I used, the front became quite scratched, smudged and ugly.
With the new black emblem still outside the chrome holder, I wet sanded the front to 1000 grit & buffed with some plastic compound until it was a near perfect finish.
I found my emblem adhesive glue has turned into a sticky booger-like goo that won't squeeze from the tube, rather I had to pull it from the nozzle... no good.
With no other proper emblem glue around, I grabbed some construction adhesive (small tube) and smoothed on a thin layer onto the newly polished black insert.
I held the insert in place (it was a little off from the heating, bending, scraping & polishing) with some electrical tape stretched tight to apply as much pressure as I could.
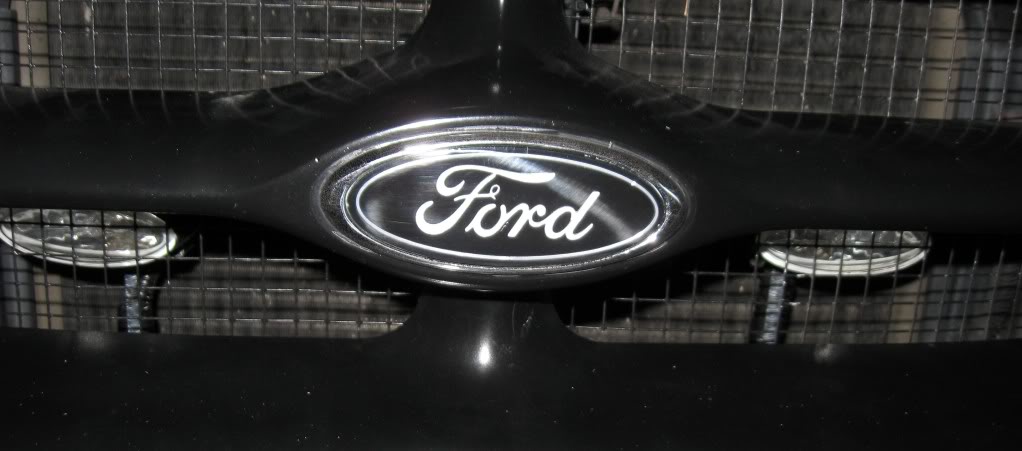
After a few hours of drying, I removed the tape & here's the result.
It's not perfect, but it's not too bad for my second attempt. I've since polished it again to remove some of the tape residue & smudges I didn't see before.
The only big problem is that I noticed a small crack in the plastic just to the right of center above the top of the F. I guess I couldn't see it when I was removing the front part due to the other scratches & gunk on the emblem.
Hopefully, emblem #3.... will go smoother.
I first heated the front of the emblem until it was quite hot. I took a utility knife blade and pried up one edge, then used a small screwdriver to continue to pry the face off. Unfortunately, it must have been too hot as the plastic warped something awful. After another heat cycle, I tried to bend the plastic back into shape & this is the result....
Kinda sucks.
There's no way of saving the insert, but the chrome backing is in good shape & I'm going to try & print out a few Ford logos with some high quality gloss photo paper in an inkjet printer. I'll cover the paper with some plain plexi to keep it safe. It won't make it outside, so this one will be delegated to the side of my tool box in the garage.
However....
After spending a LOT more time on my second one, I came up with this...
It's my first "successful" black emblem.
The hardest part came when removing the insert.
Unlike before, I heated the BACK of the emblem only this time. One of the tabs on the back is a little bent now from all the heat.
This emblem was already starting to come apart on one end, so I was able to insert the corner of a blade to help pry the face off once the back was hot. This worked ok, enough to get a small screwdriver in there for more control. Rather than break another front, I decided (while it was still warm) to pour in some Goo Gone between the front & chrome back to loosen the adhesive. This worked a little as I was able to see the adhesive & with the screwdriver holding the front up, I could use the blade to begin cutting the adhesive from the back.
Some of the chrome inside the Ford script still stuck to the adhesive & pulled off, leaving areas where there was some chrome and some that were just clear.
The only way I could remedy this was to scrape all the remaining chrome from the Ford script using an xacto knife & a magnifying glass. Skip forward about 8 hours & I had all the chrome removed & rinsed the emblem many times with paint thinner to help loosen any remaining blue paint that had worked into the chrome areas.
If anybody has access to a sandblaster, I bet you could carefully remove all the chrome from the Ford script & the outer oval to make eliminate the scratches. If you have a sandblaster & have the time I'd be interested in trying this sometime.
For now, I'm leaving the chrome outer ring as is... luckily none of the chrome peeled off here.
The first coat of paint (the Ford script) is Krylon silver metallic paint that looks almost chrome. Unfortunately, there are millions of tiny little scratches in the Ford script from scraping the chrome out. You can't see them unless you look closely, but I know they're there.
A few coats of silver to fill in any areas that looked light or thin.
After the silver dried, I wet sanded the entire back with 400 - 1000 grit paper and washed a few times with soap & water, then 70% rubbing alcohol to remove any fingerprints I may have left.
Second coat of paint (old blue backing) is Krylon Fusion gloss black. I wanted something that would adhere to the backing as well as possible.
A few coats later & it was ready to have the front worked on.
During the chrome scraping; paint thinner, whatever other chemicals I used, the front became quite scratched, smudged and ugly.
With the new black emblem still outside the chrome holder, I wet sanded the front to 1000 grit & buffed with some plastic compound until it was a near perfect finish.
I found my emblem adhesive glue has turned into a sticky booger-like goo that won't squeeze from the tube, rather I had to pull it from the nozzle... no good.
With no other proper emblem glue around, I grabbed some construction adhesive (small tube) and smoothed on a thin layer onto the newly polished black insert.
I held the insert in place (it was a little off from the heating, bending, scraping & polishing) with some electrical tape stretched tight to apply as much pressure as I could.
After a few hours of drying, I removed the tape & here's the result.
It's not perfect, but it's not too bad for my second attempt. I've since polished it again to remove some of the tape residue & smudges I didn't see before.
The only big problem is that I noticed a small crack in the plastic just to the right of center above the top of the F. I guess I couldn't see it when I was removing the front part due to the other scratches & gunk on the emblem.
Hopefully, emblem #3.... will go smoother.


Member

Joined: Jun 2007
Posts: 1,523
Likes: 1
From: Killafornia
cant belive you scraped the ford out with an xacto and resprayed it, i would have throw it in the trash and put bandaids over where my emblems used to be. came out nice way to stick with it 3rd one will be a breeze now that you've done it twice the hard way
I even kept the first broken one... doubt if I'll ever be able to salvage it though.
looks great man. i broke first emblem i tried to do the first time too and i haven't tried since then lol....i would try the sand blasting thing but i think my sandblaster and the slag i use would probably put a hole in it lol
Well, ain't this a kick in the tail?!!?!
I left the emblem in the garage to let the adhesive cure a day or so before I put it on the truck & to my horror I saw that the adhesive had eaten the black paint. It didn't just smear the black paint, it was literally GONE!
Stupid liquid nails!
Now it's back to scraping all the crud out of those darn letters again & starting over again. Here comes attempt #3.
Anybody have any good alternative adhesives for holding the colored insert to the chrome backer?
Hot glue came to mind, but I'm sure it would melt the first day I put it on if it's another hot day like today... 96* or probably break off on a -10* winter day.
I have some polyurethane glue that will hold pretty much anything to anything else, but I'm concerned that it too may eat the paint.
How would plain old silicone caulk do?
On a side note, I believe this is my 400th posting, woo hoo!
So, another day working on the emblem.
This time went much faster than before. Had to clean all the silver out of the Ford script again, but this time all I needed was paint thinner & a toothbrush. A few washes later & it was ready to paint again. Got 3 coats of silver & 2 coats of clear, then on to sanding the silver off the "black" area again. I only sanded it down to 220 grit this time, to give the paint a little more grip. 3 coats of black, no clear here. Had to re-sand the front of the emblem again & buff it back to a fine finish. This time around, I used some clear silicone adhesive/sealant to hold the newly painted emblem in place. Several small dabs all on the chrome housing, pressed the front on, wiggled it around & pulled it back off to make sure the silicone was evenly distributed, then pressed it in place. Some masking tape wrapped around the middle section to hold it in place while the silicone dries.
Hopefully this will be the last time I have to work on this one. I have another slightly larger one that's being more difficult, at least the chrome lettering is being a pain & doesn't want to come out at all (at least the chrome I want to come out doesn't want to budge).
So far, so good today.
Got the emblem installed (pics to come) and with another 95*+ day, a severe thunderstorm, and humidity so high that just walking out the door almost instantly soaks your clothing from head to toe... it's still holding in place.
On to the next one...
Got the emblem installed (pics to come) and with another 95*+ day, a severe thunderstorm, and humidity so high that just walking out the door almost instantly soaks your clothing from head to toe... it's still holding in place.
On to the next one...
Here's attempts #3 & #4.
Black & silver 4 3/4"
This one didn't have the retaining nuts installed on the back.
I removed ALL of the OEM chrome from the Ford script & ring, painted with 3 or 4 coats of silver metallic paint, 2 or 3 clear coats over the chrome, sanded background to 500 grit, painted 3 or 4 coats of Krylon Fusion gloss black, re-assembled with silicone adhesive.
There's a 99% chance I'm putting this one on my truck in place of the 4 1/2" one I just installed.


White & black 4 1/2"
I removed ALL of the OEM chrome from the Ford script & ring, painted with 3 or 4 coats of Krylon Fusion gloss black paint, 2 or 3 clear coats over the black, sanded background to 500 grit, painted 3 or 4 coats of Krylon Fusion gloss white.
This one looks to be a trunk or tailgate emblem with no screw posts, only the 3 indicator posts.
It's so fresh that I haven't had time to silicone it back together yet.
I did notice a small chip on the right side.


After each one was painted, I wet sanded the fronts down to 1000 grit & buffed them to a near perfect finish.
The black lettering came out much better than the other silver ones I've done.
My next project is going to be a John Deere themed green/yellow one. I'm not a John Deere fanatic, but I thought that it would be cool & unusual.
Black & silver 4 3/4"
This one didn't have the retaining nuts installed on the back.
I removed ALL of the OEM chrome from the Ford script & ring, painted with 3 or 4 coats of silver metallic paint, 2 or 3 clear coats over the chrome, sanded background to 500 grit, painted 3 or 4 coats of Krylon Fusion gloss black, re-assembled with silicone adhesive.
There's a 99% chance I'm putting this one on my truck in place of the 4 1/2" one I just installed.
White & black 4 1/2"
I removed ALL of the OEM chrome from the Ford script & ring, painted with 3 or 4 coats of Krylon Fusion gloss black paint, 2 or 3 clear coats over the black, sanded background to 500 grit, painted 3 or 4 coats of Krylon Fusion gloss white.
This one looks to be a trunk or tailgate emblem with no screw posts, only the 3 indicator posts.
It's so fresh that I haven't had time to silicone it back together yet.
I did notice a small chip on the right side.
After each one was painted, I wet sanded the fronts down to 1000 grit & buffed them to a near perfect finish.
The black lettering came out much better than the other silver ones I've done.
My next project is going to be a John Deere themed green/yellow one. I'm not a John Deere fanatic, but I thought that it would be cool & unusual.

Thread
Thread Starter
Forum
Replies
Last Post
Jp7
OLD - Interior, Exterior, Electrical, & Misc.
5
Aug 1, 2012 08:40 PM
winks
OLD - Interior, Exterior, Electrical, & Misc.
14
Sep 26, 2009 10:26 AM
FireRanger
4.0L OHV & SOHC V6 Tech
32
Nov 15, 2005 05:56 AM


