


Dash Lights Idea!!!!


Thread Starter
|
Member

Joined: Sep 2008
Posts: 17
Likes: 0
From: Dundee, FL
 Dash Lights Idea!!!!
Okay so I have seen a lot of people switching over to LED's and changing the color of the gauges, and changing the colors of the brakes lights, tach, air bag, and all other lights that are on the dash. But I was wondering can I just replace the lights with the normal lights and paint the the tach an all that with the colors I choose. I have the ugly green that I have. I would take picture but I have no idea how to post on here. Please leave any comments even if I sound like an idiot.

all these LED conversion gauges spawned from a simple color change mod...
http://www.cardomain.com/ride/296394/24
In fact....all my dash lighting spawned from Mr. Griggs.
http://www.cardomain.com/ride/296394/24
In fact....all my dash lighting spawned from Mr. Griggs.
Thread Starter
|
Member
Joined: Sep 2008
Posts: 17
Likes: 0
From: Dundee, FL
So I can just do that without having to do the LED mod. Because I just like my normal lights, I dont like the colors. So just pull it all out, remove needles, wet sand the back to get rid of factory paint and then choose paint color?

Basically.
But it's not quite that simple. As long as you follow the write up's on here and on John Grigg's Cardomain you'll be fine.
No need to add LED's but it creates a more vibrant light as long as you do it correctly.
But it's not quite that simple. As long as you follow the write up's on here and on John Grigg's Cardomain you'll be fine.
No need to add LED's but it creates a more vibrant light as long as you do it correctly.
Well once you pop the needles off how are you going to know where to put them when you go to put them back on?
The gauges drop back down once the power is off so you don't know exactly where they go.
When you're done leave the plastic front cover off and then push the needles back on once the truck is warmed up completely. As far as tach and speedometer, I don't know exactly how to do that.
Taking a picture works great. Detail of each gauge works best.
The gauges drop back down once the power is off so you don't know exactly where they go.
When you're done leave the plastic front cover off and then push the needles back on once the truck is warmed up completely. As far as tach and speedometer, I don't know exactly how to do that.
Taking a picture works great. Detail of each gauge works best.
Thread Starter
|
Member
Joined: Sep 2008
Posts: 17
Likes: 0
From: Dundee, FL
Okay so you put the needles back on after the truck is warmed up. Okay I was thinking of just putting them on when the gauge's were out of the truck and doing that but I get the idea now.
Yeah the way he explains the speed an tach on the MOD is kind of confusing. Anyone care to chime in with that?
Yeah the way he explains the speed an tach on the MOD is kind of confusing. Anyone care to chime in with that?

Elaborate on what you are confused about? You drive at a set speed down the road and lightly push the needle on and let go and see if its at the speed you are at.

Why do you have to know where the needles are. Like said above when you shut the truck down the needles go all the way back down so if I just leave it off and pull the needles off and then put them back on with the truck off it will be the same. Correct?
Oh yeah and I'm glad I found this thread cause I am totally doing this this weekend.
Oh yeah and I'm glad I found this thread cause I am totally doing this this weekend.
Member
Joined: Jan 2008
Posts: 1,037
Likes: 1
From: Zephyrhills, FLorida
Why do you have to know where the needles are. Like said above when you shut the truck down the needles go all the way back down so if I just leave it off and pull the needles off and then put them back on with the truck off it will be the same. Correct?
Oh yeah and I'm glad I found this thread cause I am totally doing this this weekend.
Oh yeah and I'm glad I found this thread cause I am totally doing this this weekend.
Do you do this and then turn the truck back on to put the needles back on? Just put 2 and 2 together and thought of that. LOL
Member
Joined: Jan 2008
Posts: 1,037
Likes: 1
From: Zephyrhills, FLorida
Either way. Weather the truck is on or off if the motors are gonna do that there gonna do that. If you turn it on and remember were they are when you shut it off they are going to go back down to where they would be when it is off.
Do you do this and then turn the truck back on to put the needles back on? Just put 2 and 2 together and thought of that. LOL
Do you do this and then turn the truck back on to put the needles back on? Just put 2 and 2 together and thought of that. LOL
I wonder if you could just pull the needle past the pin and then remember how far the go below and do it that way.

You could but the gauges have those little pins at the bottom of each part. Not really sure how to describe it but if you look you will know what I am talking about.
Member
Joined: Jan 2008
Posts: 1,037
Likes: 1
From: Zephyrhills, FLorida
The pins the needles stop it at 0? I was wondering if you could bend the needles below those, then see how far they go.

Member
Joined: Apr 2007
Posts: 459
Likes: 0
From: East , Texas
Last we heard he Hydrolocked the engine on his truck off-roading hasnt been on since .
I can shed some light on this though , I had to do this when I did my overlays . You have to know where there at when its warmed up , on acount if the needle isnt on the indicater motor goes to six o clock , if you put your needles back on while in this position you will be way off when you start it .
Hence why you need to know where there at when its moving and warmed up , I did the dummy gauges by taking a picture . The tach I did by sound just reved to around 2000 rpm and held it pushed it on , then went for a drive and put on MPH by the RPM . Double checked by fallowing a friend a month later .
I can shed some light on this though , I had to do this when I did my overlays . You have to know where there at when its warmed up , on acount if the needle isnt on the indicater motor goes to six o clock , if you put your needles back on while in this position you will be way off when you start it .
Hence why you need to know where there at when its moving and warmed up , I did the dummy gauges by taking a picture . The tach I did by sound just reved to around 2000 rpm and held it pushed it on , then went for a drive and put on MPH by the RPM . Double checked by fallowing a friend a month later .
There's a much safer and more accurate way to set your speedometer needle.
Here's the pic I was talking about... And in a min, i'll make a PAINTchop schematic as to how to do it.
Speed might not be correct, but i believe what Mike and I got was 77mph w/ a AA battery. And the bottom pic i believe the battery is turned the correct direction, but black wire = positive, red = neg. Diagram should be correct.

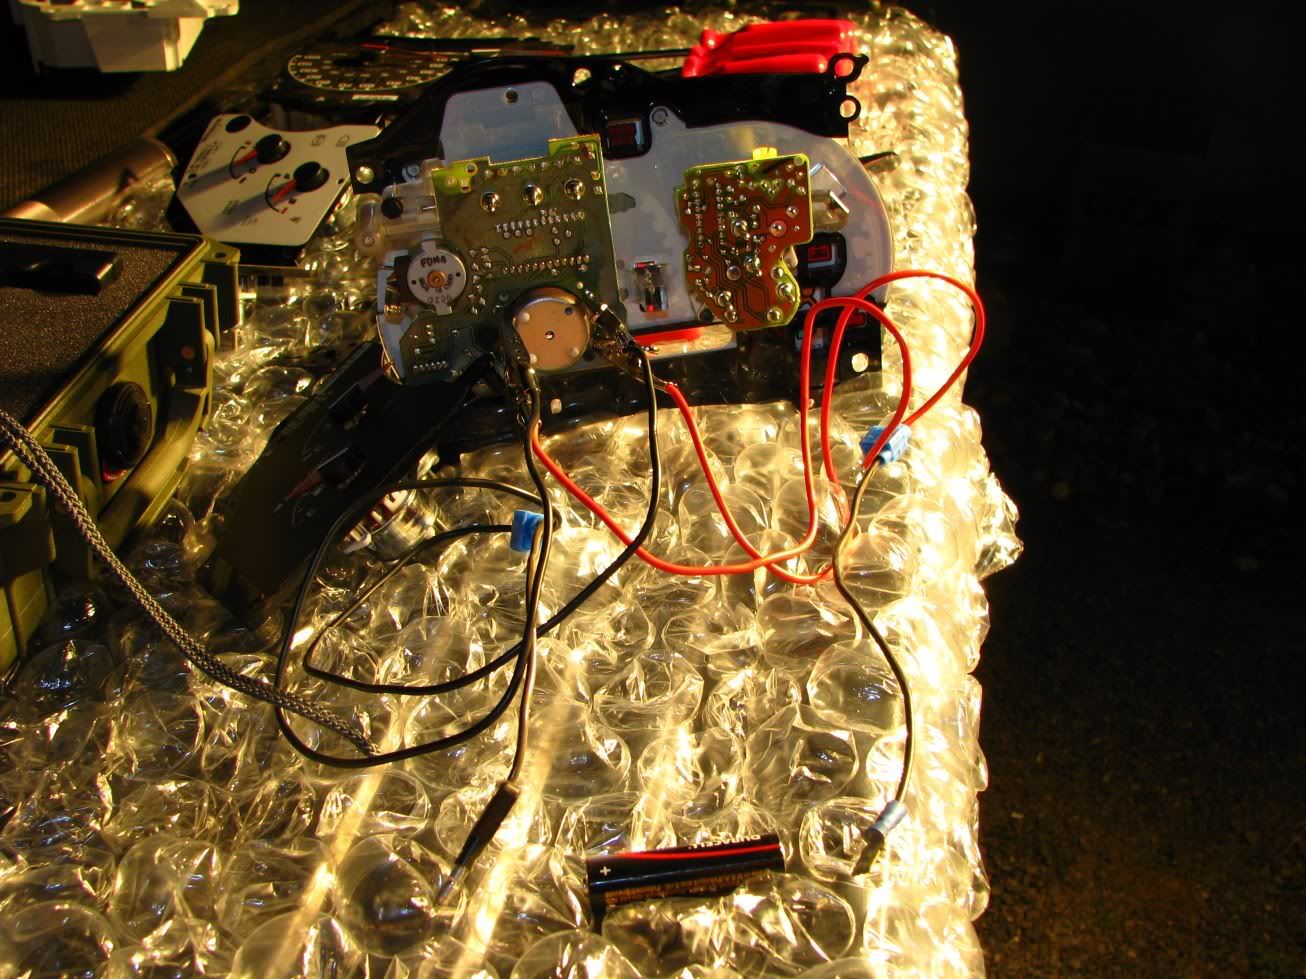
Here's the pic I was talking about... And in a min, i'll make a PAINTchop schematic as to how to do it.
Speed might not be correct, but i believe what Mike and I got was 77mph w/ a AA battery. And the bottom pic i believe the battery is turned the correct direction, but black wire = positive, red = neg. Diagram should be correct.
little explanation might help!
lol.
Above is instructions to properly remove the speedo/odo needle and replace it in the same exact spot as it was before. Might work with the tach, but i honestly dont know.
Do what is said above, and the needle should be about 77mph w/ AA battery. Get your reading, and write it down. then pull the needle. Then when ready to reinstall the needle, do the battery trick again, lightly place the needle on the before reading, and check and make sure its showing the same. Then, push the needle on the rest of the way.
lol.
Above is instructions to properly remove the speedo/odo needle and replace it in the same exact spot as it was before. Might work with the tach, but i honestly dont know.
Do what is said above, and the needle should be about 77mph w/ AA battery. Get your reading, and write it down. then pull the needle. Then when ready to reinstall the needle, do the battery trick again, lightly place the needle on the before reading, and check and make sure its showing the same. Then, push the needle on the rest of the way.

Thread
Thread Starter
Forum
Replies
Last Post
AK96RANGER
General Technical & Electrical
10
Nov 29, 2019 10:11 PM
SportyDog
General Technical & Electrical
3
Jul 18, 2012 08:56 PM
Scrambler82
Interior Semi-Tech
36
May 3, 2010 02:50 PM
bdc217
General Technical & Electrical
8
Jul 2, 2007 08:26 PM


