
Painting my fender flares today

Thread Starter
|
Member

Joined: Jul 2009
Posts: 483
Likes: 0
From: Vancouver, Canada
Painting my fender flares today
I picked up some gloss black paint for my fenders, I like how the newer rangers have painted flares and not textured. The truck is all masked up, what sorta prep should I do to the actual fenders before I spray them?
BEFORE
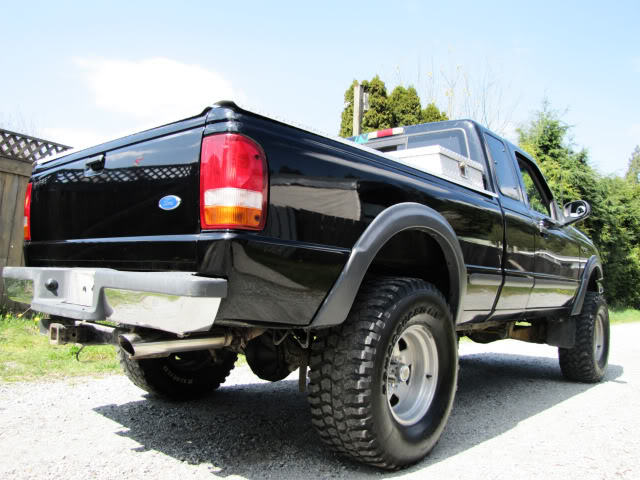
AFTER
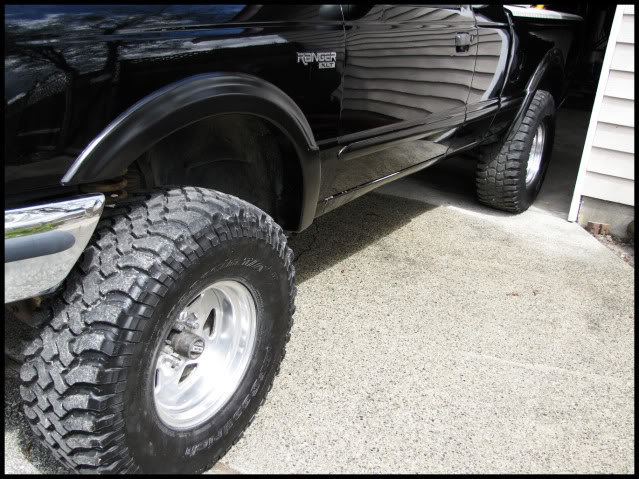
BEFORE
AFTER
Last edited by dan24; Apr 28, 2010 at 11:12 PM.

you need to sand them good with a 400-600 grit sand paper clean. them with a glass cleaner like windex or something. let dry for a little bit. then put on 2 first light coats of paint. then the 3rd and 4th coat do it heavier and then 2 coats of clear
That should work good. Make sure you clean the crap out of the flares after you sand them
What paint did you pick up?
Make sure you have a plastic primer, OR specificly plastic paint. Anything else normally flakes off. Especially with fenders cause of the amout of rocks that get thrown up.
Make sure you have a plastic primer, OR specificly plastic paint. Anything else normally flakes off. Especially with fenders cause of the amout of rocks that get thrown up.


A lot more work than what needs to be done. Wash the flares with hot water and dish soap and a brush. Dry with paper towel and then wipe off the lint with a CLEAN microfiber rag. Then let air dry for about ~30 minutes or so, then mask it all off and start painting. Works every time.
Thread Starter
|
Member
Joined: Jul 2009
Posts: 483
Likes: 0
From: Vancouver, Canada
A lot more work than what needs to be done. Wash the flares with hot water and dish soap and a brush. Dry with paper towel and then wipe off the lint with a CLEAN microfiber rag. Then let air dry for about ~30 minutes or so, then mask it all off and start painting. Works every time.
Member
Joined: Apr 2010
Posts: 12
Likes: 0
From: Havre, MT
hey im new to the RF.. i painted my fenderflares by just scrubbing them up really well with soap and water and letting them dry up real well.. i masked off the pickup (probably be easier to just remove em tho) and rattle canned them with black krylon specific for plastic.. looks pretty good.. I was afraid to sand em, i didnt want to fuzz up the texture on em...
Member
Joined: Apr 2010
Posts: 493
Likes: 2
From: Walworth, NY
can someone go through how to take the flares off? i'm looking to repaint mine silver, or go get some Ford black from the auto store and match the truck, seeing as i'm having my bro fix and paint the grille black.
i never paint anything with out doing a light sanding first. there is reason the paint is still on my flares and not flaking off. same with the black all the way around my truck. its 99 cent black paint from walmart and with the correct prep it will stick and not flake.
the best way is to work on each clip area at a time, give it a good tug straight out. the 1st clip would be the hardest but as you work along the top it should get easier in the fact that you can see where the clip is instead of guesstimation

Member
Joined: Apr 2010
Posts: 493
Likes: 2
From: Walworth, NY
i can actually look under tho and see all the little black clip thingys that hold it on tho. i'll be doing this on friday probably. going to my auto store tomorrow to pick up the matching black, then taking them off friday to prep/paint.
Dan24: don't mean to jack the thread lol. when you get them finished real good post some pics :) your truck is the exact same color theme as mine and i'd love to see the finished result.
Dan24: don't mean to jack the thread lol. when you get them finished real good post some pics :) your truck is the exact same color theme as mine and i'd love to see the finished result.


Isn�t that the OP pic ?
Anyway, Plastic is not an absolute solid material so in turn it will absorb paint, to some extent, differently along the piece, that is why you see a variation in the finished color and that is why there are Primers or Primer Sealers.
If and when you do it again, try this� (everyone has an opinion, you know the saying)
Remove the paint, clean the flares, spray with an Adhesion Promoter (DuPont makes one in Rattle Can) after setting the spec�d time frame to dry, spray with a good primer.
How to pick the primer is easy, if the surface id smooth then a standard Primer is OK , if there are imperfections in the surface you might want to try a Primer Filler.
Primer Fillers require additional prep work, sand wipe clean, etc� but the results are what you are looking for so a little more work may be all it will take.
After getting a surface that is a smooth and clean as you want, and hopefully you did not break through the primed surface, spray with the color you want.
Stick to the same manufacturer of paint products to assure compatibility and use the adhesion promoter.


