Project Logs For detailed builds specific to the Ford Ranger, one thread per vehicle please.

The Green Machine!

Thread Tools
 
Search this Thread
 
Old Jan 29, 2014
  #1  
boyd_835's Avatar
Thread Starter
|
Member
Joined: Jan 2011
Posts: 523
Likes: 0
From: lake tapps, wa
The Green Machine!

I figured i start a thread on everything I've done to make it easy I'm just gunna post pictures and list the general of where i am and what i plan in the future
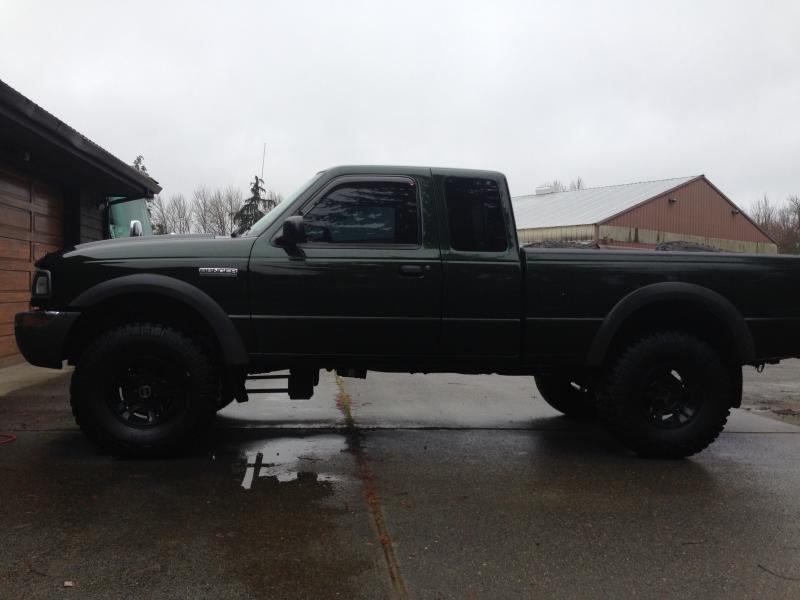
-superlift
-superlift front driveline
-33x10.50 km2
-powdercoated edge wheels
-manual locking hub conversion
-rear axle rebuilt
-tint
-infinity 4 channel amp
-2 kapa component sets with tweets
-2 10inch mtx subs
-750watta mtx mono amp
-06 tailights
-modded 06 corners
-black background headlights
-55watt hide and fogs
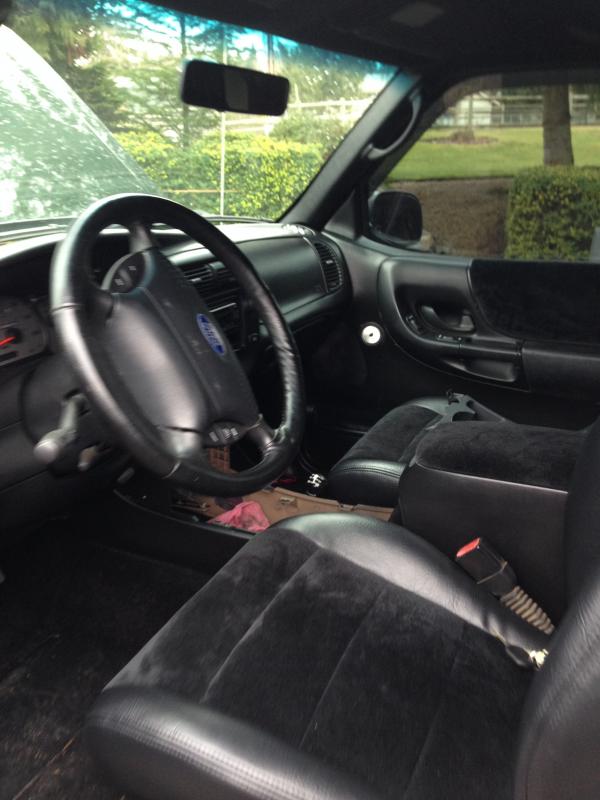
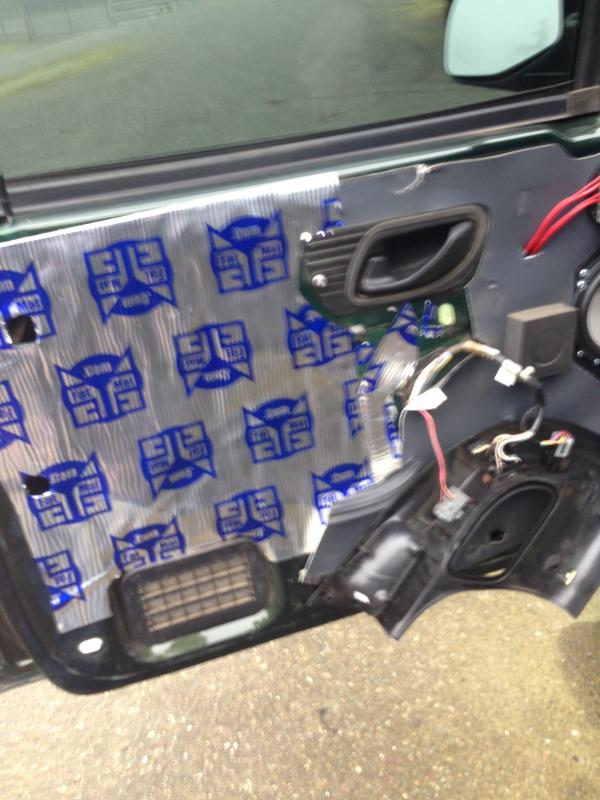
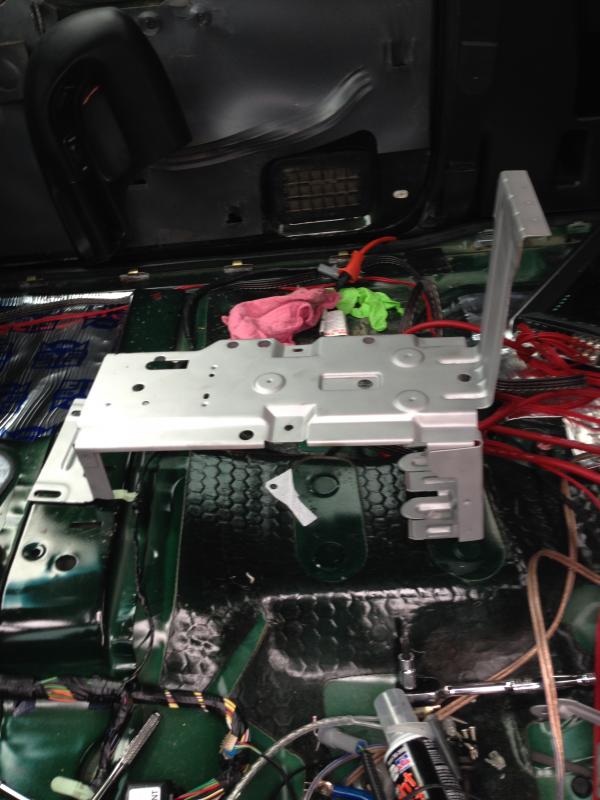
-Black level 2 interior makeover
-dynomatt interior
-hurst shifter with reservoir
-explorer center consol
-explorer pwr seats
-spray bedliner
-exhaust
-cai
-airaide spacer
-sct tunner custom tune by fred


future

-coilover conversion
--456 gears
-3000 watt inverter
- ls for front axle
-air locker rear
-onboard air


Attached Thumbnails The Green Machine!-img_1057.jpg   The Green Machine!-img_1056.jpg   The Green Machine!-img_1055.jpg   The Green Machine!-img_1046.jpg   The Green Machine!-img_1043.jpg  

The Green Machine!-img_1026.jpg   The Green Machine!-img_1001.jpg   The Green Machine!-img_0991.jpg   The Green Machine!-img_0993.jpg   The Green Machine!-img_1057.jpg  

The Green Machine!-img_1056.jpg   The Green Machine!-img_0980.jpg   The Green Machine!-img_1055.jpg   The Green Machine!-img_1046.jpg   The Green Machine!-img_1043.jpg  

The Green Machine!-img_0982.jpg   The Green Machine!-img_1026.jpg   The Green Machine!-img_0977.jpg   The Green Machine!-img_1001.jpg   The Green Machine!-img_0971.jpg  

The Green Machine!-img_0991.jpg   The Green Machine!-img_0903.jpg   The Green Machine!-img_0993.jpg   The Green Machine!-img_0980.jpg   The Green Machine!-img_0982.jpg  

The Green Machine!-img_0937.jpg   The Green Machine!-img_0977.jpg   The Green Machine!-img_0971.jpg   The Green Machine!-img_0896.jpg   The Green Machine!-img_0903.jpg  

The Green Machine!-img_0937.jpg   The Green Machine!-img_0896.jpg  

Last edited by boyd_835; Jan 30, 2014 at 01:18 AM.
Reply
Old Jan 29, 2014
  #2  
01RangerEdge's Avatar
Scrambles the DeathDealer
iTrader: (11)
Joined: Jul 2009
Posts: 7,579
Likes: 5
From: Jackson, MO
You know better than to start a build thread without pics
 
Reply
Old Jan 29, 2014
  #3  
boyd_835's Avatar
Thread Starter
|
Member
Joined: Jan 2011
Posts: 523
Likes: 0
From: lake tapps, wa
Photo bucket is down I'm gunna add them as soon as it's up tomorrow or tonight !!
 
Reply
Old Jan 30, 2014
  #4  
boyd_835's Avatar
Thread Starter
|
Member
Joined: Jan 2011
Posts: 523
Likes: 0
From: lake tapps, wa
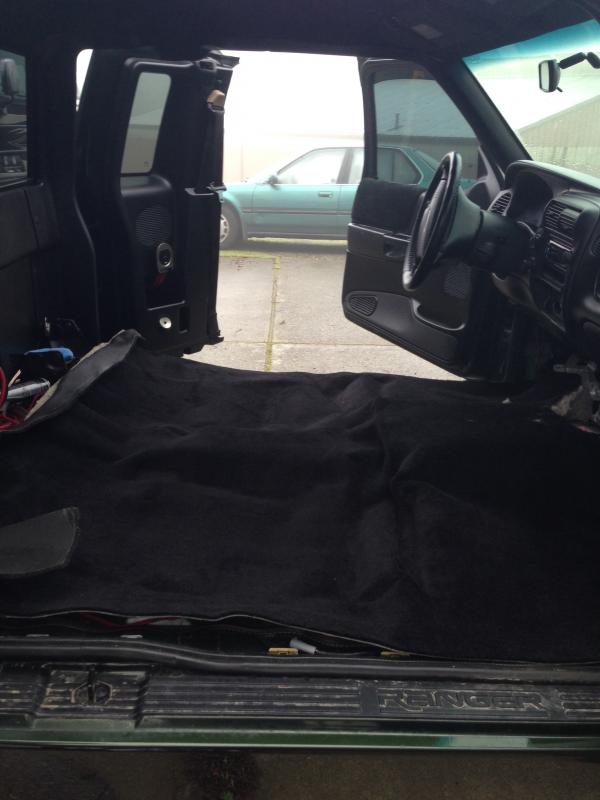
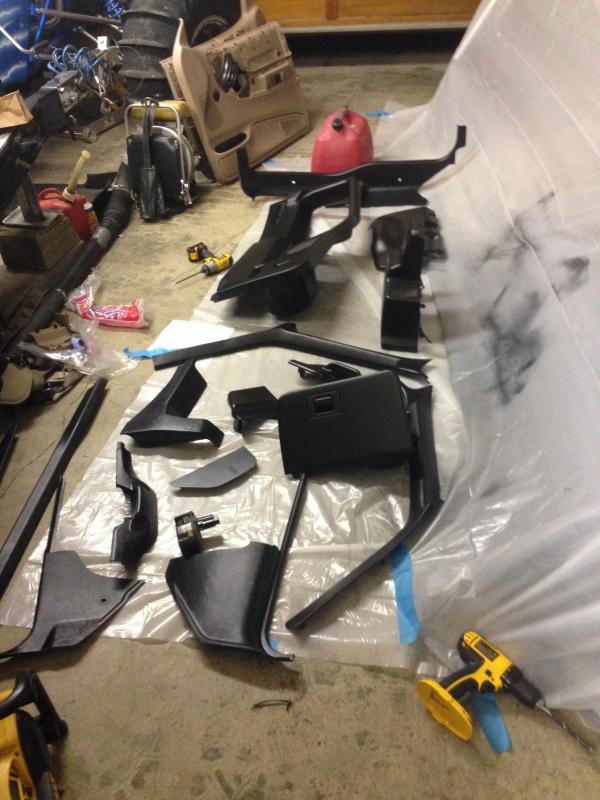
Im gunna take some more pics tomorrow once the interior is all in one pieces and clean everything . When i did the interior the carpet headliner and all the pads were all replaced with brand new stuff
 
Reply
Old Jan 30, 2014
  #5  
mikerider's Avatar
Member
iTrader: (8)
Joined: Oct 2006
Posts: 2,518
Likes: 11
From: Renton WA
Looks great! I love the green and have always wanted one. Keep the pics coming!
 
Reply
Old Jan 30, 2014
  #6  
00GreenRanger's Avatar
Level III Supporter
Joined: Nov 2011
Posts: 1,352
Likes: 3
Truck looks great man!
 
Reply
Old Jan 30, 2014
  #7  
boyd_835's Avatar
Thread Starter
|
Member
Joined: Jan 2011
Posts: 523
Likes: 0
From: lake tapps, wa
heres some more pics ill upload more tonight now thats almost together


Attached Thumbnails The Green Machine!-img_1070.jpg   The Green Machine!-img_1069.jpg   The Green Machine!-img_1068.jpg   The Green Machine!-img_1065.jpg   The Green Machine!-img_1063.jpg  

The Green Machine!-img_1062.jpg  
Reply
Old Jan 30, 2014
  #8  
boyd_835's Avatar
Thread Starter
|
Member
Joined: Jan 2011
Posts: 523
Likes: 0
From: lake tapps, wa
Thanks everyone !!
 
Reply
Old Jan 31, 2014
  #9  
boyd_835's Avatar
Thread Starter
|
Member
Joined: Jan 2011
Posts: 523
Likes: 0
From: lake tapps, wa
A few more


Attached Thumbnails The Green Machine!-img_1086.jpg   The Green Machine!-img_1083.jpg   The Green Machine!-img_1085.jpg  
Reply
Old Jan 31, 2014
  #10  
mikerider's Avatar
Member
iTrader: (8)
Joined: Oct 2006
Posts: 2,518
Likes: 11
From: Renton WA
Are your flares black or grey? Hard to tell from the pics
 
Reply
Old Jan 31, 2014
  #11  
boyd_835's Avatar
Thread Starter
|
Member
Joined: Jan 2011
Posts: 523
Likes: 0
From: lake tapps, wa
Grey this summer I'm going to paint them black when the weather is better or I'm gunna get them done in bedliner
 
Reply
Old Jan 31, 2014
  #12  
mikerider's Avatar
Member
iTrader: (8)
Joined: Oct 2006
Posts: 2,518
Likes: 11
From: Renton WA
Originally Posted by boyd_835
Grey this summer I'm going to paint them black when the weather is better or I'm gunna get them done in bedliner
Gotcha, I'm not a fan of the bed liner look on flares but if you like it.

Personally I would just spray them semi gloss black and be done with it.
 
Reply
Old Jan 31, 2014
  #13  
03edge's Avatar
Member
iTrader: (1)
Joined: Feb 2009
Posts: 1,038
Likes: 2
From: OH
Truck looks great, finally another 01+ with manual hubs
 
Reply
Old Jan 31, 2014
  #14  
BACKCOUNTRYEDGE02's Avatar
Member
iTrader: (1)
Joined: Feb 2012
Posts: 386
Likes: 0
From: Laramie, WY
How did you do the manual hubs?
 
Reply
Old Jan 31, 2014
  #15  
powerranger262's Avatar
Member
iTrader: (1)
Joined: Feb 2009
Posts: 1,222
Likes: 2
From: Hartford, WI
Name:  i_like_that_workaholics_zpsisvzraes.gif
Views: 280
Size:  1.94 MB
 
Reply
Old Jan 31, 2014
  #16  
boyd_835's Avatar
Thread Starter
|
Member
Joined: Jan 2011
Posts: 523
Likes: 0
From: lake tapps, wa
I i followed a thread that i found another forum ill see if i can find it .. basically i bought the cvs and hubs for 2000 and older and i used rugged ridge manual hubs .. you have to buy a couple different seals buts really its very easy you need a dremel to clean some stuff but besides that its plug and play it took me about 6 hours total but i had a good idea of what i was doing for i went for it .. if anyone wants to do it i can walk you through or answer questions if you get stuck at any point
 
Reply
Old Jan 31, 2014
  #17  
boyd_835's Avatar
Thread Starter
|
Member
Joined: Jan 2011
Posts: 523
Likes: 0
From: lake tapps, wa
Originally Posted by mikerider
Gotcha, I'm not a fan of the bed liner look on flares but if you like it.

Personally I would just spray them semi gloss black and be done with it.
I think im gunna do the black plasti dip i think it holds up really well and i just used it on a couple interior parts that the paint wasn't holding up and it seems to be way more durable and since i have a full can still (the parts i did were small) i could probably get away with just buying one more can
 
Reply
Old Jan 31, 2014
  #18  
00GreenRanger's Avatar
Level III Supporter
Joined: Nov 2011
Posts: 1,352
Likes: 3
How do you like the 33X10.5s?
 
Reply
Old Jan 31, 2014
  #19  
boyd_835's Avatar
Thread Starter
|
Member
Joined: Jan 2011
Posts: 523
Likes: 0
From: lake tapps, wa
Originally Posted by 00GreenRanger
How do you like the 33X10.5s?

I really like them if my rims were 8inch wide I woulda got the same as mikerider because that's like a 33x11.50 if I'm not mistaken which I think does look better.12.50 personally I think are a little overkill if you do a lot of street driving .. But I'm really happy I got what I did for my setup and what I drive their perfect
 
Reply
Old Jan 31, 2014
  #20  
00GreenRanger's Avatar
Level III Supporter
Joined: Nov 2011
Posts: 1,352
Likes: 3
They look good. I wish a 33x11.5 was made on a 15 inch rim. I think that would look great on our trucks with rims that had back spacing that made the tires stick out a little!
 
Reply
Old Jan 31, 2014
  #21  
boyd_835's Avatar
Thread Starter
|
Member
Joined: Jan 2011
Posts: 523
Likes: 0
From: lake tapps, wa
305/70R16 that's basically a 33x11.50 I'm pretty sure I just didn't wanna change rims cause I was already vested in mine with the powdercoat and I like that their a factory forged aluminum wheel
 

Last edited by boyd_835; Feb 2, 2014 at 01:34 AM.
Reply
Old Jan 31, 2014
  #22  
00GreenRanger's Avatar
Level III Supporter
Joined: Nov 2011
Posts: 1,352
Likes: 3
Originally Posted by boyd_835
305/70R16 that's basically a 33x11.50 I'm pretty sure I just didn't wanna change rims cause I was already vested in mine with the powdercoat and unlike that tier a factory forged aluminum wheel
I know, but what I'm saying is that 15 inch rims have more backspacing options. That's why I want 33x11.5s on a 15! Haha they look good though man!
 
Reply
Old Feb 3, 2014
  #23  
0RangerEdge2's Avatar
Member
iTrader: (2)
Joined: Jun 2005
Posts: 2,592
Likes: 0
From: Ohio
Looks great!

Few questions: where did you get the carpet? What paint did you use? How much was it to recover the Explorer seats?
 
Reply
Old Feb 3, 2014
  #24  
boyd_835's Avatar
Thread Starter
|
Member
Joined: Jan 2011
Posts: 523
Likes: 0
From: lake tapps, wa
I used the sem and the seats were 520 and 200 for the headliner and the pads in doors and the center console lid .. I got the carpet from stock interiors I was happy with the quality but not the form fit cut I had to do a lot of cutting to get it in and they wouldn't answer the phone
 
Reply
Old Feb 18, 2014
  #25  
boyd_835's Avatar
Thread Starter
|
Member
Joined: Jan 2011
Posts: 523
Likes: 0
From: lake tapps, wa
coil over brackets are on the way and i ordered my limit straps and the mounting clips.. also new bump stops just waiting for everything to show up .. Im gunna order my coil overs in a couple weeks when i get a couple more paychecks
 
Reply


All times are GMT -6. The time now is 08:08 PM.