Suspension and Frame fix
#1
 03-19-2012


Suspension and Frame fix
Well since im on spring break i finally have time to fix the cracks in my frame and while i was at it i figured i would put in explorer leafs and new shocks. So far its been easier said then done. The frame has several small cracks in it around the shock mount holes so i am also replacing those since i have to take them off to fix the frame.
A couple days ago i removed the bushing from the "new" leafs and got the eye holes cleaned up. I could have gotten it done a lot sooner if i would have just went over to my Uncle's and used his press since thats where i ended up anyway.

Then yesterday I got the bed off and went to start taking the shocks off. I ended up striping one of the heads to the lower shock mounts so i will have to get a replacement from ford. I only got one shock off yesterday before I quit for the night. That shock still worked but it was still slow at moving.
Today I got up and went to start getting other shock and shock mounts off. I got the cut off wheel out and cut the shock bolts head off. This could be why my ride was bad. i think shocks are supposed to move a little bit when they dont have any weight on them.

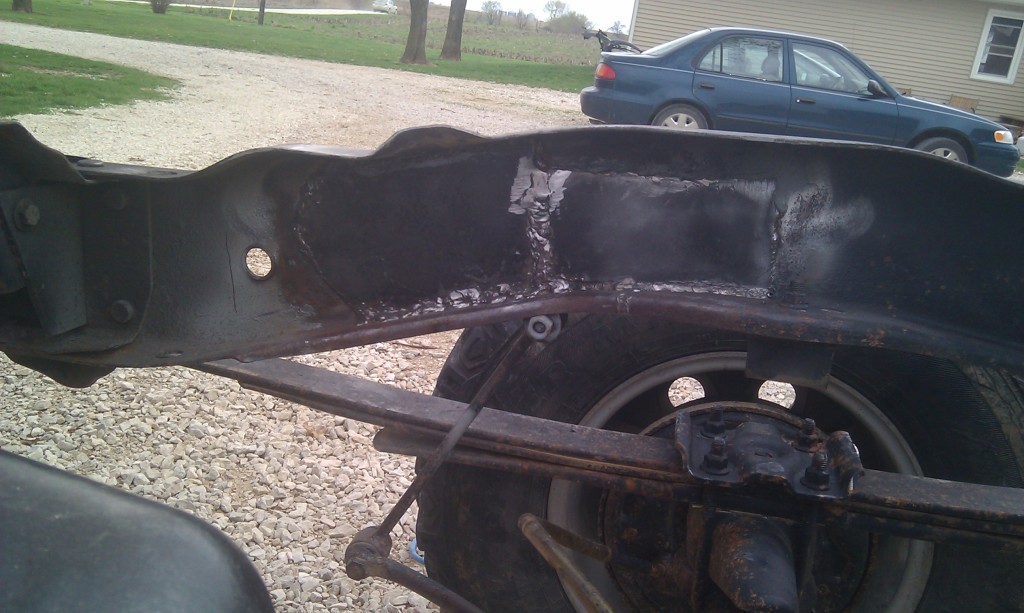
Then i started on getting the shock moutns off. I got one rivet head ground off with the grinder and i couldnt get to the other ones with it. So i got the torch out. Got them off and started cleaning it up. The damage was a little worse than i thought it was. but i stop drilled all of the cracks.


Then I made cardboard templates of the plates im going to be welding in and started cleaing up the new leafs.

Had to stop for the night because it was getting ready to rain. But tomorrow im going to pick up the metal and bolt. Im also going to need new U bolts because Im going to be removing my block and the threads dont go down far enough. But I also have to move the welder back over to the shed so i can start getting it welded up. Im also going to paint the new leafs so i can get them in later this week.
A couple days ago i removed the bushing from the "new" leafs and got the eye holes cleaned up. I could have gotten it done a lot sooner if i would have just went over to my Uncle's and used his press since thats where i ended up anyway.
Then yesterday I got the bed off and went to start taking the shocks off. I ended up striping one of the heads to the lower shock mounts so i will have to get a replacement from ford. I only got one shock off yesterday before I quit for the night. That shock still worked but it was still slow at moving.
Today I got up and went to start getting other shock and shock mounts off. I got the cut off wheel out and cut the shock bolts head off. This could be why my ride was bad. i think shocks are supposed to move a little bit when they dont have any weight on them.
Then i started on getting the shock moutns off. I got one rivet head ground off with the grinder and i couldnt get to the other ones with it. So i got the torch out. Got them off and started cleaning it up. The damage was a little worse than i thought it was. but i stop drilled all of the cracks.
Then I made cardboard templates of the plates im going to be welding in and started cleaing up the new leafs.
Had to stop for the night because it was getting ready to rain. But tomorrow im going to pick up the metal and bolt. Im also going to need new U bolts because Im going to be removing my block and the threads dont go down far enough. But I also have to move the welder back over to the shed so i can start getting it welded up. Im also going to paint the new leafs so i can get them in later this week.


#4
03-19-2012
No. When i weld the cracks up they might get filled and if not they will be some the rosette welds that i will do. But they will be filled before im finished. If i dont fill them it would allow water and dirt and salt in behind the new plate and cause it to rust out again.

#7
03-20-2012
Not really lol. I would only recommend bigger projects when you have more time.
When you weld on the new plate, will your welds go all the way around the plate? If so, then this might keep any water from getting into the holes. I would still weld them up.
Im not sure if condensation or anything could pop up in the holes after the plate is completely welded.
No. When i weld the cracks up they might get filled and if not they will be some the rosette welds that i will do. But they will be filled before im finished. If i dont fill them it would allow water and dirt and salt in behind the new plate and cause it to rust out again.
Im not sure if condensation or anything could pop up in the holes after the plate is completely welded.
#8
03-20-2012
Not really lol. I would only recommend bigger projects when you have more time.
When you weld on the new plate, will your welds go all the way around the plate? If so, then this might keep any water from getting into the holes. I would still weld them up.
Im not sure if condensation or anything could pop up in the holes after the plate is completely welded.
When you weld on the new plate, will your welds go all the way around the plate? If so, then this might keep any water from getting into the holes. I would still weld them up.
Im not sure if condensation or anything could pop up in the holes after the plate is completely welded.
Yes im planing on welding all the way around the plate and then weld up the holes. And silicone around the bolt holes so that i keep as much moisture out as possible. I just found 2 spots where the other plate that i had welded on wasnt welded all the way to the frame and it got water behind it.
Last edited by littlered; 03-20-2012 at 04:57 PM.
#9
03-20-2012
Today went to town and got the metal and new bolts for the shocks. Ford didnt have replacements so I just got some grade 8 bolts to use. I got some of the cuts done but with it being so windy i didnt get them cut all the way out since i needed the torch. I welded up the cracks inside and out and ground the welds down a little bit. especially on the inside where the plates are going.
I also got the leafs painted and killed the dog.


I also got the leafs painted and killed the dog.

#12
03-21-2012
It was funny because as soon as i took it she rolled over like she knew i was taking it.
Well today was a fun day. I cut out the pieces that i am welding on to the frame. Took a while since i had to use a torch and im still a torch noob. Then i had to spend a lot of time grinding them clean and getting them to the exact fit.

Then i clamped them in place and tack welded them. It was difficult to get into positions that were comfortable to do the welds and i should have done some practice verticle welds. But it turned out ok, not my best welds but they will do just fine. Got it all cleaned up and put some paint on it. I didnt have the correct size drill bits to drill out the bolt holes so that will have to wait till tomorrow. should have the shock mounts and new shocks back on tomorrow along with the leaf springs. Then i just have to wait to have enough help to put the bed back on.

Well today was a fun day. I cut out the pieces that i am welding on to the frame. Took a while since i had to use a torch and im still a torch noob. Then i had to spend a lot of time grinding them clean and getting them to the exact fit.
Then i clamped them in place and tack welded them. It was difficult to get into positions that were comfortable to do the welds and i should have done some practice verticle welds. But it turned out ok, not my best welds but they will do just fine. Got it all cleaned up and put some paint on it. I didnt have the correct size drill bits to drill out the bolt holes so that will have to wait till tomorrow. should have the shock mounts and new shocks back on tomorrow along with the leaf springs. Then i just have to wait to have enough help to put the bed back on.
#13
03-21-2012
Join Date: Mar 2006
Location: Limestone NY
Posts: 23
Likes: 0
Received 0 Likes
on
0 Posts
#16
03-22-2012
Well today i got the holes drilled for the shock mounts and for the sway bar on thepassenger side. Also got the shock moutns put on and the shocks mounted. I cleaning up the new leafs and put the new bushings in. then started trying to get the old ones off. We had to cut the back bolts on both sides because they were stuck. but we got the front two out. had a hell of a time getting the U-bolts undone because we couldnt find a deepwell 18mm socket (untill i was putting them back together) but got the old leafs off and then new ones on. I ended up just flipping the block and leaving it on but it almost made my U-bolts to short since i went from 3 leafs to 4. But i got it all back together. I ran out of time tonight so tomorrow i need to finish tightening the bolts on the rear shocks and put the tires back on and then double check everything. I can already tell they are much stiffer than my old ones. hopefully it will sitll be sitting close to level tomorrow when i let it off the jack stands. Sorry not to many pics today a friend was helping and we were working kinda fast.


#18
03-23-2012
Thanks!
Got everything tightened up this morning and got it backon all fours. still wondering if its going to sit level after the bed is back on or not. if not i can still go down a hole on my shackles to raise it up. took it for a little drive without the bed on and it was riding rough but it also doesnt have any weight on the back end yet. Couldnt get the bed on tonight because we had some pretty bad storms roll through. we had over 1.5 inches in an hour with hail and then i left to go to a friends house and there was over an inch of hail frozen on the highway. Should have the bed back on tomorrow and then its time to head back to school.

Got everything tightened up this morning and got it backon all fours. still wondering if its going to sit level after the bed is back on or not. if not i can still go down a hole on my shackles to raise it up. took it for a little drive without the bed on and it was riding rough but it also doesnt have any weight on the back end yet. Couldnt get the bed on tonight because we had some pretty bad storms roll through. we had over 1.5 inches in an hour with hail and then i left to go to a friends house and there was over an inch of hail frozen on the highway. Should have the bed back on tomorrow and then its time to head back to school.
#19
03-24-2012
Got it all back together today. It sits perfect. The explorer leafs gave me enough lift to get rid of the blocks without having to go to the next hole on the shackles. Ride pretty good too, a whole let better than it was before. I will get some pics of it tomorrow before i head back to school.
#20
03-25-2012
Good repair, nice work and the frame LOOKS good (NOW) but beware of it now that the first cracks have shown up.
Keep checking it when you do oil chg/ grease job.
RUST $ucks !
Ford made the frames too thin to save money, if I had known before I bought my last one (2003) I would have gone back a generation or two and looked for a one in good condition.
Luck with it !
Keep checking it when you do oil chg/ grease job.
RUST $ucks !
Ford made the frames too thin to save money, if I had known before I bought my last one (2003) I would have gone back a generation or two and looked for a one in good condition.
Luck with it !
#21
03-25-2012
Yeah this was the 4th time ive fixed it because of cracks or rust. The gas tank skid plate is going to have to be replaced sometime too but I think it can wait for now.
Got some pics today and even did some hauling. for some reason the bed looks like its sitting weird. It looks like the back passenger corner goes down and i dont know what would be causing it. But I hauld 4 shelvs still in the box i would say they weigh aobut 80lbs a piece and you couldnt even tell anything was in the bed. Before it would have been squating!

Finally have some arch back in the leafs!

pic of the bed


Got some pics today and even did some hauling. for some reason the bed looks like its sitting weird. It looks like the back passenger corner goes down and i dont know what would be causing it. But I hauld 4 shelvs still in the box i would say they weigh aobut 80lbs a piece and you couldnt even tell anything was in the bed. Before it would have been squating!
Finally have some arch back in the leafs!
pic of the bed
#22
03-25-2012
#24
03-25-2012


