
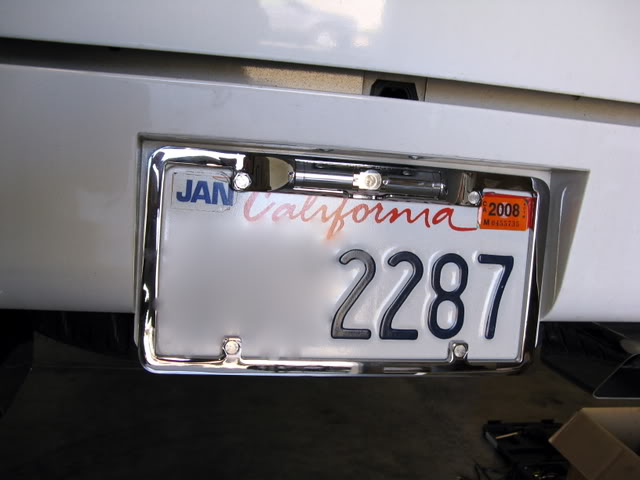
White Light-nin...A popular name for Rangers

Thread Starter
|
Member

Joined: Mar 2007
Posts: 331
Likes: 1
From: Spring City, TN
White Light-nin...A popular name for Rangers
My truck is a 2002 Ranger XLT, 3.0L, automatic, extended cab, 4 door. The engine has been "warmed up" a bit with a K&N cold air intake, Granatelli Mass Flow Sensor,
SuperChip programmer set for 87 octane mileage. I can also program for 91 & 93 octane performance when I'm in the mood to play.
Magnaflow cat back exhaust system with single 2.25" in/dual 2.0" out the rear of the truck into 4 Gibson rectangular chrome tips .
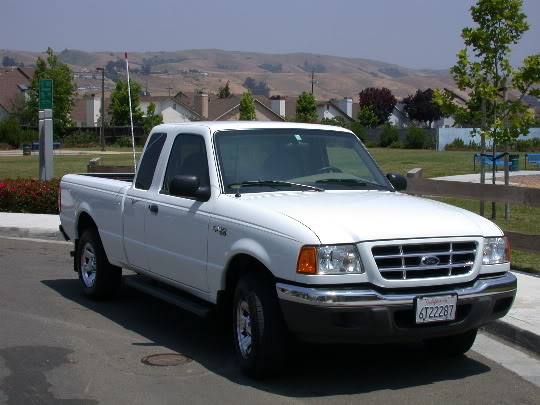
My ranger about a week after I purchased it in 2002.
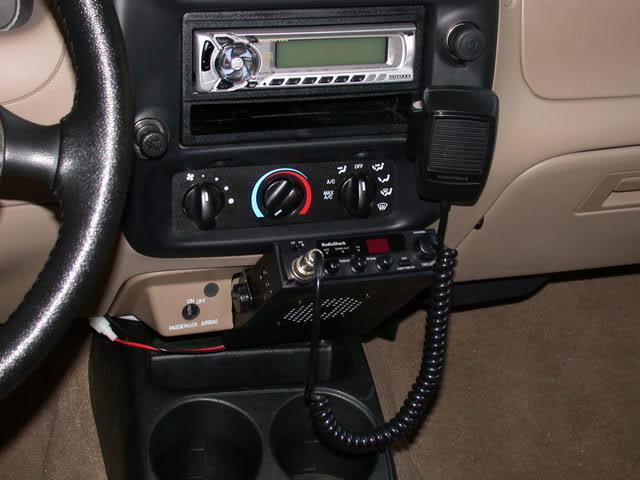
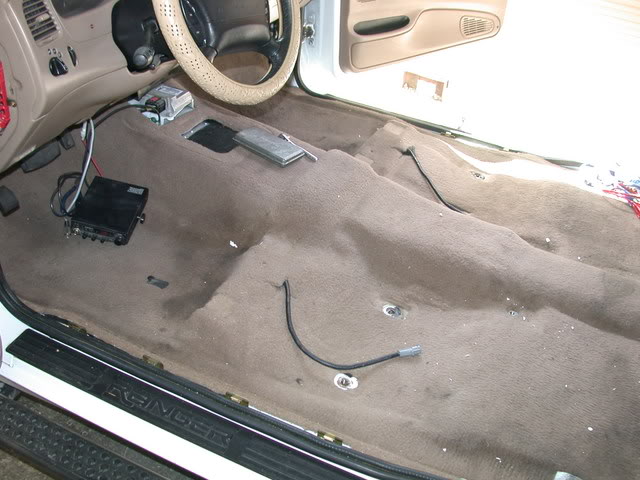
I had already installed the CB you see in the photo below. -----------------------------------------------My first upgrade. An A.R.E. hard tonneau cover.
My first audio upgrade. A Kenwood MPV 619 H/U. (this was recently replaced by a Pioneer AVIC-N4
In-dash DVD receiver with navigation and 7" video screen. I was mainly after the navigation part. My sense of direction sucks.)
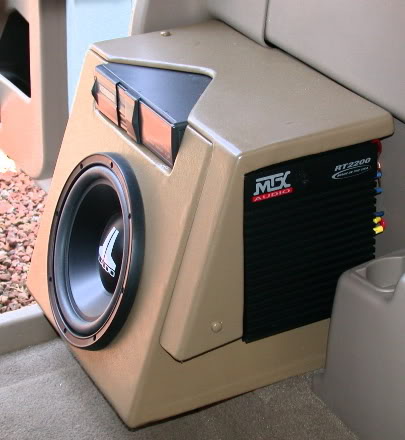
About a year later I added a 10" JL sub, MTX amp and a Kenwood 6 CD changer you see on the right.
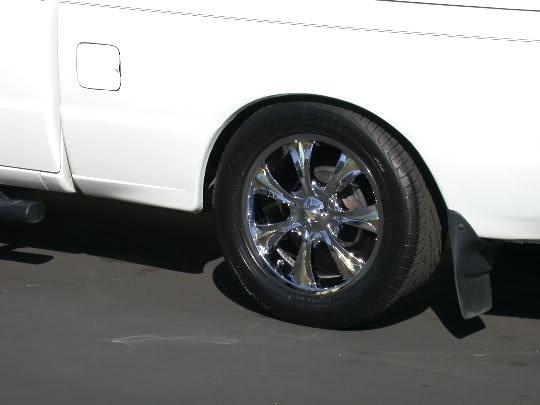
About 4 years ago I lowered the truck 2"Front/3"Rear. ---------------------------------------------------- Then I added 18" Baccarat wheels and 235/50 GoodYear Eagles'.
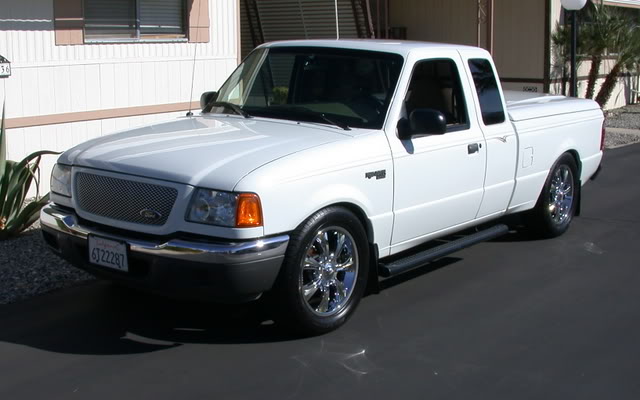
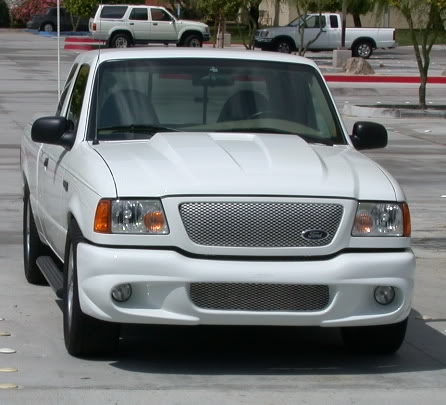
New front end. Cowl induction hood, bumper cover with fog lights,
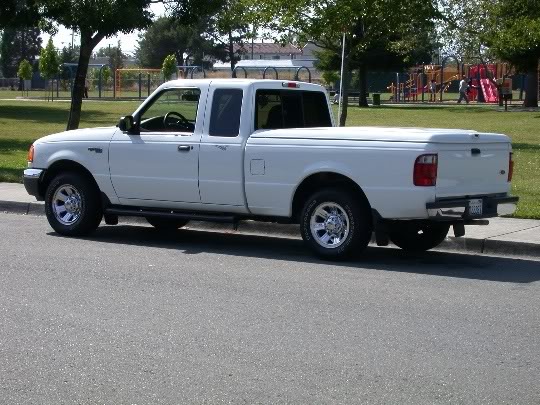
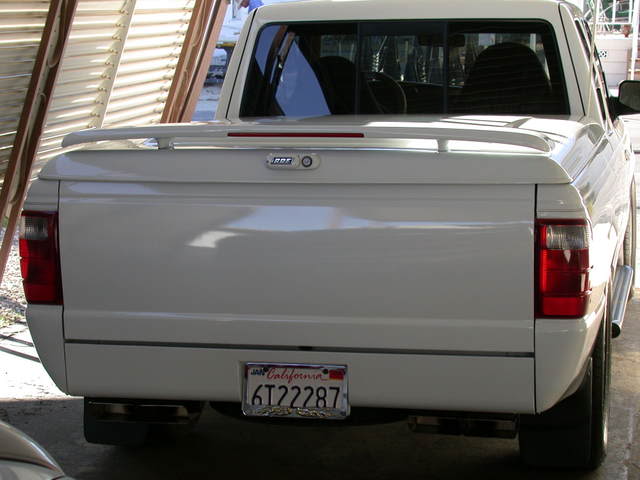
upper and lower Speed grills. ----------------------------------------------------------- Roll pan, tailgate cover with handle removed, spoiler.
----------------------------------------------------------------------------------------------Note 3rd brake light removed from roof of cab and placed in spoiler.
That's it for now. Much more to come.
SuperChip programmer set for 87 octane mileage. I can also program for 91 & 93 octane performance when I'm in the mood to play.
Magnaflow cat back exhaust system with single 2.25" in/dual 2.0" out the rear of the truck into 4 Gibson rectangular chrome tips .
My ranger about a week after I purchased it in 2002.
I had already installed the CB you see in the photo below. -----------------------------------------------My first upgrade. An A.R.E. hard tonneau cover.
My first audio upgrade. A Kenwood MPV 619 H/U. (this was recently replaced by a Pioneer AVIC-N4
In-dash DVD receiver with navigation and 7" video screen. I was mainly after the navigation part. My sense of direction sucks.)
About a year later I added a 10" JL sub, MTX amp and a Kenwood 6 CD changer you see on the right.
About 4 years ago I lowered the truck 2"Front/3"Rear. ---------------------------------------------------- Then I added 18" Baccarat wheels and 235/50 GoodYear Eagles'.
New front end. Cowl induction hood, bumper cover with fog lights,
upper and lower Speed grills. ----------------------------------------------------------- Roll pan, tailgate cover with handle removed, spoiler.
----------------------------------------------------------------------------------------------Note 3rd brake light removed from roof of cab and placed in spoiler.
That's it for now. Much more to come.


Thread Starter
|
Member
Joined: Mar 2007
Posts: 331
Likes: 1
From: Spring City, TN
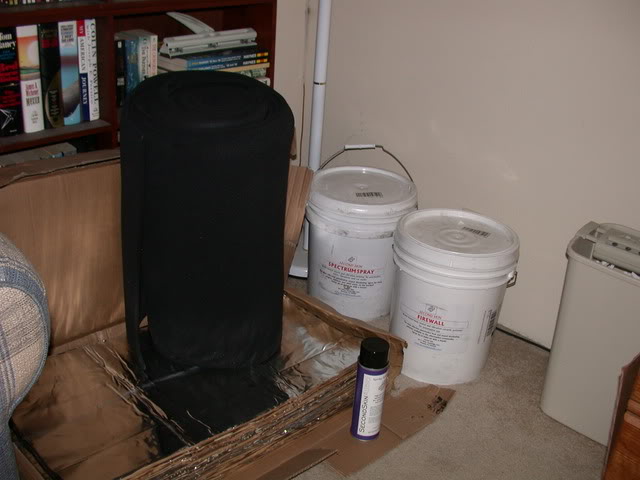
Work begins on the interior of my truck. What you see below is almost $1,000 worth
of sound deadening, 125 sq.ft. of SecondSkin's "Damplifier Pro," 5 gals of "Firewall"
used for both heat and noise reduction. I'll use it inside the cab. Plus 5 gals of "Spectrum"
a noise and vibration coating I'll use outside the cab as an undercoating. The black stuff
on top of the Damp Pro is called "Overkill-Pro" According to SecondSkin "This vinyl based
filter not only dissipates airborne sound waves that are able to penetrate the layers below
it, but because of the rubber content it enhances vibration damping results." I have about
60 sq. ft. of it and I'll use it to cover the back wall, floor, firewall and wheelwells of the cab.
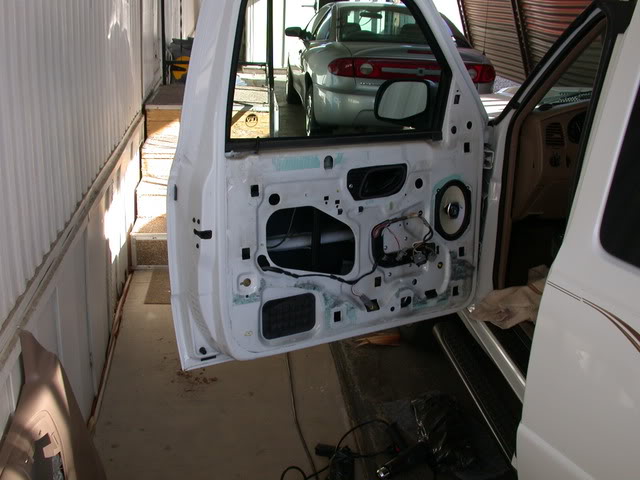
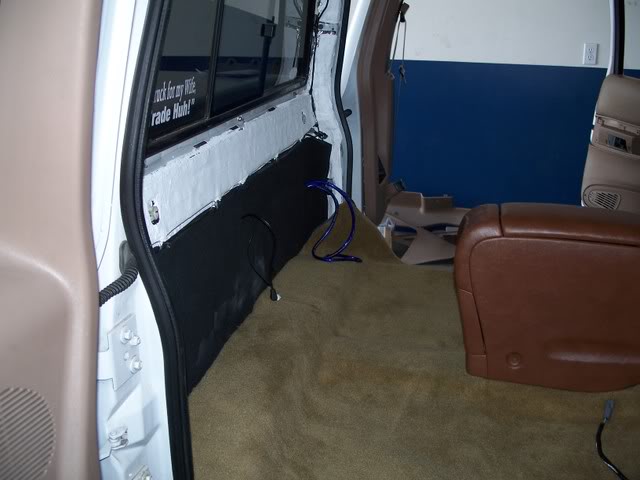
Below is the drivers door, with the panel removed.
The Pioneer 3-way speaker on the right has been replaced by an Infinity 6810cs component set.
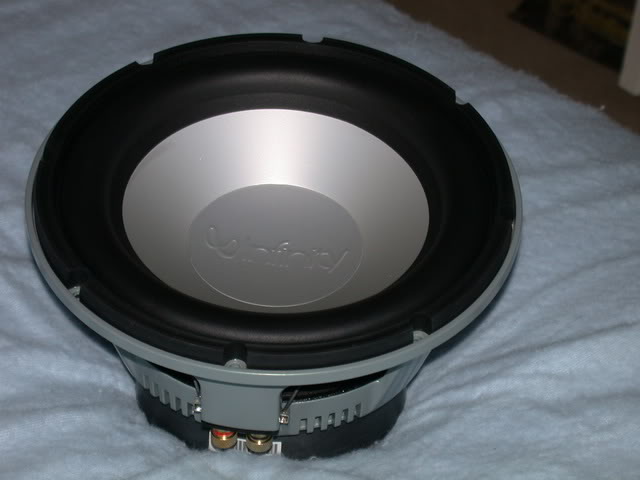
Here is the Infinity Reference 10" sub and Infinity amp, I have 2 of each,
that will replace the current set up.
My room-mate has built a box to house them.

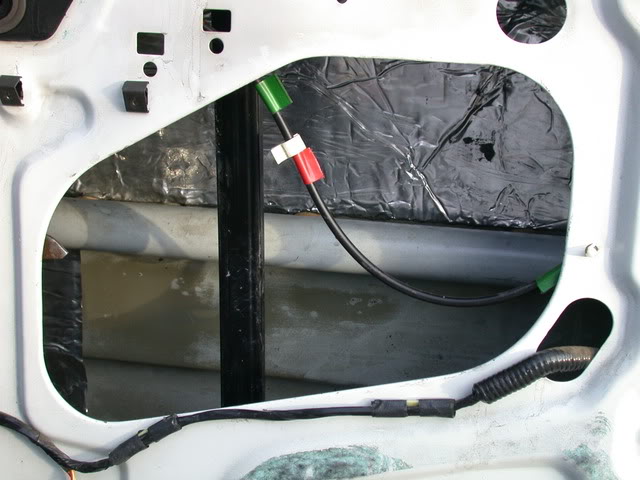
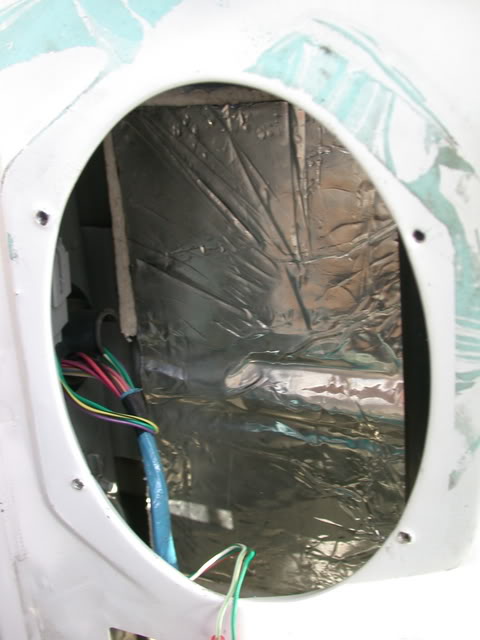
This is a close up of the openings in the drivers door with the speaker removed.
The heavy tube running through the middle is a reinforcement bar.
To protect the passengers in a side impact crash.
The bar is exactly where I needed to glue the below speaker pad.
So I glued some 1.5" thick styrofoam above and below the bar so the pad could lay flat.
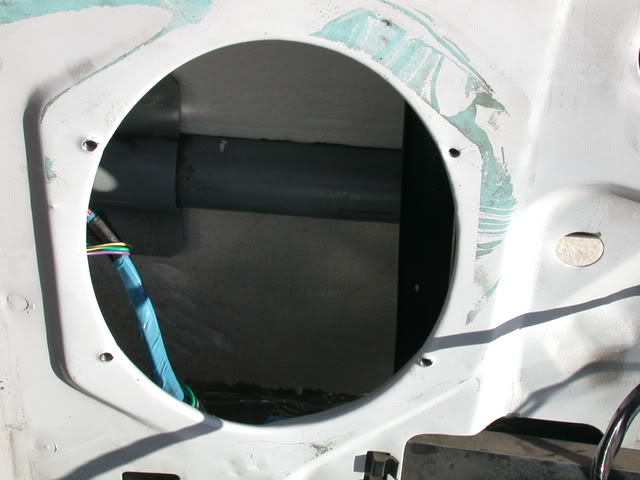
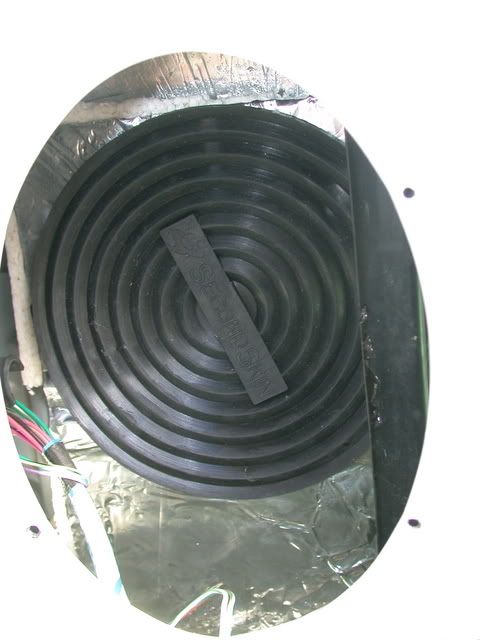
On the left is the styrofoam covered with "Damplifier", as you can see there's just a slight hump around the bar. On the right is the speaker pad installed.
The Speaker Pads get applied to the inner skin of the car door to absorb and redirect the rear wave away from the speaker.
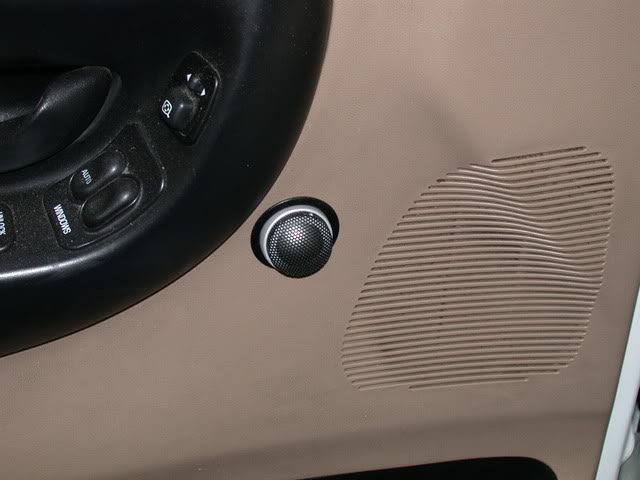
The finished door with tweeter flush mounted. Sounds good, but it's a bit underpowered.
The current amp only puts out 60w RMS the speaker specs call for 90w.
The new amp pictured above has 111w.
of sound deadening, 125 sq.ft. of SecondSkin's "Damplifier Pro," 5 gals of "Firewall"
used for both heat and noise reduction. I'll use it inside the cab. Plus 5 gals of "Spectrum"
a noise and vibration coating I'll use outside the cab as an undercoating. The black stuff
on top of the Damp Pro is called "Overkill-Pro" According to SecondSkin "This vinyl based
filter not only dissipates airborne sound waves that are able to penetrate the layers below
it, but because of the rubber content it enhances vibration damping results." I have about
60 sq. ft. of it and I'll use it to cover the back wall, floor, firewall and wheelwells of the cab.
Below is the drivers door, with the panel removed.
The Pioneer 3-way speaker on the right has been replaced by an Infinity 6810cs component set.
Here is the Infinity Reference 10" sub and Infinity amp, I have 2 of each,
that will replace the current set up.
My room-mate has built a box to house them.
This is a close up of the openings in the drivers door with the speaker removed.
The heavy tube running through the middle is a reinforcement bar.
To protect the passengers in a side impact crash.
The bar is exactly where I needed to glue the below speaker pad.
So I glued some 1.5" thick styrofoam above and below the bar so the pad could lay flat.
On the left is the styrofoam covered with "Damplifier", as you can see there's just a slight hump around the bar. On the right is the speaker pad installed.
The Speaker Pads get applied to the inner skin of the car door to absorb and redirect the rear wave away from the speaker.
The finished door with tweeter flush mounted. Sounds good, but it's a bit underpowered.
The current amp only puts out 60w RMS the speaker specs call for 90w.
The new amp pictured above has 111w.
Last edited by MemphisSenior; Jan 28, 2008 at 12:02 AM.


Thread Starter
|
Member
Joined: Mar 2007
Posts: 331
Likes: 1
From: Spring City, TN
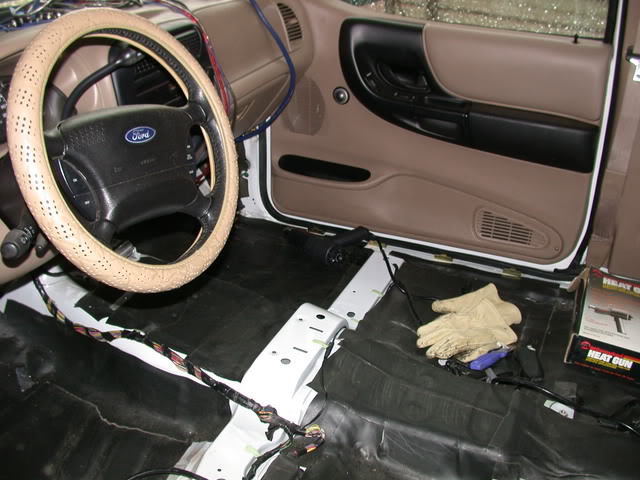
The stripped cab. Getting ready to sound proof.
I had put "Dynamat" in just after buying the truck. I had to strip it all out. While it helped some,
the cab was still noisier that I wanted. With a heat gun it comes out rather easily.
The real problem was getting the glue residue left behind off. That part was a ROYAL P.I.T.A.
The "Dynamat" removal and the subsequent residue cleanup took me about 1 week.
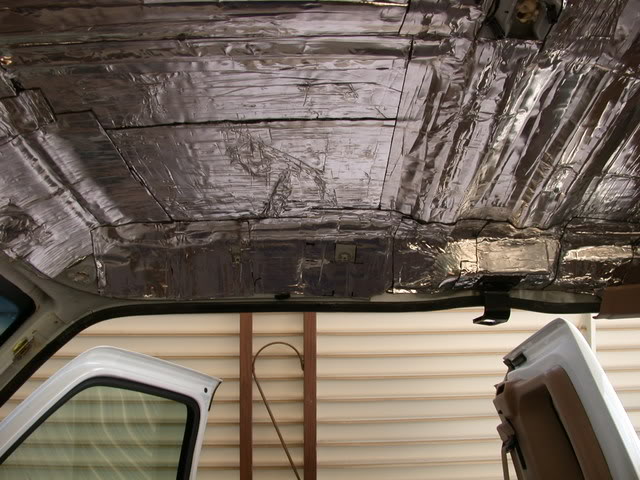
"Damplifier Pro" installed on the ceiling.
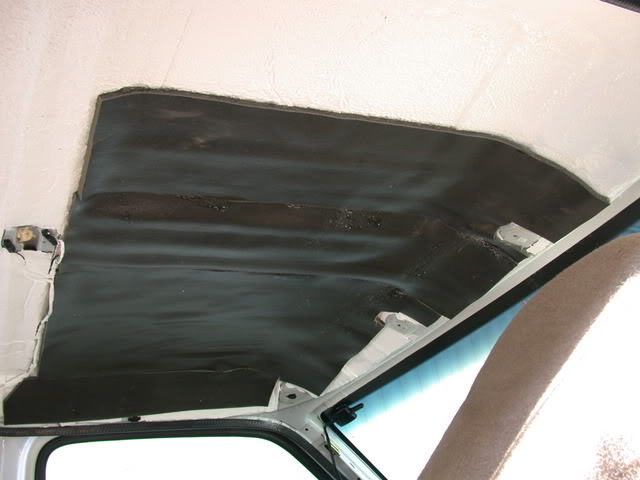
"Firewall" (white area) covered by something SecondSkin calls "Luxury Liner."
SS claims it "is a highly effective barrier and absorber composite mat consisting of a flexible
vinyl barrier and acoustical grade open cell foam." With just the doors and roof done,
there was a noticeable drop in noise level. Not as much as I had hoped for but still very noticeable.
The doors and roof only account for 40% of the cab surface.
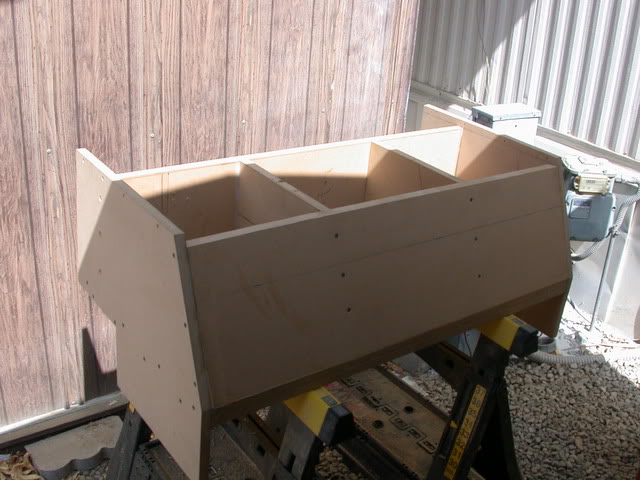
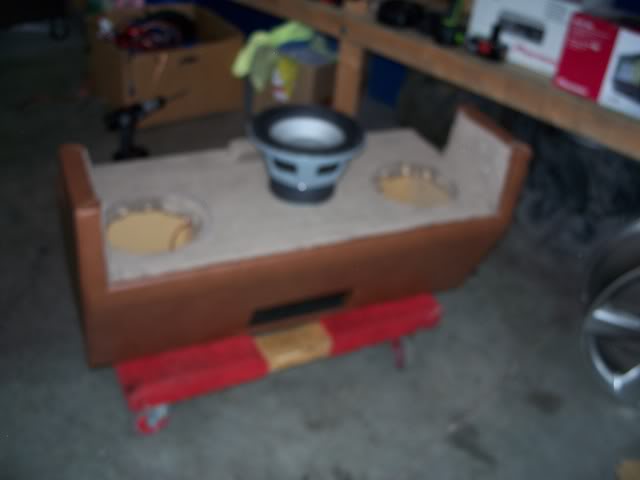
The humble beginnings of my speaker box.
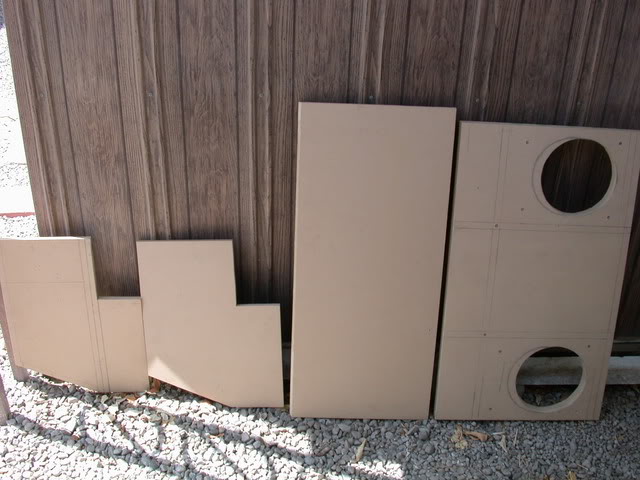
My room mate laying out the 4' X 8' sheet of 3/4" MDF he used to build the box.
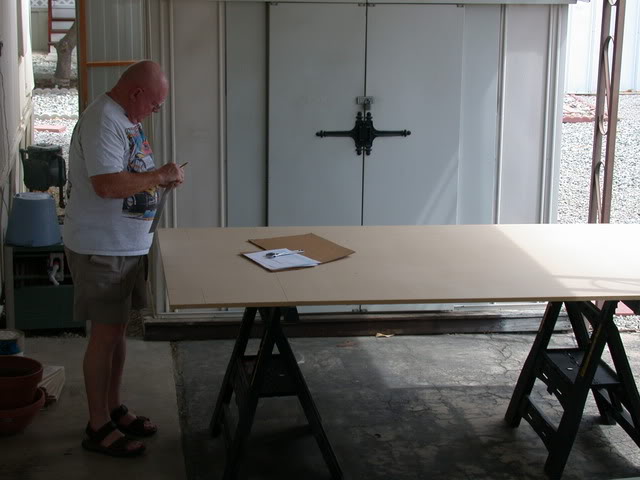
Some of the cut pieces. The box will be 38.5" wide X 17.5" high X 18" deep.
It will house the 2 new 10" Infinity subs, 2 Infinity amps, plus a 12 disc Pioneer CD changer.
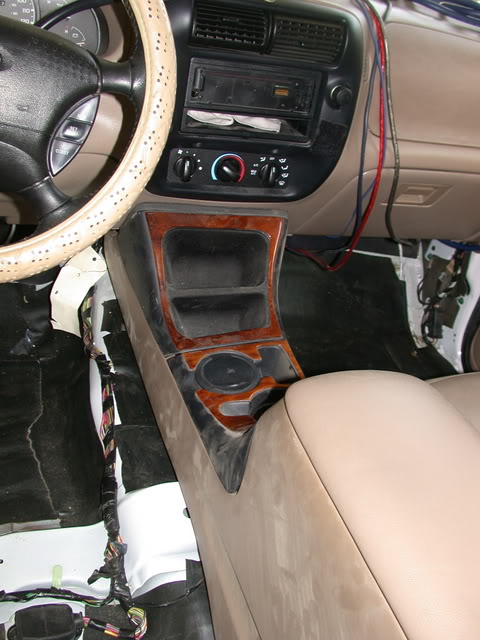
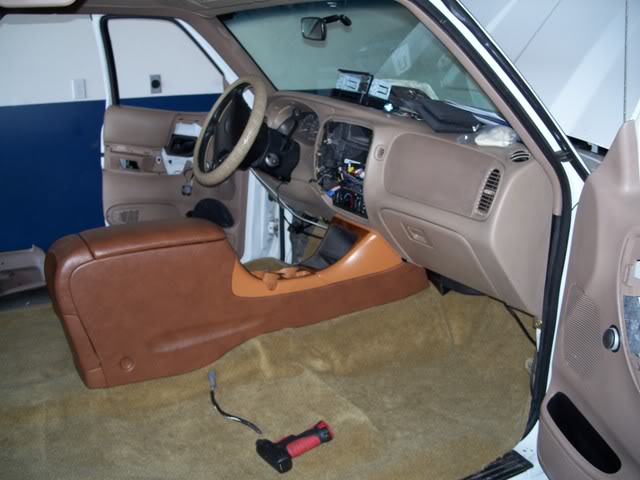
Trial fitting the Explorer center console.
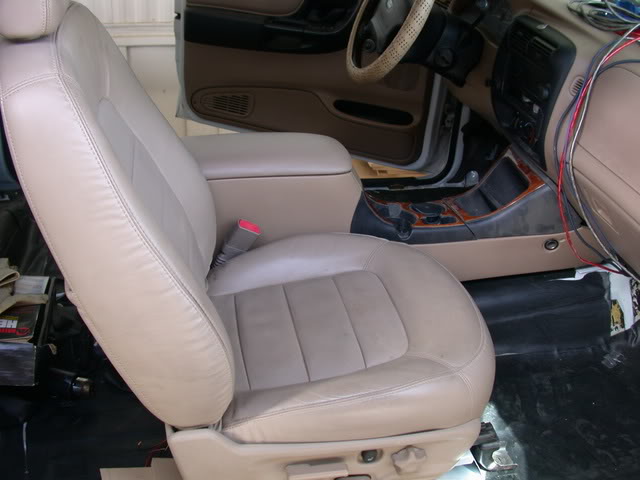
The Explorer heated, power, bucket seat being trial fitted.
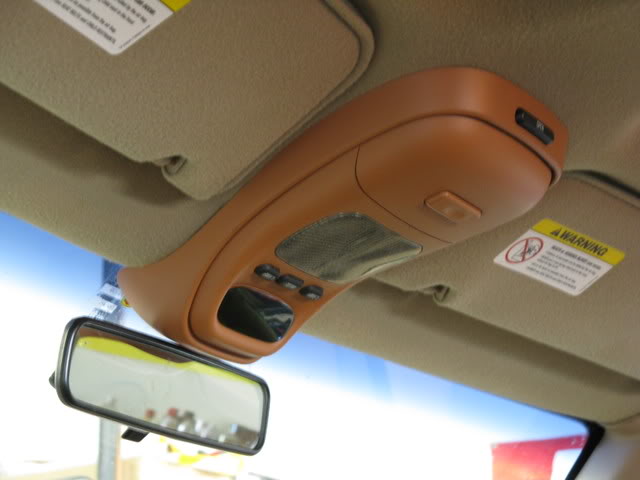
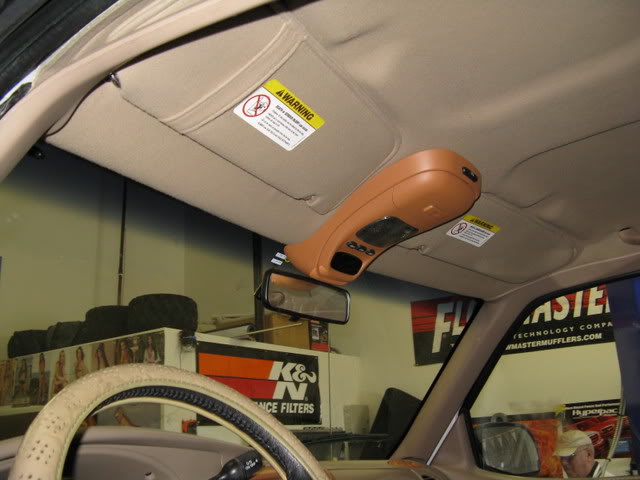
I also have an Explorer overhead console that goes over the rearview mirror.
I had read many times that the Explorer buckets were a drop-in conversion for a Ranger.
I made the mistake of thinking 2002 seats would match my Ranger color wise and be a drop in.
Mistake, BIG mistake. I learned to late that while Explorers were built on Ranger platforms originally.
That all changed in 2002. So the seats from 2002 and later Explorers no longer "drop in" to a Ranger.
They can be made to work, but it's a great deal more work. So if you're thinking about this swap, BEWARE.
Another problem. After beating, banging and a whole lot of cussing, we finally got the passenger seat to fit.
When we finally got the drivers seat in and hooked up the wiring, we couldn't get the seat to move.
After checking closer we found the frame for the adjustments, up/down, forward/reverse, had been bent in the crash.
Not much but enough to cause it to jam when you tried to move the seat.
At that point I had the seats for about 4 months and the junk yard only allowed 30 days to return them.
Also we had cut and bent the mounting brackets to the point that they wouldn't have taken them back anyway,
even if we were inside the 30 day window.
So if you buy anything from a junk yard, especially if the part has any electrical components,
make sure EVERYTHING works before you leave the yard. It was a VERY expensive lesson for me to learn.
I had put "Dynamat" in just after buying the truck. I had to strip it all out. While it helped some,
the cab was still noisier that I wanted. With a heat gun it comes out rather easily.
The real problem was getting the glue residue left behind off. That part was a ROYAL P.I.T.A.
The "Dynamat" removal and the subsequent residue cleanup took me about 1 week.
"Damplifier Pro" installed on the ceiling.
"Firewall" (white area) covered by something SecondSkin calls "Luxury Liner."
SS claims it "is a highly effective barrier and absorber composite mat consisting of a flexible
vinyl barrier and acoustical grade open cell foam." With just the doors and roof done,
there was a noticeable drop in noise level. Not as much as I had hoped for but still very noticeable.
The doors and roof only account for 40% of the cab surface.
The humble beginnings of my speaker box.
My room mate laying out the 4' X 8' sheet of 3/4" MDF he used to build the box.
Some of the cut pieces. The box will be 38.5" wide X 17.5" high X 18" deep.
It will house the 2 new 10" Infinity subs, 2 Infinity amps, plus a 12 disc Pioneer CD changer.
Trial fitting the Explorer center console.
The Explorer heated, power, bucket seat being trial fitted.
I also have an Explorer overhead console that goes over the rearview mirror.
I had read many times that the Explorer buckets were a drop-in conversion for a Ranger.
I made the mistake of thinking 2002 seats would match my Ranger color wise and be a drop in.
Mistake, BIG mistake. I learned to late that while Explorers were built on Ranger platforms originally.
That all changed in 2002. So the seats from 2002 and later Explorers no longer "drop in" to a Ranger.
They can be made to work, but it's a great deal more work. So if you're thinking about this swap, BEWARE.
Another problem. After beating, banging and a whole lot of cussing, we finally got the passenger seat to fit.
When we finally got the drivers seat in and hooked up the wiring, we couldn't get the seat to move.
After checking closer we found the frame for the adjustments, up/down, forward/reverse, had been bent in the crash.
Not much but enough to cause it to jam when you tried to move the seat.
At that point I had the seats for about 4 months and the junk yard only allowed 30 days to return them.
Also we had cut and bent the mounting brackets to the point that they wouldn't have taken them back anyway,
even if we were inside the 30 day window.
So if you buy anything from a junk yard, especially if the part has any electrical components,
make sure EVERYTHING works before you leave the yard. It was a VERY expensive lesson for me to learn.
first things first sorry you didnt do the research on the seats..
2002+ 4 DOOR explorers changed completely...
2002-2006 SPORT TRAC are the same still as rangers...
2002+ SPORT are the same still as rangers...
just FYI...
2002+ 4 DOOR explorers changed completely...
2002-2006 SPORT TRAC are the same still as rangers...
2002+ SPORT are the same still as rangers...
just FYI...
Thread Starter
|
Member
Joined: Mar 2007
Posts: 331
Likes: 1
From: Spring City, TN
I thought I had Zach. Obviously I didn't do enough and what I did do was done in the wrong place.
I did as much reading as I could find on the subject and then posted to 2 different boards asking for help/information.
This was done almost 3 years ago and unfortunately I didn't know about Ranger-Forums at that time.
Everything I read and all of the answers I received told me the project was a simple "drop in" job.
Thank you for the information. If I ever decide to do another project like this, I'll be sure to come here first for help.
Thread Starter
|
Member
Joined: Mar 2007
Posts: 331
Likes: 1
From: Spring City, TN
Hi Mark, yes that was me. The photos above are about 4 years old. I still had the Ground Force 2/3 drop on it.
The reason it looks lower is I had 255/55X18 tires on it a the time. They were 29" tall. So they filled the wheel well more.
When I went to the DJM 4/5 drop I had to switch to 235/40X18 to make it work. The truck rode like CRAP.
The guy at the front end shop told me it would take a few hundred miles for the set up to seat in.
After less than 500 miles I was to pi$$ed off with the ride I took the truck back and told them to put it back to stock.
That was about 2 years ago. Earlier this month I took the truck to a local custom shop to have it bagged with a 4 link set up.
With luck I'll have it back the end of this week or Monday/Tuesday of next week. Photos to follow.
So I sold them for junk. Went out and got custom made seats. Photos to follow.
Thread Starter
|
Member
Joined: Mar 2007
Posts: 331
Likes: 1
From: Spring City, TN
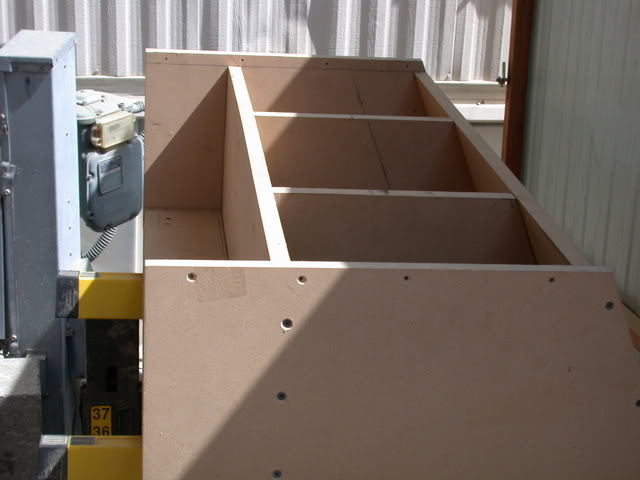
My speaker box in the final stages of construction. The 2 outer compartments will house the subwoffers.
The center compartment will house the new 12 disc CD changer.
The 2 amps will be hung on the end panels outside the box.
At this point I was trying to decide weather to paint it or cover it in vinyl.
Decisions, decisions, decisions...


The center compartment will house the new 12 disc CD changer.
The 2 amps will be hung on the end panels outside the box.
At this point I was trying to decide weather to paint it or cover it in vinyl.
Decisions, decisions, decisions...
Thread Starter
|
Member
Joined: Mar 2007
Posts: 331
Likes: 1
From: Spring City, TN
After having been put on hold for 7 months for vacation, Thanksgiving, Christmas and New Years.
I started working on my Ranger again just after Christmas.
Last year I did all the sound proofing myself. This overweight, out of shape, soon to be
70 year old body of mine let me know it wasn't happy with what I was doing to it.
When I started working on my truck again, my body really protested. After one 3-4 hr session my back,
shoulder and right leg hurt so bad it took me 3 days and what seemed like a 1/2 case of "Ben-Gay" to recover.
So 3 1/2 weeks ago I took my truck to a shop here in Palm Springs called "Luxurious Customs."
Their specialty is audio and wheels. Except for body work they also do most other kinds of custom work.
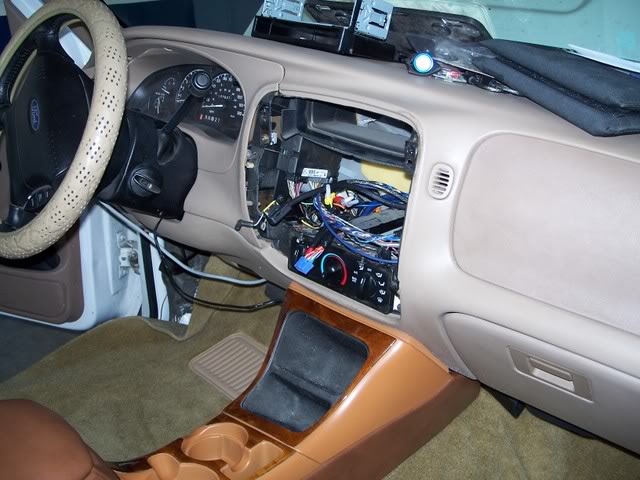
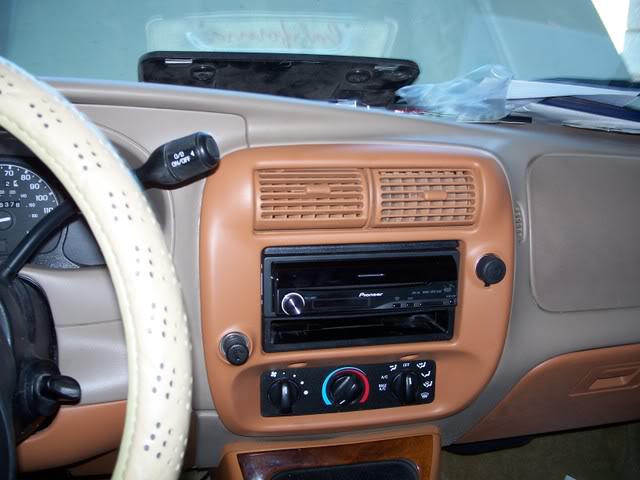
The radio opening ready to receive the new Pioneer AVIC-N4 head unit.
The newly covered and repainted center console and the new carpeting installed.
The newly covered speaker box. (sorry for the fuzziness. photography has never been my bailiwick.)
The box is upside down in the photo. The speakers will fire down toward the floor.
The rectangular hole in the bottom (top) of the box will house the CD changer.
The final layer of sound deadening on the back wall.
The speaker box installed. You can see the CD changer in the middle of the box.
The lid over the CD changer covers a storage bin for the 4 extra CD magazines I'll carry on road trips.
I have a total of 5 counting the 1 in the changer. That means I can carry 60 CD's total.
Depending on the CD's I pick, I'll have from 50 to 65 hours or so of music available.
At 6-8 hours per day, I figure I'm good for a week to 10 days without repeating.
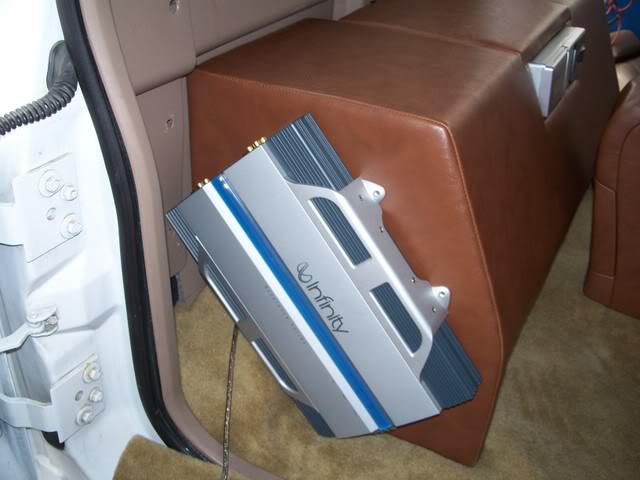
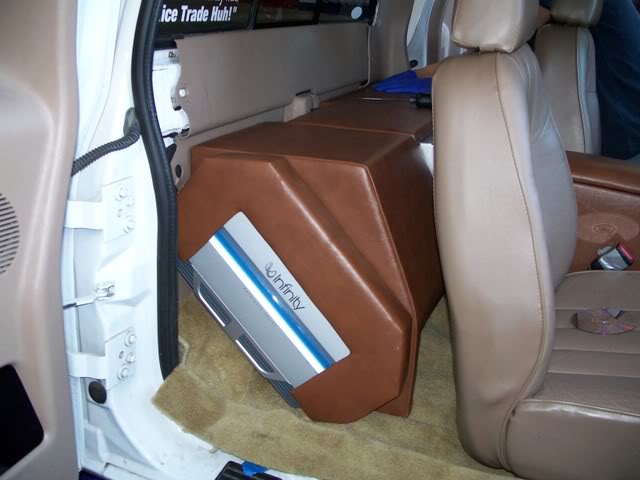
Test fitting one of the 2 amps. These amps are HUGE physically. About 19"-20" wide.
So we had a heck of a time figuring how to mount them in the space available.
After they are mounted an open face box will be built to cover the edges of the amps and hide all the wiring.
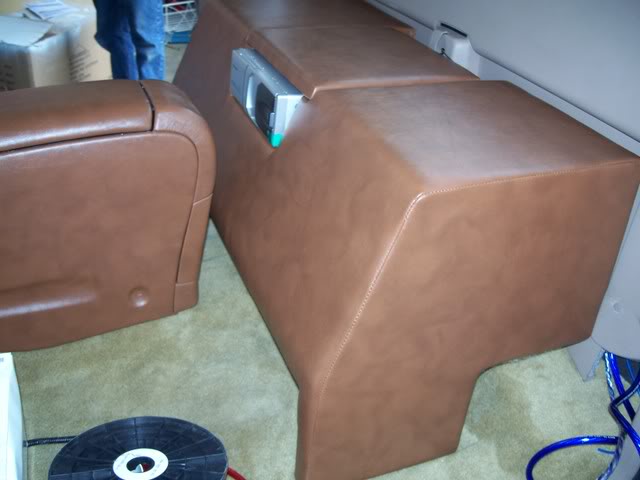
The Infinity logo and the blue stripe will be visible. The box will be covered in the same material as the speaker box.
By the way. The lower photo gives a better representation of the actual color of the box.
Not sure why the one on top looks so washed out. To much flash I suspect.
Like I said, photography has never been my bailiwick.
I started working on my Ranger again just after Christmas.
Last year I did all the sound proofing myself. This overweight, out of shape, soon to be
70 year old body of mine let me know it wasn't happy with what I was doing to it.
When I started working on my truck again, my body really protested. After one 3-4 hr session my back,
shoulder and right leg hurt so bad it took me 3 days and what seemed like a 1/2 case of "Ben-Gay" to recover.
So 3 1/2 weeks ago I took my truck to a shop here in Palm Springs called "Luxurious Customs."
Their specialty is audio and wheels. Except for body work they also do most other kinds of custom work.
The radio opening ready to receive the new Pioneer AVIC-N4 head unit.
The newly covered and repainted center console and the new carpeting installed.
The newly covered speaker box. (sorry for the fuzziness. photography has never been my bailiwick.)
The box is upside down in the photo. The speakers will fire down toward the floor.
The rectangular hole in the bottom (top) of the box will house the CD changer.
The final layer of sound deadening on the back wall.
The speaker box installed. You can see the CD changer in the middle of the box.
The lid over the CD changer covers a storage bin for the 4 extra CD magazines I'll carry on road trips.
I have a total of 5 counting the 1 in the changer. That means I can carry 60 CD's total.
Depending on the CD's I pick, I'll have from 50 to 65 hours or so of music available.
At 6-8 hours per day, I figure I'm good for a week to 10 days without repeating.
Test fitting one of the 2 amps. These amps are HUGE physically. About 19"-20" wide.
So we had a heck of a time figuring how to mount them in the space available.
After they are mounted an open face box will be built to cover the edges of the amps and hide all the wiring.
The Infinity logo and the blue stripe will be visible. The box will be covered in the same material as the speaker box.
By the way. The lower photo gives a better representation of the actual color of the box.
Not sure why the one on top looks so washed out. To much flash I suspect.
Like I said, photography has never been my bailiwick.
Member
Joined: Jun 2004
Posts: 13
Likes: 3
From: Parma Ohio
Im suprised you were not happy with the ride of the 4/5 Im at 5/7 with no notch and it isnt that bad with a decent set of shocks but you did it right and decided to go bagged, hopefully you kept those djm arms you will need them for the front when you go bagged.

Thread Starter
|
Member
Joined: Mar 2007
Posts: 331
Likes: 1
From: Spring City, TN
Getting close. Newly painted radio bezel, glove box door and bottom dash panel.
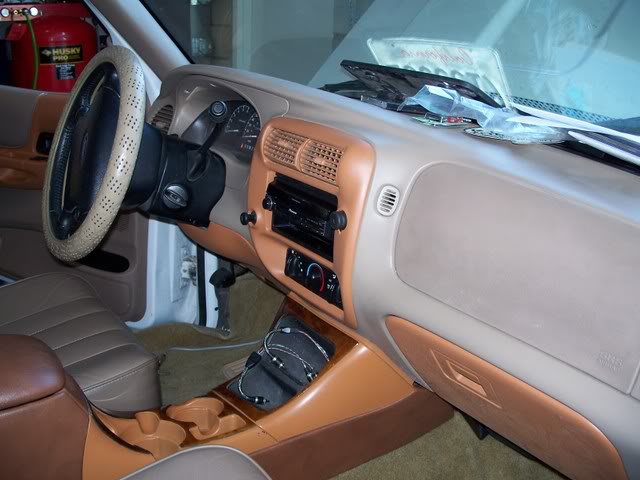
The speaker box with CD changer and AMPS installed. I love the way the AMP cover came out.
A better look at the radio and bezel. Sorry I forgot to take a pic of the 7" video screen in the up position.
The radio is all wired up and ready to go.
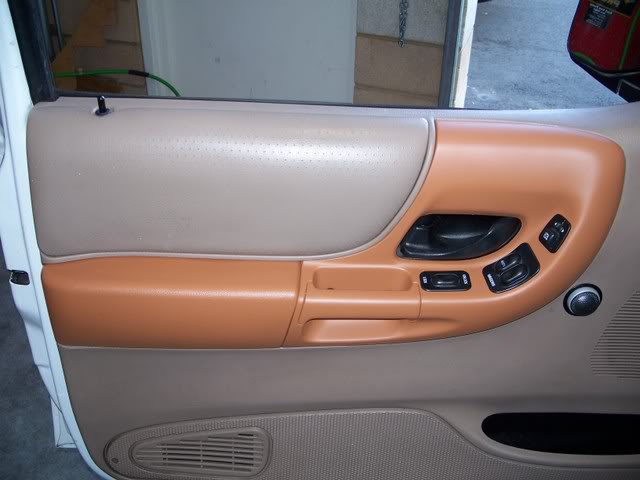
I like the way the door panel came out. With 20/20 hind sight I think I should have had the part
of the arm rest that's fabric covered done in the same material as the speaker box.
Just a few more things to do inside the cab at this point. Wire up the fog lights.
Install the over head console. Stuff like that.
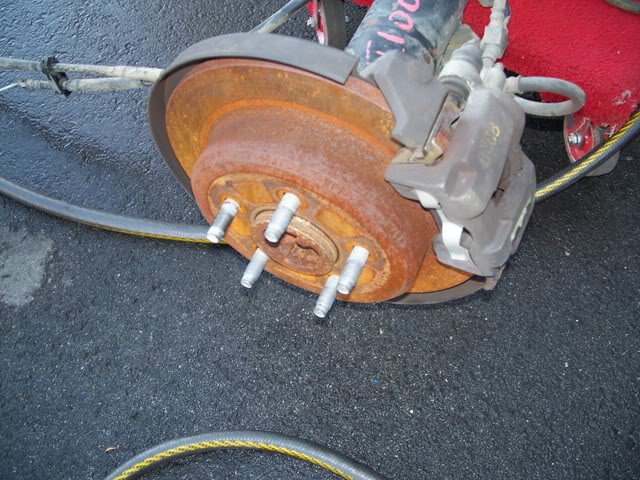
This is the 8.8" Explorer rear end with discs that will replace the stock 7" drum brake setup.
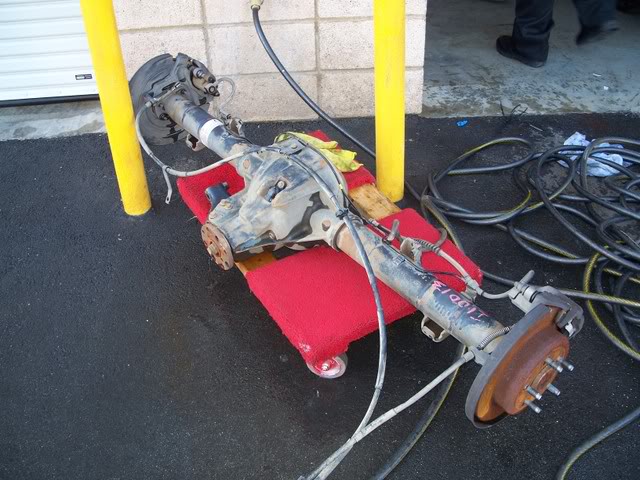
Guess you can tell from the photos I'm having the discs and pads replaced with new ones.
The speaker box with CD changer and AMPS installed. I love the way the AMP cover came out.
A better look at the radio and bezel. Sorry I forgot to take a pic of the 7" video screen in the up position.
The radio is all wired up and ready to go.
I like the way the door panel came out. With 20/20 hind sight I think I should have had the part
of the arm rest that's fabric covered done in the same material as the speaker box.
Just a few more things to do inside the cab at this point. Wire up the fog lights.
Install the over head console. Stuff like that.
This is the 8.8" Explorer rear end with discs that will replace the stock 7" drum brake setup.
Guess you can tell from the photos I'm having the discs and pads replaced with new ones.
Thread Starter
|
Member
Joined: Mar 2007
Posts: 331
Likes: 1
From: Spring City, TN
I'll be 70 in July and things that were fun 50 years ago, just aren't anymore.
I'm afraid the old joke about "it's takes me all night to do, what I use to do all night"
unfortunately is very much the case for me these days.


Besides with the 4/5 drop I was having problems getting in/out of some driveways
and over some speed bumps. Again something I could tolerate if I was 50 years younger.
But not today.
Thread Starter
|
Member
Joined: Mar 2007
Posts: 331
Likes: 1
From: Spring City, TN
Explorer overhead console installed.
This is my backup camera. It comes on automatically when the transmission is put in reverse.
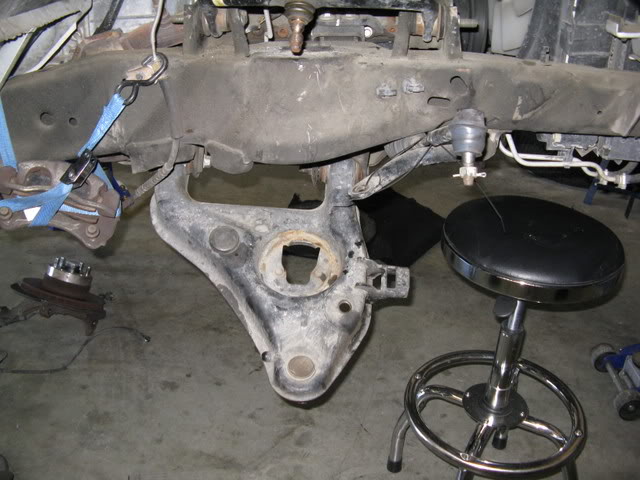
My 4 link air bag kit.
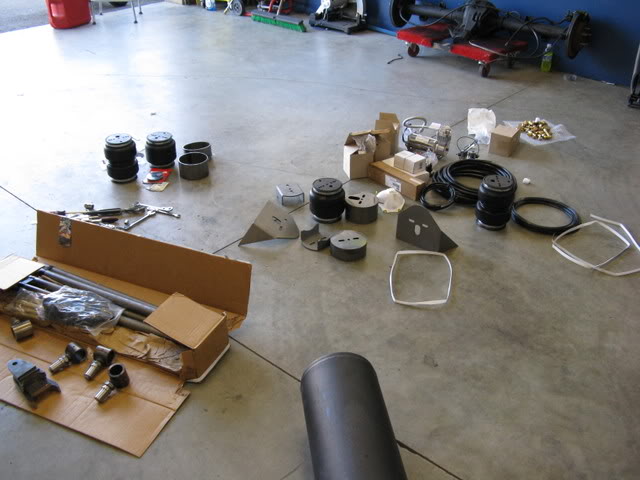
The notch installed in back. Rear and springs will be replaces by the Explorer rear and air bags.
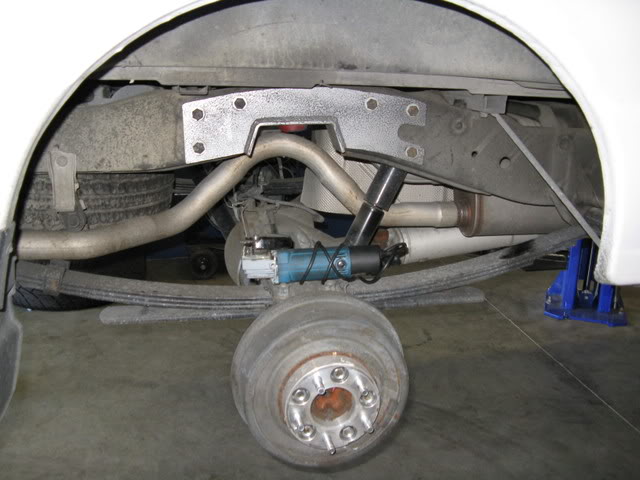
Front end disassembled and ready for the air bags to go in.
This is my backup camera. It comes on automatically when the transmission is put in reverse.
My 4 link air bag kit.
The notch installed in back. Rear and springs will be replaces by the Explorer rear and air bags.
Front end disassembled and ready for the air bags to go in.
Member
Joined: Jun 2004
Posts: 13
Likes: 3
From: Parma Ohio
Mark, If I was in my teens or 20's I probably could have lived with it.
I'll be 70 in July and things that were fun 50 years ago, just aren't anymore.
I'm afraid the old joke about "it's takes me all night to do, what I use to do all night"
unfortunately is very much the case for me these days.
Besides with the 4/5 drop I was having problems getting in/out of some driveways
and over some speed bumps. Again something I could tolerate if I was 50 years younger.
But not today.
Couple questions though for the back your just bagging it with the bolt in notch there? Not cutting up the frame for a 8 inch step notch to lay out?
Also looks up front your going ot bag on stock control arms? Did you not keep your DJM arms it would be easier for you to bag on them and also let you lay lower.
I give you mad props for building such a nice truck, I dont see many 70yrs building a badass truck like you are esp a lowered one to boot!


