
99 leaf springs+shocks

Thread Starter
|
Member

Joined: Jun 2010
Posts: 88
Likes: 0
From: Usa, Maryland
Hi all back again with another project underway. I figured out why my 99 ranger always leaned to the left, at first i assumed it was a sagging shock but it turns out that one of the driver side leaf springs has broken off(or left off by last owner during a rearend replacement) . I have read many forums and websites on the issue and have ordered 2 new 4 leaf spring replacements and 2 cheapo rear shocks(just incase) from JC Whitney Auto Parts & Auto Accessories - Car, Truck, Jeep, Motorcycle, VW, RV & ATV - Aftermarket Parts & Accessories. It will take awhile to ship but wanted to know if anyone has done this kinda work on 98+ rangers. Im changing from a 3 leaf to a 4 will there be any problems? Any helpful tips welcome ^^. will update later when parts show up. R-F rules 
Thread Starter
|
Member
Joined: Jun 2010
Posts: 88
Likes: 0
From: Usa, Maryland
for the x2 leaf springs was 99$ each and for both 225$ the shocks were 23$ each and 45$ both with shipping and crap total spent $297.93. Also i have read a few sites on changing the leafs most recommend doing both because 1 sagging causes the other to bend also over time and just replacing one might still leave a slight lean or damage the new one over time. adding links to parts (for the leaf springs look here http://www.jcwhitney.com/replacement...58y1999r200j1#) (Shocks here http://www.jcwhitney.com/guardian-sh...298d658y1999j1)
Last edited by Akuma; Oct 6, 2010 at 01:32 PM.
Member
Joined: May 2010
Posts: 224
Likes: 0
From: woonsocket RI
just make sure u spray the bolts a few time with rust penitrent did mine just over a year ago
broke my pass side off at the axle
did both of them and it rides ok on mine thow i went with a set that has 2 leafs instead of 3 but they are thicker than the factory by about 3/4inch
broke my pass side off at the axle
did both of them and it rides ok on mine thow i went with a set that has 2 leafs instead of 3 but they are thicker than the factory by about 3/4inch
Thread Starter
|
Member
Joined: Jun 2010
Posts: 88
Likes: 0
From: Usa, Maryland
UPDATE TIME- well both the shocks and new leafs showed up and we got to work on removing the old driver side leaf(pics at bottom omg its bad) we expected we might need a new bolt or 2 for it but we were way off. Turns out the leaf spring hanger/shackle used to secure the leaf springs to the frame are rusted to a point that removing the bolt holding the leaf spring will cause the entire hanger to tear from frame. So now im going to parts store tomarrow for 2 new shackles & hangers.... Has anyone removed these before they seem to be rivited in so a torch or good drill must be needed to remove.. any advice would be helpful, thanks for reading.


Uploaded with ImageShack.us


Uploaded with ImageShack.us
Member
Joined: May 2010
Posts: 224
Likes: 0
From: woonsocket RI
i had to do both sides on my truck this is how i did it
cut and x in the top of the rivet and then take a air hammer with a chisel and cut the head off with the chisel and then just push the rest out with a punch (cutting and x in the rivet makes them 10x easy to take off with the chisel )
then just use grade 8 bolts and nuts to put the new ones on
note -- make sure u check the metal thickness behind ware the old spring purch is mine was paper thin and needed to be replaced with plate
just wack the frame with a hammer and if the hammer gose thew it u need to fix it
this is what i did
Last edited by 0ranger99; Oct 15, 2010 at 07:20 PM.
Thread Starter
|
Member
Joined: Jun 2010
Posts: 88
Likes: 0
From: Usa, Maryland
Thanks for cutting advice 0ranger99 X pattern sounds like a great idea. Well both parts stores i tryed did not have the parts in i got them ordered and otw tomarrow but i just ran into another small issue the star socket to remove the bed is missing so i need a new one tomarrow also i noticed theres about 6 main star bolts holding bed down + rear lights which have been removed also the gas door area bolts, is there any other hidden bolts or wires i must disconnect before removing it?
Member
Joined: May 2010
Posts: 224
Likes: 0
From: woonsocket RI
not that i can think of
ive had my bed off so many time its take me like 10 min to have it ready to come off
i replace the torx bit bolts with regular grade 8 bolts front bolts on mine with body lift are like 10 inchs long the rear 4 bolts are 8 inchs i think
o and make sure u put antisize on those bed bolts when u put them back in ive broken mine 3 times and now since i put the antisize they havent broken and i had the bed off 4 times
Thread Starter
|
Member
Joined: Jun 2010
Posts: 88
Likes: 0
From: Usa, Maryland
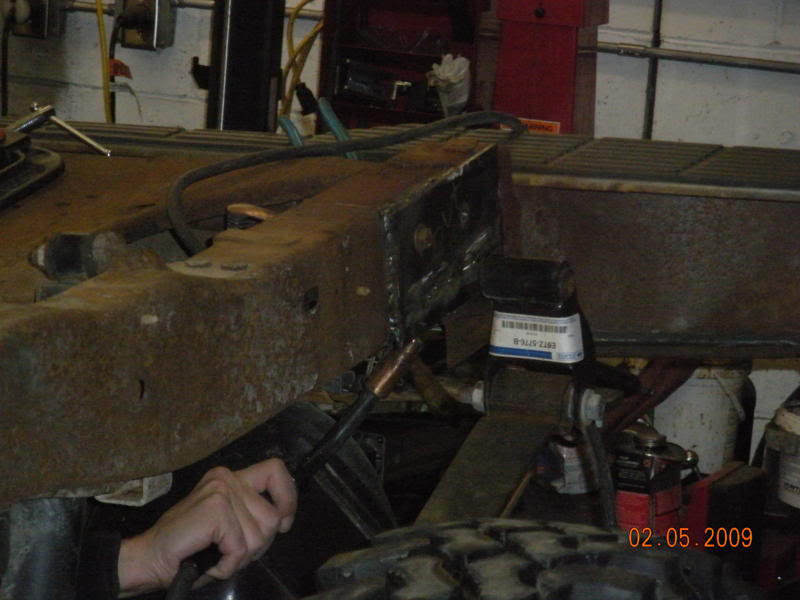
UPDATE: Well a great day of work 1 side done :) ran into minor issues but nothing to major.
First off had to pickup all parts and wait about 30 mins for the people to find them.. after we got started removing the bed, the 4 bolts at the rear and front had the worst wear but all removed without a break exept the front driver side it snapped off and must be fixed later. After removing the bed we could see how the frame looked really the front area seemed decent, but the rear had some heavy rust. We started by heating the 2 rivits then ended up using an air tool too cut through it and shave it down flush with the frame, the other 2 bolts seemed decent and reuseable. Then we hammered a good small prybar inbetween the frame and old rusted hanger and with a combined use of the flame and hammering pop'd the old one out with little effort. The new parts went in with no problems a hammer could not adjust and it looks great, 1 side and 2 shocks to go, posting some cool pics from today more work to come Sunday.


Uploaded with ImageShack.us
Thread Starter
|
Member
Joined: Jun 2010
Posts: 88
Likes: 0
From: Usa, Maryland
Well placing them on the outside will make it somewhat easy to remove them the next time around. Is there a reason doing this is bad? they dont seem to hit anything. Also i will be doing some sanding/rust proofing tomarrow i might remove them to spray a little better, but i still think vs removing the bed having them outside might be a plus since my airtool wont fit inside it when beds there.
Last edited by Akuma; Oct 16, 2010 at 07:08 PM.
Thread Starter
|
Member
Joined: Jun 2010
Posts: 88
Likes: 0
From: Usa, Maryland
If anyone can please tell me if this is a bad idea not just "your bolts are turned around" something more like a reason why its wrong, I could use the info about to start working on it now for other things

Thread Starter
|
Member
Joined: Jun 2010
Posts: 88
Likes: 0
From: Usa, Maryland
Yeah, I believe they are grade 8 according to the notches. They are the hardware/bolts that came with the replacement hangers. I do see where the frame is rusting thru near where the hanger bolts to the frame, which worries me some. It not a big area so it might not effect the hanger bolt.
Member
Joined: May 2010
Posts: 224
Likes: 0
From: woonsocket RI
one thing u may want to do is turn the bolt around that gose from the leaf spring to the shackle with it that way and with the bed on u may not be able to get it out all the way if the bed is on ?? not sure about that but i have mine the same way u do now
Thread Starter
|
Member
Joined: Jun 2010
Posts: 88
Likes: 0
From: Usa, Maryland
UPDATE: Well yet another day of great work found a few problems but fixed many more :) good news is the truck has been test driven and seems to feel great. We are about 80% complete on the project we must goto ford dealer for replacement bed clips and bolts, add rust remover/rubber coating to rest of frame, install new shocks, replace bed. :D very excited at how it will act/look when done uploading pics.

This is the other sides hanger shackle and springs before removal.


This is the rusted thru spot we noticed that had us a little concerned.

After shaving the rivits even with heating they acted fused to the frame and would not hammer out. So we cut the X pattern into the ends and heated in its center heating the bolt better then it tapped out very easy.

all rivits clear and the metal around the holes seems very solid.

close up of rusted hole.

new hanger shackle and leafspring installed.

new shackle and hanger


rust stopper+primer and finish rubber uncoating spray. 2nd side

heres the 1st side.
more work done soon stay tuned XD.
Thread Starter
|
Member
Joined: Jun 2010
Posts: 88
Likes: 0
From: Usa, Maryland
MAJOR UPDATE... ITS DONE! got frame rust proof/painted, new shocks installed(sitting much higher in rear and rides more stiff feeling, but much better feeling over bumps very nice and stable), got bed back on with all but 1 original bolt and clip, tail lights and tailgate installed. truck is complete i have a few pics of finished frame will post pics with bed on tomarrow need more light.


Wooo 180k and new shocks and springs hope truck has alot more life now after all this. I will post some more pics tomarrow in the afternoon with good lighting. thanks for all help and watching progress everyone.


Wooo 180k and new shocks and springs hope truck has alot more life now after all this. I will post some more pics tomarrow in the afternoon with good lighting. thanks for all help and watching progress everyone.
Last edited by Akuma; Oct 19, 2010 at 12:26 AM.
Thread Starter
|
Member
Joined: Jun 2010
Posts: 88
Likes: 0
From: Usa, Maryland
Its time for final post on this, truck sits and rides great now very happy with results. heres some pics of it now no lean and beds sitting even looking on frame now :D


i like this pic alot can see old mustang on tailgate XD


these next 2 are kinda off topic but random ranger seen leaving dump.


also saw this looks great older then mine but i like the tires and height.
Thanks again for all help and info everyone, tell me if u think it looks good :) good luck when you give it a try.
Last edited by Akuma; Oct 20, 2010 at 06:55 PM.

Thread
Thread Starter
Forum
Replies
Last Post
PUNKROCKPILOT
Suspension Tech
55
Jun 14, 2019 06:47 PM
mikerider
OLD - Suspension, Tires, & Wheels
12
Apr 11, 2012 07:38 PM
Sonic04Edge
Suspension Tech
9
May 27, 2011 03:36 PM


