6x9 Installation - Includes Pictures/Small How-To
#1
 08-20-2008


6x9 Installation - Includes Pictures/Small How-To
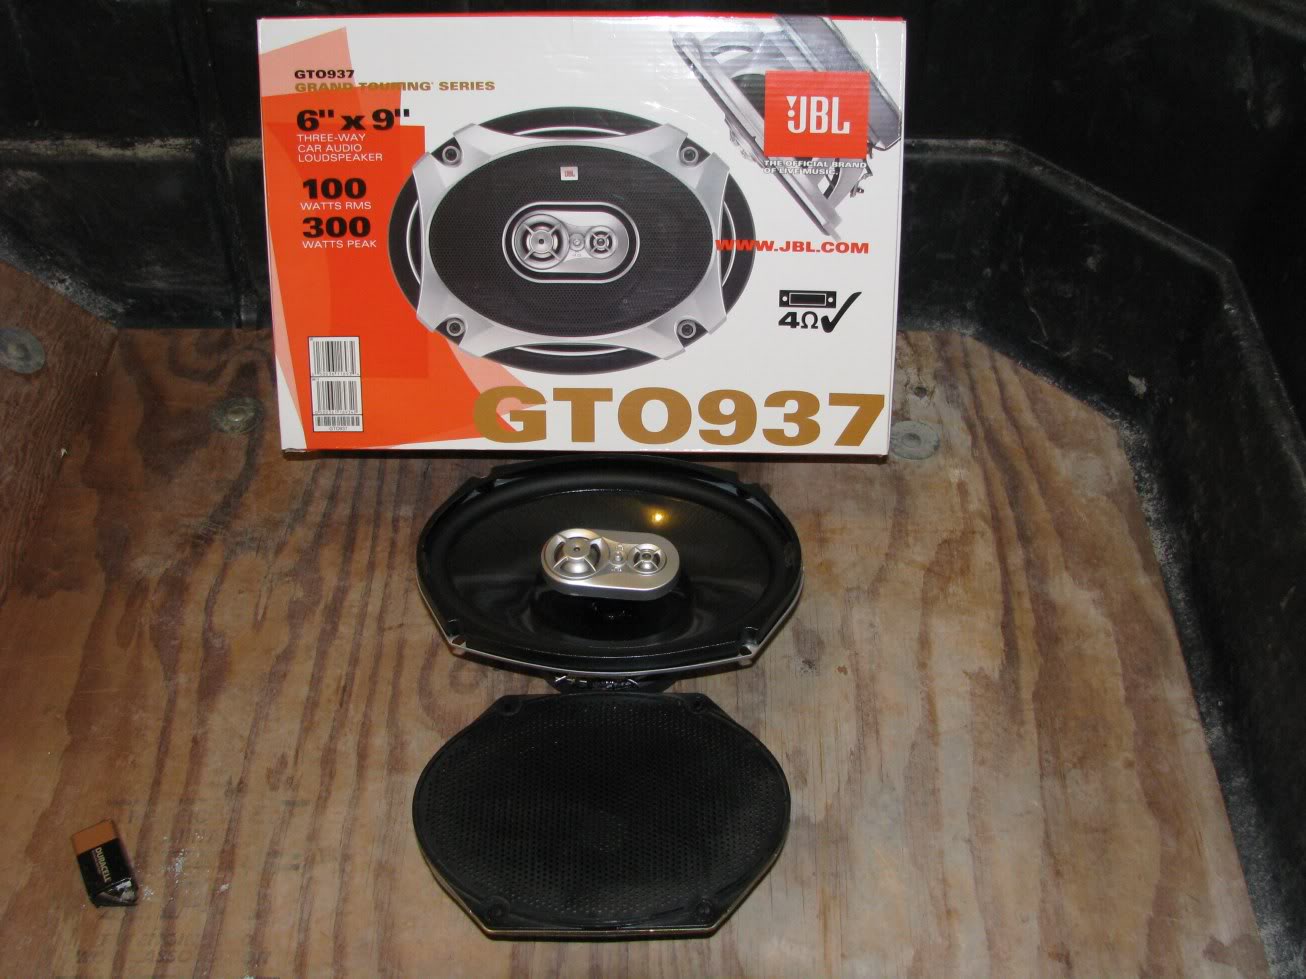
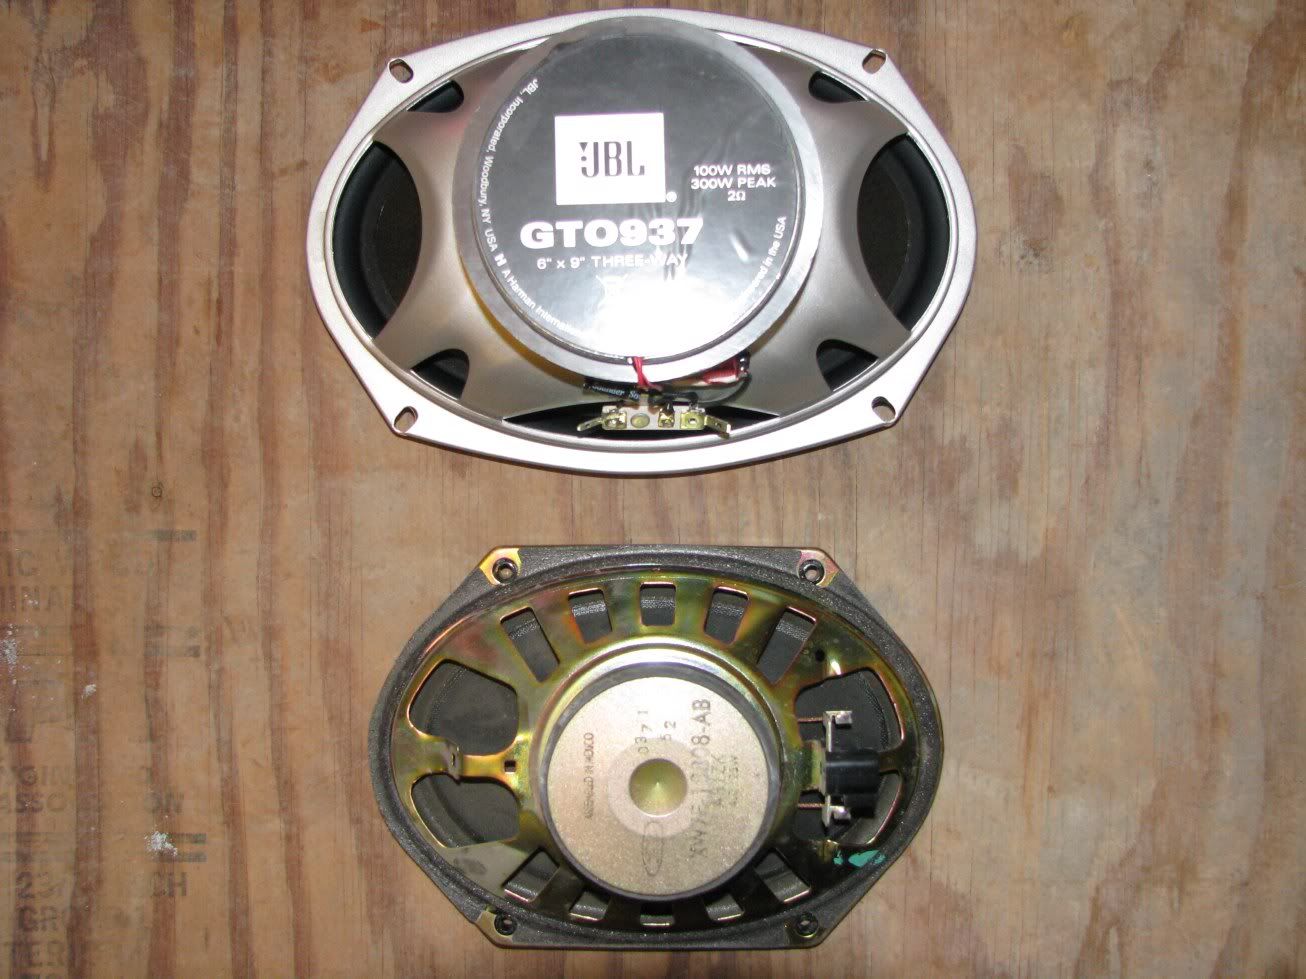
New speakers I ordered - 6x9 JBL 3 Ways.. stock speaker is on the bottom.
I had already done the drivers side door.. this is a very easy mod and only took me an hour and a half for the first door.. that was including unboxing the new speakers with its packaging, parking my truck, and getting my dremel, T-20, assorted screwdrivers, and a blanket out to cover my interior while dremeling the metal.
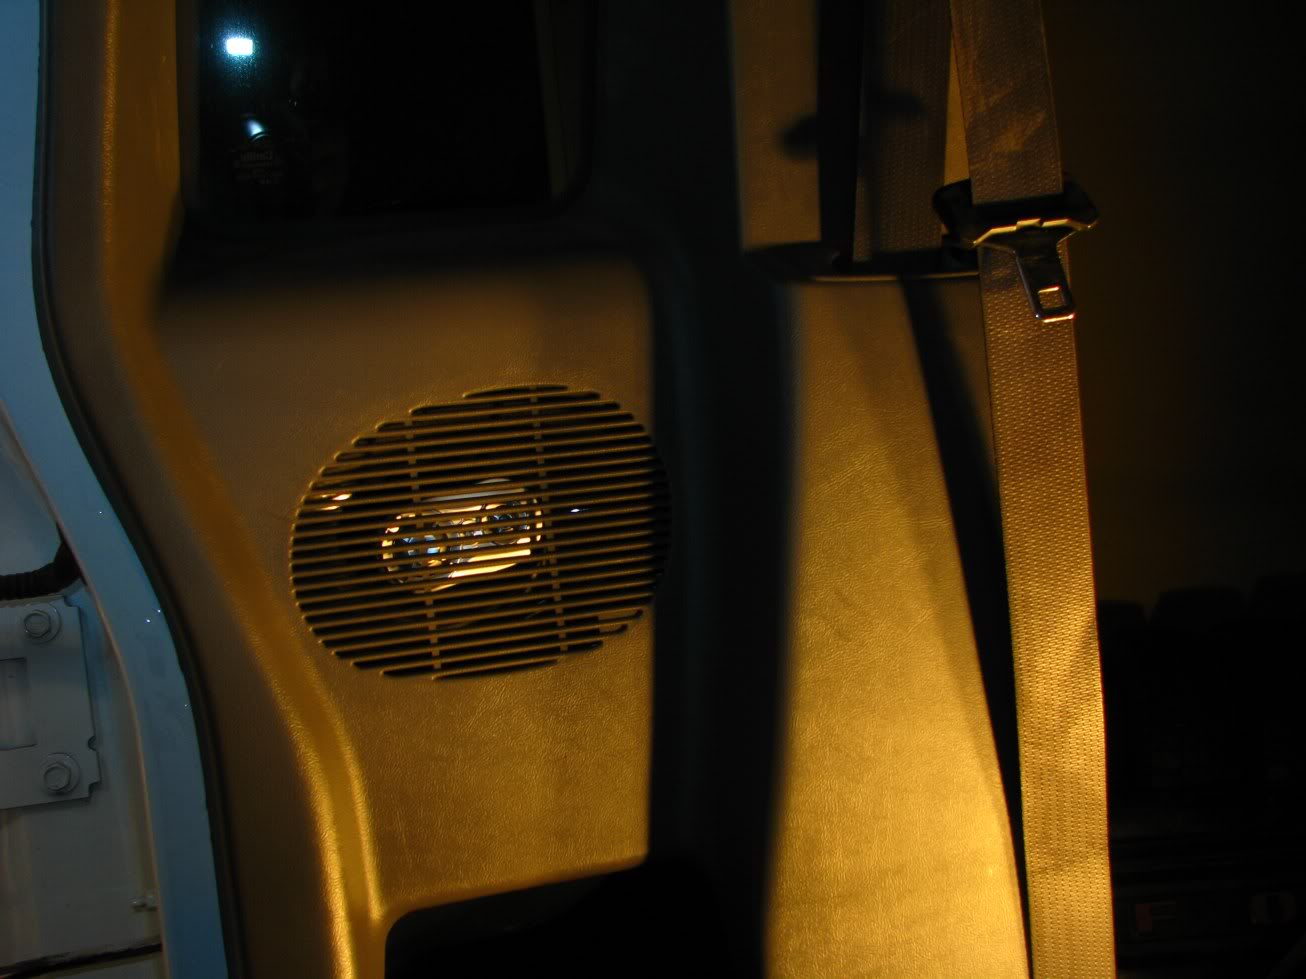
Showing the comparison on the rear end.. it really is a large step up from a standard stock speaker!

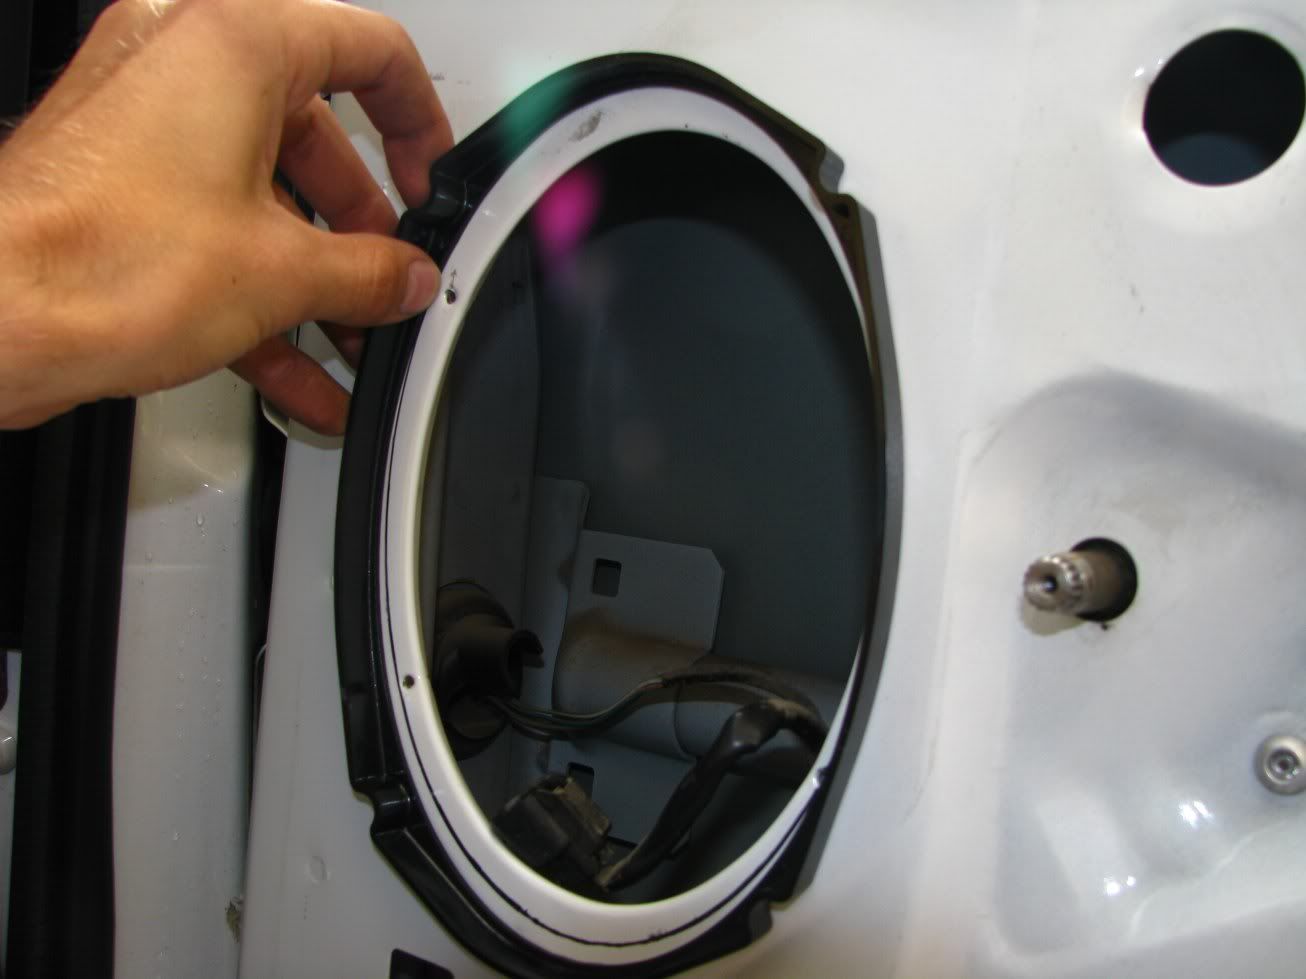
Remove the door panels (very easy), pull out old stock speaker + wiring (very easy as well) And then trace out a pattern for your cut. I was lucky enough to have a plastic piece that came with the faceplate on my own speakers that gave me the perfect size to fit the baffling in, and the speaker as well.

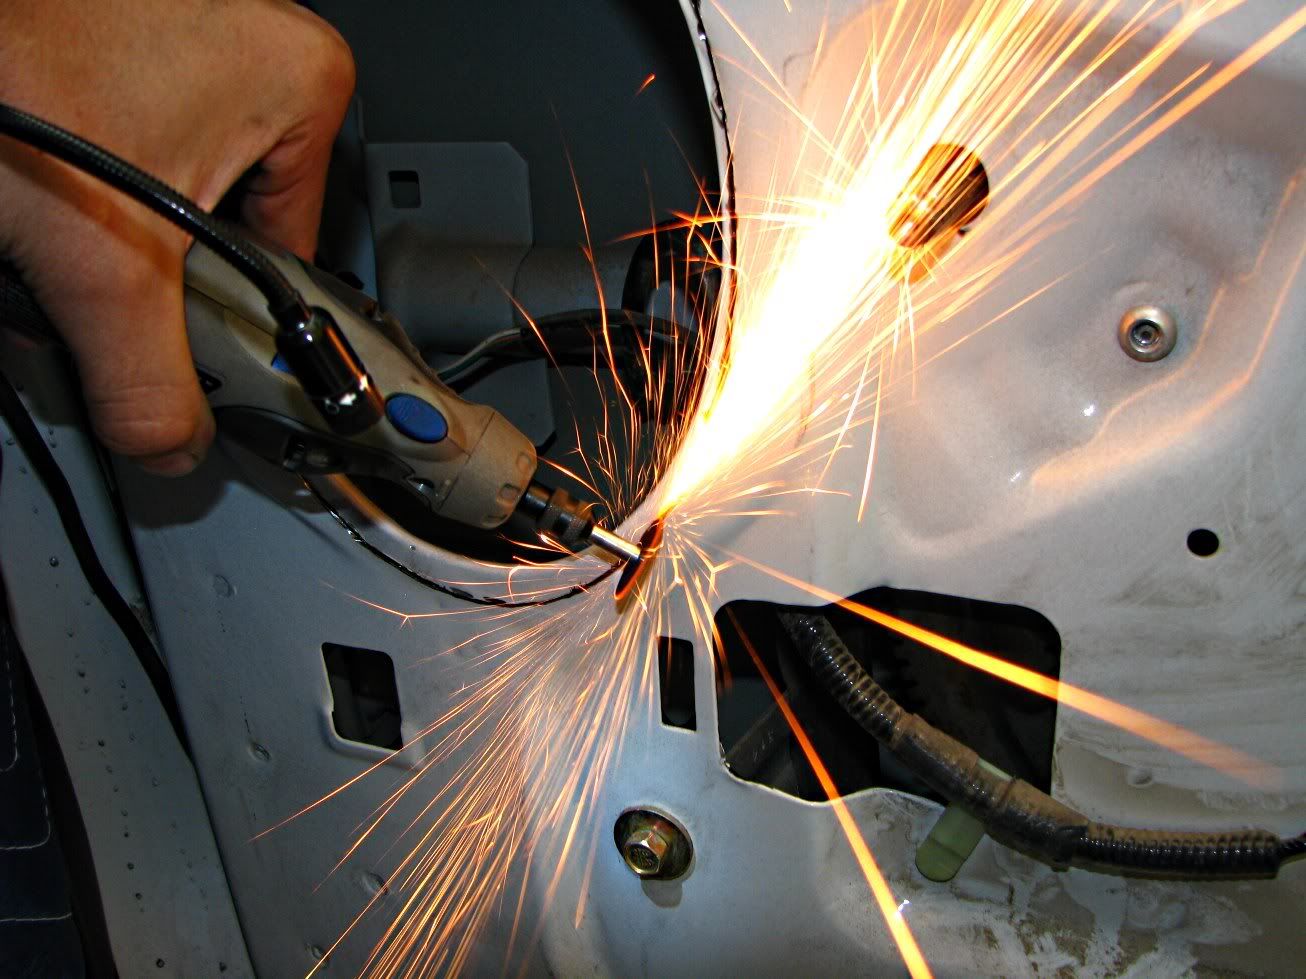
Take out your dremel and start cutting! Only takes 3 discs per speaker! Try to take a blanket and cover the interior carpeting/seats before starting this.. as it always gets messy!
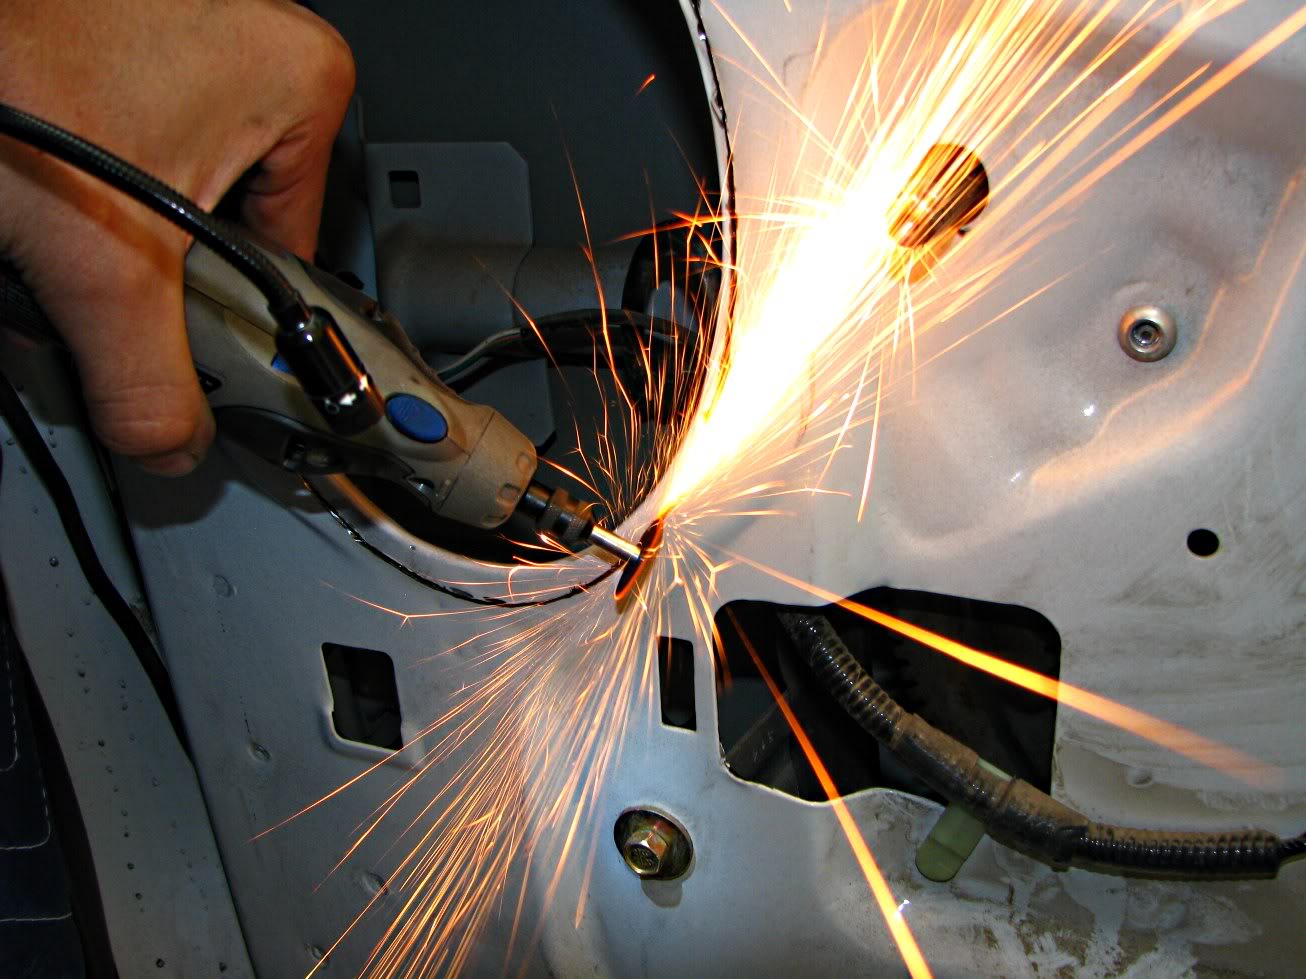
After the cut has been made, take out a rounded file and start cleaning off burrs! You dont want them to scratch up anything!

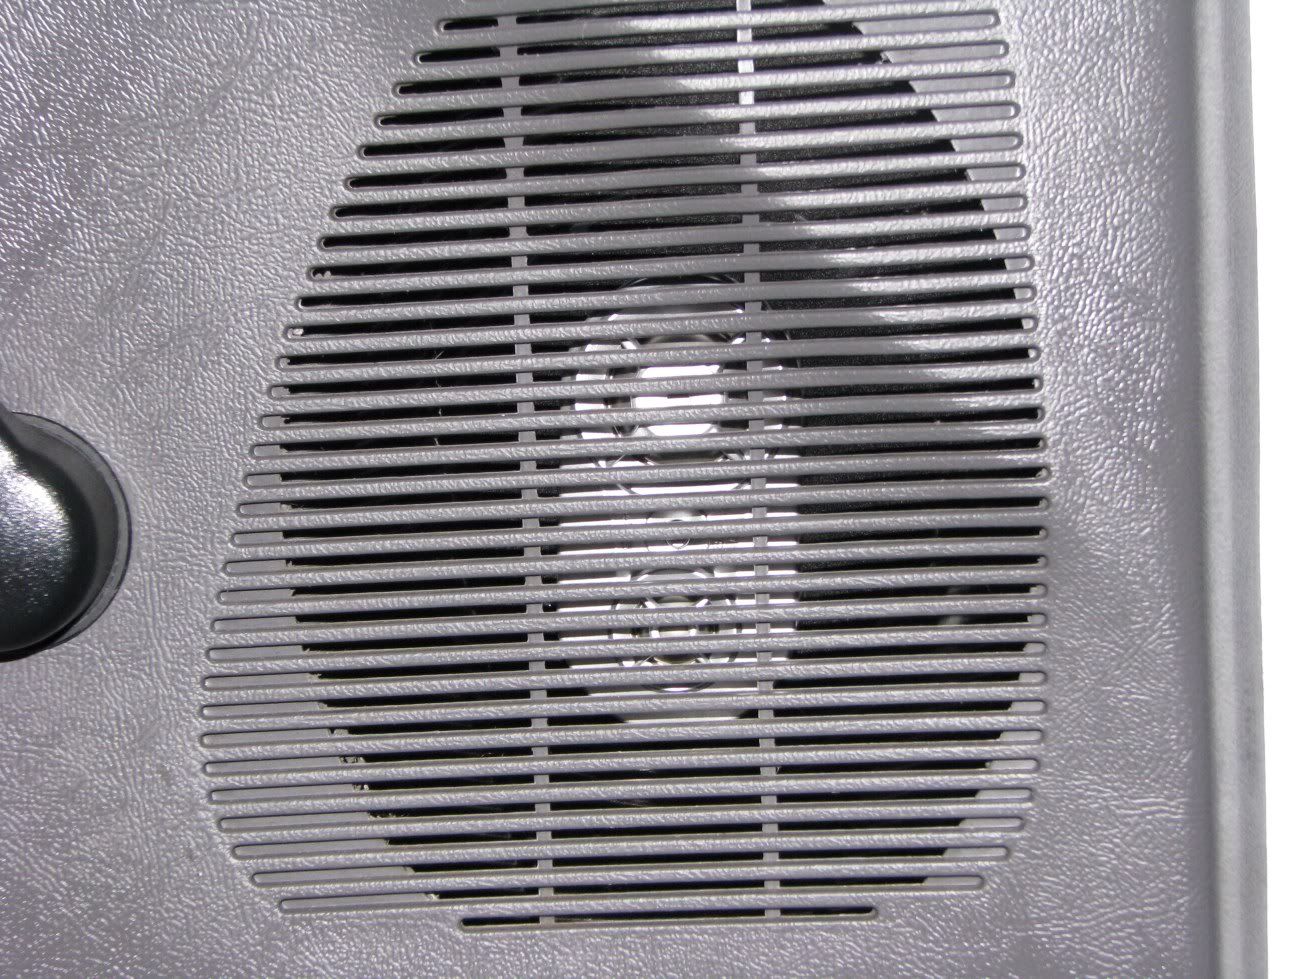
After you cleaned it up, test fit and/or install the speakers. In this picture, I put my 6x9 slim baffles in, routed the cables through the side, and went ahead and used some self-tapping screw to start the holes, and followed it up with the stock 6mm socket screws.
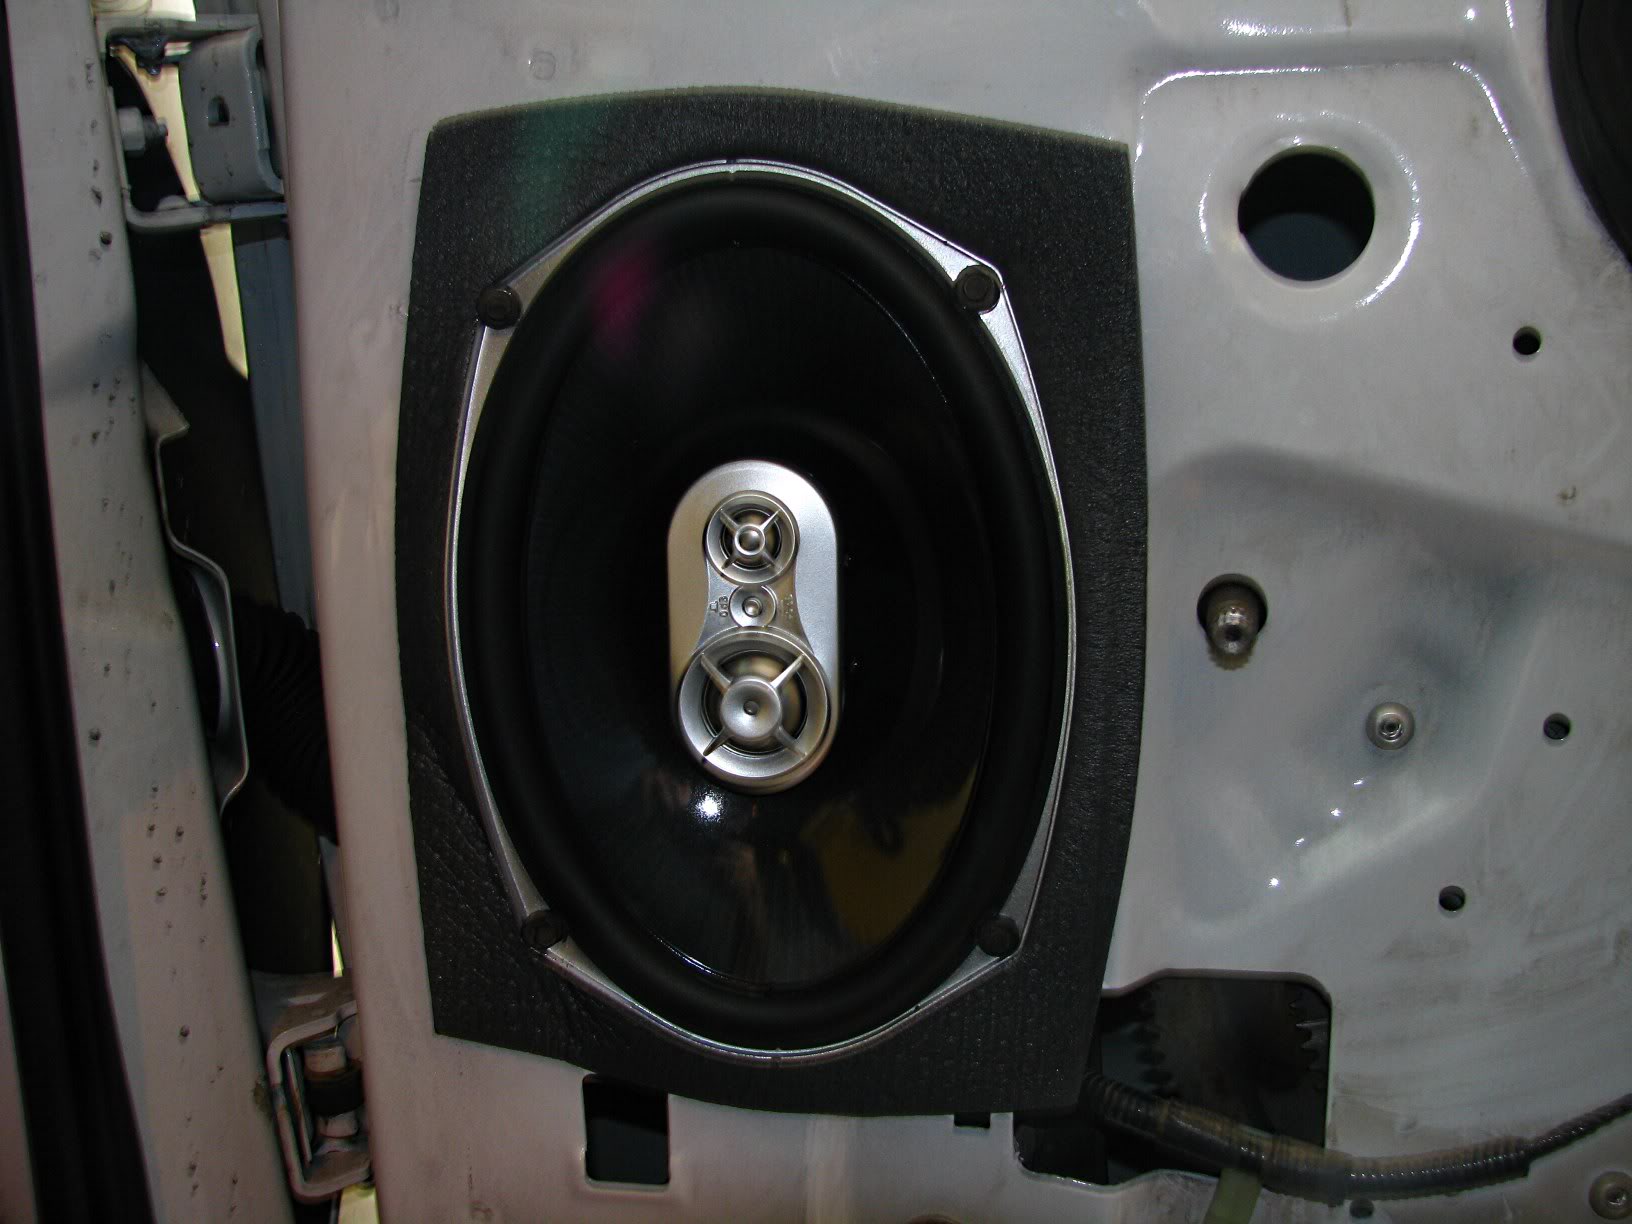
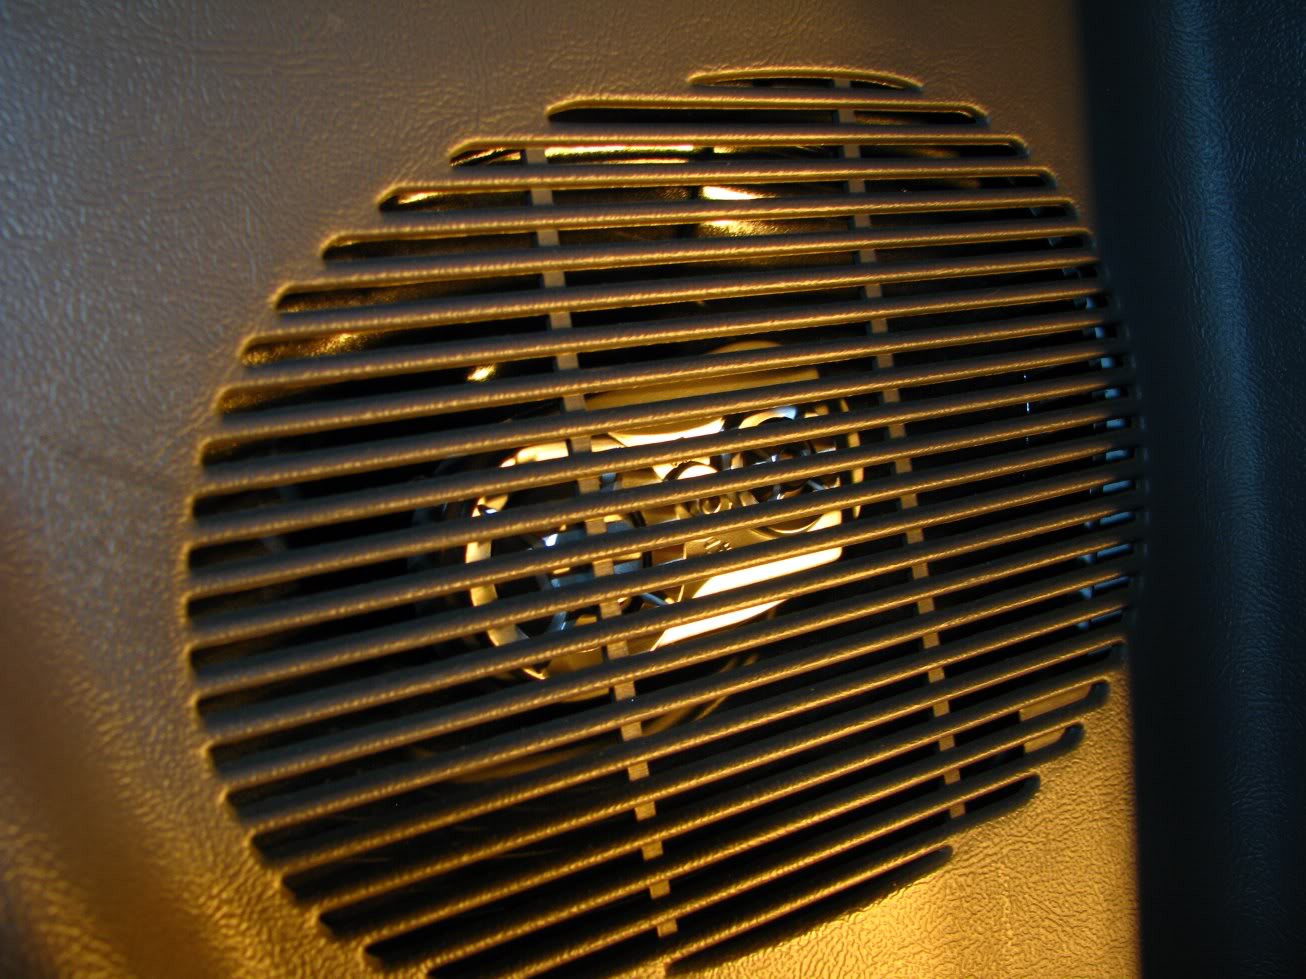
You will have to dremel off the "lip" around the door opening for the speaker inside the door.. you'll see what I mean.. easy to accomplish! Fits like a glove, nice and perfect, looks nice too! Sounds MUCH better then stock (and I do have an aftermarket headunit as well)
This is a rather easy mod to do.. I knew going in that it woudl take me less then 3 hours to do everything.. took almost exactly three if you include cleaning everything up when I was done and putting it all back.
I had already done the drivers side door.. this is a very easy mod and only took me an hour and a half for the first door.. that was including unboxing the new speakers with its packaging, parking my truck, and getting my dremel, T-20, assorted screwdrivers, and a blanket out to cover my interior while dremeling the metal.
Showing the comparison on the rear end.. it really is a large step up from a standard stock speaker!
Remove the door panels (very easy), pull out old stock speaker + wiring (very easy as well) And then trace out a pattern for your cut. I was lucky enough to have a plastic piece that came with the faceplate on my own speakers that gave me the perfect size to fit the baffling in, and the speaker as well.
Take out your dremel and start cutting! Only takes 3 discs per speaker! Try to take a blanket and cover the interior carpeting/seats before starting this.. as it always gets messy!
After the cut has been made, take out a rounded file and start cleaning off burrs! You dont want them to scratch up anything!
After you cleaned it up, test fit and/or install the speakers. In this picture, I put my 6x9 slim baffles in, routed the cables through the side, and went ahead and used some self-tapping screw to start the holes, and followed it up with the stock 6mm socket screws.
You will have to dremel off the "lip" around the door opening for the speaker inside the door.. you'll see what I mean.. easy to accomplish! Fits like a glove, nice and perfect, looks nice too! Sounds MUCH better then stock (and I do have an aftermarket headunit as well)
This is a rather easy mod to do.. I knew going in that it woudl take me less then 3 hours to do everything.. took almost exactly three if you include cleaning everything up when I was done and putting it all back.
Last edited by WowMike2001; 08-30-2008 at 04:05 AM.
#2
08-20-2008
#3
08-20-2008
I plan on installing another 2 6x9 JBL 3-ways in the rear doors, then 4-channel amping them with 100 apiece.. should sound pretty decent when its all finished up :-)

#5
08-20-2008
#8
08-20-2008
#9
08-30-2008
Just installed 1 of my rear speakers.. got the box in earlier today, had a small misshap as I didnt recieve any of my factory wiring harness's from crutchfield.. but since I was eager to get them in.. I did the next step, cut the harness off and soldered some connecting tips on the ends... heres a couple pictures of what the rear looks like with them successfully put in.
#11
08-30-2008
The baffles should fit regardless.. I honestly took out the baffles.. long story short, with this size of speaker you dont need them.. they KILL any low end bass... so both of the front baffles are pulled out and sitting in the back of my truck right now; not using baffles on the rear as well :-)


#13
11-12-2008
Join Date: Nov 2008
Location: Commerce, Mi
Posts: 3
Likes: 0
Received 0 Likes
on
0 Posts
#14
11-12-2008

Join Date: Sep 2007
Location: LANSING, MI
Posts: 339
Likes: 0
Received 0 Likes
on
0 Posts
and what did you gain by putting 6x9's in? nothing. i would have rather seen you go with a nice set of 6 1/2" components in the front and 5x7's in the rear. you are loosing sound quality with the 6x9's maybe gain a lil midbass but that can be made up with an amped comp set and a subwoofer
#15
11-22-2008
#16
11-22-2008
Why wouldn't you be able to? It's the exact same as one with doors,except it doesn't open. Just have to pull off all the plastic trim to get at the speakers.

#19
11-23-2008
Join Date: Dec 2007
Location: Albuquerque, NM
Posts: 324
Likes: 0
Received 0 Likes
on
0 Posts
Maybe I'm just ignorant but I dont see that you really gain anything by putting 6x9s instead of 6x8s in. Sure its a very slightly bigger woofer so you'll get a small amount of bass increase but hardly noticeable. Unless you get a killer deal on the speaks or something it seems like more work than its worth. Kind of pointless in my opinion.
#20
11-23-2008

#24
11-24-2008
Join Date: Dec 2007
Location: Albuquerque, NM
Posts: 324
Likes: 0
Received 0 Likes
on
0 Posts
#25
11-04-2010


New speakers I ordered - 6x9 JBL 3 Ways.. stock speaker is on the bottom.
I had already done the drivers side door.. this is a very easy mod and only took me an hour and a half for the first door.. that was including unboxing the new speakers with its packaging, parking my truck, and getting my dremel, T-20, assorted screwdrivers, and a blanket out to cover my interior while dremeling the metal.

Showing the comparison on the rear end.. it really is a large step up from a standard stock speaker!
Remove the door panels (very easy), pull out old stock speaker + wiring (very easy as well) And then trace out a pattern for your cut. I was lucky enough to have a plastic piece that came with the faceplate on my own speakers that gave me the perfect size to fit the baffling in, and the speaker as well.
Take out your dremel and start cutting! Only takes 3 discs per speaker! Try to take a blanket and cover the interior carpeting/seats before starting this.. as it always gets messy!
After the cut has been made, take out a rounded file and start cleaning off burrs! You dont want them to scratch up anything!

After you cleaned it up, test fit and/or install the speakers. In this picture, I put my 6x9 slim baffles in, routed the cables through the side, and went ahead and used some self-tapping screw to start the holes, and followed it up with the stock 6mm socket screws.

You will have to dremel off the "lip" around the door opening for the speaker inside the door.. you'll see what I mean.. easy to accomplish! Fits like a glove, nice and perfect, looks nice too! Sounds MUCH better then stock (and I do have an aftermarket headunit as well)
This is a rather easy mod to do.. I knew going in that it woudl take me less then 3 hours to do everything.. took almost exactly three if you include cleaning everything up when I was done and putting it all back.
I had already done the drivers side door.. this is a very easy mod and only took me an hour and a half for the first door.. that was including unboxing the new speakers with its packaging, parking my truck, and getting my dremel, T-20, assorted screwdrivers, and a blanket out to cover my interior while dremeling the metal.
Showing the comparison on the rear end.. it really is a large step up from a standard stock speaker!
Remove the door panels (very easy), pull out old stock speaker + wiring (very easy as well) And then trace out a pattern for your cut. I was lucky enough to have a plastic piece that came with the faceplate on my own speakers that gave me the perfect size to fit the baffling in, and the speaker as well.
Take out your dremel and start cutting! Only takes 3 discs per speaker! Try to take a blanket and cover the interior carpeting/seats before starting this.. as it always gets messy!
After the cut has been made, take out a rounded file and start cleaning off burrs! You dont want them to scratch up anything!
After you cleaned it up, test fit and/or install the speakers. In this picture, I put my 6x9 slim baffles in, routed the cables through the side, and went ahead and used some self-tapping screw to start the holes, and followed it up with the stock 6mm socket screws.
You will have to dremel off the "lip" around the door opening for the speaker inside the door.. you'll see what I mean.. easy to accomplish! Fits like a glove, nice and perfect, looks nice too! Sounds MUCH better then stock (and I do have an aftermarket headunit as well)
This is a rather easy mod to do.. I knew going in that it woudl take me less then 3 hours to do everything.. took almost exactly three if you include cleaning everything up when I was done and putting it all back.


