


Found a piece of corn stalk in my front axle dust boot


Found a piece of corn stalk in my front axle dust boot
So when i was installing my pre-keys, i noticed a 5in piece of corn stalk sticking out of the front axle's dust boot. (i don't know if i got it when i went home in december or if i got it playing in a friends corn field.) anyway, when i pulled it out there was some pretty thick grease on it.

(image isn't mine, obviously)
How hard is it to replace? i know it's a dealer part so no matter what it's going to be expensive.
there's no noise or anything coming from it.
(image isn't mine, obviously)
How hard is it to replace? i know it's a dealer part so no matter what it's going to be expensive.
there's no noise or anything coming from it.

Member
Joined: May 2004
Posts: 4,926
Likes: 1
From: Lewiston, Maine

this might help out
CV axle re boot instructions--- With Pictures!!! - Ford Explorer Ranger Enthusiasts Serious Explorations
CV axle re boot instructions--- With Pictures!!! - Ford Explorer Ranger Enthusiasts Serious Explorations
Well, since I have my truck dis assembled for a very major repair, I had my cv's removed.
I had noticed earlier, the passenger side which I had replaced last summer, had a
"caved in" boot. It no longer acordianed quite right. it isn't cut or split, but it bugged me.
I have 2 of these new boot kits laying around, and, decided since my original cv was replaced only because the boot was torn, it would be a good practice.
Well, it went so well, I do think I have saved the original. and, will use the "remanufactured" as a spare.
I was half way into it, before it hit me to do a how to,
forgive me, as the pictures take up after the cv itself had been cleaned. I will try to used cleaned pics for dis assembly instructions.
Now we will learn together, as I have never had one of these apart before in my life. This is a figure it out as you go deal.
Here is the kit as it comes, with part number

Inside, you will find a boot, a thing of new grease, new metal retaining straps, 2 new metal snap retainers and a cotter pin

This procedure assumes you have the cv axle removed from the truck
CV Axle Replacement How To (Pictures) - Ford Explorer Ranger Enthusiasts Serious Explorations
Be sure the vehicle is supported well, and, wheels are chokked
Here are the tools I used--( minus a set of side cutters)

Pair of lineman pliers
needle nose pliers
internal snap ring pliers
screw driver
hammer
razor blade for cutting the boot
also you want a grease gun loaded with good grease, and,optionally a sealed bearing grease nozzle for the grease gun

Begin by snipping prying what have you to remove the metal rings on the old boot. Don't worry, as you have new stuff. Once you have the larger ring off the end cup will slide off.
Cut the remaining boot off the shaft. Inside a torn boot you will find this choco mocha pudding, which, does not taste like choco mocha pudding at all, and, is nooo good

the whole mess will come apart, and look like this, but dirtier

Now, look under the 3 rollers, and you will see a snap ring riding in a groove, which stops the roller assembly from sliding further on the splines

using a snap ring plier, open up the ring enough to slide it down the shaft, like this

this will allow the roller assembly to slide down like this

which will expose the smaller wire retaining ring

Remove the outer ring, and, slide the roller assembly off the shaft
Take note of the inner splines--the blank goes toward the end of the shaft

Clean it all up real good. I used brake cleaner, then sprayed it down with liquid lube.

Now for re assembly
slide on the smaller retaining strap

Slide the new boot onto the shaft. it should be hard to slide. If you need some lube, use some spit,and slide it up until it "snaps" onto it's groove.
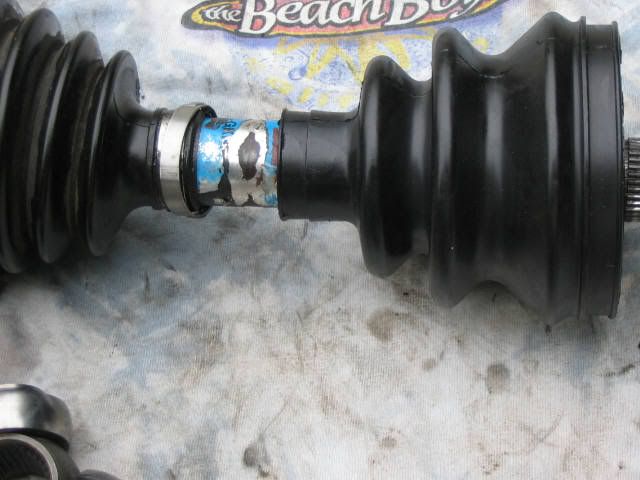
install the metal strap over it and lock it tight

at this time let's look at the straps
they come "locked" like this

you can unlock em one handed, like this

to allow them to go over the boot, once it is in place
once you have them snapped back together, use a side cutter, and , carefully WITHOUT CUTTING pinch in on the lower portion of the bulged area like this to tighten them down. I used the hammer to tap them down flat when tightened well

Now back to the cv joint----
Install the new lower ring like this
slide on the roller assembly
install the new outer retaining ring
Pull out on the roller assembly now, until you get the outer ring seated under it, and, slide the lower snap ring up into it's groove
ok, now the fun
grease up all the rollers well, squirt grease in all areas with the fitting on the grease gun until you are sure there are no dry areas
now, use the supplied grease and fill up the "cup" end ,

Slide the 2 parts together

Now, Maybe I am wrong here, but I squirted in a lot more grease on top of the mess, rotating the shaft until it was all covered

and slide the boot on over it

lock on the large retainer strap
And put the thing back in your truck

Hopefully, this will help someone save a few bucks
I had noticed earlier, the passenger side which I had replaced last summer, had a
"caved in" boot. It no longer acordianed quite right. it isn't cut or split, but it bugged me.
I have 2 of these new boot kits laying around, and, decided since my original cv was replaced only because the boot was torn, it would be a good practice.
Well, it went so well, I do think I have saved the original. and, will use the "remanufactured" as a spare.
I was half way into it, before it hit me to do a how to,
forgive me, as the pictures take up after the cv itself had been cleaned. I will try to used cleaned pics for dis assembly instructions.
Now we will learn together, as I have never had one of these apart before in my life. This is a figure it out as you go deal.
Here is the kit as it comes, with part number
Inside, you will find a boot, a thing of new grease, new metal retaining straps, 2 new metal snap retainers and a cotter pin
This procedure assumes you have the cv axle removed from the truck
CV Axle Replacement How To (Pictures) - Ford Explorer Ranger Enthusiasts Serious Explorations
Be sure the vehicle is supported well, and, wheels are chokked
Here are the tools I used--( minus a set of side cutters)
Pair of lineman pliers
needle nose pliers
internal snap ring pliers
screw driver
hammer
razor blade for cutting the boot
also you want a grease gun loaded with good grease, and,optionally a sealed bearing grease nozzle for the grease gun
Begin by snipping prying what have you to remove the metal rings on the old boot. Don't worry, as you have new stuff. Once you have the larger ring off the end cup will slide off.
Cut the remaining boot off the shaft. Inside a torn boot you will find this choco mocha pudding, which, does not taste like choco mocha pudding at all, and, is nooo good
the whole mess will come apart, and look like this, but dirtier
Now, look under the 3 rollers, and you will see a snap ring riding in a groove, which stops the roller assembly from sliding further on the splines
using a snap ring plier, open up the ring enough to slide it down the shaft, like this
this will allow the roller assembly to slide down like this
which will expose the smaller wire retaining ring
Remove the outer ring, and, slide the roller assembly off the shaft
Take note of the inner splines--the blank goes toward the end of the shaft
Clean it all up real good. I used brake cleaner, then sprayed it down with liquid lube.
Now for re assembly
slide on the smaller retaining strap
Slide the new boot onto the shaft. it should be hard to slide. If you need some lube, use some spit,and slide it up until it "snaps" onto it's groove.
install the metal strap over it and lock it tight
at this time let's look at the straps
they come "locked" like this
you can unlock em one handed, like this
to allow them to go over the boot, once it is in place
once you have them snapped back together, use a side cutter, and , carefully WITHOUT CUTTING pinch in on the lower portion of the bulged area like this to tighten them down. I used the hammer to tap them down flat when tightened well
Now back to the cv joint----
Install the new lower ring like this
slide on the roller assembly
install the new outer retaining ring
Pull out on the roller assembly now, until you get the outer ring seated under it, and, slide the lower snap ring up into it's groove
ok, now the fun
grease up all the rollers well, squirt grease in all areas with the fitting on the grease gun until you are sure there are no dry areas
now, use the supplied grease and fill up the "cup" end ,
Slide the 2 parts together
Now, Maybe I am wrong here, but I squirted in a lot more grease on top of the mess, rotating the shaft until it was all covered
and slide the boot on over it
lock on the large retainer strap
And put the thing back in your truck
Hopefully, this will help someone save a few bucks



Go ahead and buy the CV grease (or any grease that specifically has CV joints as an application). I worked on a professional race team that worked on cutting costs wherever they could we always used the real stuff. If there was a cheaper substitute, we would have been using it.
Just for a frame of reference, we secured CV boots using heavy zip ties that were tightened with a pair of needle-nose pliers, instead of the metal clips.
Just for a frame of reference, we secured CV boots using heavy zip ties that were tightened with a pair of needle-nose pliers, instead of the metal clips.

Thread
Thread Starter
Forum
Replies
Last Post
NewShockerGuy
OLD - Interior, Exterior, Electrical, & Misc.
4
Jan 7, 2012 11:34 PM
1996Ranger4x4SuperCabSTX
OLD - Engine & Drivetrain
6
Nov 6, 2009 10:46 AM


