
How-To: Install 06+ Mirrors


Joined: May 2005
Posts: 21,721
Likes: 16
From: Boring, Oregon
How-To: Install 06+ Mirrors
Original thread: https://www.ranger-forums.com/f59/ho...ht-way-107483/
Let the modding Begin!!
_________________________
How-To: Install 06+ Mirrors
This how-to shows you how to install 2006+ Ranger mirrors into a 2005 and older truck WITHOUT modifying the truck in any way.
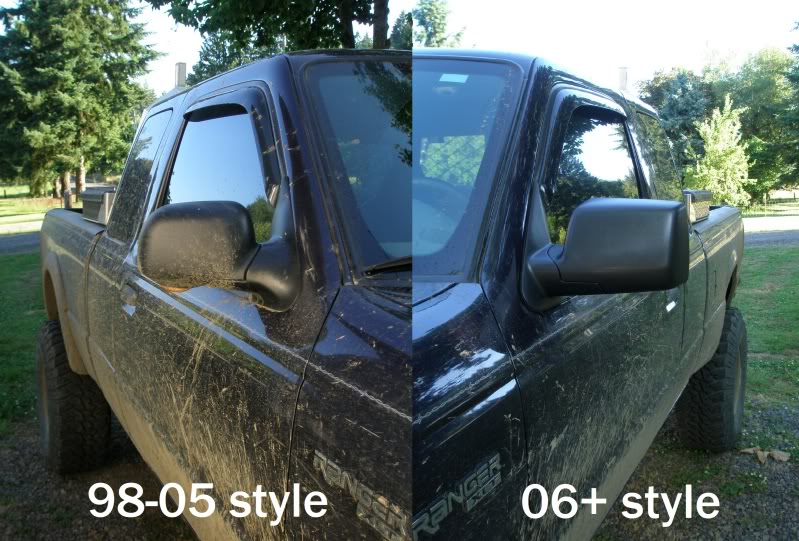
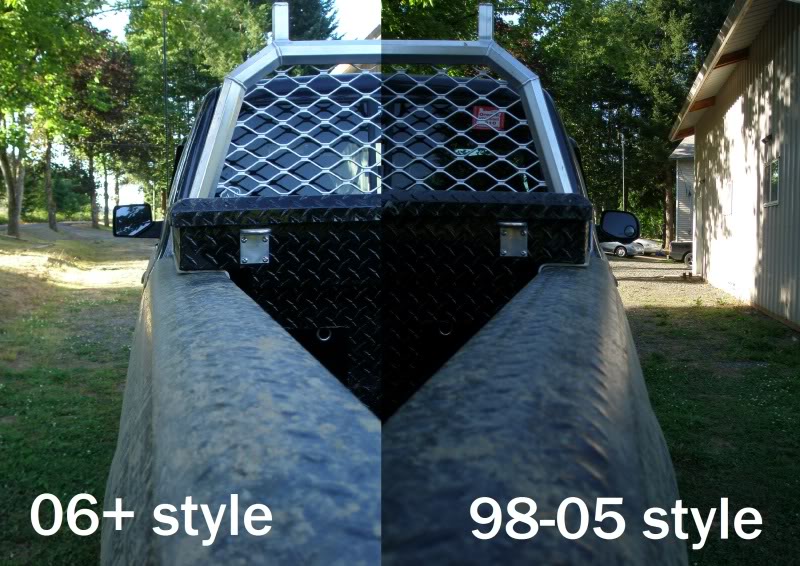
This mod is perfect for someone wanting not only a new look on their truck, but much better visibility out the sides. I noticed, and still notice, a very big improvement in seeing your surroundings over the 98-05 "styled" mirrors. I absolutely love them. They're not towing mirrors by any means, but a HUGE improvement over the older style mirrors. Overall glass is a little bit wider, but a whole lot taller. And I think the passenger side glass is more convex than the previous mirror style.
Materials needed:
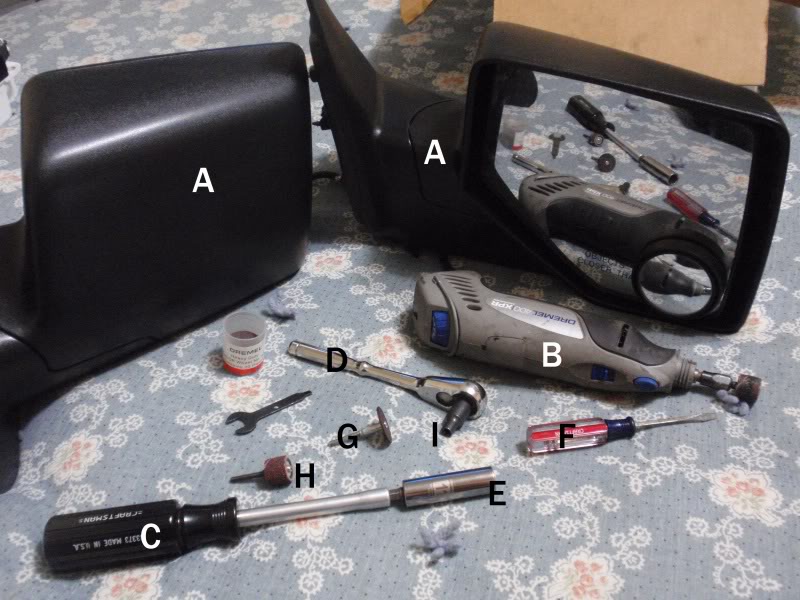
A: ‘06+ Mirrors (duh!)
B: Dremel Tool (Or hack saw)
C: Nut Driver
D: �” Ratchet
E: 11mm socket
F: Small flat head screw driver
G: Cut-off wheel for Dremel
H: Sanding drum for Dremel
I: E6 socket(external torx)
There was less “impressive” tools that can get this done…using a hacksaw and sandpaper. But what a pain that would be! lol.
Difficultly level: 2 out of 10
Time spend on mod: Less than 1 hour.
Note1: I will not cover how to remove the door panel to remove the mirror….those how-to’s can be found elsewhere, though I may add it to this how-to at a later date.
Note2: I do not have a power optioned truck, so this how-to in it's current state will not cover it. But I do know there are wiring plug differences between 06+ and '05 and older. You will have to retrofit your trucks existing pigtail onto the new mirrors. I do not have the info at this time to add this to the how-to, but look forward to making that happen sometime...SO STAY TUNED!!!
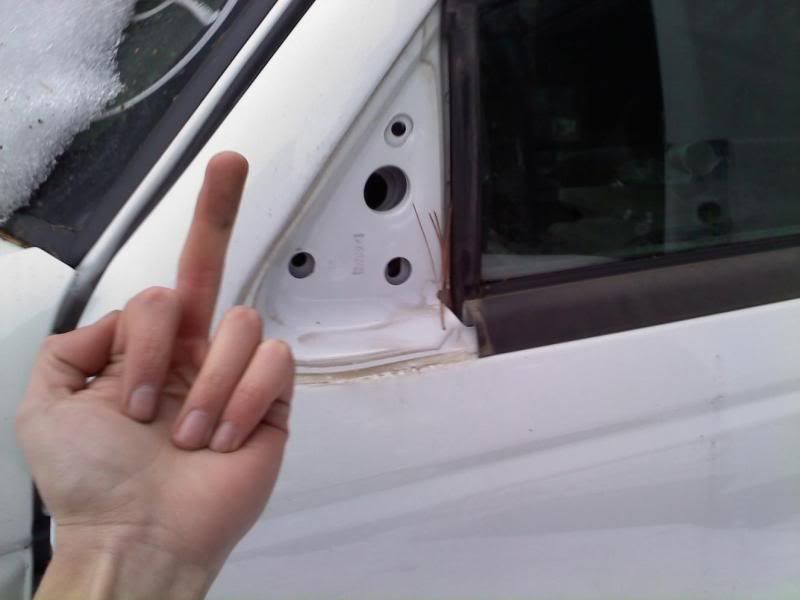
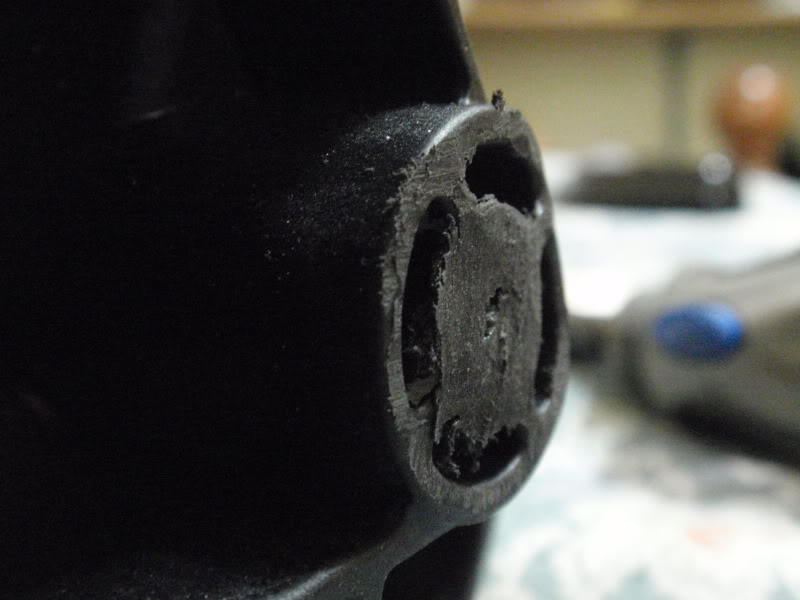
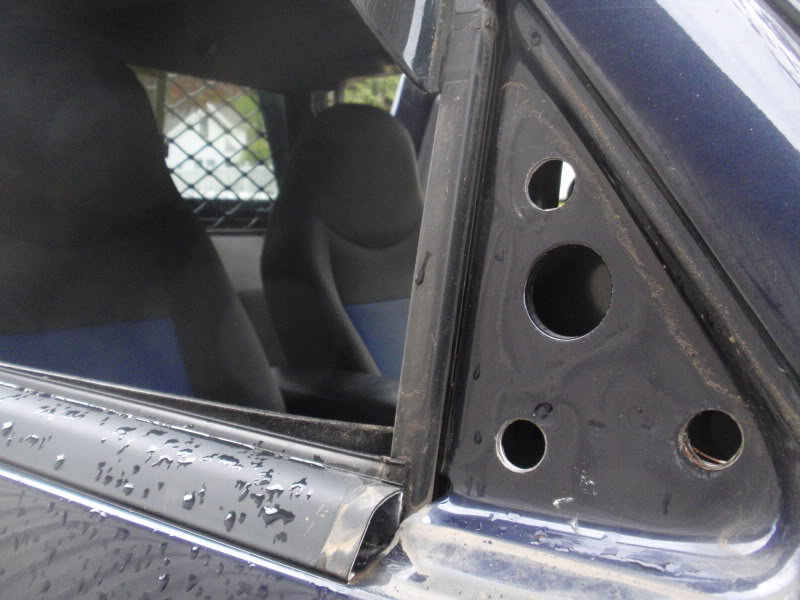
Pictured below will show you why this isn’t just a straight bolt-on mod. As you can see, this picture of a mirrorless ’06+ door, there’s a big outside hole and a small inside hole. ’05 and older doors have just a small outside hole and big inside hole. The 06+ Mirrors have steps that fit inside that big outside hole. The top is minor, but it is sticking out of the housing some.
*credit to 99offroadrngr for the photo.
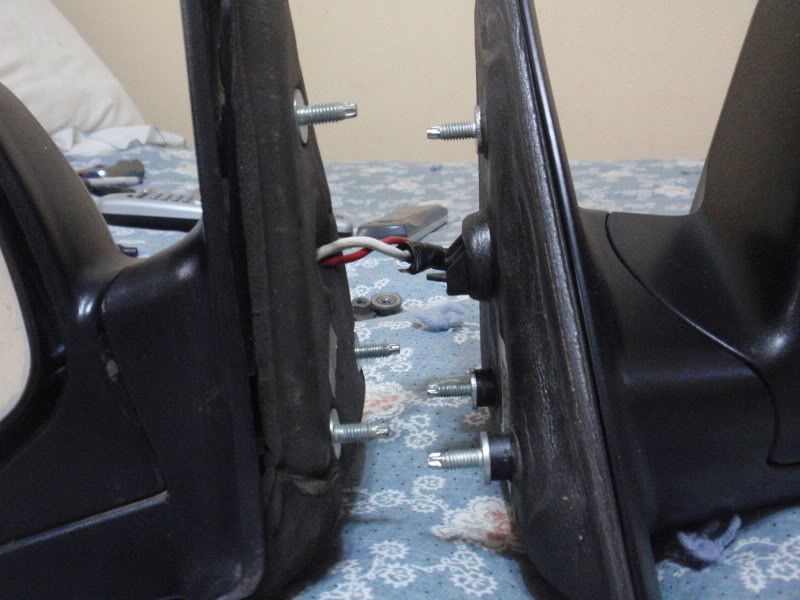
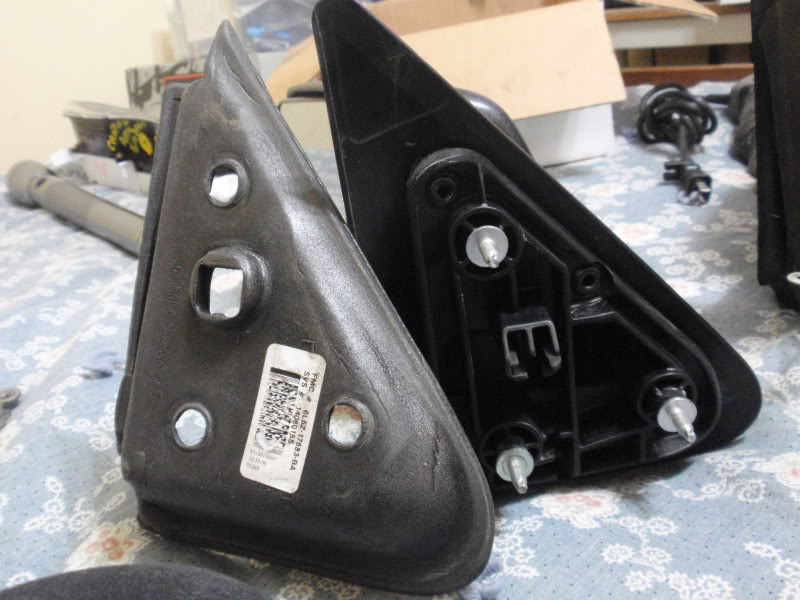
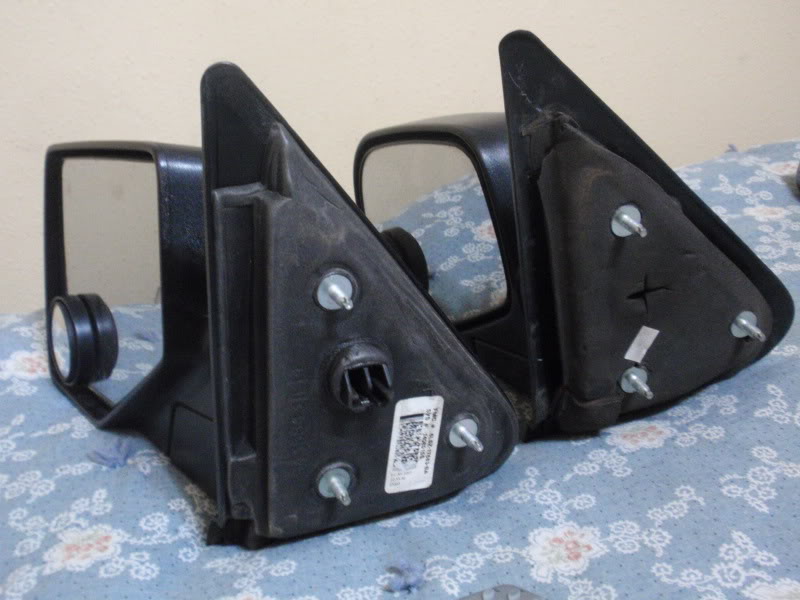
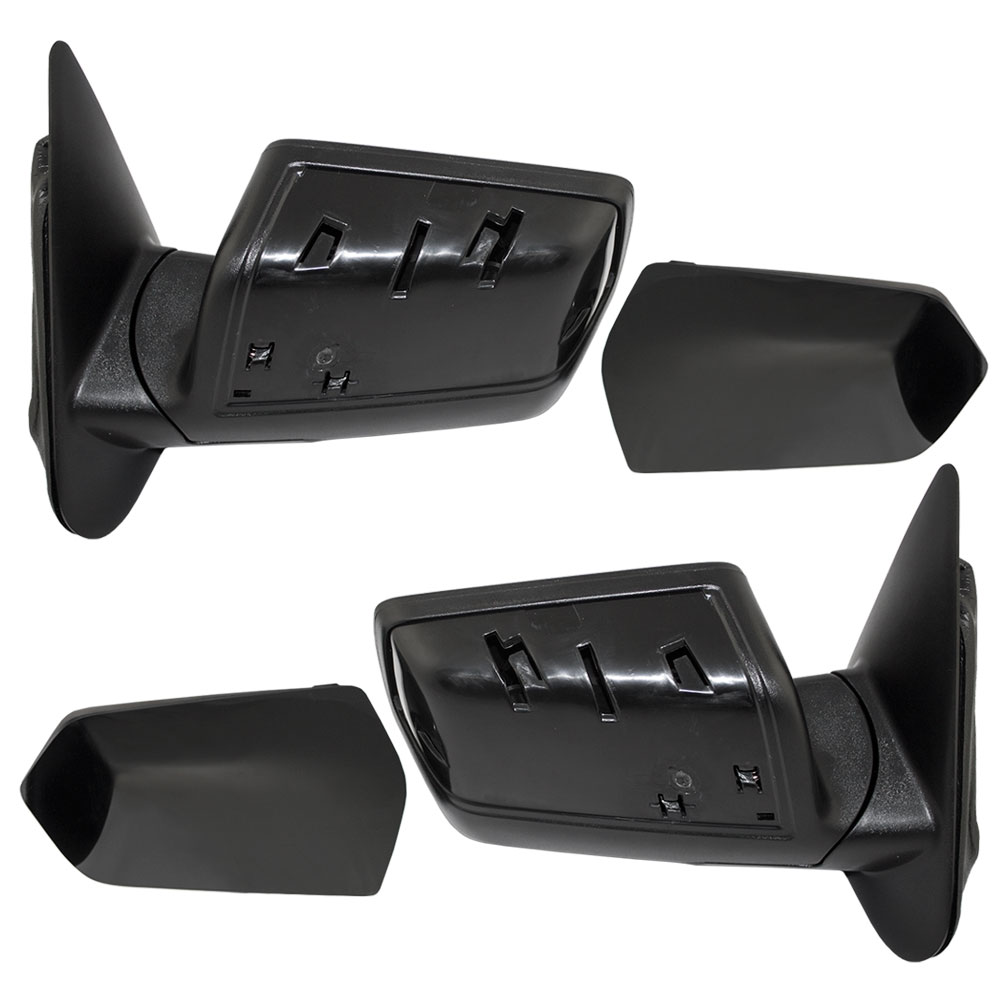
Comparison of the actual mirrors side by side…98-05 on left, 06+ on right…
First, you’ll wanna remove the foam. Just grab a corner and work it off there. It may have a little bit of glue holding it to the mirror housing, but I experienced virtually no resistance to removal…
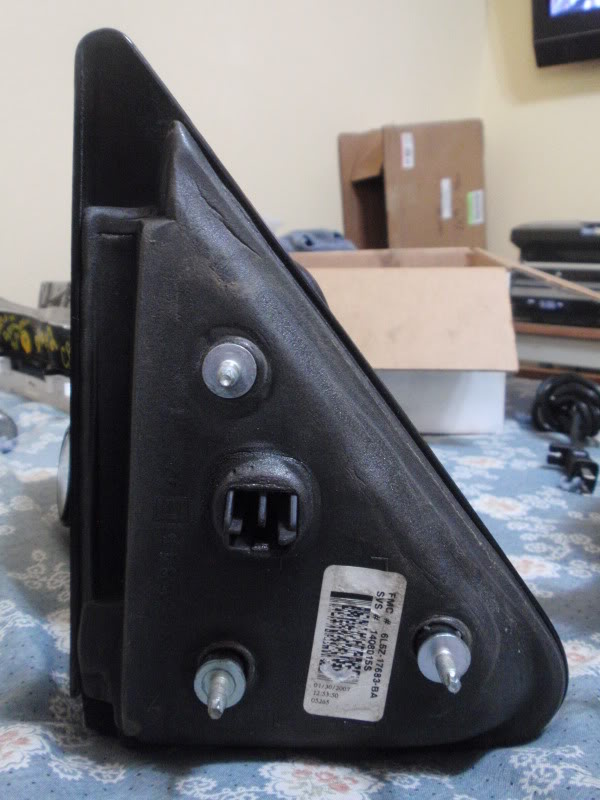
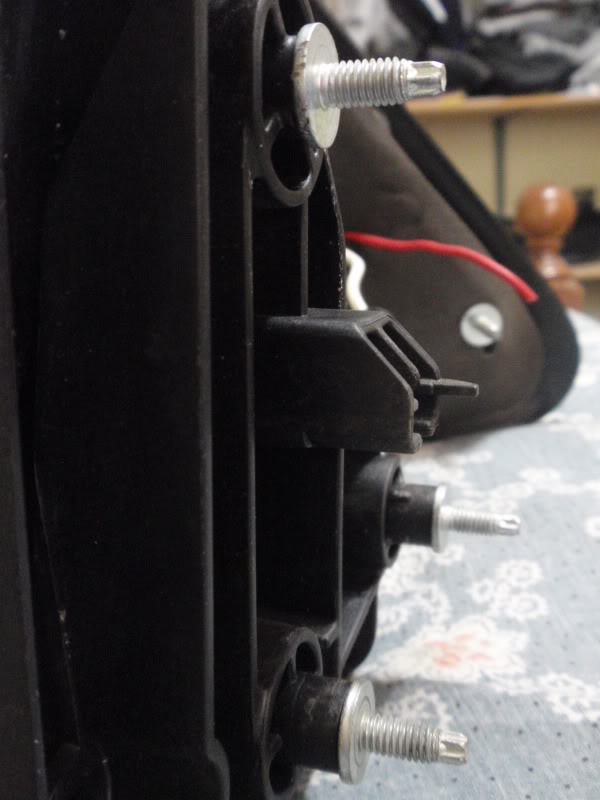
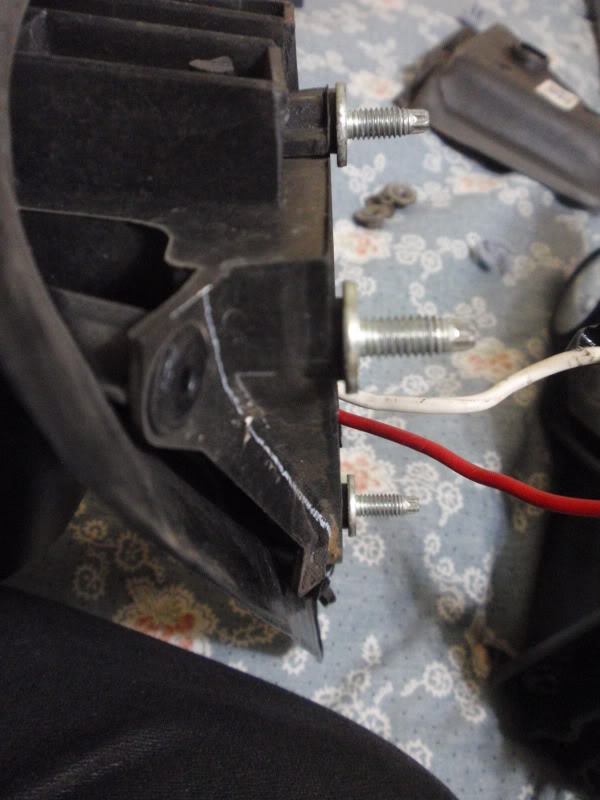
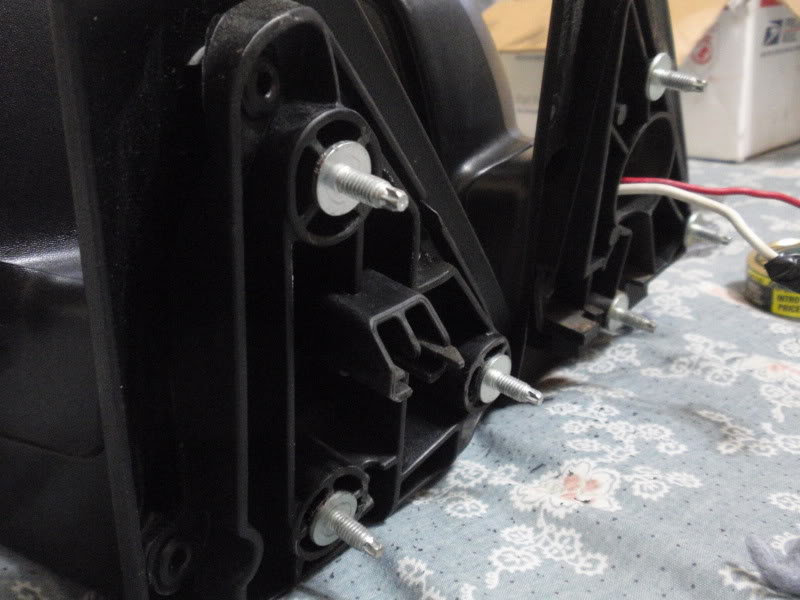
These two pics show what has to happen….all three raised bases for the mounting stud need shaved down to the major ‘flat spot” of the mounting surface, just like your stock ’05 and older mirrors.
Take your E6 external torx socket and remove the mounting studs. Lefty loosey! I used the nutdriver w/ �” socket bit…
Time to whip out the dremel and start cuttin!! You don’t need to cut all the way into the meat of the base…just enough to remove the part that’s protruding out…

Take your sanding drum and sand your area smooth and flush with the meat of the mounting surface…
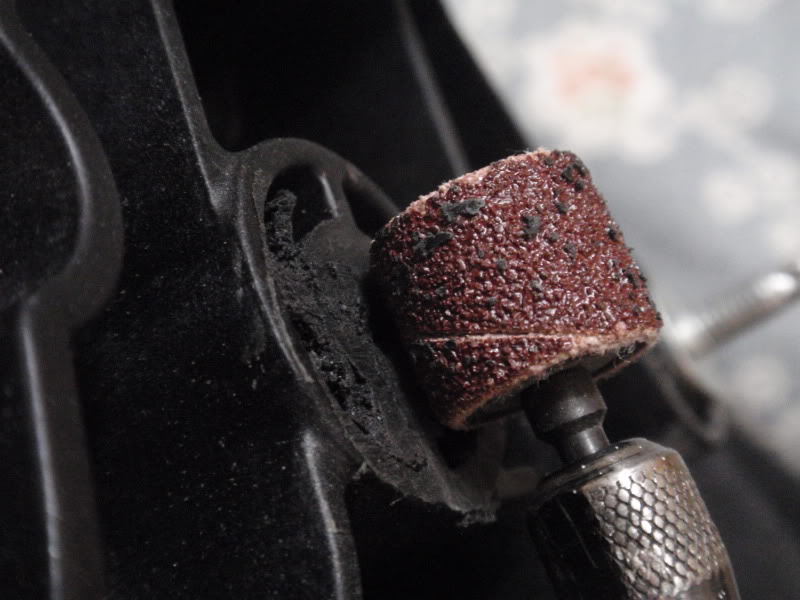
You’ll be left with something that looks like this…
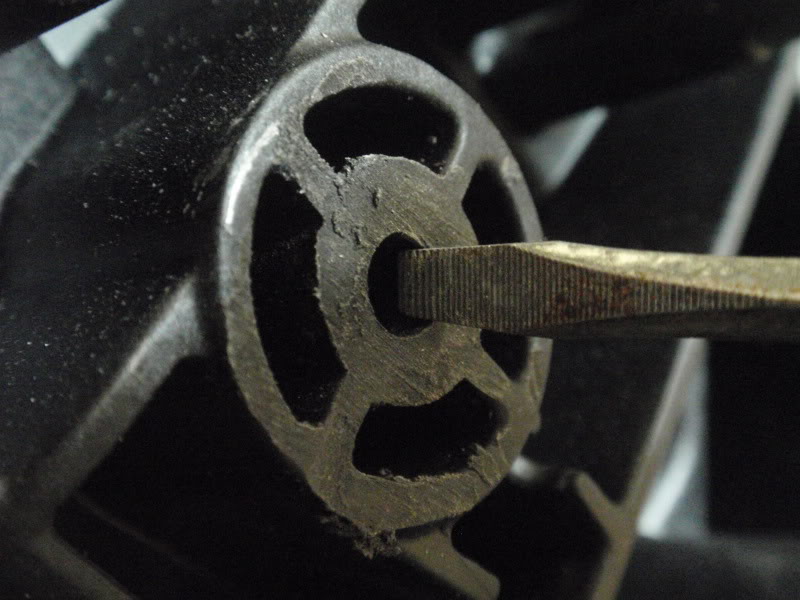
Now it’s time to clean up your cut/shave…take the small screwdriver and clean up the center hole and the 4 side holes…
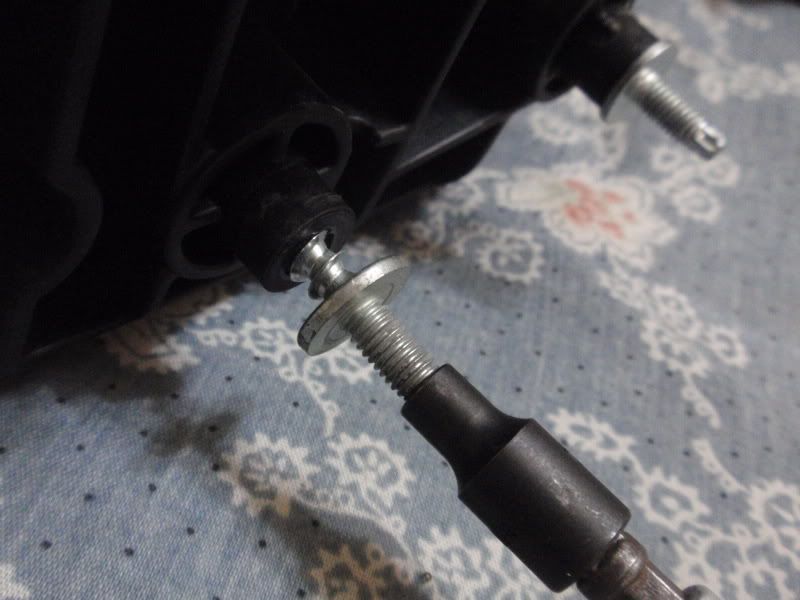
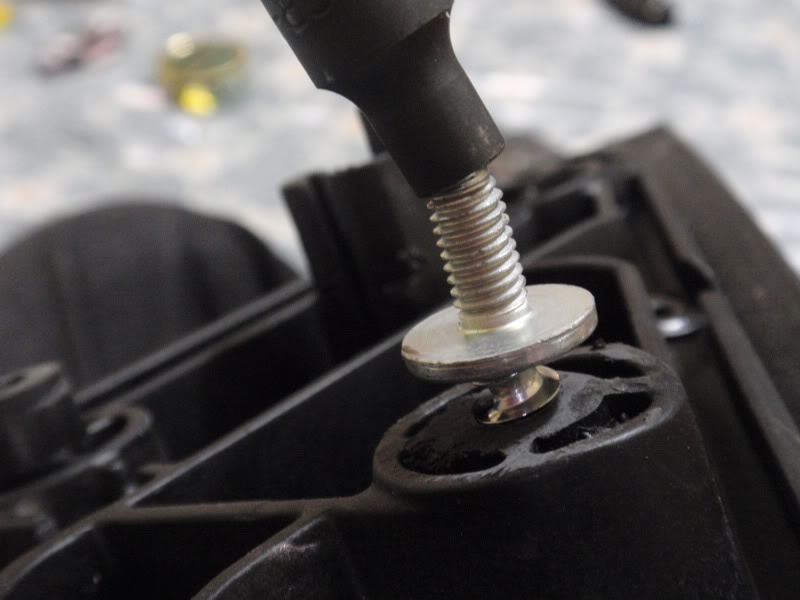
Once your satisfied with your depth, take your mounting stud and begin to thread it into the hole. I started it in the hole using the nut driver, then moved to the ratchet because now I’m creating a new thread for the stud. It’s not very easy at all to make new threads using a nut driver….even in plastic. Lol.
If the stud starts to go in crooked….don’t worry! I had a few of those happen and it straightened itself out soon as the base of the stud made contact.
Repete your steps to the other 5 studs on your mirrors….put the foam back in place…done! I didn’t bother with the cut-off wheel on the top stud hole…I just sanded that one with the sanding wheel.
Here’s both old style and modded new style mirrors side by side and with the foam padding back on…
Install them just like your old ones…..done!! NO modifications to the truck itself!! See below why THIS version is the RIGHT way to rock ‘06+ mirrors on your ’05 and older rig!! I’ve had them on my truck since summer ’08 and never want to not have these mirrors on the truck. I even put on adjustable blind spot mirrors. I virtually have NO blindspots at all!
Plus...should you ever wanna go back to your old mirrors, it's no problem. Simply swap 'em and you can sell those 06+'s to someone who wants to upgrade...and they'll bolt right up!
Enjoy your new, updated, awesome, tons of new visibility mirrors!!
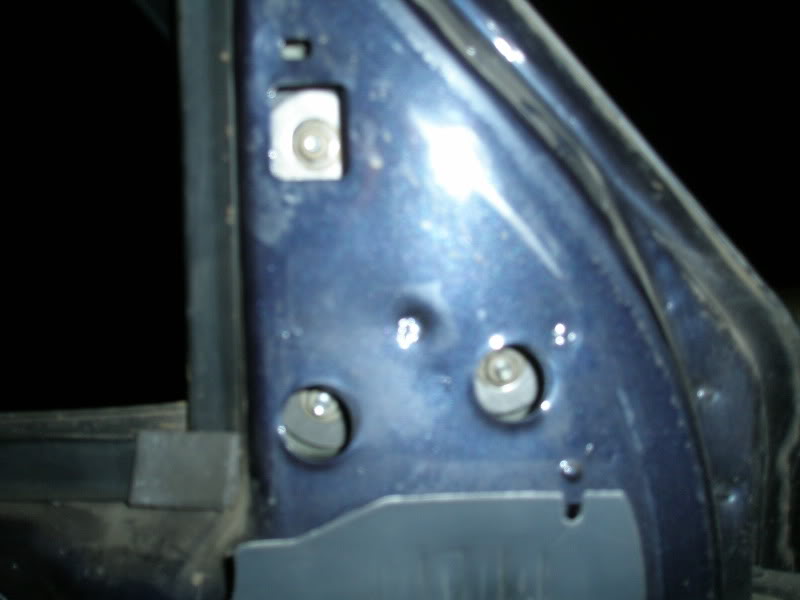
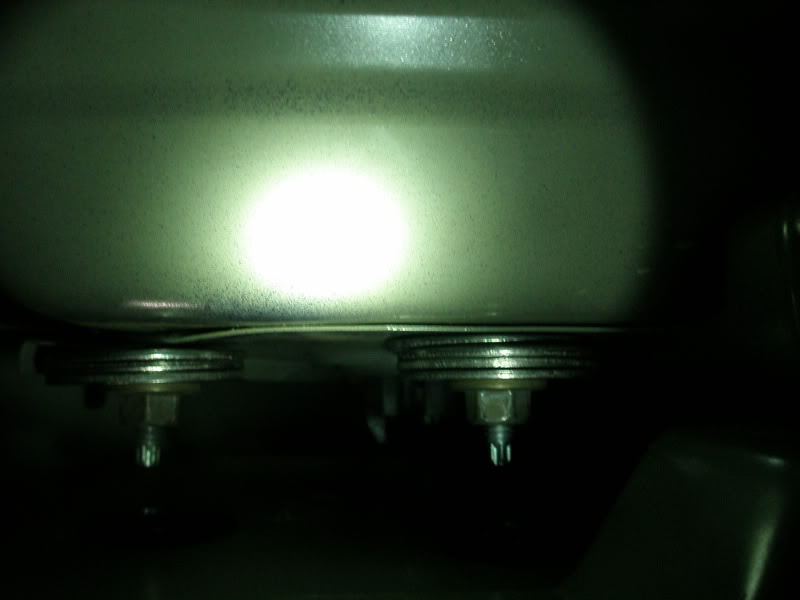
The old way of doing this mod, in fact the only how-to written for this mod is what’s pictured below…. DRILLING YOUR DOOR and using washers!!! Ewwwwwwwwww. Not only are you drilling huge holes into your door, but it makes install/removal a real pain in the butt. Removing the speaker is pretty much a requirement to get the washers in there. My mirrors were never as secure as I would’ve liked them to be. Plus, if too many washers were used, you’d lose threads for your nuts to thread onto the mirror.
I’ve read of people modifying the mirrors instead of the doors and since I had my mirrors off anyway, I figure I’d update/upgrade my upgrade. Lol. Though, I am forced to use one washer on each stud now. If you do the mod as I wrote above, you won’t have this issue. But you will if you already drilled your doors.

Let the modding Begin!!
_________________________
How-To: Install 06+ Mirrors
This how-to shows you how to install 2006+ Ranger mirrors into a 2005 and older truck WITHOUT modifying the truck in any way.
This mod is perfect for someone wanting not only a new look on their truck, but much better visibility out the sides. I noticed, and still notice, a very big improvement in seeing your surroundings over the 98-05 "styled" mirrors. I absolutely love them. They're not towing mirrors by any means, but a HUGE improvement over the older style mirrors. Overall glass is a little bit wider, but a whole lot taller. And I think the passenger side glass is more convex than the previous mirror style.
Materials needed:
A: ‘06+ Mirrors (duh!)
B: Dremel Tool (Or hack saw)
C: Nut Driver
D: �” Ratchet
E: 11mm socket
F: Small flat head screw driver
G: Cut-off wheel for Dremel
H: Sanding drum for Dremel
I: E6 socket(external torx)
There was less “impressive” tools that can get this done…using a hacksaw and sandpaper. But what a pain that would be! lol.
Difficultly level: 2 out of 10
Time spend on mod: Less than 1 hour.
Note1: I will not cover how to remove the door panel to remove the mirror….those how-to’s can be found elsewhere, though I may add it to this how-to at a later date.
Note2: I do not have a power optioned truck, so this how-to in it's current state will not cover it. But I do know there are wiring plug differences between 06+ and '05 and older. You will have to retrofit your trucks existing pigtail onto the new mirrors. I do not have the info at this time to add this to the how-to, but look forward to making that happen sometime...SO STAY TUNED!!!
Pictured below will show you why this isn’t just a straight bolt-on mod. As you can see, this picture of a mirrorless ’06+ door, there’s a big outside hole and a small inside hole. ’05 and older doors have just a small outside hole and big inside hole. The 06+ Mirrors have steps that fit inside that big outside hole. The top is minor, but it is sticking out of the housing some.
*credit to 99offroadrngr for the photo.
Comparison of the actual mirrors side by side…98-05 on left, 06+ on right…
First, you’ll wanna remove the foam. Just grab a corner and work it off there. It may have a little bit of glue holding it to the mirror housing, but I experienced virtually no resistance to removal…
These two pics show what has to happen….all three raised bases for the mounting stud need shaved down to the major ‘flat spot” of the mounting surface, just like your stock ’05 and older mirrors.
Take your E6 external torx socket and remove the mounting studs. Lefty loosey! I used the nutdriver w/ �” socket bit…
Time to whip out the dremel and start cuttin!! You don’t need to cut all the way into the meat of the base…just enough to remove the part that’s protruding out…
Take your sanding drum and sand your area smooth and flush with the meat of the mounting surface…
You’ll be left with something that looks like this…
Now it’s time to clean up your cut/shave…take the small screwdriver and clean up the center hole and the 4 side holes…
Once your satisfied with your depth, take your mounting stud and begin to thread it into the hole. I started it in the hole using the nut driver, then moved to the ratchet because now I’m creating a new thread for the stud. It’s not very easy at all to make new threads using a nut driver….even in plastic. Lol.
If the stud starts to go in crooked….don’t worry! I had a few of those happen and it straightened itself out soon as the base of the stud made contact.
Repete your steps to the other 5 studs on your mirrors….put the foam back in place…done! I didn’t bother with the cut-off wheel on the top stud hole…I just sanded that one with the sanding wheel.
Here’s both old style and modded new style mirrors side by side and with the foam padding back on…
Install them just like your old ones…..done!! NO modifications to the truck itself!! See below why THIS version is the RIGHT way to rock ‘06+ mirrors on your ’05 and older rig!! I’ve had them on my truck since summer ’08 and never want to not have these mirrors on the truck. I even put on adjustable blind spot mirrors. I virtually have NO blindspots at all!
Plus...should you ever wanna go back to your old mirrors, it's no problem. Simply swap 'em and you can sell those 06+'s to someone who wants to upgrade...and they'll bolt right up!
Enjoy your new, updated, awesome, tons of new visibility mirrors!!
The old way of doing this mod, in fact the only how-to written for this mod is what’s pictured below…. DRILLING YOUR DOOR and using washers!!! Ewwwwwwwwww. Not only are you drilling huge holes into your door, but it makes install/removal a real pain in the butt. Removing the speaker is pretty much a requirement to get the washers in there. My mirrors were never as secure as I would’ve liked them to be. Plus, if too many washers were used, you’d lose threads for your nuts to thread onto the mirror.
I’ve read of people modifying the mirrors instead of the doors and since I had my mirrors off anyway, I figure I’d update/upgrade my upgrade. Lol. Though, I am forced to use one washer on each stud now. If you do the mod as I wrote above, you won’t have this issue. But you will if you already drilled your doors.
Last edited by 98liftedranger; Nov 27, 2011 at 09:15 PM.


99offroadrngr,
Hey PC, need a couple of the pictures replaced, any chance that you still have them ?
From what I can tell Picture #2 and #8 have gone the way of Photobucket's money grabbing scheme !
Thanks if you can !
Hey PC, need a couple of the pictures replaced, any chance that you still have them ?
From what I can tell Picture #2 and #8 have gone the way of Photobucket's money grabbing scheme !
Thanks if you can !
Member
Joined: Nov 2011
Posts: 266
Likes: 1
From: PA
Is there any recommendations as to a brand of mirror?
I would love to go OEM but they are very proud of their stuff.
Are any aftermarket ones any good?
Found these but I am afraid of them at less than 1/4 the cost of the OEM ones
https://www.everydayautoparts.com/06...-power-mirrors
I would love to go OEM but they are very proud of their stuff.
Are any aftermarket ones any good?
Found these but I am afraid of them at less than 1/4 the cost of the OEM ones
https://www.everydayautoparts.com/06...-power-mirrors
Member
Joined: Nov 2011
Posts: 266
Likes: 1
From: PA
The ones I've bought were branded Kool-Vue. They're a little short of OEM quality, however I haven't had any issues with them and they seem to be what you receive when you buy mirrors at the price point you've listed. They have your typical aftermarket manufacturing leftovers like molding separation scars, and irregularities in the texture. The motors run quiet and smooth on the power versions, and there aren't any dead spots in their range of movement. Same goes for the manual folding aspect, there is an acceptable amount of resistance when trying to fold the mirrors in. The mirrors are stable, and fit well to their opening on the door. My only real complaint is with the fitment of the "paint to match" caps on that version of mirror, it's subpar to say the least. Otherwise, they're great mirrors, and they do what they need to do for a reasonable price.
Ok, thanks for the input. I got ahold of my local junk yard today. $65 for 2 power OEM mirror. I just need to paint the paint to match caps something other than yellow LOL
I can't speak for the OEM mirrors, but on the aftermarket paint to match mirrors, the caps are basically a one and done type install. When you remove them, it's almost impossible to do so without breaking one or more of the mounting tabs off. Hopefully the OEM caps are not the same way. Of course, this isn't a worry if you're just planning on taping off the textured part of the mirror.
Member
Joined: Nov 2011
Posts: 266
Likes: 1
From: PA
I can't speak for the OEM mirrors, but on the aftermarket paint to match mirrors, the caps are basically a one and done type install. When you remove them, it's almost impossible to do so without breaking one or more of the mounting tabs off. Hopefully the OEM caps are not the same way. Of course, this isn't a worry if you're just planning on taping off the textured part of the mirror.
I did not plan on taping them off. I guess I will have to google or be extra careful

Here again, I guess the good ones never fade away, they just keep popping up and get used again and again and again !
There is a lot of talk about this How-To, you wrote a good one for what it worth.
FX4wannbe01, Do you mind that I have copied the How-To, and I want to pass it on to other Ranger Owners, in an Apple Pages format ?
Please get back to me.
There is a lot of talk about this How-To, you wrote a good one for what it worth.
FX4wannbe01, Do you mind that I have copied the How-To, and I want to pass it on to other Ranger Owners, in an Apple Pages format ?
Please get back to me.

Thread
Thread Starter
Forum
Replies
Last Post
Fx4wannabe01
Exterior Semi-Tech
60
Jul 17, 2008 11:48 AM


